HttpClient 源码阅读
在项目中常用的HttpClient,与我们非常的亲密,为了能处理遇到的Http问题,我们应该去了解里面的机制和实现。
官方文档:http://hc.apache.org/httpcomponents-client-ga/tutorial/html/
Maven
        <!-- components.httpclient-->

        <dependency>

            <groupId>org.apache.httpcomponents</groupId>

            <artifactId>httpclient</artifactId>

            <version>4.5.5</version>

        </dependency>
HttpClient的看点主要是它的责任链设计、连接池机制、工具类的封装,个人觉得它设计得还比较优雅。
我们从一个简单的Http请求,就可以步步深入得去阅读它的源码。
        HttpGet get = new HttpGet("http://localhost:8080/hello/say");

        RequestConfig config = RequestConfig.custom()

                .setConnectTimeout(3000)

                .setSocketTimeout(3000)

                .build();

        get.setConfig(config);

        HttpClient client = HttpClientBuilder.create()

                .setMaxConnTotal(1<<6)

                .setMaxConnPerRoute(1<<3)

                .evictExpiredConnections()

                .build();

        HttpResponse response = client.execute(get);

        System.out.println(EntityUtils.toString(response.getEntity()));
首先,发起一个Get请求,它先要实例化请求方法,然后设置请求的配置(连接时间、读取时间)等,然后使用HttpClient的Builder实例化一个按照你配置的HttpClient,最后发起请求拿到响应,在解析响应的时候,它提供了EntityUtils帮你解析响应体。
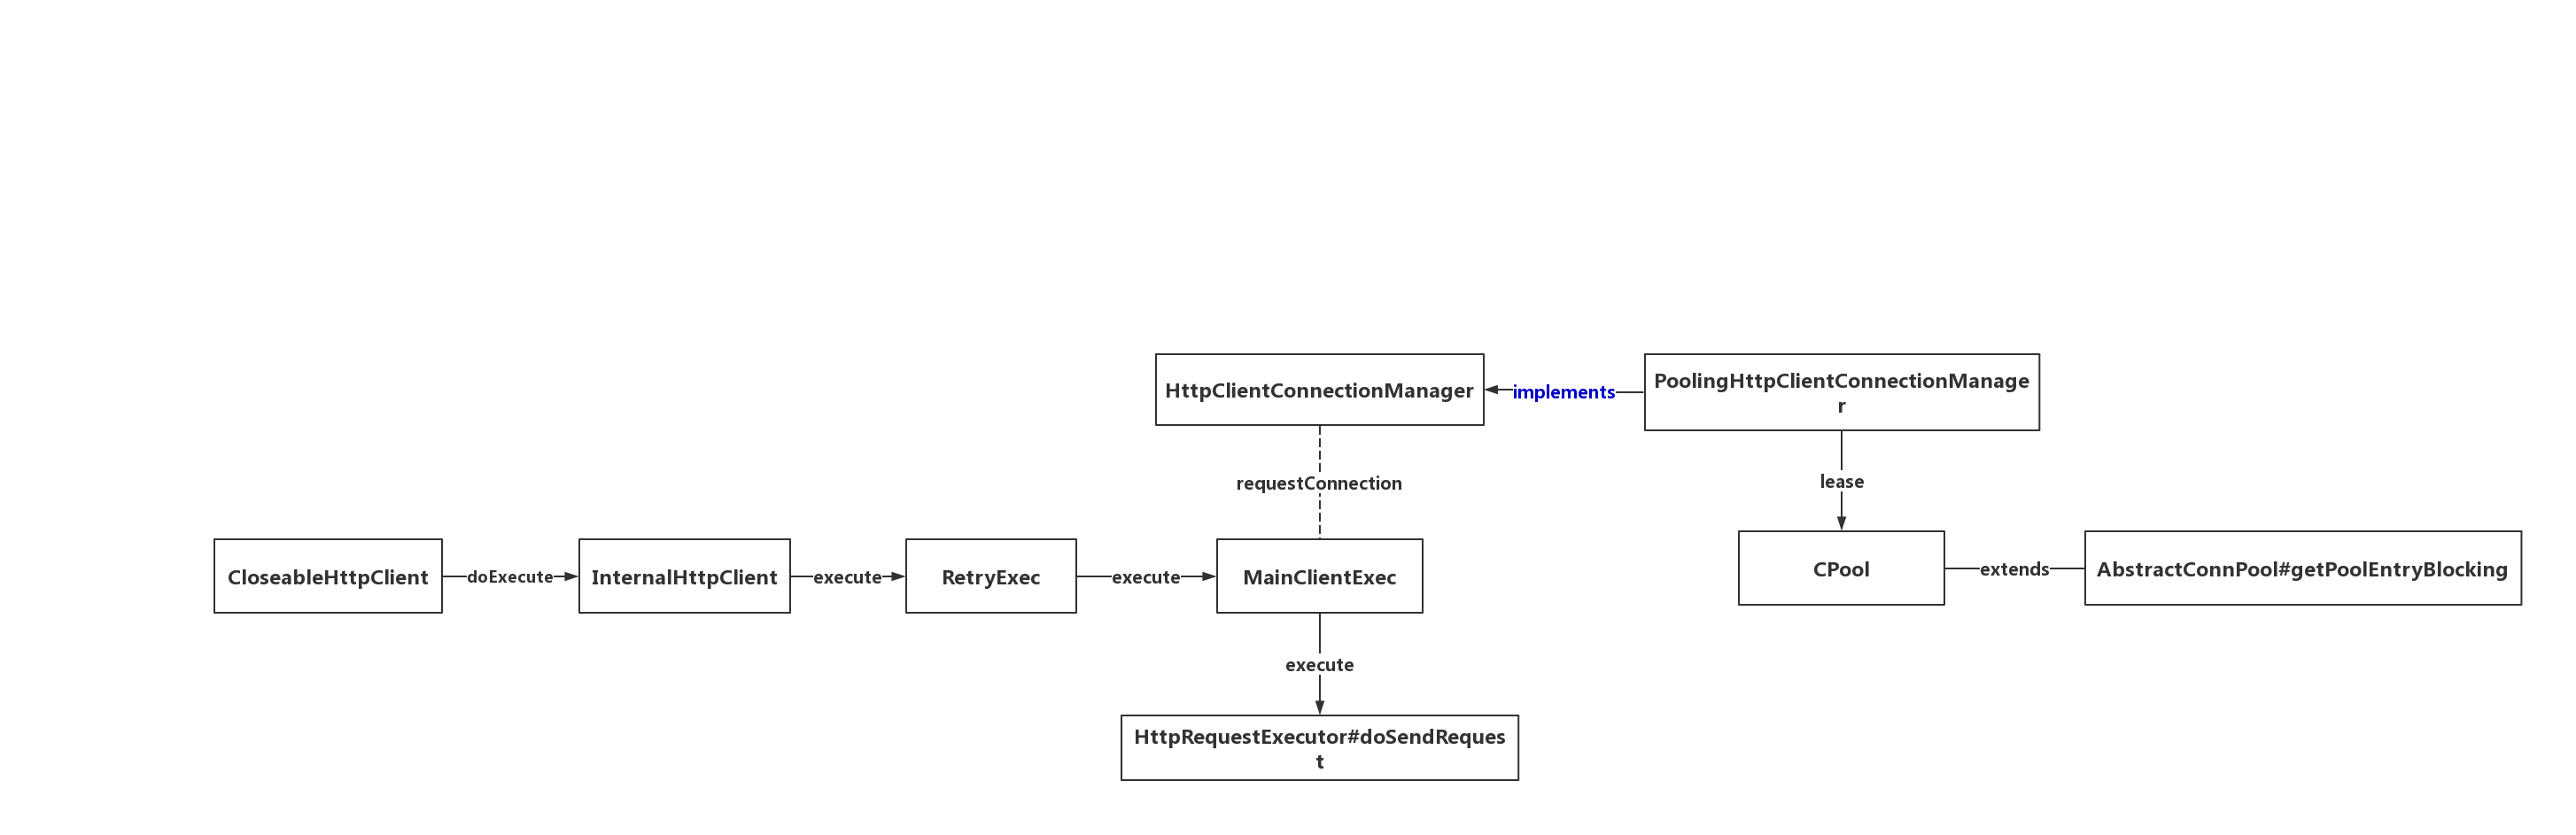
当我们从它的execute方法进去的时候,它是一个抽象类CloseableHttpClient;它封装了各式各样发起请求的方法,可以说是走入核心之前的外部接口封装,它的真正功能在doExecute方法里面,这个方法是抽象的,取决与Builder在创建实例的时候,实现类或者内部类实现的这个方法。
我们通过debug可以知道,它实际上是走入了InternalHttpClient中,这个时候已经走入了责任链的头部了,开始走入设计者想好的路径了;这个类的主要作用是封装内部调用使用的Request和Config,在它的return方法中,可以看出它将走入下一个execChain。
    protected CloseableHttpResponse doExecute(HttpHost target, HttpRequest request, HttpContext context) throws IOException, ClientProtocolException {

        Args.notNull(request, "HTTP request");

        HttpExecutionAware execAware = null;

        if(request instanceof HttpExecutionAware) {

            execAware = (HttpExecutionAware)request;

        }

        try {

            HttpRequestWrapper wrapper = HttpRequestWrapper.wrap(request, target);

            HttpClientContext localcontext = HttpClientContext.adapt((HttpContext)(context != null?context:new BasicHttpContext()));

            RequestConfig config = null;

            if(request instanceof Configurable) {

                config = ((Configurable)request).getConfig();

            }

            if(config == null) {

                HttpParams params = request.getParams();

                if(params instanceof HttpParamsNames) {

                    if(!((HttpParamsNames)params).getNames().isEmpty()) {

                        config = HttpClientParamConfig.getRequestConfig(params, this.defaultConfig);

                    }

                } else {

                    config = HttpClientParamConfig.getRequestConfig(params, this.defaultConfig);

                }

            }

            if(config != null) {

                localcontext.setRequestConfig(config);

            }

            this.setupContext(localcontext);

            HttpRoute route = this.determineRoute(target, wrapper, localcontext);

            return this.execChain.execute(route, wrapper, localcontext, execAware);

        } catch (HttpException var9) {

            throw new ClientProtocolException(var9);

        }

    }
再往下走,它将走入RetryClient;这个类的主要作用是控制重试,当下层链出现超时的时候会进行重试。这个重试的次数是之前你创建实例的时候可以指定的,没有指定它也有默认值。
    @Override

    public CloseableHttpResponse execute(

            final HttpRoute route,

            final HttpRequestWrapper request,

            final HttpClientContext context,

            final HttpExecutionAware execAware) throws IOException, HttpException {

        Args.notNull(route, "HTTP route");

        Args.notNull(request, "HTTP request");

        Args.notNull(context, "HTTP context");

        final Header[] origheaders = request.getAllHeaders();

        for (int execCount = 1;; execCount++) {

            try {

                return this.requestExecutor.execute(route, request, context, execAware);

            } catch (final IOException ex) {

                if (execAware != null && execAware.isAborted()) {

                    this.log.debug("Request has been aborted");

                    throw ex;

                }

                if (retryHandler.retryRequest(ex, execCount, context)) {

                    if (this.log.isInfoEnabled()) {

                        this.log.info("I/O exception ("+ ex.getClass().getName() +

                                ") caught when processing request to "

                                + route +

                                ": "

                                + ex.getMessage());

                    }

                    if (this.log.isDebugEnabled()) {

                        this.log.debug(ex.getMessage(), ex);

                    }

                    if (!RequestEntityProxy.isRepeatable(request)) {

                        this.log.debug("Cannot retry non-repeatable request");

                        throw new NonRepeatableRequestException("Cannot retry request " +

                                "with a non-repeatable request entity", ex);

                    }

                    request.setHeaders(origheaders);

                    if (this.log.isInfoEnabled()) {

                        this.log.info("Retrying request to " + route);

                    }

                } else {

                    if (ex instanceof NoHttpResponseException) {

                        final NoHttpResponseException updatedex = new NoHttpResponseException(

                                route.getTargetHost().toHostString() + " failed to respond");

                        updatedex.setStackTrace(ex.getStackTrace());

                        throw updatedex;

                    } else {

                        throw ex;

                    }

                }

            }

        }

    }
继续往下,它到达了MainClientExec类;这个类厉害了,控制着连接池的获取、socket连接的建立、链接的释放,可以说是HttpClient的核心了。它的下层调用是HttpRequestExecutor,里面控制着Http请求头的发送,Http Request Line的发送,以及响应的收集。至此,我们可以梳理一个路径。
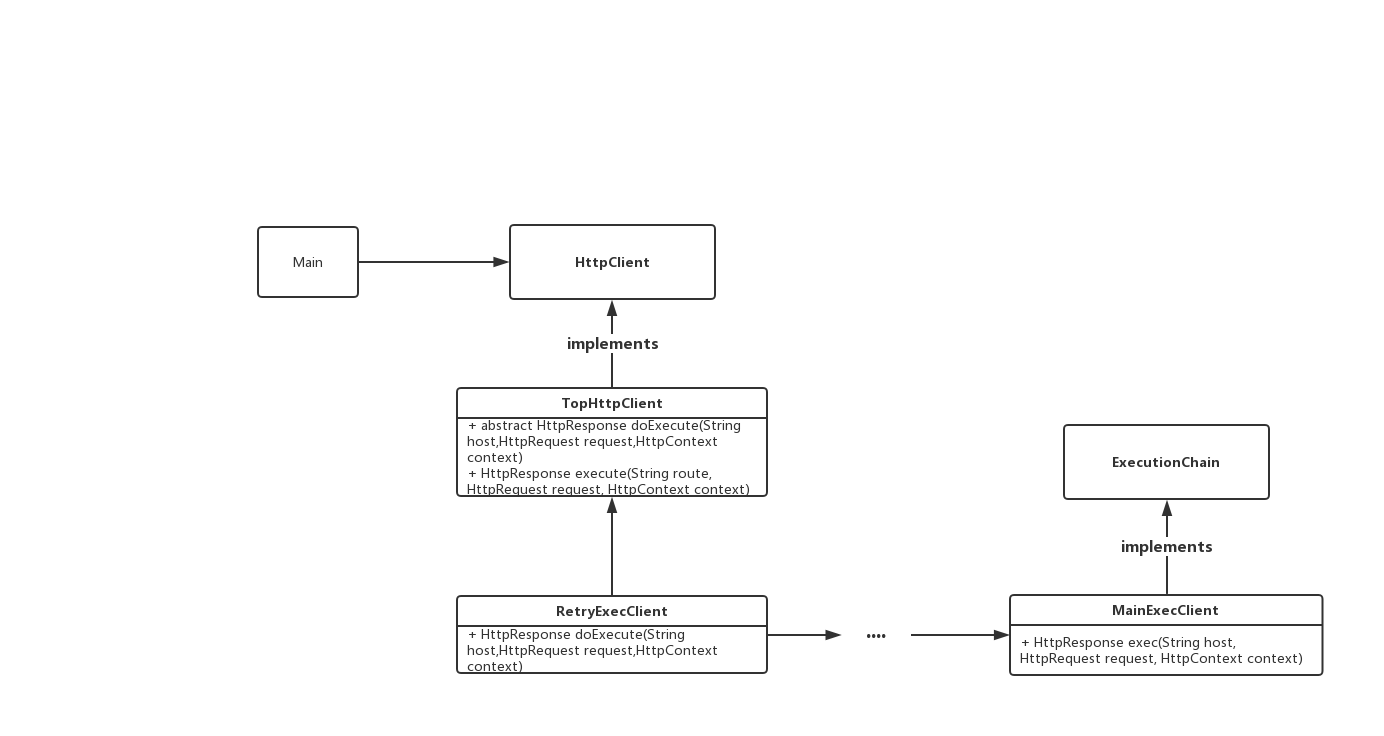
它使用了责任链进行拼装,并且每个链条上的抽象很干净,只做它负责的范围的工作。而它们这个链条的形成,是在builder里面组装的。
我们把调用链抽象出来,结合builder,它的设计是比较优雅的。
package execChain;

public interface ExecutionChain {

    HttpResponse exec(String host,HttpRequest request,HttpContext context);

}
package execChain;

import java.io.IOException;

public interface HttpClient {

    HttpResponse execute(String route,HttpRequest request,HttpContext context)

            throws IOException;

}
package execChain;

import java.io.IOException;

public abstract class TopHttpClient implements HttpClient{

    protected abstract HttpResponse doExecute(String host,HttpRequest request,HttpContext context);

    @Override

    public HttpResponse execute(String route, HttpRequest request, HttpContext context) throws IOException {

        return doExecute(route,request,context);

    }

}
package execChain;

public class RetryExecClient extends TopHttpClient{

    private ExecutionChain requestExecChain;

    public RetryExecClient(ExecutionChain requestExecChain) {

        this.requestExecChain = requestExecChain;

    }

    @Override

    protected HttpResponse doExecute(String host, HttpRequest request, HttpContext context) {

        return this.requestExecChain.exec(host,request,context);

    }

}
package execChain;

public class MainExecClient implements ExecutionChain{

    @Override

    public HttpResponse exec(String host, HttpRequest request, HttpContext context) {

        System.out.println("host : "+host);

        return new HttpResponse();

    }

}
package execChain;

public class MyHttpClientBuilder {

    public static MyHttpClientBuilder create() {

        return new MyHttpClientBuilder();

    }

    public TopHttpClient build(){

        MainExecClient client = new MainExecClient();

        // append chain ....

        return new RetryExecClient(client);

    }

}
        TopHttpClient client = MyHttpClientBuilder.create().build();

        client.execute("http://www.baidu.com",new HttpRequest(),new HttpContext());
有关连接池的操作,是在PoolingHttpClientConnectionManager里边,它把对链接的申请称呼为lease,也就是租借的意思。
    @Override

    public ConnectionRequest requestConnection(

            final HttpRoute route,

            final Object state) {

        Args.notNull(route, "HTTP route");

        if (this.log.isDebugEnabled()) {

            this.log.debug("Connection request: " + format(route, state) + formatStats(route));

        }

        final Future<CPoolEntry> future = this.pool.lease(route, state, null);

        return new ConnectionRequest() {

            @Override

            public boolean cancel() {

                return future.cancel(true);

            }

            @Override

            public HttpClientConnection get(

                    final long timeout,

                    final TimeUnit tunit) throws InterruptedException, ExecutionException, ConnectionPoolTimeoutException {

                final HttpClientConnection conn = leaseConnection(future, timeout, tunit);

                if (conn.isOpen()) {

                    final HttpHost host;

                    if (route.getProxyHost() != null) {

                        host = route.getProxyHost();

                    } else {

                        host = route.getTargetHost();

                    }

                    final SocketConfig socketConfig = resolveSocketConfig(host);

                    conn.setSocketTimeout(socketConfig.getSoTimeout());

                }

                return conn;

            }

        };

    }
我们观察到它的池子pool是CPool这个类,它的继承关系如下。

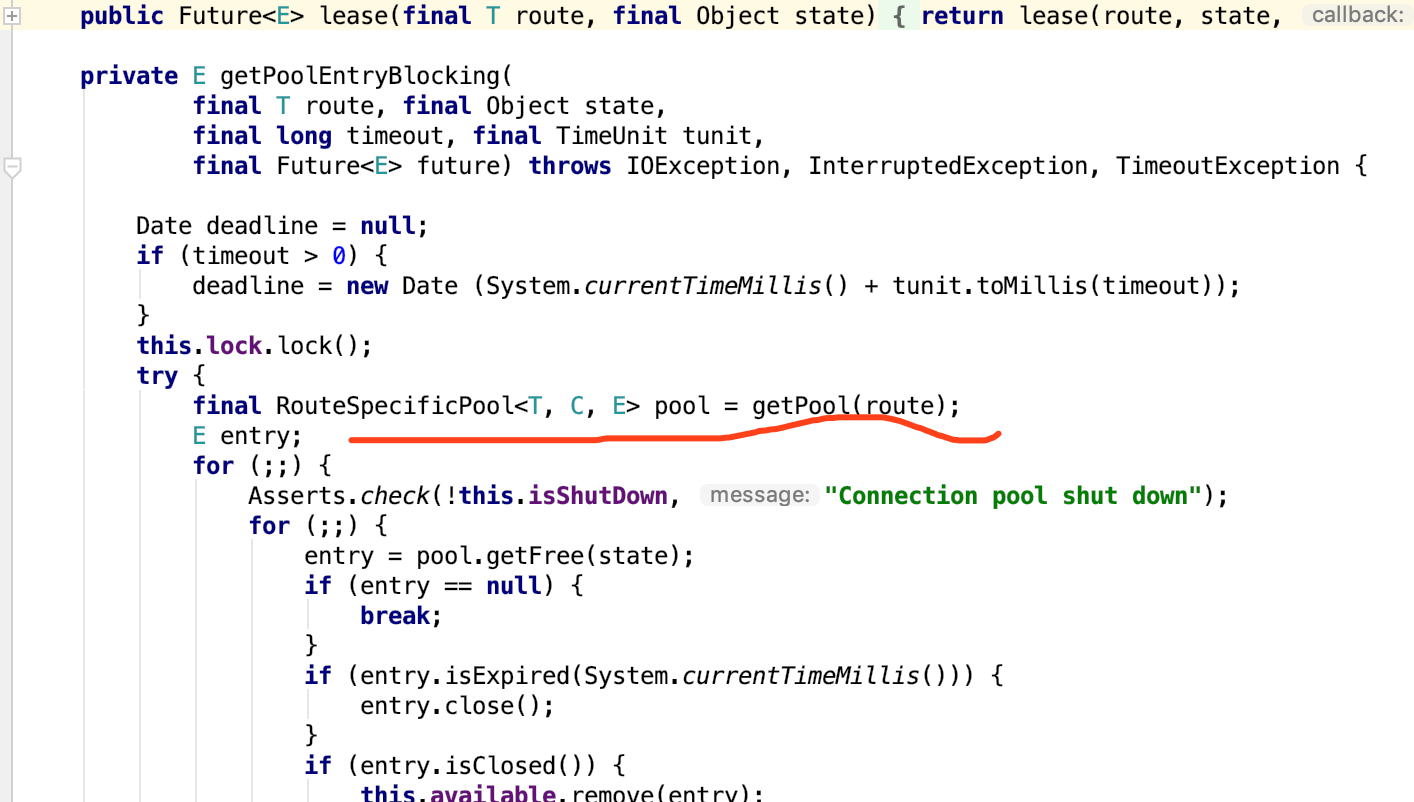
发现大部分的逻辑实在AbstractConnPool里边,租借的时候走了这个方法org.apache.http.pool.AbstractConnPool#getPoolEntryBlocking。在这个方法中,我们发现它往一个RouteSpecificPool中通过route获取了一个池子。
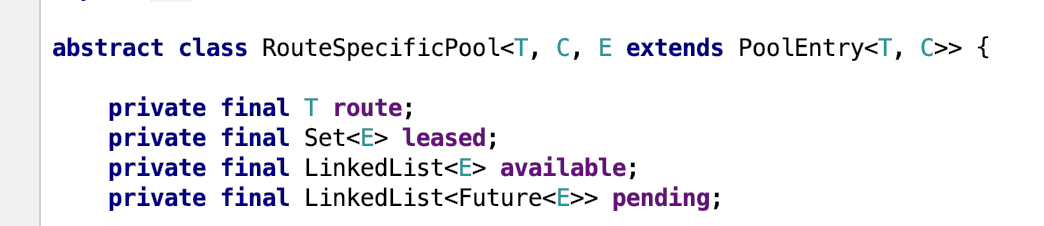
然后进去看到它池子的定义,结合代码可以看出,它把链接的状态分为:已租借、可用链接、等待三种状态。梳理了一下lease方法,它是将avalible的链接拿出来放到lease中,如果可用队列没有链接,那它将创建一个并放入租借队列,这里如果它这个route的连接数超过了你设置的MaxPerRoute配置,那么它将会方法pending队列,并且await当前线程,直到有hold链接的线程调用了releaseConnection等方法才会被notify。
这个getPoolEntityBlocking方法,就是申请连接池链接的核心代码了。
    private E getPoolEntryBlocking(

            final T route, final Object state,

            final long timeout, final TimeUnit tunit,

            final Future<E> future) throws IOException, InterruptedException, TimeoutException {

        Date deadline = null;

        if (timeout > 0) {

            deadline = new Date (System.currentTimeMillis() + tunit.toMillis(timeout));

        }

        this.lock.lock();

        try {

            final RouteSpecificPool<T, C, E> pool = getPool(route);

            E entry;

            for (;;) {

                Asserts.check(!this.isShutDown, "Connection pool shut down");

                for (;;) {

                    entry = pool.getFree(state);

                    if (entry == null) {

                        break;

                    }

                    if (entry.isExpired(System.currentTimeMillis())) {

                        entry.close();

                    }

                    if (entry.isClosed()) {

                        this.available.remove(entry);

                        pool.free(entry, false);

                    } else {

                        break;

                    }

                }

                if (entry != null) {

                    this.available.remove(entry);

                    this.leased.add(entry);

                    onReuse(entry);

                    return entry;

                }

                // New connection is needed

                final int maxPerRoute = getMax(route);

                // Shrink the pool prior to allocating a new connection

                final int excess = Math.max(0, pool.getAllocatedCount() + 1 - maxPerRoute);

                if (excess > 0) {

                    for (int i = 0; i < excess; i++) {

                        final E lastUsed = pool.getLastUsed();

                        if (lastUsed == null) {

                            break;

                        }

                        lastUsed.close();

                        this.available.remove(lastUsed);

                        pool.remove(lastUsed);

                    }

                }

                if (pool.getAllocatedCount() < maxPerRoute) {

                    final int totalUsed = this.leased.size();

                    final int freeCapacity = Math.max(this.maxTotal - totalUsed, 0);

                    if (freeCapacity > 0) {

                        final int totalAvailable = this.available.size();

                        if (totalAvailable > freeCapacity - 1) {

                            if (!this.available.isEmpty()) {

                                final E lastUsed = this.available.removeLast();

                                lastUsed.close();

                                final RouteSpecificPool<T, C, E> otherpool = getPool(lastUsed.getRoute());

                                otherpool.remove(lastUsed);

                            }

                        }

                        final C conn = this.connFactory.create(route);

                        entry = pool.add(conn);

                        this.leased.add(entry);

                        return entry;

                    }

                }

                boolean success = false;

                try {

                    if (future.isCancelled()) {

                        throw new InterruptedException("Operation interrupted");

                    }

                    pool.queue(future);

                    this.pending.add(future);

                    if (deadline != null) {

                        success = this.condition.awaitUntil(deadline);

                    } else {

                        this.condition.await();

                        success = true;

                    }

                    if (future.isCancelled()) {

                        throw new InterruptedException("Operation interrupted");

                    }

                } finally {

                    // In case of 'success', we were woken up by the

                    // connection pool and should now have a connection

                    // waiting for us, or else we're shutting down.

                    // Just continue in the loop, both cases are checked.

                    pool.unqueue(future);

                    this.pending.remove(future);

                }

                // check for spurious wakeup vs. timeout

                if (!success && (deadline != null && deadline.getTime() <= System.currentTimeMillis())) {

                    break;

                }

            }

            throw new TimeoutException("Timeout waiting for connection");

        } finally {

            this.lock.unlock();

        }

    }
回过头来,在MainClient里边的这一行,是建立Tcp链接的代码。
他们将链接的各种类型作为一种常量也可以说是一种枚举,然后通过while循环全部处理,这里边的状态跳转就不理了。
    /** Indicates that the route can not be established at all. */

    public final static int UNREACHABLE = -1;

    /** Indicates that the route is complete. */

    public final static int COMPLETE = 0;

    /** Step: open connection to target. */

    public final static int CONNECT_TARGET = 1;

    /** Step: open connection to proxy. */

    public final static int CONNECT_PROXY = 2;

    /** Step: tunnel through proxy to target. */

    public final static int TUNNEL_TARGET = 3;

    /** Step: tunnel through proxy to other proxy. */

    public final static int TUNNEL_PROXY = 4;

    /** Step: layer protocol (over tunnel). */

    public final static int LAYER_PROTOCOL = 5;
    /**

     * Establishes the target route.

     */

    void establishRoute(

            final AuthState proxyAuthState,

            final HttpClientConnection managedConn,

            final HttpRoute route,

            final HttpRequest request,

            final HttpClientContext context) throws HttpException, IOException {

        final RequestConfig config = context.getRequestConfig();

        final int timeout = config.getConnectTimeout();

        final RouteTracker tracker = new RouteTracker(route);

        int step;

        do {

            final HttpRoute fact = tracker.toRoute();

            step = this.routeDirector.nextStep(route, fact);

            switch (step) {

            case HttpRouteDirector.CONNECT_TARGET:

                this.connManager.connect(

                        managedConn,

                        route,

                        timeout > 0 ? timeout : 0,

                        context);

                tracker.connectTarget(route.isSecure());

                break;

            case HttpRouteDirector.CONNECT_PROXY:

                this.connManager.connect(

                        managedConn,

                        route,

                        timeout > 0 ? timeout : 0,

                        context);

                final HttpHost proxy  = route.getProxyHost();

                tracker.connectProxy(proxy, false);

                break;

            case HttpRouteDirector.TUNNEL_TARGET: {

                final boolean secure = createTunnelToTarget(

                        proxyAuthState, managedConn, route, request, context);

                this.log.debug("Tunnel to target created.");

                tracker.tunnelTarget(secure);

            }   break;

            case HttpRouteDirector.TUNNEL_PROXY: {

                // The most simple example for this case is a proxy chain

                // of two proxies, where P1 must be tunnelled to P2.

                // route: Source -> P1 -> P2 -> Target (3 hops)

                // fact:  Source -> P1 -> Target       (2 hops)

                final int hop = fact.getHopCount()-1; // the hop to establish

                final boolean secure = createTunnelToProxy(route, hop, context);

                this.log.debug("Tunnel to proxy created.");

                tracker.tunnelProxy(route.getHopTarget(hop), secure);

            }   break;

            case HttpRouteDirector.LAYER_PROTOCOL:

                this.connManager.upgrade(managedConn, route, context);

                tracker.layerProtocol(route.isSecure());

                break;

            case HttpRouteDirector.UNREACHABLE:

                throw new HttpException("Unable to establish route: " +

                        "planned = " + route + "; current = " + fact);

            case HttpRouteDirector.COMPLETE:

                this.connManager.routeComplete(managedConn, route, context);

                break;

            default:

                throw new IllegalStateException("Unknown step indicator "

                        + step + " from RouteDirector.");

            }

        } while (step > HttpRouteDirector.COMPLETE);

    }
最近遇到了一个问题,设置了最大超时时间为5s,但是由于触发了某种条件,监控显示Http调用有长达12s也能成功的,因为阅读了源码,所以马上想到了是连接池的PerRoute设置得太小了,导致同一域名的请求超过了这个设置,引起了线程的await事件,所以Http层面的超时时间只能保证通信的超时,如果触发了线程排队,那么设置的超时时间并没有生效,而且在源码中也没找到能快速失败的路径,正在寻找这一问题的解决方案。
HttpClient 源码阅读的更多相关文章
- 【原】AFNetworking源码阅读(四)
[原]AFNetworking源码阅读(四) 本文转载请注明出处 —— polobymulberry-博客园 1. 前言 上一篇还遗留了很多问题,包括AFURLSessionManagerTaskDe ...
- 【原】FMDB源码阅读(三)
[原]FMDB源码阅读(三) 本文转载请注明出处 —— polobymulberry-博客园 1. 前言 FMDB比较优秀的地方就在于对多线程的处理.所以这一篇主要是研究FMDB的多线程处理的实现.而 ...
- 【原】FMDB源码阅读(二)
[原]FMDB源码阅读(二) 本文转载请注明出处 -- polobymulberry-博客园 1. 前言 上一篇只是简单地过了一下FMDB一个简单例子的基本流程,并没有涉及到FMDB的所有方方面面,比 ...
- 【原】FMDB源码阅读(一)
[原]FMDB源码阅读(一) 本文转载请注明出处 —— polobymulberry-博客园 1. 前言 说实话,之前的SDWebImage和AFNetworking这两个组件我还是使用过的,但是对于 ...
- 【原】AFNetworking源码阅读(六)
[原]AFNetworking源码阅读(六) 本文转载请注明出处 —— polobymulberry-博客园 1. 前言 这一篇的想讲的,一个就是分析一下AFSecurityPolicy文件,看看AF ...
- 【原】AFNetworking源码阅读(五)
[原]AFNetworking源码阅读(五) 本文转载请注明出处 —— polobymulberry-博客园 1. 前言 上一篇中提及到了Multipart Request的构建方法- [AFHTTP ...
- 【原】AFNetworking源码阅读(三)
[原]AFNetworking源码阅读(三) 本文转载请注明出处 —— polobymulberry-博客园 1. 前言 上一篇的话,主要是讲了如何通过构建一个request来生成一个data tas ...
- 【原】AFNetworking源码阅读(二)
[原]AFNetworking源码阅读(二) 本文转载请注明出处 —— polobymulberry-博客园 1. 前言 上一篇中我们在iOS Example代码中提到了AFHTTPSessionMa ...
- 【原】AFNetworking源码阅读(一)
[原]AFNetworking源码阅读(一) 本文转载请注明出处 —— polobymulberry-博客园 1. 前言 AFNetworking版本:3.0.4 由于我平常并没有经常使用AFNetw ...
随机推荐
- Hive explode
- Spark算子与RDD基本转换
map 将一个RDD中的每个数据项,通过map中的函数映射变为一个新的元素. 输入分区与输出分区一对一,即:有多少个输入分区,就有多少个输出分区. flatMap 属于Transformation算子 ...
- Java Unsigned Bytes
Having had to use unsigned bytes for the first time, I also had to learn how Java references these d ...
- 使用rabbit mq.模拟dubbo,使MQ异步调用代码写起来像是同步方法.
最近在改造老系统,遇到了需要使用rabbitMq的场景.在以前使用的过程中需要在发送端和消费端各种配置,感觉比较麻烦,然后突然想到了dubbo中@Reference注解的形式,可不可以做一个类似的架子 ...
- vue中自定义指令的使用
原文地址 vue中除了内置的指令(v-show,v-model)还允许我们自定义指令 想要创建自定义指令,就要注册指令(以输入框获取焦点为例) 一.注册全局指令: // 注册一个全局自定义指令 `v- ...
- sql server 备份语句
1.BACKUP DATABASE your_database TO DISK = 'diff.bak'with DIFFERENTIAL #差异备份,仅备份数据2.BACKUP DATABASE y ...
- dfs入门-cogs1640[黑白图像]
题目链接:http://cogs.pro:8081/cogs/problem/problem.php?pid=vxSmxkeqa [题目描述] 输入一个n×n的黑白图像(1表示黑色,0表示白色),任务 ...
- Windows Server 2019远程桌面服务配置和授权激活
参考Windows Server 2016远程桌面服务配置和授权激活方法可适用于Windows Server 2019 Server 2016默认远程桌面连接数是2个用户,如果多余两个用户进行 ...
- python安装第三方库报错:Cannot uninstall '***'. It is a distutils installed project and thus we cannot accurately determine which files belong to it which would lead to only a partial uninstall.
pip install --ignore-installed ${PACKAGE_NAME}
- C#规范整理·资源管理和序列化
资源管理(尤其是内存回收)曾经是程序员的噩梦,不过在.NET平台上这个噩梦似乎已经不复存在.CLR在后台为垃圾回收做了很多事情,使得我们现在谈起在.NET上进行开发时,都会说还是new一个对象吧!回收 ...