SpringBoot(二)启动原理
SpringApplicationRunListener:接口的作用主要就是在Spring Boot 启动初始化的过程中可以通过SpringApplicationRunListener接口回调来让用户在启动的各个流程中可以加入自己的逻辑

@SpringBootApplication annotation can be used to enable those three features, that is:
@EnableAutoConfiguration: enable Spring Boot’s auto-configuration mechanism(扫描“spring.factories”文件,实现自动注册)@ComponentScan: enable@Componentscan on the package where the application is located (see the best practices)等同于(<compan-scan/>扫描加上注解的类)@Configuration: allow to register extra beans in the context or import additional configuration classes等同于(spring中在spring.xml文件中 写一个<bean/>。bean注册及bean管理)
内置Tomcat
The @SpringBootApplication annotation is equivalent to using @Configuration, @EnableAutoConfiguration, and @ComponentScan with their default attributes, as shown in the following example:
SpringBoot自动配置模块
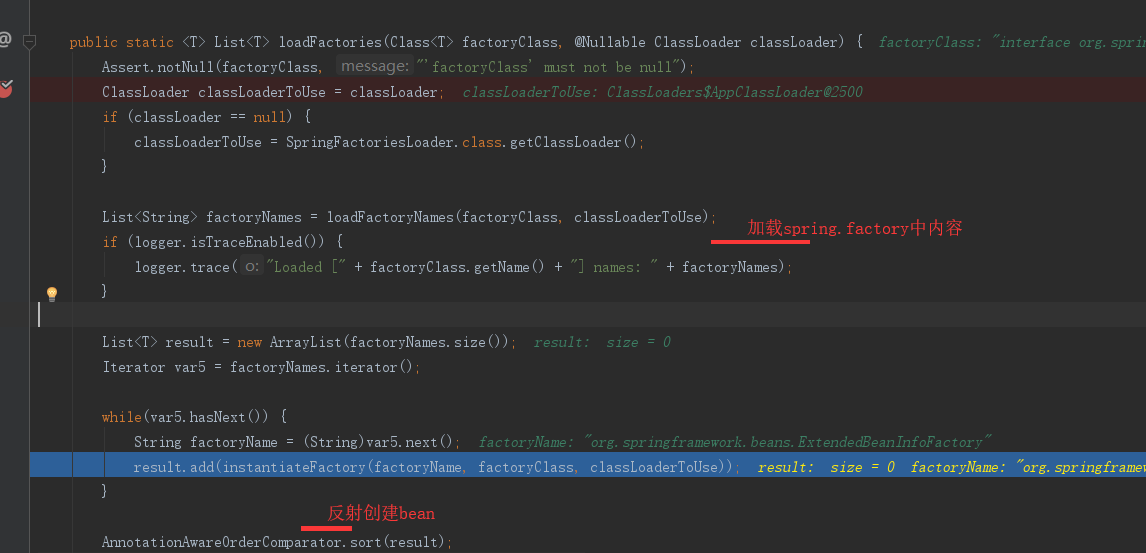
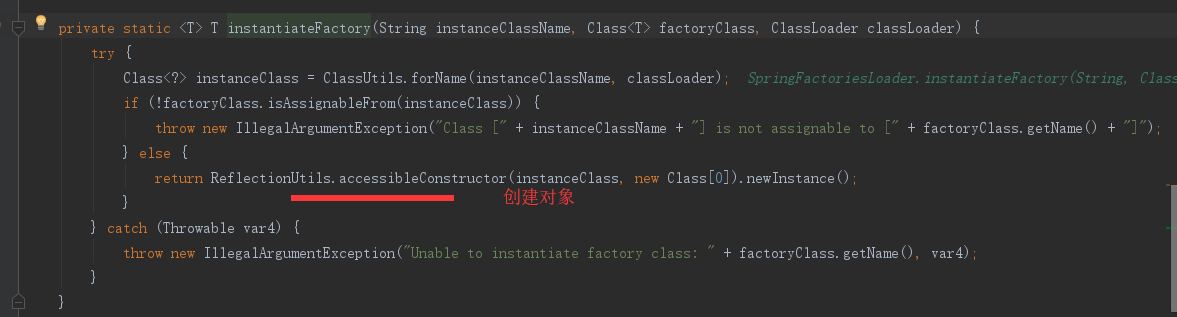
该配置模块的主要使用到了SpringFactoriesLoader,即Spring工厂加载器,该对象提供了loadFactoryNames方法,入参为factoryClass和classLoader,即需要传入工厂类名称和对应的类加载器,方法会根据指定的classLoader,加载该类加器搜索路径下的指定文件,即spring.factories文件,传入的工厂类为接口,而文件中对应的类则是接口的实现类,或最终作为实现类,所以文件中一般为如下图这种一对多的类名集合,获取到这些实现类的类名后,loadFactoryNames方法返回类名集合,方法调用方得到这些集合后,再通过反射获取这些类的类对象、构造方法,最终生成实例。
SpringBoot自动化配置关键组件关系图
mybatis-spring-boot-starter、spring-boot-starter-web等组件的META-INF文件下均含有spring.factories文件,自动配置模块中,SpringFactoriesLoader收集到文件中的类全名并返回一个类全名的数组,返回的类全名通过反射被实例化,就形成了具体的工厂实例,工厂实例来生成组件具体需要的bean。
之前我们提到了EnableAutoConfiguration注解,其类图如下:

可以发现其最终实现了ImportSelector(选择器)和BeanClassLoaderAware(bean类加载器中间件),重点关注一下AutoConfigurationImportSelector的selectImports方法。
MybatisAutoConfiguration

 在上面的代码可以看到自动配置器会根据传入的factoryClass.getName()到项目系统路径下所有的spring.factories文件中找到相应的key,从而加载里面的类。我们就选取这个mybatis-spring-boot-autoconfigure下的spring.factories文件
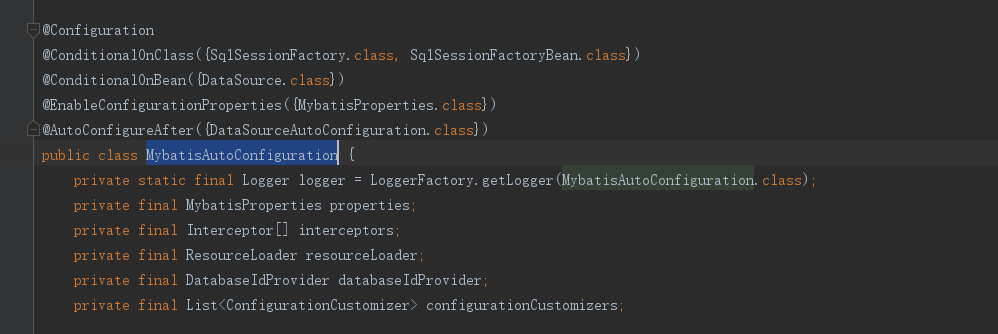
发现Spring的@Configuration,俨然是一个通过注解标注的springBean,继续向下看,
@ConditionalOnClass({ SqlSessionFactory.class, SqlSessionFactoryBean.class}):当存在SqlSessionFactory.class,SqlSessionFactoryBean.class这两个类时才解析MybatisAutoConfiguration配置类,否则不解析这一个配置类,make sence,我们需要mybatis为我们返回会话对象,就必须有会话工厂相关类。@CondtionalOnBean(DataSource.class):只有处理已经被声明为bean的dataSource。@ConditionalOnMissingBean(MapperFactoryBean.class)这个注解的意思是如果容器中不存在name指定的bean则创建bean注入,否则不执行(该类源码较长,篇幅限制不全粘贴)
以上配置可以保证sqlSessionFactory、sqlSessionTemplate、dataSource等mybatis所需的组件均可被自动配置,@Configuration注解已经提供了Spring的上下文环境,所以以上组件的配置方式与Spring启动时通过mybatis.xml文件进行配置起到一个效果。
通过分析我们可以发现,只要一个基于SpringBoot项目的类路径下存在SqlSessionFactory.class, SqlSessionFactoryBean.class,并且容器中已经注册了dataSourceBean,就可以触发自动化配置,意思说我们只要在maven的项目中加入了mybatis所需要的若干依赖,就可以触发自动配置,但引入mybatis原生依赖的话,每集成一个功能都要去修改其自动化配置类,那就得不到开箱即用的效果了。

这里是截取的mybatis-spring-boot-starter的源码中pom.xml文件中所有依赖:

因为maven依赖的传递性,我们只要依赖starter就可以依赖到所有需要自动配置的类,实现开箱即用的功能。也体现出Springboot简化了Spring框架带来的大量XML配置以及复杂的依赖管理,让开发人员可以更加关注业务逻辑的开发。
SpringBoot 内置tomcat
@SpringBootApplication->,@EnableAutoConfiguration->@ComponentScan,@EnableAutoConfiguration->AutoConfigurationImportSelector:selectImports()
-getAutoConfigurationEntry()->getCandidateConfigurations():
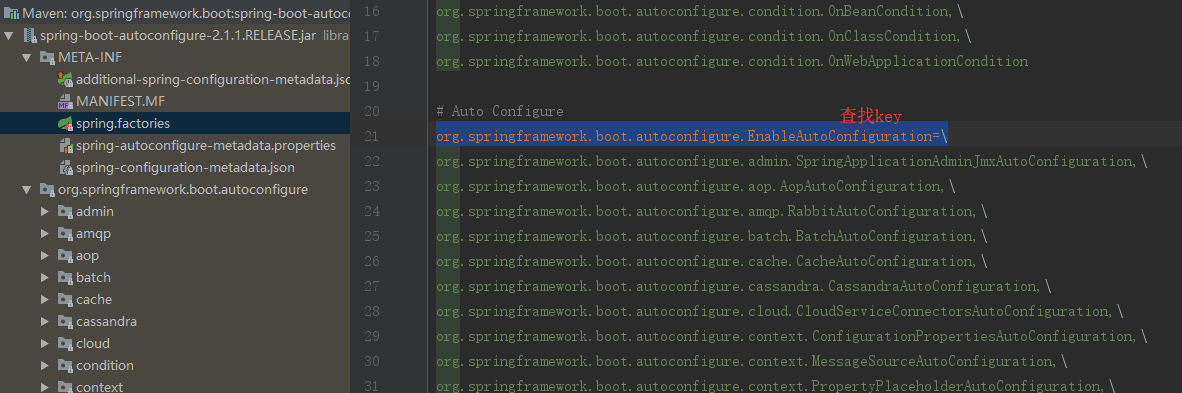
org.springframework.boot.autoconfigure.EnableAutoConfiguration=org.springframework.boot.autoconfigure.web.servlet.ServletWebServerFactoryAutoConfiguration,\
autoconfig.jar 下面 spring-boot-autoconfigure-2.1.1.RELEASE.jar->spring.factories
ServletWebServerFactoryAutoConfiguration(生产出一个servlet容器)):
EmbeddedTomcat->TomcatServletWebServerFactory->getWebServer
public WebServer getWebServer(ServletContextInitializer... initializers) {
//等于创建了server 里面在添加Connector,host 等

        Tomcat tomcat = new Tomcat();

        File baseDir = this.baseDirectory != null ? this.baseDirectory : this.createTempDir("tomcat");

        tomcat.setBaseDir(baseDir.getAbsolutePath());

        Connector connector = new Connector(this.protocol);

        tomcat.getService().addConnector(connector);

        this.customizeConnector(connector);

        tomcat.setConnector(connector);

        tomcat.getHost().setAutoDeploy(false);

        this.configureEngine(tomcat.getEngine());

        Iterator var5 = this.additionalTomcatConnectors.iterator();

        while(var5.hasNext()) {

            Connector additionalConnector = (Connector)var5.next();

            tomcat.getService().addConnector(additionalConnector);

        }

        this.prepareContext(tomcat.getHost(), initializers);

        return this.getTomcatWebServer(tomcat);

    }
Tomcat 在什么时候被创建的?
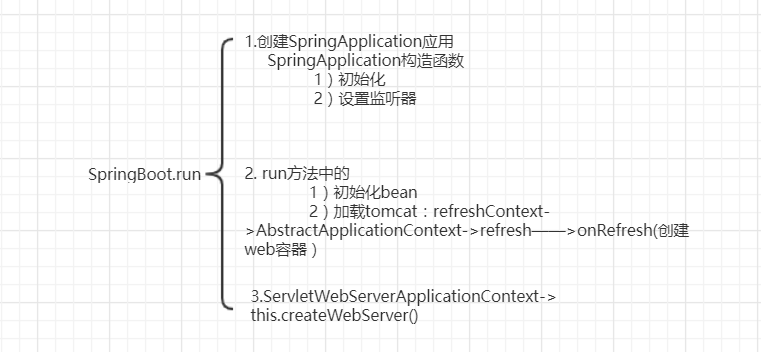
SpringApplication.run(SpringbootProviderApplication.class, args)->refreshContext()->onRefresh->
ServletWebServerApplicationContext->createWebServer()->
 protected void onRefresh() {

        super.onRefresh();

        try {

            this.createWebServer();

        } catch (Throwable var2) {

            throw new ApplicationContextException("Unable to start web server", var2);

        }

    }
private void createWebServer() {
WebServer webServer = this.webServer;
ServletContext servletContext = this.getServletContext();
if (webServer == null && servletContext == null) {
//在加载的时候getWebServerFactory 已经加载了
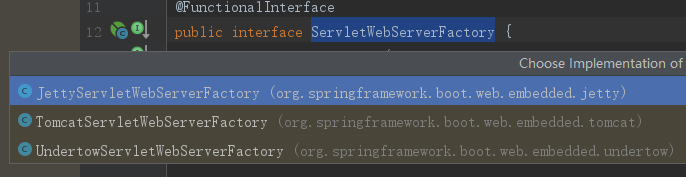
ServletWebServerFactory factory = this.getWebServerFactory();
//创建webServer ServletWebServerFactory 有不同的实现类 如 tomcat ,jetty的
this.webServer = factory.getWebServer(new ServletContextInitializer[]{this.getSelfInitializer()});
} else if (servletContext != null) {
try {
this.getSelfInitializer().onStartup(servletContext);
} catch (ServletException var4) {
throw new ApplicationContextException("Cannot initialize servlet context", var4);
}
}
this.initPropertySources();
}
SpringApplication.run()
Spring Context IOC 容器 (spring所有初始化的操作)
Listener
Filter
1.创建SpringApplication应用
 public SpringApplication(ResourceLoader resourceLoader, Class... primarySources) {

        this.sources = new LinkedHashSet();

        this.bannerMode = Mode.CONSOLE;

        this.logStartupInfo = true;

        this.addCommandLineProperties = true;

        this.addConversionService = true;

        this.headless = true;

        this.registerShutdownHook = true;

        this.additionalProfiles = new HashSet();

        this.isCustomEnvironment = false;

        this.resourceLoader = resourceLoader;

        Assert.notNull(primarySources, "PrimarySources must not be null");

        this.primarySources = new LinkedHashSet(Arrays.asList(primarySources));
       //判断web应用类型

        this.webApplicationType = WebApplicationType.deduceFromClasspath();
       //初始化

        this.setInitializers(this.getSpringFactoriesInstances(ApplicationContextInitializer.class));
        //设计监听器 SpringFactories-> spring.factories文件

        this.setListeners(this.getSpringFactoriesInstances(ApplicationListener.class));

        this.mainApplicationClass = this.deduceMainApplicationClass();

    }
# Application Listeners
org.springframework.context.ApplicationListener=\
org.springframework.boot.autoconfigure.BackgroundPreinitializer
# Auto Configuration Import Listeners
org.springframework.boot.autoconfigure.AutoConfigurationImportListener=\
org.springframework.boot.autoconfigure.condition.ConditionEvaluationReportAutoConfigurationImportListener
2.run (以下源码删除了部分代码)
 public ConfigurableApplicationContext run(String... args) {

        ConfigurableApplicationContext context = null;

        Collection<SpringBootExceptionReporter> exceptionReporters = new ArrayList();

        this.configureHeadlessProperty();

        Collection exceptionReporters;

        try {

            ApplicationArguments applicationArguments = new DefaultApplicationArguments(args);

            ConfigurableEnvironment environment = this.prepareEnvironment(listeners, applicationArguments);

            this.configureIgnoreBeanInfo(environment);
            //打印banner

            Banner printedBanner = this.printBanner(environment);
             // spring上下文

            context = this.createApplicationContext();

            exceptionReporters = this.getSpringFactoriesInstances(SpringBootExceptionReporter.class, new Class[]{ConfigurableApplicationContext.class}, context);

            this.prepareContext(context, environment, listeners, applicationArguments, printedBanner);
             // 在该方法中加载tomcat :AbstractApplicationContext->refresh——>onRefresh(创建web容器)

            this.refreshContext(context);

            this.afterRefresh(context, applicationArguments);

            if (this.logStartupInfo) {

                (new StartupInfoLogger(this.mainApplicationClass)).logStarted(this.getApplicationLog(), stopWatch);

            }

            listeners.started(context);

            this.callRunners(context, applicationArguments);

        } catch (Throwable var10) {

            this.handleRunFailure(context, var10, exceptionReporters, listeners);

            throw new IllegalStateException(var10);

        }

        try {

            listeners.running(context);

            return context;

        } catch (Throwable var9) {

            this.handleRunFailure(context, var9, exceptionReporters, (SpringApplicationRunListeners)null);

            throw new IllegalStateException(var9);

        }

    }
创建web容器即Tomcat
 protected void onRefresh() {

        super.onRefresh();

        try {

            this.createWebServer();

        } catch (Throwable var2) {

            throw new ApplicationContextException("Unable to start web server", var2);

        }

    }
spring-boot-starter?
SpringBoot(二)启动原理的更多相关文章
- (转)springboot应用启动原理(二) 扩展URLClassLoader实现嵌套jar加载
转:https://segmentfault.com/a/1190000013532009 在上篇文章<springboot应用启动原理(一) 将启动脚本嵌入jar>中介绍了springb ...
- springboot之启动原理解析
前言 SpringBoot为我们做的自动配置,确实方便快捷,但是对于新手来说,如果不大懂SpringBoot内部启动原理,以后难免会吃亏.所以这次博主就跟你们一起一步步揭开SpringBoot的神秘面 ...
- springboot之启动原理解析及源码阅读
前言 SpringBoot为我们做的自动配置,确实方便快捷,但是对于新手来说,如果不大懂SpringBoot内部启动原理,以后难免会吃亏.所以这次博主就跟你们一起一步步揭开SpringBoot的神秘面 ...
- SpringBoot FatJar启动原理
目录 SpringBoot FatJar启动原理 背景 储备知识 URLStreamHandler Archive 打包 SpringBoot启动 扩展 SpringBoot FatJar启动原理 背 ...
- 【SpringBoot】 理解SpringBoot的启动原理
前言 前文已经介绍了Spring Bean的生命周期,那么使用过程中发现SpringBoot 的启动非常快捷,本文将介绍SpringBoot的内部启动原理. 启动过程 如上图所示,我们先分析下Spri ...
- (转)springboot应用启动原理(一) 将启动脚本嵌入jar
转:https://segmentfault.com/a/1190000013489340 Spring Boot Takes an opinionated view of building prod ...
- 【转】Spring Boot干货系列:(三)启动原理解析
前言 前面几章我们见识了SpringBoot为我们做的自动配置,确实方便快捷,但是对于新手来说,如果不大懂SpringBoot内部启动原理,以后难免会吃亏.所以这次博主就跟你们一起一步步揭开Sprin ...
- Spring Boot干货系列:(三)启动原理解析
Spring Boot干货系列:(三)启动原理解析 2017-03-13 嘟嘟MD 嘟爷java超神学堂 前言 前面几章我们见识了SpringBoot为我们做的自动配置,确实方便快捷,但是对于新手来说 ...
- Spring Boot启动原理解析
Spring Boot启动原理解析http://www.cnblogs.com/moonandstar08/p/6550758.html 前言 前面几章我们见识了SpringBoot为我们做的自动配置 ...
- 5、Spring Boot 2.x 启动原理解析
1.5 Spring Boot 启动原理解析 前言 前面几章我们见识了SpringBoot为我们做的自动配置,确实方便快捷,但是对于新手来说,如果不大懂SpringBoot内部启动原理,以后难免会吃亏 ...
随机推荐
- AtCoder Beginner Contest 133
目录 Contest Info Solutions A. T or T B.Good Distance C. Remainder Minimization 2019 D. Rain Flows int ...
- P2831 愤怒的小鸟——状压
P2831 愤怒的小鸟 抛物线过原点,只要再找两个就能确定抛物线: 处理出两两之间的抛物线能过哪些点,状态压缩: 但是直接枚举每一条抛物线常数太大会T,所以我们需要预处理一个low_bit表示当前状态 ...
- new HttpClient().PostAsync封装参数
var data = Encoding.UTF8.GetBytes("{ \"y\": 5, \"x\": 3}"); var conten ...
- arcgis python 布局中所有元素平移
# Author: ESRI # Date: July 5, 2010 # Version: ArcGIS 10.0 # Purpose: This script will loop through ...
- cross-env 使用方式
cross-env能跨平台设置及使用环境变量 大多数情况下,在windows平台下使用类似于: NODE_ENV=production的命令行指令会卡住,windows平台与POSIX在使用命令行时有 ...
- What is the yield keyword used for in C#?
What is the yield keyword used for in C#? https://stackoverflow.com/a/39496/3782855 The yield keywor ...
- wmi 远程访问问题解决
WMI远程访问问题解决方法 WMI 全称为:Microsoft Windows Management Instrumentation (WMI) 按微软的介绍大致如下: WMI 是 Mic ...
- OpenJudge计算概论-年龄与疾病
/*========================================================== 年龄与疾病 总时间限制: 1000ms 内存限制: 65536kB 描述 某医 ...
- [转] node.js express的安装与部署,以及pm2下的运行启动。
node.js 下的express 安装可以参考官方网站的 http://www.expressjs.com.cn/ 这里主要讲一下一些不同的地方,将我们生成的dist文件夹里的文件放在public里 ...
- gitment初始化评论跳回博客首页
表现 众所周知,gitment评论系统需要初始化以创建对应的issue,可是我在点击login with github的时候,总是跳向博客首页!WTF!什么鬼?这样不程序啊? 排查 1.F12查看lo ...