[转帖]CentOS 7 安装 GlusterFS
CentOS 7 安装 GlusterFS
https://www.cnblogs.com/jicki/p/5801712.html

改天测试一下 我一直没有搞这一块呢.
CentOS 7 GlusterFS

环境说明:
3台机器安装 GlusterFS 组成一个集群。
使用 docker volume plugin GlusterFS
服务器:
10.6.0.140
10.6.0.192
10.6.0.196
配置 hosts
10.6.0.140 swarm-manager
10.6.0.192 swarm-node-1
10.6.0.196 swarm-node-2
client:
10.6.0.94 node-94
安装:
CentOS 安装 glusterfs 非常的简单
在三个节点都安装glusterfs
yum install centos-release-gluster
yum install -y glusterfs glusterfs-server glusterfs-fuse glusterfs-rdma
配置 GlusterFS 集群:
启动 glusterFS
systemctl start glusterd.service
systemctl enable glusterd.service
在 swarm-manager 节点上配置,将 节点 加入到 集群中。
[root@swarm-manager ~]#gluster peer probe swarm-manager
peer probe: success. Probe on localhost not needed
[root@swarm-manager ~]#gluster peer probe swarm-node-1
peer probe: success.
[root@swarm-manager ~]#gluster peer probe swarm-node-2
peer probe: success.
查看集群状态:
[root@swarm-manager ~]#gluster peer status
Number of Peers: 2
Hostname: swarm-node-1
Uuid: 41573e8b-eb00-4802-84f0-f923a2c7be79
State: Peer in Cluster (Connected)
Hostname: swarm-node-2
Uuid: da068e0b-eada-4a50-94ff-623f630986d7
State: Peer in Cluster (Connected)
创建数据存储目录:
[root@swarm-manager ~]#mkdir -p /opt/gluster/data
[root@swarm-node-1 ~]# mkdir -p /opt/gluster/data
[root@swarm-node-2 ~]# mkdir -p /opt/gluster/data
查看volume 状态:
[root@swarm-manager ~]#gluster volume info
No volumes present
创建GlusterFS磁盘:
[root@swarm-manager ~]#gluster volume create models replica 3 swarm-manager:/opt/gluster/data swarm-node-1:/opt/gluster/data swarm-node-2:/opt/gluster/data force
volume create: models: success: please start the volume to access data
GlusterFS 几种volume 模式说明:
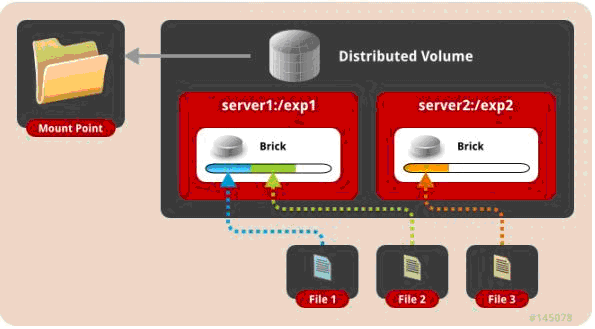
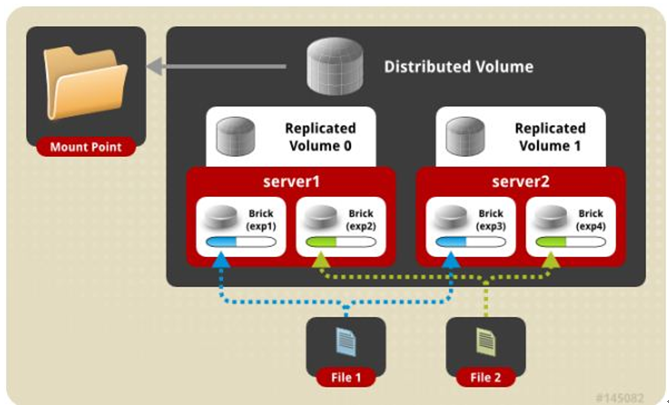
一、 默认模式,既DHT, 也叫 分布卷: 将文件已hash算法随机分布到 一台服务器节点中存储。
gluster volume create test-volume server1:/exp1 server2:/exp2
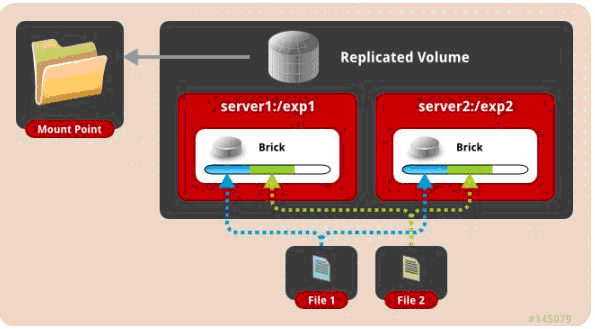
二、 复制模式,既AFR, 创建volume 时带 replica x 数量: 将文件复制到 replica x 个节点中。
gluster volume create test-volume replica 2 transport tcp server1:/exp1 server2:/exp2
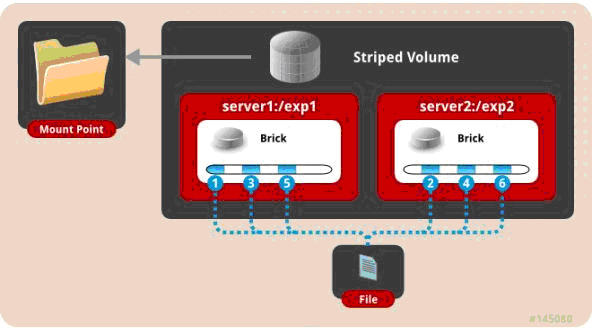
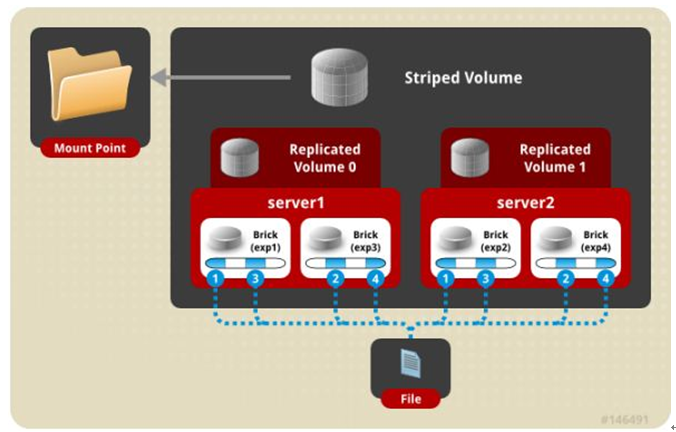
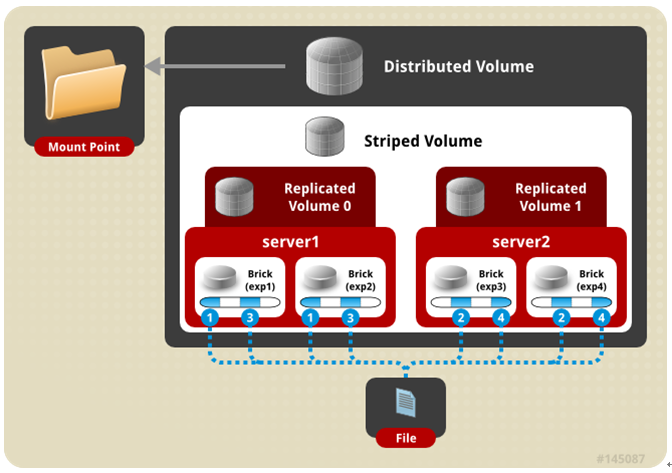
三、 条带模式,既Striped, 创建volume 时带 stripe x 数量: 将文件切割成数据块,分别存储到 stripe x 个节点中 ( 类似raid 0 )。
gluster volume create test-volume stripe 2 transport tcp server1:/exp1 server2:/exp2
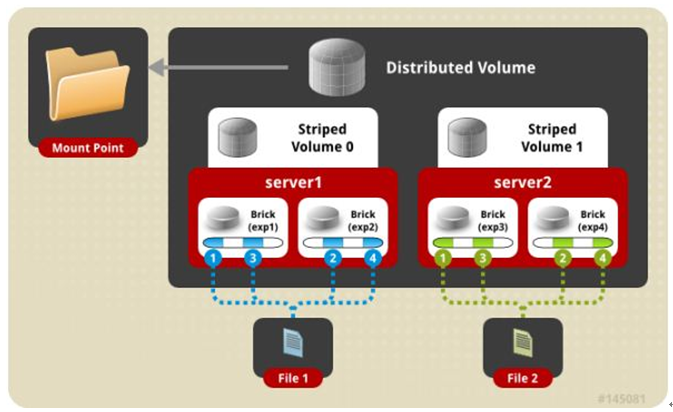
四、 分布式条带模式(组合型),最少需要4台服务器才能创建。 创建volume 时 stripe 2 server = 4 个节点: 是DHT 与 Striped 的组合型。
gluster volume create test-volume stripe 2 transport tcp server1:/exp1 server2:/exp2 server3:/exp3 server4:/exp4
五、 分布式复制模式(组合型), 最少需要4台服务器才能创建。 创建volume 时 replica 2 server = 4 个节点:是DHT 与 AFR 的组合型。
gluster volume create test-volume replica 2 transport tcp server1:/exp1 server2:/exp2 server3:/exp3 server4:/exp4
六、 条带复制卷模式(组合型), 最少需要4台服务器才能创建。 创建volume 时 stripe 2 replica 2 server = 4 个节点: 是 Striped 与 AFR 的组合型。
gluster volume create test-volume stripe 2 replica 2 transport tcp server1:/exp1 server2:/exp2 server3:/exp3 server4:/exp4
七、 三种模式混合, 至少需要8台 服务器才能创建。 stripe 2 replica 2 , 每4个节点 组成一个 组。
gluster volume create test-volume stripe 2 replica 2 transport tcp server1:/exp1 server2:/exp2 server3:/exp3 server4:/exp4 server5:/exp5 server6:/exp6 server7:/exp7 server8:/exp8
再查看 volume 状态:
[root@swarm-manager ~]#gluster volume info
Volume Name: models
Type: Replicate
Volume ID: e539ff3b-2278-4f3f-a594-1f101eabbf1e
Status: Created
Number of Bricks: 1 x 3 = 3
Transport-type: tcp
Bricks:
Brick1: swarm-manager:/opt/gluster/data
Brick2: swarm-node-1:/opt/gluster/data
Brick3: swarm-node-2:/opt/gluster/data
Options Reconfigured:
performance.readdir-ahead: on
启动 models
[root@swarm-manager ~]#gluster volume start models
volume start: models: success
gluster 性能调优:
开启 指定 volume 的配额: (models 为 volume 名称)
gluster volume quota models enable
限制 models 中 / (既总目录) 最大使用 80GB 空间
gluster volume quota models limit-usage / 80GB
#设置 cache 4GB
gluster volume set models performance.cache-size 4GB
#开启 异步 , 后台操作
gluster volume set models performance.flush-behind on
#设置 io 线程 32
gluster volume set models performance.io-thread-count 32
#设置 回写 (写数据时间,先写入缓存内,再写入硬盘)
gluster volume set models performance.write-behind on
部署GlusterFS客户端并mount GlusterFS文件系统 (客户端必须加入 glusterfs hosts 否则报错。)
[root@node-94 ~]#yum install -y glusterfs glusterfs-fuse
[root@node-94 ~]#mkdir -p /opt/gfsmnt
[root@node-94 ~]#mount -t glusterfs swarm-manager:models /opt/gfsmnt/
[root@node-94 ~]#df -h
文件系统 容量 已用 可用 已用% 挂载点
/dev/mapper/vg001-root 98G 1.2G 97G 2% /
devtmpfs 32G 0 32G 0% /dev
tmpfs 32G 0 32G 0% /dev/shm
tmpfs 32G 130M 32G 1% /run
tmpfs 32G 0 32G 0% /sys/fs/cgroup
/dev/mapper/vg001-opt 441G 71G 370G 17% /opt
/dev/sda2 497M 153M 344M 31% /boot
tmpfs 6.3G 0 6.3G 0% /run/user/0
swarm-manager:models 441G 18G 424G 4% /opt/gfsmnt
测试:
DHT 模式 客户端 创建一个 1G 的文件
[root@node-94 ~]#time dd if=/dev/zero of=hello bs=1000M count=1
记录了1+0 的读入
记录了1+0 的写出
1048576000字节(1.0 GB)已复制,9.1093 秒,115 MB/秒
real 0m9.120s
user 0m0.000s
sys 0m1.134s
AFR 模式 客户端 创建一个 1G 的文件
[root@node-94 ~]#time dd if=/dev/zero of=hello.txt bs=1024M count=1
录了1+0 的读入
记录了1+0 的写出
1073741824字节(1.1 GB)已复制,27.4566 秒,39.1 MB/秒
real 0m27.469s
user 0m0.000s
sys 0m1.065s
Striped 模式 客户端 创建一个 1G 的文件
[root@node-94 ~]#time dd if=/dev/zero of=hello bs=1000M count=1
记录了1+0 的读入
记录了1+0 的写出
1048576000字节(1.0 GB)已复制,9.10669 秒,115 MB/秒
real 0m9.119s
user 0m0.001s
sys 0m0.953s
条带复制卷模式 (Number of Bricks: 1 x 2 x 2 = 4) 客户端 创建一个 1G 的文件
[root@node-94 ~]#time dd if=/dev/zero of=hello bs=1000M count=1
记录了1+0 的读入
记录了1+0 的写出
1048576000字节(1.0 GB)已复制,17.965 秒,58.4 MB/秒
real 0m17.978s
user 0m0.000s
sys 0m0.970s
分布式复制模式 (Number of Bricks: 2 x 2 = 4) 客户端 创建一个 1G 的文件
[root@node-94 ~]#time dd if=/dev/zero of=haha bs=100M count=10
记录了10+0 的读入
记录了10+0 的写出
1048576000字节(1.0 GB)已复制,17.7697 秒,59.0 MB/秒
real 0m17.778s
user 0m0.001s
sys 0m0.886s
针对 分布式复制模式还做了如下测试:
4K随机写 测试:
安装 fio (yum -y install libaio-devel (否则运行fio 会报错engine libaio not loadable, 已安装需重新编译,否则一样报错))
[root@node-94 ~]#fio -ioengine=libaio -bs=4k -direct=1 -thread -rw=randwrite -size=10G -filename=1.txt -name="EBS 4KB randwrite test" -iodepth=32 -runtime=60
write: io=352204KB, bw=5869.9KB/s, iops=1467, runt= 60002msec
WRITE: io=352204KB, aggrb=5869KB/s, minb=5869KB/s, maxb=5869KB/s, mint=60002msec, maxt=60002msec
4K随机读 测试:
fio -ioengine=libaio -bs=4k -direct=1 -thread -rw=randread -size=10G -filename=1.txt -name="EBS 4KB randread test" -iodepth=8 -runtime=60
read: io=881524KB, bw=14692KB/s, iops=3672, runt= 60001msec
READ: io=881524KB, aggrb=14691KB/s, minb=14691KB/s, maxb=14691KB/s, mint=60001msec, maxt=60001msec
512K 顺序写 测试:
fio -ioengine=libaio -bs=512k -direct=1 -thread -rw=write -size=10G -filename=512.txt -name="EBS 512KB seqwrite test" -iodepth=64 -runtime=60
write: io=3544.0MB, bw=60348KB/s, iops=117, runt= 60135msec
WRITE: io=3544.0MB, aggrb=60348KB/s, minb=60348KB/s, maxb=60348KB/s, mint=60135msec, maxt=60135msec
其他的维护命令:
1. 查看GlusterFS中所有的volume:
[root@swarm-manager ~]#gluster volume list
2. 删除GlusterFS磁盘:
[root@swarm-manager ~]#gluster volume stop models #停止名字为 models 的磁盘
[root@swarm-manager ~]#gluster volume delete models #删除名字为 models 的磁盘
注: 删除 磁盘 以后,必须删除 磁盘( /opt/gluster/data ) 中的 ( .glusterfs/ .trashcan/ )目录。
否则创建新 volume 相同的 磁盘 会出现文件 不分布,或者 类型 错乱 的问题。
3. 卸载某个节点GlusterFS磁盘
[root@swarm-manager ~]#gluster peer detach swarm-node-2
4. 设置访问限制,按照每个volume 来限制
[root@swarm-manager ~]#gluster volume set models auth.allow 10.6.0.*,10.7.0.*
5. 添加GlusterFS节点:
[root@swarm-manager ~]#gluster peer probe swarm-node-3
[root@swarm-manager ~]#gluster volume add-brick models swarm-node-3:/opt/gluster/data
注:如果是复制卷或者条带卷,则每次添加的Brick数必须是replica或者stripe的整数倍
6. 配置卷
[root@swarm-manager ~]# gluster volume set
7. 缩容volume:
先将数据迁移到其它可用的Brick,迁移结束后才将该Brick移除:
[root@swarm-manager ~]#gluster volume remove-brick models swarm-node-2:/opt/gluster/data swarm-node-3:/opt/gluster/data start
在执行了start之后,可以使用status命令查看移除进度:
[root@swarm-manager ~]#gluster volume remove-brick models swarm-node-2:/opt/gluster/data swarm-node-3:/opt/gluster/data status
不进行数据迁移,直接删除该Brick:
[root@swarm-manager ~]#gluster volume remove-brick models swarm-node-2:/opt/gluster/data swarm-node-3:/opt/gluster/data commit
注意,如果是复制卷或者条带卷,则每次移除的Brick数必须是replica或者stripe的整数倍。
扩容:
gluster volume add-brick models swarm-node-2:/opt/gluster/data
8. 修复命令:
[root@swarm-manager ~]#gluster volume replace-brick models swarm-node-2:/opt/gluster/data swarm-node-3:/opt/gluster/data commit -force
9. 迁移volume:
[root@swarm-manager ~]#gluster volume replace-brick models swarm-node-2:/opt/gluster/data swarm-node-3:/opt/gluster/data start
pause 为暂停迁移
[root@swarm-manager ~]#gluster volume replace-brick models swarm-node-2:/opt/gluster/data swarm-node-3:/opt/gluster/data pause
abort 为终止迁移
[root@swarm-manager ~]#gluster volume replace-brick models swarm-node-2:/opt/gluster/data swarm-node-3:/opt/gluster/data abort
status 查看迁移状态
[root@swarm-manager ~]#gluster volume replace-brick models swarm-node-2:/opt/gluster/data swarm-node-3:/opt/gluster/data status
迁移结束后使用commit 来生效
[root@swarm-manager ~]#gluster volume replace-brick models swarm-node-2:/opt/gluster/data swarm-node-3:/opt/gluster/data commit
10. 均衡volume:
[root@swarm-manager ~]#gluster volume models lay-outstart
[root@swarm-manager ~]#gluster volume models start
[root@swarm-manager ~]#gluster volume models startforce
[root@swarm-manager ~]#gluster volume models status
[root@swarm-manager ~]#gluster volume models stop
[转帖]CentOS 7 安装 GlusterFS的更多相关文章
- CentOS 7 安装 GlusterFS
CentOS 7 GlusterFS 环境说明: 3台机器安装 GlusterFS 组成一个集群. 使用 docker volume plugin GlusterFS 服务器: 10.6.0.140 ...
- [转帖]CentOS 7安装并启动Google浏览器(★firecat亲测有效★)
CentOS 7安装并启动Google浏览器(★firecat亲测有效★) https://blog.csdn.net/libaineu2004/article/details/82821405 自己 ...
- 【good】在CentOS 6.x上安装GlusterFS
转发:http://quenywell.com/install-glusterfs-on-centos-6-x/ 本文主要介绍如何在CentOS 6.x上快速安装GlusterFS.GlusterFS ...
- NoSql1 在Linux(CentOS)上安装memcached及使用
前言: 今天是初五,生活基本要从过年的节奏中回归到正常的生活了,所以想想也该想想与工作有关的事情了.我之前在工作中会经常使用memcached和redis,但是自己一直没有时间系统的好好看 ...
- 在Ubuntu|CentOS上安装Shutter截图工具及快捷键设置
简介 Shutter前身叫GScrot,它是一款相当棒的截图软件. 通过Shutter,你可以截取包括选定区域.全屏幕.窗口.窗口内的控件甚至网页的图像.通过内置的强大插件机制,你可以在截图后,对图像 ...
- CentOS下安装hadoop
CentOS下安装hadoop 用户配置 添加用户 adduser hadoop passwd hadoop 权限配置 chmod u+w /etc/sudoers vi /etc/sudoers 在 ...
- CentOS下安装使用start-stop-daemon
CentOS下安装使用start-stop-daemon 在centos下下了个自启动的服务器脚本 执行的时候发现找不到start-stop-daemon命令 好吧 执行手动编译一下 加上这个命令 w ...
- CentOS 7 安装 Docker
CentOS 7 安装 Docker 这里介绍 ContOS 7 的安装 docker V1.2+,包括阿里云加速 docker 镜像下载的设置,这对提升使用 docker 体验至关重要.其他系统安装 ...
- centos在线安装svn
centos在线安装svn 用下列命令安装svn服务 yum install subversion 创建svn版本库目录 mkdir -p /var/svn/svnrepos 创建版本库 svnadm ...
随机推荐
- mpvue开发坑点总结
最近一直在开发微信小程序,趁着空闲时间总结下使用情况. 现在项目目前使用的是 mpvue:^1.0.11 版本,后续看看更新情况. 文档在此: http://mpvue.com/mpvue/#_2 # ...
- Tkinter 之记事本项目实战
一.效果图 二.文件 链接:https://pan.baidu.com/s/1CUkfWpfH8t2GSJyy5hYv-A 提取码:5yvn 后续可能做一些功能扩展,有需要源码的可以评论联系我!!!
- linux设置定时任务的方法步骤
一,首先登录 二,找到文件夹 三,查看定时任务 crontab -l 四,vi root 编辑定时任务 编辑完成后,点ESC,然后:wq 时间格式 分钟 小时 日期 月份 周 命令 数字范围 0-59 ...
- 【软工实践】团队Git现场编程实战
组长博客链接 博客链接 组员职责分工 队员 职责分工 恩泽 进行任务的划分与安排,调用API,负责餐饮商铺及商圈信息的获取 金海 解析API返回的json数据,提取有关信息 君曦 部分算法编写 季城 ...
- JWT Claims
JWT Claims “iss” (issuer) 发行人 “sub” (subject) 主题 “aud” (audience) 接收方 用户 “exp” (expiration time) 到 ...
- SpringBoot访问不了JSP但却能进入后台
博主在使用sring-boot跳转HTML页面后,由于好奇心就想跳转到JSP页面,就在网上搜相关信息,结果不是跳转500错误就是下载JSP文件.各种坑啊,在博主跳了N多坑后,终于跳转JSP页面成功.故 ...
- MySQL参数: innodb_flush_log_at_trx_commit和sync_binlog
innodb_flush_log_at_trx_commit 当innodb_flush_log_at_trx_commit=0时, log buffer将每秒一次地写入log file, 并且log ...
- 新概念英语第二册Lesson5:No wrong numbers
Lesson 5 No wrong numbers 无错号之虞 First listen and then answer the question. 听录音,然后回答以下问题. What does ' ...
- Nginx 配置操作注意事项
Nginx reload 会中断现有连接吗? - 知乎https://www.zhihu.com/question/57096250 在NGINX上配置HTTPS---血的教训--要重启NGINX - ...
- Vue导出ZIP
Export2Zip /* eslint-disable */ require('script-loader!file-saver'); import JSZip from 'jszip' expor ...