八、spring生命周期之BeanPostProcessor
BeanPostProcessor我们一般称为Bean的后置处理器,它与我们前面介绍的InitialingBean、init-method等一样,都是在bean的初始化时被调用,具体的用法我们在举例中进行学习。
要使用BeanPostProcessor非常简单,只要实现这个接口即可。
在此之前,我们来先看下我们的Cat类,我们的目的是将这个Cat注册进spring的ioc容器中,并让这个BeanPostProcessor起到作用。
public class Cat implements InitializingBean,DisposableBean {

	public Cat(){

		System.out.println("cat constructor...");

	}

	@Override

	public void destroy() throws Exception {

		// TODO Auto-generated method stub

		System.out.println("cat...destroy...");

	}

	@Override

	public void afterPropertiesSet() throws Exception {

		// TODO Auto-generated method stub

		System.out.println("cat...afterPropertiesSet...");

	}

	//对象创建并赋值之后调用

	@PostConstruct

	public void initMethod(){

		System.out.println("Cat....@PostConstruct...");

	}

	//容器移除对象之前

	@PreDestroy

	public void detoryMethod(){

		System.out.println("Cat....@PreDestroy...");

	}

	public void initCat() {

		System.out.println("Cat.initCat()......");

	}

	public void cleanup() {

		System.out.println("Cat.cleanup()......");

	}

}
再来看下我们的配置类
@Configuration

public class MainConfigOfLifeCycle {

//	@Scope("prototype")

	@Bean(initMethod="initCat",destroyMethod="cleanup")

	public Cat cat(){

		return new Cat();

	}

	@Bean

	public MyBeanPostProcessor myBeanPostProcessor() {

		return new MyBeanPostProcessor();

	}

}
结合之前学习过的内容, 就能知道我们为这个Cat类应用了三种初始化及销毁方法,
分别是@PostConstruct和@Predestroy
还有就是实现 InitializingBean,DisposableBean这两个接口的afterPropertiesSet()和destro()方法
另外就是标注在@Bean(initMethod="initCat",destroyMethod="cleanup")定义的两个方法,也存在于Cat类中,
现在我们就要加入BeanPostProcessor
/**

 * 后置处理器:初始化前后进行处理工作

 * 将后置处理器加入到容器中,只需要继承BeanPostProcessor接口并实现其两个方法即可。

 */

@Component

public class MyBeanPostProcessor implements BeanPostProcessor {

	@Override

	public Object postProcessBeforeInitialization(Object bean, String beanName) throws BeansException {

		System.out.println("postProcessBeforeInitialization..."+beanName+"=>"+bean);

		return bean;

	}

	@Override

	public Object postProcessAfterInitialization(Object bean, String beanName) throws BeansException {

		System.out.println("postProcessAfterInitialization..."+beanName+"=>"+bean);

		return bean;

	}

}
现在一切具备,再写一个测试方法:
	@Test

	public void test01(){

		//1、创建ioc容器

		AnnotationConfigApplicationContext applicationContext = new AnnotationConfigApplicationContext(MainConfigOfLifeCycle.class);

		System.out.println("容器创建完成...");

		//applicationContext.getBean("car");

		//关闭容器

		applicationContext.close();

	}
观察控制台打印结果
cat constructor...// 创建cat对象

postProcessBeforeInitialization...cat=>com.atguigu.bean.Cat@6591f517 //在所有初始化方法之前被调用

Cat....@PostConstruct...

cat...afterPropertiesSet...

Cat.initCat()......

postProcessAfterInitialization...cat=>com.atguigu.bean.Cat@6591f517// 在所有初始化方法之后被调用

容器创建完成...

Cat....@PreDestroy...// 销毁方法不需要关注

cat...destroy...

Cat.cleanup()......
通过上面这个例子,已经很显然BeanPostProcessor的用法,它是在容器中bean初始化前后被调用。
源码调用分析:
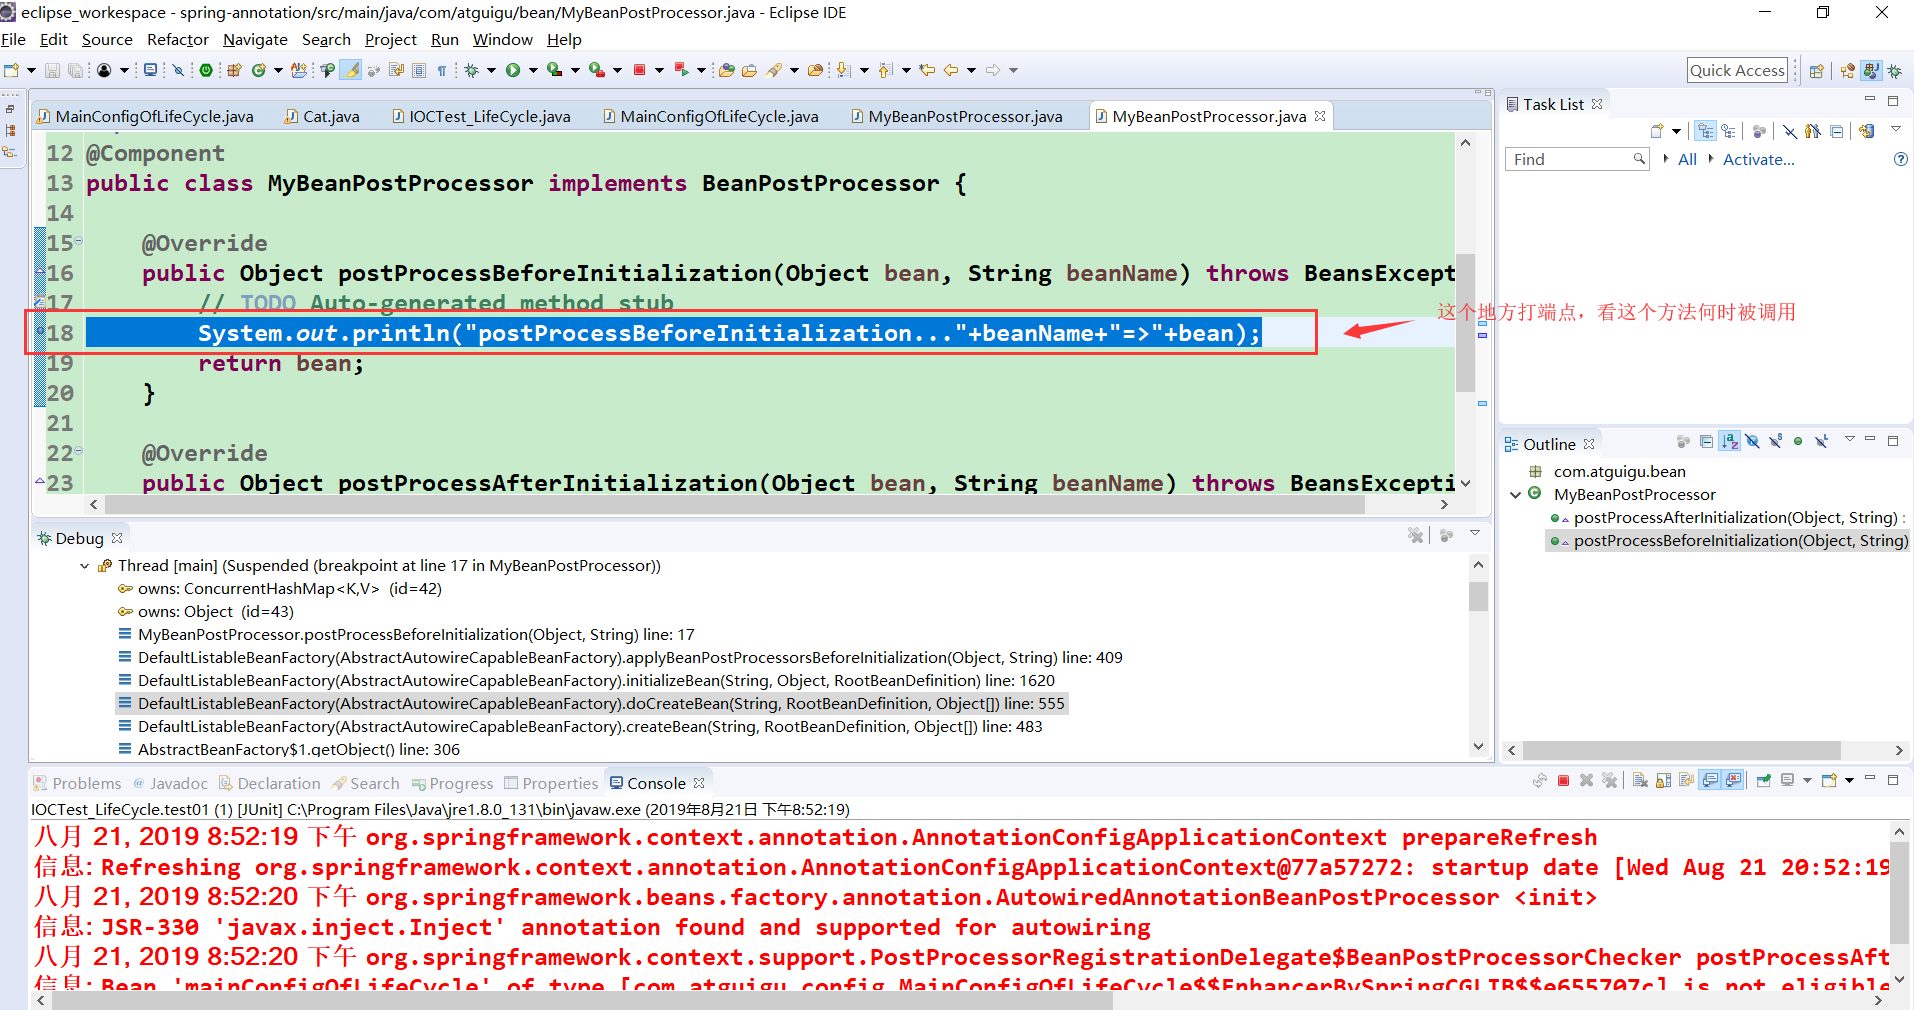
我们在eclipse中启用debug模式,
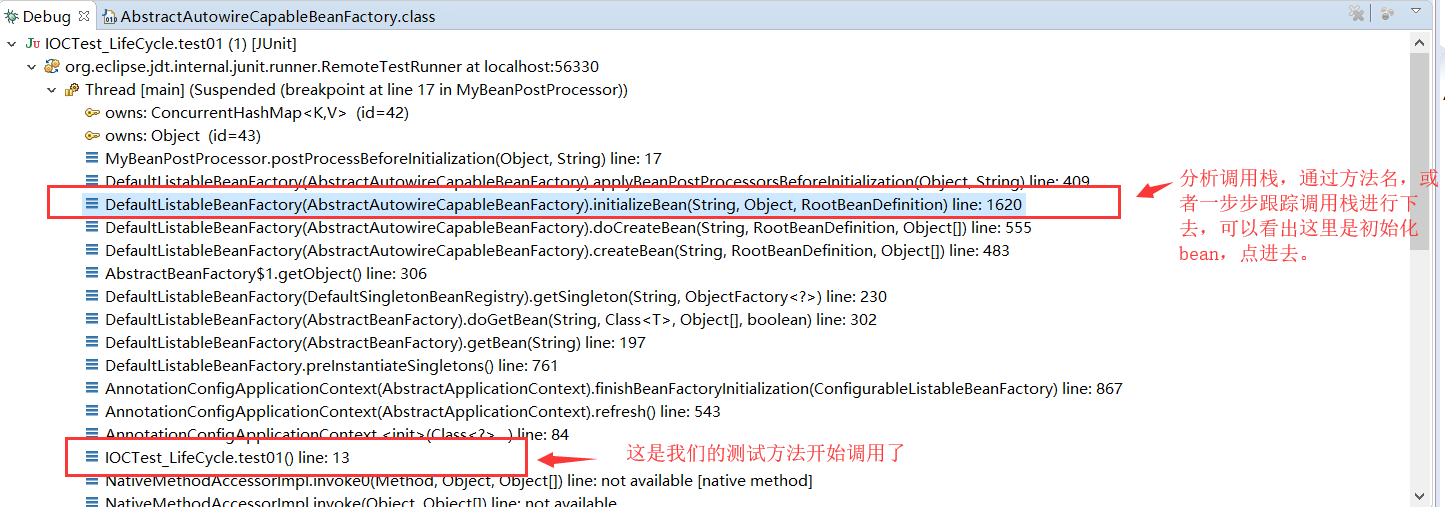
看看这个方法的源码,直接在方法注释中进行分析
	protected Object initializeBean(final String beanName, final Object bean, RootBeanDefinition mbd) {

		if (System.getSecurityManager() != null) {

			AccessController.doPrivileged(new PrivilegedAction<Object>() {

				@Override

				public Object run() {

					invokeAwareMethods(beanName, bean);

					return null;

				}

			}, getAccessControlContext());

		}

		else {

			invokeAwareMethods(beanName, bean);

		}

		Object wrappedBean = bean;

		if (mbd == null || !mbd.isSynthetic()) {

            // 初始化前调用BeanPostProcessor

			wrappedBean = applyBeanPostProcessorsBeforeInitialization(wrappedBean, beanName);

		}

		try {

            //初始化方法

			invokeInitMethods(beanName, wrappedBean, mbd);

		}

		catch (Throwable ex) {

			throw new BeanCreationException(

					(mbd != null ? mbd.getResourceDescription() : null),

					beanName, "Invocation of init method failed", ex);

		}

		if (mbd == null || !mbd.isSynthetic()) {

            // 初始化后调用BeanPostProcessor

			wrappedBean = applyBeanPostProcessorsAfterInitialization(wrappedBean, beanName);

		}

		return wrappedBean;

	}
就看到这里,里面内容比较多,可以进invokeInitMethods看看几个初始化方法的调用顺序,JSR-250注解@PostConstruct是如何起作用的等等 ,我们这里只是来源码中找找它在源码中的位置。
又是一个夜晚,一船的清梦。
八、spring生命周期之BeanPostProcessor的更多相关文章
- spring生命周期
Github地址 最近在整合mybatis-spring. 公司里面已经有一个叫做kylin-datasource的开发包,以前能够提供master和slave2个数据源,最近更新了2.0版本,支持自 ...
- 说下spring生命周期
面试官:说下spring生命周期 程序员:不会 那你先回去等消息吧 Bean实现了BeanNameAware,Spring会将Bean的ID透传给setBeanName java.后端开发.程 ...
- Spring生命周期详解
导读 Spring中Bean的生命周期从容器的启动到停止,涉及到的源码主要是在org.springframework.context.support.AbstractApplicationContex ...
- 【源码】spring生命周期
一.spring生命周期 1. 实例化Bean 对于BeanFactory容器,当客户向容器请求一个尚未初始化的bean时,或初始化bean的时候需要注入另一个尚未初始化的依赖时,容器就会调用crea ...
- Spring学习总结(4)-Spring生命周期的回调
参考文档:https://docs.spring.io/spring-framework/docs/current/spring-framework-reference/core.html#beans ...
- spring源码学习(四)-spring生命周期用到的后置处理器
生命周期的九大后置处理器 第一次调用后置处理器org.springframework.beans.factory.support.AbstractAutowireCapableBeanFactory# ...
- Spring生命周期 Constructor > @PostConstruct > InitializingBean > init-method
项目中用到了 afterPropertiesSet: 于是具体的查了一下到底afterPropertiesSet到底是什么时候执行的.为什么一定要实现 InitializingBean; **/ @C ...
- spring 生命周期最详解
转载. https://blog.csdn.net/qq_23473123/article/details/76610052 目的 在大三开始学习spring时,老师就说spring bean周期非常 ...
- spring生命周期流程图
Spring作为当前Java最流行.最强大的轻量级框架,受到了程序员的热烈欢迎.准确的了解Spring Bean的生命周期是非常必要的.我们通常使用ApplicationContext作为Spring ...
随机推荐
- Java代码写PDF-保全批单
前言:最近自己要开发一个保全批单模块,由于自己在平时没有怎么接触过批单类型模块,甲方给了自己一套word模板,自己看了一下,个险的模板比较简单,但是团险一看,自己比较蒙圈,询问需求负责人说word中的 ...
- LeetCode 1102. Path With Maximum Minimum Value
原题链接在这里:https://leetcode.com/problems/path-with-maximum-minimum-value/ 题目: Given a matrix of integer ...
- S1_搭建分布式OpenStack集群_07 nova服务配置 (计算节点)
一.服务安装(计算节点)安装软件:# yum install openstack-nova-compute -y 编辑/etc/nova/nova.conf文件并设置如下内容:# vim /etc/n ...
- 微信小程序开发工具“当前系统代理不是安全代理”
(1)删除注册表中以proxy开头的项目再次重启 regedit进入[HKEY_CURRENT_USER/Software/Microsoft/Windows/CurrentVersion/Inter ...
- 开源项目 05 Dapper
using System; using System.Collections.Generic; using System.Linq; using System.Text; using System.T ...
- 洛谷 SP740 TRT - Treats for the Cows 题解
SP740 TRT - Treats for the Cows 题目描述 FJ has purchased N (1 <= N <= 2000) yummy treats for the ...
- 洛谷 P1629 邮递员送信 题解
P1629 邮递员送信 题目描述 有一个邮递员要送东西,邮局在节点1.他总共要送N-1样东西,其目的地分别是2~N.由于这个城市的交通比较繁忙,因此所有的道路都是单行的,共有M条道路,通过每条道路需要 ...
- POJ 1436.Horizontally Visible Segments-线段树(区间更新、端点放大2倍)
水博客,水一水. Horizontally Visible Segments Time Limit: 5000MS Memory Limit: 65536K Total Submissions: ...
- DDL 语言
数据库模式定义语言并非程序设计语言,DDL数据库模式定义语言是SQL语言(结构化查询语言)的组成部分. SQL语言包括四种主要程序设计语言类别的语句:数据定义语言(DDL),数据操作语言(DML),数 ...
- 集合类 collection接口 LinkedList
LinkedList 是另外一种重要的数据结构形式, 底层是使用了双向链表数据结构, 特点: 查询速度慢,增删快. 继承关系如下: 可以发现,LinkedList同时实现了Quene和Deque接口. ...