Trunk 实现跨交换机 VLAN 通信

当网络中有多台交换机时,位于不同交换机上的相同VLAN的主机之间时如何通信的呢?我们使用Trunk实现跨交换机VLAN通信。还有以太网通道的操作哦。
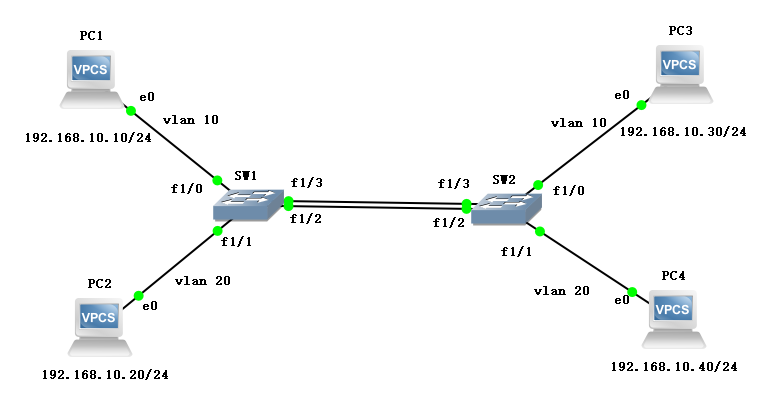
实验拓扑
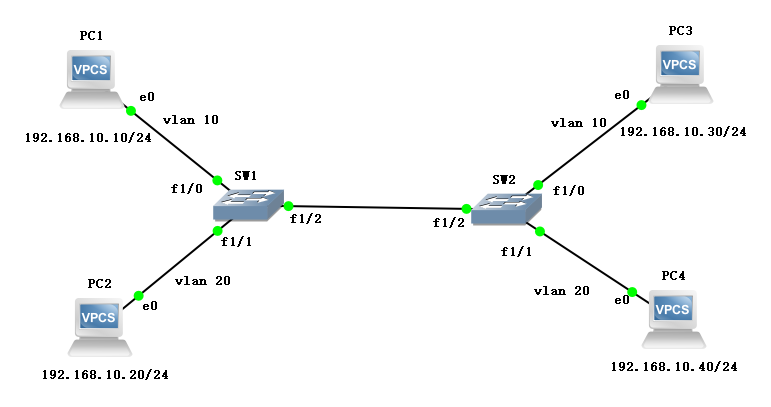
两台交换机直连,每台下面再连接两台VPC,划分VLAN,地址规划如下:
| 名称 | 接口 | VLAN | 地址 |
|---|---|---|---|
| PC1 | SW1-f1/0 | vlan 10 | 192.168.10.10/24 |
| PC2 | SW1-f1/1 | vlan 20 | 192.168.10.20/24 |
| PC3 | SW2-f1/0 | vlan 10 | 192.168.10.30/24 |
| PC4 | SW2-f1/1 | vlan 20 | 192.168.10.40/24 |
配置方法
SW1(config)#interface fastEthernet 1/2

SW1(config-if)#switchport mode trunk

SW1(config-if)#switchport trunk encapsulation dot1q

SW1(config-if)#end
配置过程
交换机划分 VLAN
- SW1
SW1#conf t

SW1(config)#no ip routing

SW1(config)#vlan 10,20

SW1(config-vlan)#ex

SW1(config)#int f1/0

SW1(config-if)#sw m a

SW1(config-if)#sw a v 10

SW1(config-if)#ex

SW1(config)#int f1/1

SW1(config-if)#sw m a

SW1(config-if)#sw a v 20

SW1(config-if)#ex

SW1(config)#do show vlan-sw b

VLAN Name                             Status    Ports

---- -------------------------------- --------- -------------------------------

1    default                          active    Fa1/2, Fa1/3, Fa1/4, Fa1/5

                                                Fa1/6, Fa1/7, Fa1/8, Fa1/9

                                                Fa1/10, Fa1/11, Fa1/12, Fa1/13

                                                Fa1/14, Fa1/15

10   VLAN0010                         active    Fa1/0

20   VLAN0020                         active    Fa1/1

1002 fddi-default                     act/unsup

1003 token-ring-default               act/unsup

1004 fddinet-default                  act/unsup

1005 trnet-default                    act/unsup
- SW2
SW2#conf t

SW2(config)#no ip routing

SW2(config)#vlan 10,20

SW2(config-vlan)#ex

SW2(config)#int f1/0

SW2(config-if)#sw m a

SW2(config-if)#sw a v 10

SW2(config-if)#ex

SW2(config)#int f1/1

SW2(config-if)#sw m a

SW2(config-if)#sw a v 20

SW2(config-if)#ex

SW2(config)#do show vlan-sw b

VLAN Name                             Status    Ports

---- -------------------------------- --------- -------------------------------

1    default                          active    Fa1/2, Fa1/3, Fa1/4, Fa1/5

                                                Fa1/6, Fa1/7, Fa1/8, Fa1/9

                                                Fa1/10, Fa1/11, Fa1/12, Fa1/13

                                                Fa1/14, Fa1/15

10   VLAN0010                         active    Fa1/0

20   VLAN0020                         active    Fa1/1

1002 fddi-default                     act/unsup

1003 token-ring-default               act/unsup

1004 fddinet-default                  act/unsup

1005 trnet-default                    act/unsup
配置 Trunk
- SW1
SW1(config)#interface fastEthernet 1/2

SW1(config-if)#switchport mode trunk

SW1(config-if)#switchport trunk encapsulation dot1q

SW1(config-if)#end
- 查询验证
SW1#show interfaces fastEthernet 1/2 switchport

Name: Fa1/2

Switchport: Enabled

Administrative Mode: trunk

Operational Mode: trunk

Administrative Trunking Encapsulation: dot1q

Operational Trunking Encapsulation: dot1q

Negotiation of Trunking: Disabled

Access Mode VLAN: 0 ((Inactive))

Trunking Native Mode VLAN: 1 (default)

Trunking VLANs Enabled: ALL

Trunking VLANs Active: 1,10,20

Protected: false

Priority for untagged frames: 0

Override vlan tag priority: FALSE

Voice VLAN: none

Appliance trust: none
- SW2
SW2(config)#int f1/2

SW2(config-if)#sw m t

SW2(config-if)#sw t e d

SW2(config-if)#do show int f1/2 switchport

Name: Fa1/2

Switchport: Enabled

Administrative Mode: trunk

Operational Mode: trunk

Administrative Trunking Encapsulation: dot1q

Operational Trunking Encapsulation: dot1q

Negotiation of Trunking: Disabled

Access Mode VLAN: 0 ((Inactive))

Trunking Native Mode VLAN: 1 (default)

Trunking VLANs Enabled: ALL

Trunking VLANs Active: 1,10,20

Protected: false

Priority for untagged frames: 0

Override vlan tag priority: FALSE

Voice VLAN: none

Appliance trust: none
PING 测试
- PC1
PC1> ip 192.168.10.10

Checking for duplicate address...

PC1 : 192.168.10.10 255.255.255.0

PC1> ping 192.168.10.20

host (192.168.10.20) not reachable

PC1> ping 192.168.10.30

84 bytes from 192.168.10.30 icmp_seq=1 ttl=64 time=1.876 ms

84 bytes from 192.168.10.30 icmp_seq=2 ttl=64 time=1.853 ms

84 bytes from 192.168.10.30 icmp_seq=3 ttl=64 time=1.992 ms

84 bytes from 192.168.10.30 icmp_seq=4 ttl=64 time=0.000 ms

84 bytes from 192.168.10.30 icmp_seq=5 ttl=64 time=1.853 ms

PC1> ping 192.168.10.40

host (192.168.10.40) not reachable
PC1 PING PC3 抓包
- 在
SW1的F1/0接口开启抓包
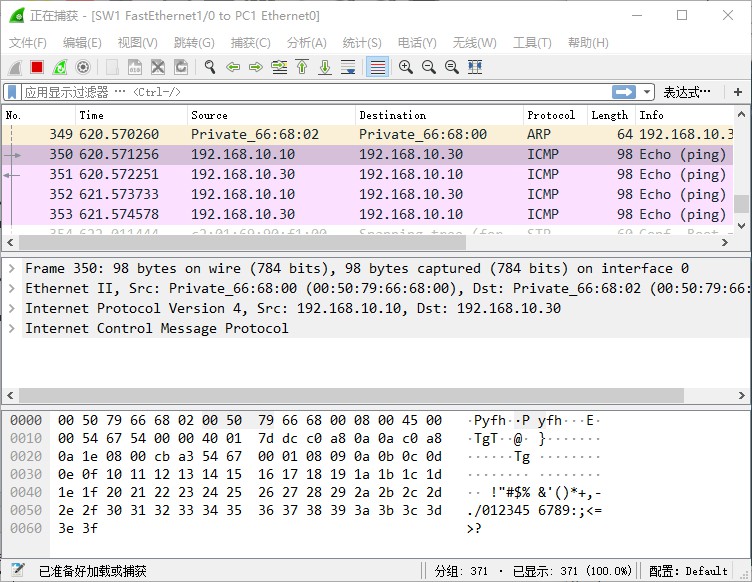
- 在
SW1的F1/2接口开启抓包
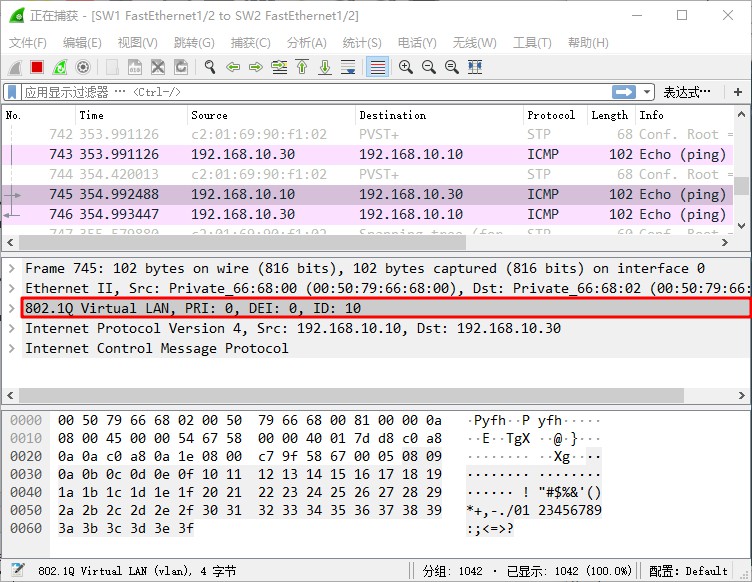
数据包在出交换机时被打上
vlan 10的标签。
- PC2
PC2> ip 192.168.10.20

Checking for duplicate address...

PC1 : 192.168.10.20 255.255.255.0

PC2> ping 192.168.10.10

host (192.168.10.10) not reachable

PC2> ping 192.168.10.30

host (192.168.10.30) not reachable

PC2> ping 192.168.10.40

84 bytes from 192.168.10.40 icmp_seq=1 ttl=64 time=1.992 ms

84 bytes from 192.168.10.40 icmp_seq=2 ttl=64 time=1.999 ms

84 bytes from 192.168.10.40 icmp_seq=3 ttl=64 time=1.870 ms

84 bytes from 192.168.10.40 icmp_seq=4 ttl=64 time=1.842 ms

84 bytes from 192.168.10.40 icmp_seq=5 ttl=64 time=1.846 ms
PC2 PING PC4 抓包
- 在
SW1的F1/1接口开启抓包
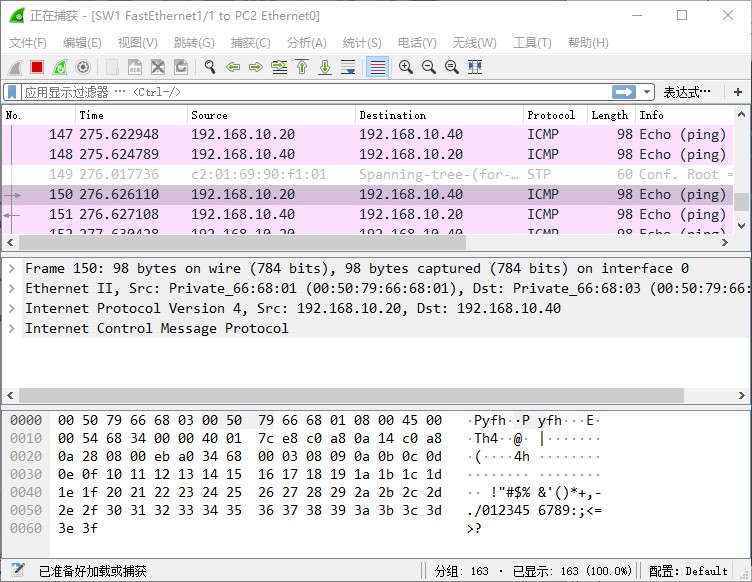
- 在
SW1的F1/2接口开启抓包

数据包在出交换机时被打上
vlan 20的标签。
- PC3
PC3> ip 192.168.10.30

Checking for duplicate address...

PC1 : 192.168.10.30 255.255.255.0

PC3> ping 192.168.10.10

84 bytes from 192.168.10.10 icmp_seq=1 ttl=64 time=1.878 ms

84 bytes from 192.168.10.10 icmp_seq=2 ttl=64 time=1.849 ms

84 bytes from 192.168.10.10 icmp_seq=3 ttl=64 time=1.840 ms

84 bytes from 192.168.10.10 icmp_seq=4 ttl=64 time=1.842 ms

84 bytes from 192.168.10.10 icmp_seq=5 ttl=64 time=1.845 ms

PC3> ping 192.168.10.20

host (192.168.10.20) not reachable

PC3> ping 192.168.10.40

host (192.168.10.40) not reachable
- PC4
PC4> ip 192.168.10.40

Checking for duplicate address...

PC1 : 192.168.10.40 255.255.255.0

PC4> ping 192.168.10.10

host (192.168.10.10) not reachable

PC4> ping 192.168.10.20

84 bytes from 192.168.10.20 icmp_seq=1 ttl=64 time=1.962 ms

84 bytes from 192.168.10.20 icmp_seq=2 ttl=64 time=1.994 ms

84 bytes from 192.168.10.20 icmp_seq=3 ttl=64 time=1.981 ms

84 bytes from 192.168.10.20 icmp_seq=4 ttl=64 time=1.991 ms

84 bytes from 192.168.10.20 icmp_seq=5 ttl=64 time=1.965 ms

PC4> ping 192.168.10.30

host (192.168.10.30) not reachable
以太网通道
创建以太网通道可以增加链路的带宽,以及可靠性。
拓扑图
在当前实验的基础上,在交换机之间增加一条链路。
配置过程
接口配成 Trunk
- SW1
SW1#conf t

SW1(config)#int f1/3

SW1(config-if)#sw m t

SW1(config-if)#sw t e d

SW1(config-if)#no sh
- SW2
SW2#conf t

SW2(config)#int f1/3

SW2(config-if)#sw m t

SW2(config-if)#sw t e d

SW2(config-if)#no sh
接口绑定到一起
- SW1
SW1(config-if)#exit

SW1(config)#int range fastEthernet 1/2 - 3

SW1(config-if-range)#channel-group 1 mode on

Creating a port-channel interface Port-channel1

SW1(config-if-range)#

*Mar  1 00:56:50.555: %EC-5-BUNDLE: Interface Fa1/2 joined port-channel Po1

SW1(config-if-range)#

*Mar  1 00:56:53.487: %LINEPROTO-5-UPDOWN: Line protocol on Interface Port-channel1, changed state to up
- SW2
SW2(config-if)#ex

SW2(config)#int r f1/2 - 3

SW2(config-if-range)#ch 1 m o

Creating a port-channel interface Port-channel1

SW2(config-if-range)#

*Mar  1 01:00:16.955: %EC-5-BUNDLE: Interface Fa1/2 joined port-channel Po1

SW2(config-if-range)#

*Mar  1 01:00:19.875: %LINEPROTO-5-UPDOWN: Line protocol on Interface Port-channel1, changed state to up
故障模拟
验证以太网通道的可靠性,断开两个交换机的
f1/2接口,查看连通性。事先使用PC1对PC3进行长PING。
- 断开接口
SW1(config-if-range)#ex

SW1(config)#int f1/2

SW1(config-if)#sh

SW1(config-if)#

*Mar  1 01:05:35.947: %EC-5-UNBUNDLE: Interface Fa1/2 left the port-channel Po1

*Mar  1 01:05:35.995: %EC-5-BUNDLE: Interface Fa1/3 joined port-channel Po1

*Mar  1 01:05:36.451: %DTP-5-NONTRUNKPORTON: Port Fa1/2 has become non-trunk

*Mar  1 01:05:36.491: %DTP-5-TRUNKPORTON: Port Fa1/3 has become dot1q trunk

SW1(config-if)#

*Mar  1 01:05:37.887: %LINK-5-CHANGED: Interface FastEthernet1/2, changed state to administratively down

SW1(config-if)#

*Mar  1 01:05:37.947: %LINK-3-UPDOWN: Interface Port-channel1, changed state to up

SW1(config-if)#

*Mar  1 01:05:38.887: %LINEPROTO-5-UPDOWN: Line protocol on Interface FastEthernet1/2, changed state to down

*Mar  1 01:05:38.991: %LINEPROTO-5-UPDOWN: Line protocol on Interface FastEthernet1/3, changed state to up
SW2(config-if-range)#ex

SW2(config)#int f1/2

SW2(config-if)#sh

SW2(config-if)#

*Mar  1 01:06:57.415: %EC-5-UNBUNDLE: Interface Fa1/2 left the port-channel Po1

*Mar  1 01:06:57.447: %EC-5-BUNDLE: Interface Fa1/3 joined port-channel Po1

*Mar  1 01:06:57.915: %DTP-5-NONTRUNKPORTON: Port Fa1/2 has become non-trunk

*Mar  1 01:06:57.947: %DTP-5-TRUNKPORTON: Port Fa1/3 has become dot1q trunk

SW2(config-if)#

*Mar  1 01:06:59.375: %LINK-5-CHANGED: Interface FastEthernet1/2, changed state to administratively down

SW2(config-if)#

*Mar  1 01:06:59.411: %LINK-3-UPDOWN: Interface Port-channel1, changed state to up

SW2(config-if)#

*Mar  1 01:07:00.375: %LINEPROTO-5-UPDOWN: Line protocol on Interface FastEthernet1/2, changed state to down

*Mar  1 01:07:00.443: %LINEPROTO-5-UPDOWN: Line protocol on Interface FastEthernet1/3, changed state to up
- PING 测试
PC1> ping 192.168.10.30 -t

84 bytes from 192.168.10.30 icmp_seq=1 ttl=64 time=1.975 ms

84 bytes from 192.168.10.30 icmp_seq=2 ttl=64 time=1.866 ms

84 bytes from 192.168.10.30 icmp_seq=3 ttl=64 time=1.849 ms

84 bytes from 192.168.10.30 icmp_seq=4 ttl=64 time=0.978 ms

84 bytes from 192.168.10.30 icmp_seq=5 ttl=64 time=1.851 ms

84 bytes from 192.168.10.30 icmp_seq=6 ttl=64 time=1.842 ms

84 bytes from 192.168.10.30 icmp_seq=7 ttl=64 time=1.896 ms

84 bytes from 192.168.10.30 icmp_seq=8 ttl=64 time=1.879 ms

84 bytes from 192.168.10.30 icmp_seq=9 ttl=64 time=1.877 ms

84 bytes from 192.168.10.30 icmp_seq=10 ttl=64 time=1.853 ms

84 bytes from 192.168.10.30 icmp_seq=11 ttl=64 time=1.988 ms

84 bytes from 192.168.10.30 icmp_seq=12 ttl=64 time=1.846 ms

84 bytes from 192.168.10.30 icmp_seq=13 ttl=64 time=1.839 ms

84 bytes from 192.168.10.30 icmp_seq=14 ttl=64 time=1.996 ms

84 bytes from 192.168.10.30 icmp_seq=15 ttl=64 time=1.847 ms

84 bytes from 192.168.10.30 icmp_seq=16 ttl=64 time=1.862 ms

84 bytes from 192.168.10.30 icmp_seq=17 ttl=64 time=1.847 ms

84 bytes from 192.168.10.30 icmp_seq=18 ttl=64 time=1.886 ms

84 bytes from 192.168.10.30 icmp_seq=19 ttl=64 time=1.849 ms

84 bytes from 192.168.10.30 icmp_seq=20 ttl=64 time=1.844 ms

84 bytes from 192.168.10.30 icmp_seq=21 ttl=64 time=1.886 ms

84 bytes from 192.168.10.30 icmp_seq=22 ttl=64 time=1.844 ms

84 bytes from 192.168.10.30 icmp_seq=23 ttl=64 time=1.889 ms

84 bytes from 192.168.10.30 icmp_seq=24 ttl=64 time=1.858 ms

84 bytes from 192.168.10.30 icmp_seq=25 ttl=64 time=1.965 ms

84 bytes from 192.168.10.30 icmp_seq=26 ttl=64 time=1.842 ms

84 bytes from 192.168.10.30 icmp_seq=27 ttl=64 time=1.848 ms

84 bytes from 192.168.10.30 icmp_seq=28 ttl=64 time=1.997 ms

84 bytes from 192.168.10.30 icmp_seq=29 ttl=64 time=1.843 ms

84 bytes from 192.168.10.30 icmp_seq=30 ttl=64 time=1.972 ms

84 bytes from 192.168.10.30 icmp_seq=31 ttl=64 time=1.847 ms

84 bytes from 192.168.10.30 icmp_seq=32 ttl=64 time=1.844 ms

84 bytes from 192.168.10.30 icmp_seq=33 ttl=64 time=0.968 ms

192.168.10.30 icmp_seq=34 timeout

192.168.10.30 icmp_seq=35 timeout

192.168.10.30 icmp_seq=36 timeout

192.168.10.30 icmp_seq=37 timeout

192.168.10.30 icmp_seq=38 timeout

192.168.10.30 icmp_seq=39 timeout

192.168.10.30 icmp_seq=40 timeout

192.168.10.30 icmp_seq=41 timeout

192.168.10.30 icmp_seq=42 timeout

192.168.10.30 icmp_seq=43 timeout

192.168.10.30 icmp_seq=44 timeout

192.168.10.30 icmp_seq=45 timeout

192.168.10.30 icmp_seq=46 timeout

192.168.10.30 icmp_seq=47 timeout

192.168.10.30 icmp_seq=48 timeout

192.168.10.30 icmp_seq=49 timeout

192.168.10.30 icmp_seq=50 timeout

192.168.10.30 icmp_seq=51 timeout

192.168.10.30 icmp_seq=52 timeout

192.168.10.30 icmp_seq=53 timeout

192.168.10.30 icmp_seq=54 timeout

192.168.10.30 icmp_seq=55 timeout

192.168.10.30 icmp_seq=56 timeout

192.168.10.30 icmp_seq=57 timeout

192.168.10.30 icmp_seq=58 timeout

192.168.10.30 icmp_seq=59 timeout

192.168.10.30 icmp_seq=60 timeout

192.168.10.30 icmp_seq=61 timeout

192.168.10.30 icmp_seq=62 timeout

192.168.10.30 icmp_seq=63 timeout

192.168.10.30 icmp_seq=64 timeout

192.168.10.30 icmp_seq=65 timeout

192.168.10.30 icmp_seq=66 timeout

192.168.10.30 icmp_seq=67 timeout

192.168.10.30 icmp_seq=68 timeout

192.168.10.30 icmp_seq=69 timeout

192.168.10.30 icmp_seq=70 timeout

192.168.10.30 icmp_seq=71 timeout

192.168.10.30 icmp_seq=72 timeout

192.168.10.30 icmp_seq=73 timeout

192.168.10.30 icmp_seq=74 timeout

192.168.10.30 icmp_seq=75 timeout

192.168.10.30 icmp_seq=76 timeout

192.168.10.30 icmp_seq=77 timeout

192.168.10.30 icmp_seq=78 timeout

192.168.10.30 icmp_seq=79 timeout

192.168.10.30 icmp_seq=80 timeout

192.168.10.30 icmp_seq=81 timeout

192.168.10.30 icmp_seq=82 timeout

192.168.10.30 icmp_seq=83 timeout

192.168.10.30 icmp_seq=84 timeout

192.168.10.30 icmp_seq=85 timeout

192.168.10.30 icmp_seq=86 timeout

192.168.10.30 icmp_seq=87 timeout

192.168.10.30 icmp_seq=88 timeout

192.168.10.30 icmp_seq=89 timeout

84 bytes from 192.168.10.30 icmp_seq=90 ttl=64 time=1.846 ms

84 bytes from 192.168.10.30 icmp_seq=91 ttl=64 time=1.982 ms

84 bytes from 192.168.10.30 icmp_seq=92 ttl=64 time=1.840 ms

84 bytes from 192.168.10.30 icmp_seq=93 ttl=64 time=1.849 ms

84 bytes from 192.168.10.30 icmp_seq=94 ttl=64 time=1.841 ms

84 bytes from 192.168.10.30 icmp_seq=95 ttl=64 time=1.846 ms

84 bytes from 192.168.10.30 icmp_seq=96 ttl=64 time=1.841 ms

84 bytes from 192.168.10.30 icmp_seq=97 ttl=64 time=1.861 ms

84 bytes from 192.168.10.30 icmp_seq=98 ttl=64 time=0.844 ms

84 bytes from 192.168.10.30 icmp_seq=99 ttl=64 time=0.833 ms
最后
这是关于使用Trunk实现跨交换机VLAN通信的实验,和以太网通道怎么创建方法。下一篇关于三层交换的实验。
Trunk 实现跨交换机 VLAN 通信的更多相关文章
- 跨交换机VLAN之间的通信(基于Cisco模拟器)
实验要求: 拓扑结构如下 1.交换机2台:主机4台:网线若干. 2.把主机.交换机进行互联. 3.给2台交换机重命名为A.B. 4.设置2台交换机及主机的ip.注意IP要不冲突 5.在2台交换机上分别 ...
- 设置跨交换机VLAN
4台计算机,pc1 pc2 连接到交换机1的f1/1和f1/2.Pc3 pc4 连接到交换机2的f1/1和f1/2.pc1设置ip地址192.168.1.10,pc2 pc3 pc4设置ip地址192 ...
- 跨Vlan通信:单臂路由,三层交换机
实验涉及命令以及知识补充(涉及Vlan通过的以太网口需要设置为Trunk口) 单臂路由 父接口 no ip address :删除实现单臂路由接口的IP no shutdown 虚拟子接口 R2(co ...
- 交换机基础配置之跨交换机划分vlan
我们以上面的拓扑图来进行实验 四台pc机都在同一网段 pc1和pc2在同一台交换机上 pc3和pc4在同一台交换机上 现在我们实验的目的就是将pc1和pc3划分到同一vlan pc2和pc4划分到同一 ...
- 跨交换机相同vlan内的通信(trunk模式)
当一个公司的小型局域网内部,处于不同楼层的主机处在同一个虚拟局域网内,连接到不同的交换机上,这时候就需要相同虚拟局域网内部的主机进行跨交换机进行通信. 通过设置交换机之间相连接的端口开启trunk模式 ...
- 交换机配置——跨交换机划分VLAN配置
一.实验要求:实现跨交换地划分vlan的配置任务,使同一vlan下的主机能相互通讯 二.拓扑图如下; 三.具体实验步骤: S1交换机配置: S1>enable --进入特权模式S1#confi ...
- Cisco基础(二):三层交换vlan间通信、多交换机vlan间通信、三层交换配置路由、RIP动态路由配置、三层交换配置RIP动态路由
一.三层交换vlan间通信 目标: VLAN实现了广播域的隔离,同时也将VLAN间的通信隔离了.三层交换技术使得VLAN间可以通信. 通过三层交换实现VLAN间通信 方案: 为了解决了传统路由器低速. ...
- 交换机VLAN、 TRUNK 、VTP 配置
交换机VLAN. TRUNK .VTP 配置 1. 配置 CISCO 二层交换机的IP 地址(catalyst 2950 为例) SW1(config)#int vlan 1 //进入管理接口inte ...
- 对交换机VLAN及各种端口类型的理解
每学习一种技术时,我们往往需要去了解why,即这个技术是为解决什么问题而出现的. VLAN全称为Virtual Local Area Network,即虚拟局域网,是逻辑上的一种划分.一般来说,如果交 ...
随机推荐
- Linux shell字符串操作
#!/bin/bash #镜像名 image="asr-server" #镜像版本 ver="5.2.1" #容器名 dname="asr" ...
- idea 出现 bootstrap.properties 中的内容不能识别
错误截图如下 依赖库引用问题 第一种: <dependency> <groupId>org.springframework.cloud</groupId> < ...
- git解决error: The following untracked working tree files would be overwritten by checkout
在IDEA中进行分支切换时,出现如此错误,导致无法正常切换:error: The following untracked working tree files would be overwritten ...
- 基于传统方法点云分割以及PCL中分割模块
之前在微信公众号中更新了以下几个章节 1,如何学习PCL以及一些基础的知识 2,PCL中IO口以及common模块的介绍 3,PCL中常用的两种数据结构KDtree以及Octree树的介绍 ...
- microsoft vs code 绿化
下载地址: https://code.visualstudio.com/#alt-downloads 各个版本比较 User Installer System Installer .zip resou ...
- LeetCode_453. Minimum Moves to Equal Array Elements
453. Minimum Moves to Equal Array Elements Easy Given a non-empty integer array of size n, find the ...
- qsort与sort
快排是我们平常敲代码和比赛的时候 经常使用到的方法 qsort是函数库中自带的函数 这是一个标准的快排函数 而sort比qsort更是好用 sort对于不同大小的数组 会使用不 ...
- python入门之格式化输出
目录 扩展: 保留几位小数 一.占位符格式化输出 1.1 %s 1.2 %d 二..format()方式 三.f-string 扩展: 保留几位小数 保留两位小数 a = 12345.2487 pri ...
- php 按照字典序排序 微信卡券签名算法用到
代码 <?php $data=array("api_ticket"=>"IpK_1T69hDhZkLQTlwsAXzJqxGE_7RuU_tjnx8rWC9f ...
- C++ Clock函数调用及用途
用途1 Clock函数可以有效地针对一些只能用随机化做的题目 为了提高该类代码的正确性,我们期望它运行的次数在要求时限内运行足够多 因此将Clock函数充当计时器 用途2 计时判断负环 原理: 给定一 ...