Linux下安装ActiveMQ CPP
ActiveMQ CPP
ActiveMQ CPP是用C++语言访问ActiveMQ的客户端开发库,也称cms(cpp message service),安装cms开发库需要先安装一些基础库。
如下:
(1)autoconf,automake,libtool
curl -OL http://ftpmirror.gnu.org/autoconf/autoconf-2.69.tar.gz

tar -xzf autoconf-2.69.tar.gz

cd autoconf-2.69

./configure --prefix=/usr/local/autoconf/&& make && sudo make install

curl -OL http://ftpmirror.gnu.org/automake/automake-1.14.tar.gz

tar -xzf automake-1.14.tar.gz

cd automake-1.14

./configure --prefix=/usr/local/automake/&& make && sudo make install

curl -OL http://ftpmirror.gnu.org/libtool/libtool-2.4.2.tar.gz

tar -xzf libtool-2.4.2.tar.gz

cd libtool-2.4.2

./configure --prefix=/usr/local/libtool/&& make && sudo make install
(2)cppunit
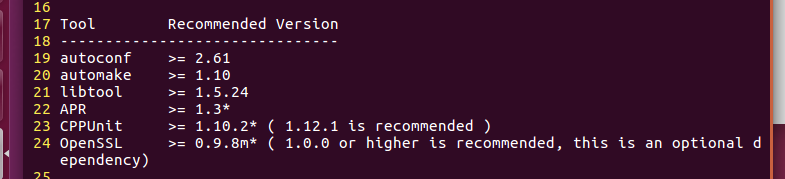
打开http://activemq.apache.org/cms/building.html页面,这里介绍了cms build时用到的依赖库。
执行下面命令完成cppunit下载:
curl -OL https://sourceforge.net/projects/cppunit/files/cppunit/1.12.1/
这里选择1.12.1版本,获取到下载地址后,在linux下可以用wget命令直接下载,或者下载完成后传到linux系统中。
tar解压后,进入目录,编译三部曲,configure、make、make install(install需要root权限):
./configure --prefix=/usr/local/cppunit/

make

make install
执行完后在/usr/local/cppunit/目录下可以看到头文件和库文件。
注:我是Ubuntu下安装的,按上述步骤安装到make的时候遇到了两个问题,解决方法如下:
1.当进行make的时候, 则出现了如下的错误:

从上面的提示可以看出, 问题是出在DllPlugInTester编译的过程中, 出现这个问题的可能原因是g++的版本为4.8.1.
解决办法
cd到DllPlugInTester目录下,

在LDFLAGS=后面加上, LDFLAGS=-Wl,--no-as-need, 然后再次make, 如果在其他的目录又出现类似的问题, 用同样的方法进行处理即可.

2.make又出现了以下错误:
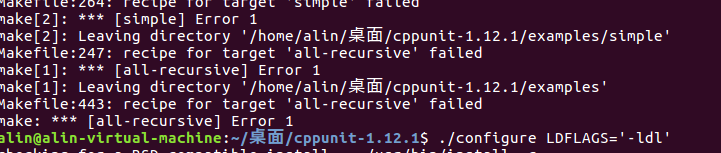
解决方法:./configure LDFLAGS='-ldl'
make
(3)apr
apr的全称为Apache Portable Runtime(Apache可移植运行时),Apache旗下有很多开源软件。
apr介绍页面:
http://apr.apache.org/download.cgi
执行下面命令完成apr下载:
curl -OL http://mirrors.hust.edu.cn/apache//apr/apr-1.5.2.tar.gz
同上,解压进入目录,三部曲:
./configure --prefix=/usr/local/apr/

make

make install
(4)apr-util
执行下面命令完成APR-util的下载:
curl -OL http://mirrors.hust.edu.cn/apache//apr/apr-util-1.5.4.tar.gz
解压编译:
./configure --prefix=/usr/local/aprutil --with-apr=/usr/local/apr/

make

make install
(5)apr-iconv
执行下面的命令完成APR iconv 的下载:
curl -OL http://mirrors.hust.edu.cn/apache//apr/apr-iconv-1.2.1.tar.gz
解压编译:
./configure --prefix=/usr/local/apr-iconv/ --with-apr=/usr/local/apr/

make

make install
(6)openssl
执行下面的命令完成openssl 的下载:
curl -OL http://www.openssl.org/source/openssl-1.0.0a.tar.gz
解压编译: ./config --prefix=/usr/local/openssl/
make
make install
若出现报错
cms.pod around line 457: Expected text after =item, not a number
在root权限下,执行rm -f /usr/bin/pod2man 然后重新make install
(7)ActiveMQ-CPP
这里选择最新的ActiveMQ-CPP 3.9.4版本,下载页面为:
http://activemq.apache.org/cms/2017/02/24/activemq-cpp-v394-released.html
解压编译:
./configure --prefix=/usr/local/ActiveMQ-CPP --with-apr=/usr/local/apr/ --with-apr-util=/usr/local/aprutil --with-cppunit=/usr/local/cppunit --with-openssl=/usr/local/openssl

make

make install
测试程序
至此编译工作完成,在/usr/local目录下生成了6个目录,分别为ActiveMQ-CPP、apr、apr-iconv、aprutil、cppunit、openssl。
下面编写一段测试代码(test.cpp),用于检测cms开发库是否可用。
#include <activemq/library/ActiveMQCPP.h>

#include <decaf/lang/Thread.h>

#include <decaf/lang/Runnable.h>

#include <decaf/util/concurrent/CountDownLatch.h>

#include <decaf/lang/Integer.h>

#include <decaf/lang/Long.h>

#include <decaf/lang/System.h>

#include <activemq/core/ActiveMQConnectionFactory.h>

#include <activemq/util/Config.h>

#include <cms/Connection.h>

#include <cms/Session.h>

#include <cms/TextMessage.h>

#include <cms/BytesMessage.h>

#include <cms/MapMessage.h>

#include <cms/ExceptionListener.h>

#include <cms/MessageListener.h>

#include <stdlib.h>

#include <stdio.h>

#include <iostream>

#include <memory>

using namespace activemq::core;

using namespace decaf::util::concurrent;

using namespace decaf::util;

using namespace decaf::lang;

using namespace cms;

using namespace std;

int main()

{

        activemq::library::ActiveMQCPP::initializeLibrary();

        Connection* conn;

        Session* sess;

        Destination* dest;

        MessageProducer* producer;

        std::string brokerurl("failover:(tcp://192.168.1.113:61616)");

        try

        {

                auto_ptr<ConnectionFactory> connFactory(ConnectionFactory::createCMSConnectionFactory(brokerurl));

                conn = connFactory->createConnection();

                conn->start();

                sess = conn->createSession(Session::AUTO_ACKNOWLEDGE);

                dest = sess->createQueue("QueueFromLinuxTest");

                producer = sess->createProducer(dest);

                producer->setDeliveryMode(DeliveryMode::NON_PERSISTENT);

                string text("Hello ActiveMQ from LinuxTest");

                for (int i = 0; i < 3; ++i)

                {

                        TextMessage* msg = sess->createTextMessage(text);

                        msg->setIntProperty("IntProp1", i);

                        producer->send(msg);

                        cout << "SEND-> " << text << endl;

                        delete msg;

                }

        }

        catch (CMSException& e)

        {

                e.printStackTrace();

        }

        try {

                delete dest;

                dest = NULL;

                delete producer;

                producer = NULL;

                if (NULL != sess)

                        sess->close();

                if (NULL != conn)

                        conn->close();

                delete sess;

                sess = NULL;

                delete conn;

                conn = NULL;

        }

        catch (CMSException& e)

        {

                e.printStackTrace();

        }

        cout << "test end" << endl;

        activemq::library::ActiveMQCPP::shutdownLibrary();

}
编译命令: g++ test.cpp -I/usr/local/ActiveMQ-CPP/include/activemq-cpp-3.9.4 -I/usr/local/apr/include/apr-1 -L/usr/local/ActiveMQ-CPP/lib -lactivemq-cpp
其中-I指定了两个include目录,-L指定了一个库目录,-l指定了一个链接库。
运行时,需要将libactivemq-cpp.so、libactivemq-cpp.so.19、libactivemq-cpp.so.19.0.3这3个运行时库复制到/usr/lib64目录下。
参考:http://blog.csdn.net/lgh1700/article/details/51055784
Linux下安装ActiveMQ CPP的更多相关文章
- Linux下安装 activemq 并指定jdk 1.8
1. 下载安装包 <apache-activemq-5.15.4-bin.tar.gz> 下载地址:https://pan.baidu.com/s/18xzjBAchjWqsHNA1HuY ...
- linux下安装或升级GCC4.8.2,以支持C++11标准[转]
在编译kenlm的时候需要安装gcc, 然后还需要安装g++. g++安装命令:sudo apt-get install g++ ----------------------以下为网上转载内容,加上自 ...
- Linux下安装 Posgresql 并设置基本参数
在Linux下安装Postgresql有二进制格式安装和源码安装两种安装方式,这里用的是二进制格式安装.各个版本的Linux都内置了Postgresql,所以可直接通过命令行安装便可.本文用的是Cen ...
- Linux下安装Tomcat服务器和部署Web应用
一.上传Tomcat服务器
- Linux下安装使用Solr
Linux下安装使用Solr 1.首先下载Solr.mmseg4j分词包.tomcat并解压,这用google.百度都可以搜索得到下载地址. 2.因为要使用到中文分词,所以要设置编码,进入tomcat ...
- Linux下安装tar.gz类型的jdk,并配置环境变量
近期因要学习一门技术,必须在Linux下运行,故开始学习如何使用Linux. 在安装jdk时出现了困难,环境变量配置不成功,花了一天时间才搞定,特分享出来,供大家参考. Linux下安装jdk,步骤如 ...
- Linux下安装和配置JDK与Tomcat(升级版)
在这个版本 Linux下安装和配置JDK与Tomcat(入门版) 的基础上优化升级 1.下载相关软件 apache-tomcat-6.0.37.tar.gz jdk-6u25-linux-i586-r ...
- Linux下安装cmake
cmake是一个跨平台的编译工具,特点是语句简单,编译高效,相对于原有的automake更为高效,接下来说明在Linux下安装cmake工具的过程 首先去cmake官网下载cmake安装包,下载界面网 ...
- linux下安装安装pcre-8.32
linux下安装安装pcre-8.32 ./configure --prefix=/usr/local/pcre 出现以下错误 configure: error: You need a C++ com ...
随机推荐
- 合并Spark社区代码的正确姿势
原创文章,转载请保留出处 最近刚刚忙完Spark 2.2.0的性能测试及Bug修复,社区又要发布2.1.2了,国庆期间刚好有空,过了一遍2.1.2的相关JIRA,发现有不少重要修复2.2.0也能用上, ...
- 动态IP解析
本文介绍两种方便获取主机动态IP的方式(DDNS,IP报告网页),并给出相应的代码实现. shell脚本获取本机IP,执行上传操作和更新DNS操作.定期执行通过crontab或者systemd等服务. ...
- SELECT与SET对变量赋值
SQL Server 中对已经定义的变量赋值的方式用两种,分别是 SET 和 SELECT. 对于这两种方式的区别,SQL Server 联机丛书中已经有详细的说明,但很多时候我们并没有注意,其实这两 ...
- spring容器启动原理分析1
在项目的web.xml中配置 <listener> <listener-class>org.springframework.web.context.ContextLoaderL ...
- 解决由于VNC日志导致服务器磁盘100%
今天通过SSH连接服务器看到磁盘直接100%了.于是通过 sudo du -h --max-depth=1 发现某个用户下面占用了100个G.于是切换进去看了一下.发现VNC的log占满了整个磁盘.然 ...
- ST40 自制 JTAG 适配器
// 文章首发于 https://zhuanlan.zhihu.com/p/28762429 // 但是不知道为什么搜索引擎还没有收录,便在博客再次发布. 0. 引言 意法半导体生产的 SH4 架构的 ...
- 工信部:我国4G用户近9.5亿 用户平均使用流量近2G
刚刚沿着广场转了一圈,我竟发现自己离他只有几步之遥,又在那条人行道上,刚才催促我前进的自豪感突然之间被惊慌代替.陌生人看着我,脸上流露出一种遗憾的表情,他向我靠近,轻轻摇着脑袋,像是为某个不受人控制的 ...
- Java 递归调用 recursive 给一个参数 返回一大堆
需求: 需要组装成对象多层嵌套式的 json字符串; 想到使用 递归来完成这个多层嵌套: 憋了四个小时,终于写出来了; 先看效果: 数据库中的数据: 拼装后的效果: [ EmpVO{ ename='孙 ...
- 在Git上如何强推代码规范
引言 最近参加了“前端规范制定topic”小组,小组成员一起制定了html.css.js.es6.vue和react等规范,但规范制定好了怎么进行推广去强制执行呢,已知我们的项目都是用git做管理的, ...
- fio2.1.10--README
fio --- fio is a tool that will spawn a number of threads or processes doing a particular type of io ...