
虚拟机下linux系统安装nginx
近在windows虚机下安装nginx,也遇到部分问题,写篇随笔总结一下
一.安装虚机
windows下安装虚拟机我就不说了,一搜一大把,一直下一步就ok了
二. 打开虚拟安装nginx
1.选择版本,下载nginx。下载地址:http://nginx.org/download/
[root@localhost /]# wget http://nginx.org/download/nginx-1.7.0.tar.gz
2.安装pcre openssl gcc库及源码包
[root@nginx /]# yum -y install pcre pcre-devel openssl openssl-devel gcc gcc-c++
3.解压
[root@nginx /]# ll nginx-1.6.3.tar.gz

[root@nginx /]# tar zxvf nginx-1.6.3.tar.gz

[root@nginx /]# cd nginx-1.6.3

[root@nginx nginx-1.7.0]# pwd

/nginx-1.7.0
4.创建nginx用户
[root@nginx nginx-1.7.0]# useradd nginx -s /sbin/nologin -M
5.配置、编译、安装
[root@nginx nginx-1.7.0]# ./configure --user=nginx --group=nginx --prefix=/usr/local/nginx --with-http_stub_status_module --with-http_ssl_module

[root@nginx nginx-1.7.0]# echo $?

0

[root@nginx nginx-1.7.0]# make && make install

[root@nginx nginx-1.7.0]# echo $?

0
[root@nginx nginx-1.7.0]# ln -s /usr/local/nginx/sbin/* /usr/local/sbin
6.启动nginx
[root@nginx nginx-1.7.0]# /usr/local/sbin/nginx -t

nginx: the configuration file /usr/local/nginx/conf/nginx.conf syntax is ok

nginx: configuration file /usr/local/nginx/conf/nginx.conf test is successful

[root@nginx nginx-1.7.0]# /usr/local/sbin/nginx

[root@nginx nginx-1.7.0]# netstat -lntup | grep nginx

tcp        0      0 0.0.0.0:80                  0.0.0.0:*                   LISTEN      3556/nginx

[root@nginx nginx-1.7.0]# lsof -i :80

COMMAND  PID  USER   FD   TYPE DEVICE SIZE/OFF NODE NAME

nginx   3556  root    6u  IPv4  17544      0t0  TCP *:http (LISTEN)

nginx   3557 nginx    6u  IPv4  17544      0t0  TCP *:http (LISTEN)
7.至此nginx启动成功了,我们先在虚拟机中试一下
[root@nginx nginx-1.7.]# curl localhost
<!DOCTYPE html>

<html>

<head>

<title>Welcome to nginx!</title>

<style>

    body {

        width: 35em;

        margin: 0 auto;

        font-family: Tahoma, Verdana, Arial, sans-serif;

    }

</style>

</head>

<body>

<h1>Welcome to nginx!</h1>

<p>If you see this page, the nginx web server is successfully installed and

working. Further configuration is required.</p>

<p>For online documentation and support please refer to

<a href="http://nginx.org/">nginx.org</a>.<br/>

Commercial support is available at

<a href="http://nginx.com/">nginx.com</a>.</p>

<p><em>Thank you for using nginx.</em></p>

</body>

</html>
8.在外部的windows下访问虚拟机中的nginx服务
[root@nginx nginx-1.7.0]# ifconfig
ens33: flags=4163<UP,BROADCAST,RUNNING,MULTICAST> mtu 1500
inet 192.168.78.130 netmask 255.255.255.0 broadcast 192.168.78.255
inet6 fe80::3164:48be:dd5f:fa27 prefixlen 64 scopeid 0x20<link>
ether 00:0c:29:78:48:f2 txqueuelen 1000 (Ethernet)
RX packets 202596 bytes 299827475 (285.9 MiB)
RX errors 0 dropped 0 overruns 0 frame 0
TX packets 107108 bytes 6501152 (6.1 MiB)
TX errors 0 dropped 0 overruns 0 carrier 0 collisions 0
lo: flags=73<UP,LOOPBACK,RUNNING> mtu 65536
inet 127.0.0.1 netmask 255.0.0.0
inet6 ::1 prefixlen 128 scopeid 0x10<host>
loop txqueuelen 1 (Local Loopback)
RX packets 104 bytes 10607 (10.3 KiB)
RX errors 0 dropped 0 overruns 0 frame 0
TX packets 104 bytes 10607 (10.3 KiB)
TX errors 0 dropped 0 overruns 0 carrier 0 collisions 0
virbr0: flags=4099<UP,BROADCAST,MULTICAST> mtu 1500
inet 192.168.122.1 netmask 255.255.255.0 broadcast 192.168.122.255
ether 52:54:00:87:29:e0 txqueuelen 1000 (Ethernet)
RX packets 0 bytes 0 (0.0 B)
RX errors 0 dropped 0 overruns 0 frame 0
TX packets 0 bytes 0 (0.0 B)
TX errors 0 dropped 0 overruns 0 carrier 0 collisions 0
红色字体部分就是虚拟机的ip地址了,然后我在外部浏览器中访问http://192.168.78.130,发现请求不到服务,原来是因为linux下防火墙的问题,默认使用的fireWall
9.禁用firewalld&开启iptables&systemctl使用简介
9.1.安装
[root@localhost ~]# yum install iptables-services
9.2.屏蔽该服务
[root@localhost ~]# systemctl mask firewalld

# systemctl mask firewalld 屏蔽服务(让它不能启动)

# ln -s '/dev/null''/etc/systemd/system/firewalld.service'

# systemctl unmask firewalld 显示服务(如 firewalld.service)

# rm '/etc/systemd/system/firewalld.service'
9.3.启用iptables
[root@localhost ~]# systemctl enable iptables

#如果需要使用 ip6tables , 需另外加一行

[root@localhost ~]# systemctl enable ip6tables
9.4.启动iptables,停止firewalld
#停止firewalld服务,开启 iptables服务

[root@localhost ~]# systemctl stop firewalld

[root@localhost ~]# systemctl start iptables

# 同上,如果需要使用 ip6tables , 需另外加一条

[root@localhost ~]# systemctl start ip6tables
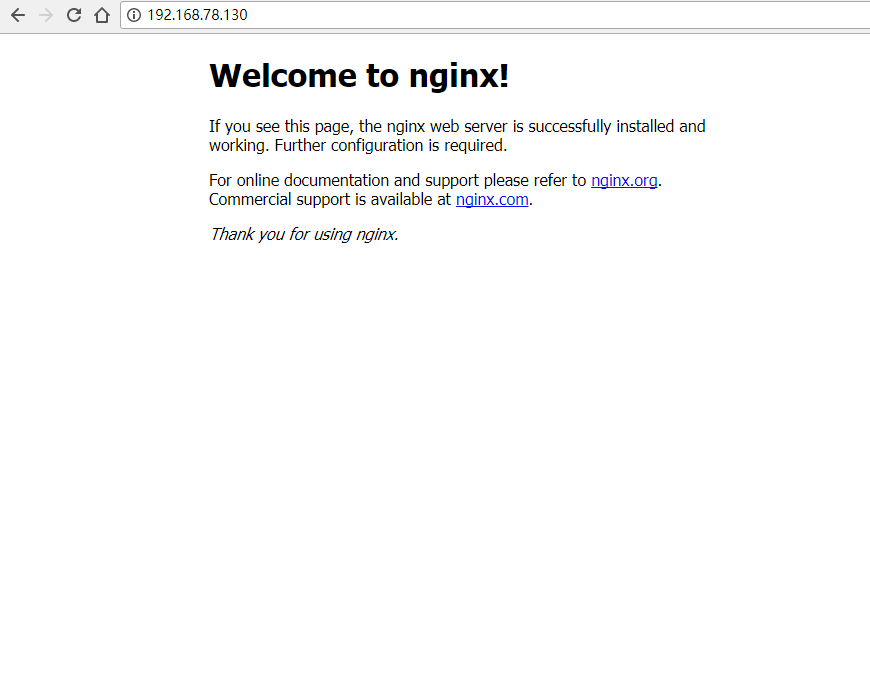
最后在用外部windows浏览器访问:http://192.168.78.130,bingo,可以了
以上就是我安装nginx的整个流程,网上类似的教程很多,我也只是亲身实验,整理了出来。
虚拟机下linux系统安装nginx的更多相关文章
- 虚拟机下Linux系统安装vmtool工具
1.启动此虚拟机2.用超级用户root登录3.登录成功后,Ctrl+Alt ,取出鼠标,点选菜单栏,虚拟机 →安装VMware工具 → Install4.待虚拟系统挂载了光盘后,弹出cdrom文件夹或 ...
- 2-0 虚拟机与Linux系统安装
虚拟机与Linux系统安装 虚拟机硬件选择 由于是初学Linux,所以我们通过在虚拟机里安装的方式学习Linux,如果不知道找虚拟机和Linux的话请看我上一篇博客:计算机基础 如果你已经准备好了虚拟 ...
- 虚拟机下Linux读取USB设备的问题虚拟机下Linux无法读取USB设备的解决方案
我们在虚拟机中识别USB设备有三种情况导致Linux系统不能读取到USB设备: 1. .当虚拟机的USB服务没有开启的时候 2. 若虚拟机的USB连接的设置选项没有设置好 3. Widows抢先一步, ...
- 虚拟机下Linux系统如何设置IP地址
虚拟机下Linux系统设置IP地址三种方法 文章来源:https://jingyan.baidu.com/article/ea24bc399ffeb9da62b3318f.html 工具/原料 V ...
- 虚拟机下linux迁移造成MAC地址异常处理办法
虚拟机下linux迁移造成MAC地址异常处理办法 Linux无法启用网卡:Device eth0 has different MAC address than expected,ignoring解决 ...
- Vmware安装与VMware下Linux系统安装
源文件地址:http://www.cnblogs.com/lclq/p/5619271.html 1.下载安装VMware,我安装的是VMware 12.VMware从11开始不再支持32位系统,32 ...
- 虚拟机下linux安装mysql,apache和php
由于腿伤了,卧床在家折腾下linux,尝试用虚拟机装mysql,apche和php.中间各种波折,装了好几天,觉得有些经验还是要记录下来,让自己别忘了:) 按照下面这篇文章的方法,基本可以顺利安装成功 ...
- VMware虚拟机下Linux系统的全屏显示
在VMware虚拟机下的Linux无法全屏的问题的解决方案如下: 1. 启动虚拟机,并启动Redhat6.4. 2. 点击“view”——然后将Autofit window这个选项勾选.(一般 ...
- 虚拟机、linux系统安装
下载VMWare解压后依据提示正触安装VMWare到硬盘中 (1) 建立虚拟机 A.用鼠标左建双击桌面中的"VMwareworkstation"图标.执行虚拟机 B.建立一台虚拟机 ...
随机推荐
- Spring Cloud 之 Ribbon
新建Spring Boot工程,命名为ribbon 1.pom.xml添加依赖 <?xml version="1.0" encoding="UTF-8"? ...
- spring mvc 复杂参数注入
过了这么久,又重新把博客拾起来了 来上海工作也已经有将近两周的时间了, 今天在整理项目的时候,遇到了一个关于参数注入的问题 背景: 我的开发前台用的是extjs4,在对后台spring mvc提交表单 ...
- Aurora Player 开源啦~~~
上一年做了很久的项目,是一个完整版的视频播放器,强大.美观!!! 现在转投UWP了,决定开源这个项目. 在你下载本项目之前,请仔细阅读每一行字,以免以后引起不必要的法律纠纷. 本项目最终解释权归本人所 ...
- cap deploy:setup报错
今天部署cap的时候,setup出现以下错误: 查询半天未果,不过最后还是在google找到了,可见度娘极为不靠谱! I had the same error on deploy:setup with ...
- 第三节:Creating API Endpoints (创建API路由)
对于这篇文章的标题,其实,直译就是创建api端点.但是,真的很难懂,我还是写为API路由吧.每篇,文章,我都会全部去进行实践操作,力求写一个好点的教程. 本文英文地址-->https://git ...
- Java解决Hanoi问题
package fa.ct; import java.util.Scanner; public class Hanoi { public static void hanoi(int num,char ...
- 机器学习实践之K-近邻算法实践学习
关于本文说明,本人原博客地址位于http://blog.csdn.net/qq_37608890,本文来自笔者于2017年12月04日 22:54:26所撰写内容(http://blog.csdn.n ...
- 分享一波eclipse常用快捷键
Eclipse快捷键 一个Eclipse骨灰级开发者总结了他认为最有用但又不太为人所知的快捷键组合.通过这些组合可以更加容易的浏览源代码,使得整体的开发效率和质量得到提升. 1. ctrl+shift ...
- Android之通过网络播放一首简单的音乐
首先,附上程序执行后的效果.例如以下图所看到的: 一.部署一个web项目到tomcatserver上: 1.这个小程序是结合网络来播放一首音乐的,首先,把我们搞好的一个web项目放置在tomcat安装 ...
- 海量服务实践──手 Q 游戏春节红包项目设计与总结(上篇)
导语 大哥说.今年手Q游戏的春节红包你来做.那该怎么做?以及怎么做才干让大哥放心?本文从后台的角度出发讲述了这个过程和方法.对于关键的前台部分也有所涉及. 文件夹 1.需求背景 1.1.红包类别 1. ...