0_Simple__clock + 0_Simple__clock_nvrtc
▶ 使用 clock() 函数在CUDA核函数内部进行计时,将核函数封装为PTX并在另外的代码中读取和使用。
▶ 源代码:文件内建核函数计时
 #include <stdio.h>

 #include <stdlib.h>

 #include <time.h>

 #include <cuda.h>

 #include <cuda_runtime.h>

 #include "device_launch_parameters.h"

 #include <helper_cuda.h>

 #include <helper_string.h>

 #define NUM_BLOCKS    1

 #define NUM_THREADS   1024

 __global__ static void timedReduction(const float *input, float *output, clock_t *timer)

 {

     extern __shared__ float shared[];

     const int tid = threadIdx.x, bid = blockIdx.x;

     if (tid == )                                           // 0 号线程记录开始时间,调用 time.h 的计时器,一个线程块有一个开始时间和一个结束时间

         timer[bid] = clock();

     shared[tid] = input[tid];

     shared[tid + blockDim.x] = input[tid + blockDim.x];

     for (int d = blockDim.x; d > ; d /= )                 // 二分规约求最小值,每次循环后较小值保存在前半段上

     {

         if (tid < d)

         {

             float f0 = shared[tid], f1 = shared[tid + d];

             if (f1 < f0)

                 shared[tid] = f1;

         }

         __syncthreads();

     }

     if (tid == )                                           // 0 号线程输出结果

         output[bid] = shared[];

     __syncthreads();

     if (tid == )                                           // 0 号线程记录结束时间

         timer[bid + gridDim.x] = clock();

 }

 int main(int argc, char **argv)

 {

     int dev = findCudaDevice(argc, (const char **)argv);    // helper_cuda.h 中设置设备的函数

     clock_t timer[NUM_BLOCKS * ];

     float input[NUM_THREADS * ];

     for (int i = ; i < NUM_THREADS * ; i++)

         input[i] = (float)i;

     float *dinput = NULL, *doutput = NULL;

     clock_t *dtimer = NULL;

     cudaMalloc((void **)&dinput, sizeof(float) * NUM_THREADS * );

     cudaMalloc((void **)&doutput, sizeof(float) * NUM_BLOCKS);

     cudaMalloc((void **)&dtimer, sizeof(clock_t) * NUM_BLOCKS * );

     cudaMemcpy(dinput, input, sizeof(float) * NUM_THREADS * , cudaMemcpyHostToDevice);

     timedReduction << <NUM_BLOCKS, NUM_THREADS, sizeof(float) *  * NUM_THREADS >> >(dinput, doutput, dtimer);

     cudaMemcpy(timer, dtimer, sizeof(clock_t) * NUM_BLOCKS * , cudaMemcpyDeviceToHost);

     cudaFree(dinput);

     cudaFree(doutput);

     cudaFree(dtimer);

     long double sumElapsedClocks = ;                       // 计算平均耗时

     for (int i = ; i < NUM_BLOCKS; i++)

         sumElapsedClocks += (long double)(timer[i + NUM_BLOCKS] - timer[i]);

     printf("Average clocks/block = %f\n", sumElapsedClocks / NUM_BLOCKS);

     getchar();

     return EXIT_SUCCESS;

 }
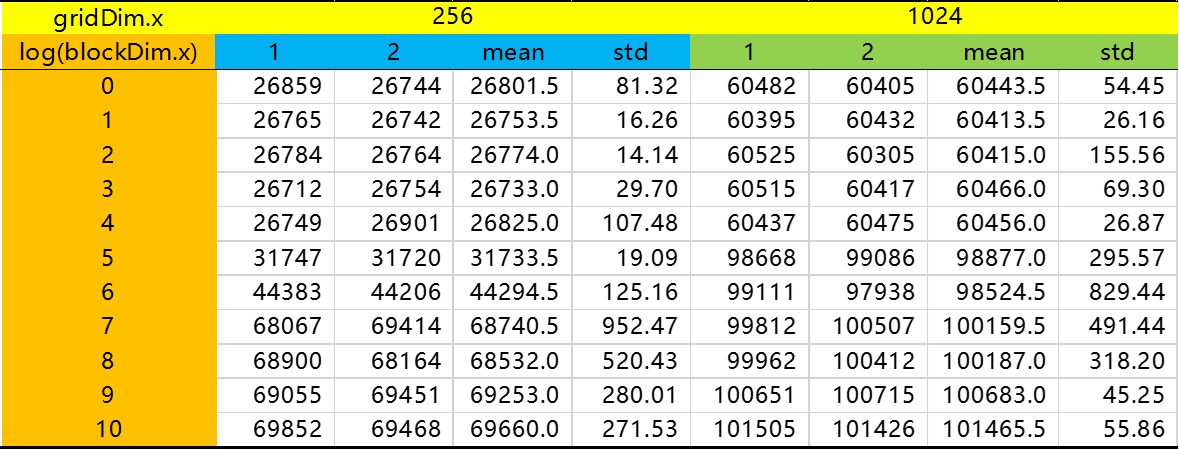
● 输出结果,比较不同的 blockDim.x 和 threadDim.x 情况结果如下图表所示。

▶ 涨姿势:
● 在核函数中也能使用 time.h 中的 clock_t 变量,并用clock() 函数计时。
▶ 源代码,封装核函数并在另外的代码中使用。分成核函数部分 clock_fernel.cu 和主函数部分 clock.cpp
 // clock_kernel.cu

 __global__ static void timedReduction(const float *input, float *output, clock_t *timer)

 {

     extern __shared__ float shared[];

     const int tid = threadIdx.x, bid = blockIdx.x;

     if (tid == )

         timer[bid] = clock();

     shared[tid] = input[tid];

     shared[tid + blockDim.x] = input[tid + blockDim.x];

     for (int d = blockDim.x; d > ; d /= )

     {

         if (tid < d)

         {

             float f0 = shared[tid], f1 = shared[tid + d];

             if (f1 < f0)

                 shared[tid] = f1;

         }

         __syncthreads();

     }

     if (tid == )

         output[bid] = shared[];

     __syncthreads();

     if (tid == )

         timer[bid + gridDim.x] = clock();

 }
 // main.c

 #include <stdio.h>

 #include <cuda.h>

 #include <cuda_runtime.h>

 #include <driver_functions.h>

 #include <nvrtc_helper.h>

 #define NUM_BLOCKS    64

 #define NUM_THREADS   256

 int main(int argc, char **argv)

 {

     typedef long clock_t;

     clock_t timer[NUM_BLOCKS * ];

     float input[NUM_THREADS * ];

     for (int i = ; i < NUM_THREADS * ; i++)

         input[i] = (float)i;

     char *kernel_file = sdkFindFilePath("clock_kernel.cu", argv[]);        // 找到核函数代码文件

     char *ptx;

     size_t ptxSize;

     compileFileToPTX(kernel_file, , NULL, &ptx, &ptxSize, );              // 将指定核函数编译为 PTX,放在指针 ptx 指向的地址,大小为ptxSize

     CUmodule module = loadPTX(ptx, argc, argv);                             // 读取编译好的 PTX

     CUfunction kernel_name;

     cuModuleGetFunction(&kernel_name, module, "timedReduction");            // 取出 PTX 中的函数 timeReducetion()

     CUdeviceptr dinput, doutput, dtimer;                                    // 内存申请和拷贝

     cuMemAlloc(&dinput, sizeof(float) * NUM_THREADS * );

     cuMemAlloc(&doutput, sizeof(float) * NUM_BLOCKS);

     cuMemAlloc(&dtimer, sizeof(clock_t) * NUM_BLOCKS * );

     cuMemcpyHtoD(dinput, input, sizeof(float) * NUM_THREADS * );

     dim3 cudaGridSize(NUM_BLOCKS, , ), cudaBlockSize(NUM_THREADS, , );

     void *arr[] = { (void *)&dinput, (void *)&doutput, (void *)&dtimer };   // 封装核函数实参的指针

     cuLaunchKernel(kernel_name,                                             // 调用核函数,函数名

         cudaGridSize.x, cudaGridSize.y, cudaGridSize.z,                     // gridDim 分量

         cudaBlockSize.x, cudaBlockSize.y, cudaBlockSize.z,                  // blockDim 分量

         sizeof(float) *  * NUM_THREADS, ,                                 // 共享内存和流号

         &arr[], );                                                        // 实参和其他参数

     cuCtxSynchronize();                                                     // 上下文同步,作用接近 cudaDeviceSynchronize()

     cuMemcpyDtoH(timer, dtimer, sizeof(clock_t) * NUM_BLOCKS * );

     cuMemFree(dinput);

     cuMemFree(doutput);

     cuMemFree(dtimer);

     long double sumElapsedClocks = ;                                       // 计算耗时

     for (int i = ; i < NUM_BLOCKS; i++)

         sumElapsedClocks += (long double)(timer[i + NUM_BLOCKS] - timer[i]);

     printf("Average clocks/block = %Lf\n", sumElapsedClocks / NUM_BLOCKS);

     getchar();

     return EXIT_SUCCESS;

 }
● 输出结果:
sdkFindFilePath <clock_kernel.cu> in ./

> Using CUDA Device []: GeForce GTX

> GPU Device has SM 6.1 compute capability

Average clocks/block = 3058.000000
▶ 涨姿势:
● 在外部核函数代码文件中采用 extern "C" __global__ void functionName() 来定义函数
● 使用 PTX 过程中涉及的函数
 // 依文件名搜索其绝对路径,传入需要查找的目标文件名 filename 和可选的可执行文件目录 executable_path

 inline char *sdkFindFilePath(const char *filename, const char *executable_path)

 {

     const char *searchPath[] = { "./" };                                    // 默认搜索路径只有当前目录,源代码中罗列了很多文件目录

     std::string executable_name;

     if (executable_path != )

     {

         executable_name = std::string(executable_path);

 #if defined(WIN32) || defined(_WIN32) || defined(WIN64) || defined(_WIN64)  // 注意 Windows 和 Linux 文件路径的分隔符不同

         size_t delimiter_pos = executable_name.find_last_of('\\');

         executable_name.erase(, delimiter_pos + );

         if (executable_name.rfind(".exe") != std::string::npos)

             executable_name.resize(executable_name.size() - );

 #else

         size_t delimiter_pos = executable_name.find_last_of('/');

         executable_name.erase(, delimiter_pos + );

 #endif

     }

     for (unsigned int i = ; i < sizeof(searchPath) / sizeof(char *); ++i)  // 遍历查找路径,找到第一个匹配的路径

     {

         std::string path(searchPath[i]);

         size_t executable_name_pos = path.find("<executable_name>");

         if (executable_name_pos != std::string::npos)

         {

             if (executable_path != )                                       // 额外路径非空,替换掉path中的值

                 path.replace(executable_name_pos, strlen("<executable_name>"), executable_name);

             else                                                            // 额外路径为空,不做调整

                 continue;

         }

 #ifdef _DEBUG

         printf("sdkFindFilePath <%s> in %s\n", filename, path.c_str());

 #endif

         path.append(filename);                                              // 根据搜索的结果测试文件是否存在

         FILE *fp;

         FOPEN(fp, path.c_str(), "rb");                                      // 在 helper_strings.h 中 #define FOPEN(fHandle,filename,mode) fopen_s(&fHandle, filename, mode)

         if (fp != NULL)

         {

             fclose(fp);

             char *file_path = (char *)malloc(path.length() + );

             STRCPY(file_path, path.length() + , path.c_str());             // #define STRCPY(sFilePath, nLength, sPath) strcpy_s(sFilePath, nLength, sPath)

             return file_path;

         }

         if (fp)                                                             // ?

             fclose(fp);

     }

     return ;                                                               // 没有找到文件,返回 0

 }

 // 文本编译为PTX,输入文件名,编译参数,指向编译结果的指针,指向存放编译结果大小的指针

 // 新版本中还多了一个参数 int requiresCGheaders,是否要用到 cooperative_groups.h,即向编译选项中添加 --include-path=cooperative_groups.h

 void compileFileToPTX(char *filename, int argc, const char **argv, char **ptxResult, size_t *ptxResultSize)

 {

     std::ifstream inputFile(filename, std::ios::in | std::ios::binary | std::ios::ate);

     if (!inputFile.is_open())

     {

         std::cerr << "\nerror: unable to open " << filename << " for reading!\n";

         exit();

     }

     std::streampos pos = inputFile.tellg();

     size_t inputSize = (size_t)pos;

     char * memBlock = new char[inputSize + ];

     inputFile.seekg(, std::ios::beg);

     inputFile.read(memBlock, inputSize);

     inputFile.close();

     memBlock[inputSize] = '\x0';

     nvrtcProgram prog;                                                                                  // 编译

     NVRTC_SAFE_CALL("nvrtcCreateProgram", nvrtcCreateProgram(&prog, memBlock, filename, , NULL, NULL));

     nvrtcResult res = nvrtcCompileProgram(prog, argc, argv);

     size_t logSize;                                                                                     // 写日志

     NVRTC_SAFE_CALL("nvrtcGetProgramLogSize", nvrtcGetProgramLogSize(prog, &logSize));

     char *log = (char *)malloc(sizeof(char) * logSize + );

     NVRTC_SAFE_CALL("nvrtcGetProgramLog", nvrtcGetProgramLog(prog, log));

     log[logSize] = '\x0';

     //std::cerr << "\n compilation log ---\n";

     //std::cerr << log;

     //std::cerr << "\n end log ---\n";

     free(log);

     NVRTC_SAFE_CALL("nvrtcCompileProgram", res);

     // fetch PTX

     size_t ptxSize;

     NVRTC_SAFE_CALL("nvrtcGetPTXSize", nvrtcGetPTXSize(prog, &ptxSize));

     char *ptx = (char *)malloc(sizeof(char) * ptxSize);

     NVRTC_SAFE_CALL("nvrtcGetPTX", nvrtcGetPTX(prog, ptx));

     NVRTC_SAFE_CALL("nvrtcDestroyProgram", nvrtcDestroyProgram(&prog));

     *ptxResult = ptx;

     *ptxResultSize = ptxSize;

 }

 // 传入文件名和错误信息内容,向std_err中输出

 #define NVRTC_SAFE_CALL(Name, x)                                                                        \

     do                                                                                                  \

     {                                                                                                   \

         nvrtcResult result = x;                                                                         \

         if (result != NVRTC_SUCCESS)                                                                    \

         {                                                                                               \

             std::cerr << "\nerror: " << Name << " failed with error " << nvrtcGetErrorString(result);   \

             exit();                                                                                    \

         }                                                                                               \

     } while()

 // 读取编译好的PTX为模块,传入指向 ptx 代码的指针和额外参数

 CUmodule loadPTX(char *ptx, int argc, char **argv)

 {

     CUdevice cuDevice = findCudaDeviceDRV(argc, (const char **)argv);// 查找设备,返回设备信息

     int major = , minor = ;

     char deviceName[];

     cuDeviceComputeCapability(&major, &minor, cuDevice);

     cuDeviceGetName(deviceName, , cuDevice);

     printf("> GPU Device has SM %d.%d compute capability\n", major, minor);

     cuInit();                                  // cuda 设备初始化 CUresult CUDAAPI cuInit(unsigned int Flags);

     cuDeviceGet(&cuDevice, );                  // 返回设备编号 CUresult CUDAAPI cuDeviceGet(CUdevice *device, int ordinal);

     CUcontext context;

     cuCtxCreate(&context, , cuDevice);         // 创建上下文 CUresult CUDAAPI cuCtxCreate(CUcontext *pctx, unsigned int flags, CUdevice dev);

     CUmodule module;

     cuModuleLoadDataEx(&module, ptx, , , );  // 读取模块信息 CUresult CUDAAPI cuModuleLoadDataEx(CUmodule *module, const void *image, unsigned int numOptions, CUjit_option *options, void **optionValues);

     return module;

 }

 CUresult CUDAAPI cuModuleGetFunction(CUfunction *hfunc, CUmodule hmod, const char *name);   // 从模块中取出指定的函数

 CUresult CUDAAPI cuMemAlloc(CUdeviceptr *dptr, size_t bytesize);                            // 类似cudaMalloc

 // 调用核函数的完整格式

 CUresult CUDAAPI cuLaunchKernel(CUfunction f,

     unsigned int gridDimX, unsigned int gridDimY, unsigned int gridDimZ, unsigned int blockDimX, unsigned int blockDimY, unsigned int blockDimZ,

     unsigned int sharedMemBytes, CUstream hStream, void **kernelParams, void **extra);

 CUresult CUDAAPI cuCtxSynchronize(void);                                                    // 上下文同步

 CUresult CUDAAPI cuMemFree(CUdeviceptr dptr);                                               // 类似 cudaFree
0_Simple__clock + 0_Simple__clock_nvrtc的更多相关文章
随机推荐
- java 如何将方法作为传参--多态
在前段时研究智能算法时,发现如果使用java进行实现的话,往往具体实现过程差不多,但是适应值函数却根据 研究对象的不同发生很大的改变,这样对代码的维护产生很大的阻碍,于是产生的一个疑问:可不可以将适 ...
- TCP/IP中你不得不知的十大秘密
这段时间 有一点心很浮躁,不过希望自己马上要矫正过来.好好学习编程!这段时间我想好好地研究一下TCP/IP协议和网络传输这块!加油 一.TCP/IP模型 TCP/IP协议模型(Transmission ...
- 深入理解计算机系统chapter3
栈在处理过程调用中起到至关重要的作用,栈向下增长,栈顶元素的地址是所有栈中元素最小的.栈指针%esp保存着栈顶元素的地址 控制: 重点: 基于条件数据传送的代码比基于条件控制转移(预测错误惩罚比较高) ...
- SQL Server 2016 Alwayson新增功能
标签:SQL SERVER/MSSQL SERVER/数据库/DBA/ 概述 SQLServer2016发布版本到现在已有一年多的时间了,目前最新的稳定版本是SP1版本.接下来就开看看2016在Alw ...
- Javascript中的noscript
引言: 在浏览器日常火爆的时代,个大浏览器几乎都想占主导地位,争个你死我活,所以现在的各大浏览器都支持javascript脚本语言,但是在童鞋们,我们假设一下,万一哪个用户出于安全,把浏览器的java ...
- oracle数据库备份、还原 (如何将Oracle 11g备份的dat文件导入到10g数据库里面)
如何将Oracle 11g备份的dat文件导入到10g数据库里面 解决方法: 导出的时候后面加上目标数据库的版本号 导出: 在SQL plus下执行:create or replace ...
- thinkphp的select和find的区别
hinkphp是比较好的php开发框架,能比较快速的开发MVC架构的管理系统,我们需要用到 select()和find()方法,两个方法都能返回数据集数组,但有什么不同呢?先看一下我的代码对比:$te ...
- Qt のEXecl
http://blog.csdn.net/czyt1988/article/details/52121360 OK http://bbs.csdn.net/topics/39184 ...
- hdu 1542 线段树 求矩形并
Atlantis Time Limit: 2000/1000 MS (Java/Others) Memory Limit: 65536/32768 K (Java/Others)Total Su ...
- (@WhiteTaken)解决Unity5.x下UnityVS2013不能使用的问题
终于解决了这一困扰我很久的问题. 下面来介绍一下我遇到的问题: 前段时间,重新做了系统,并且安装了Unity5.6版本,VS2013,UnityVS 2013.msi,Visual Studio 20 ...