eclipse 插件编写(一)
由于项目开发进程中有一些重复性的代码进行编写,没有任何业务逻辑,粘贴复制又很麻烦且容易出错,故想起做一个eclipse插件来满足一下自己的工作需要,同时记录一下,以供以后参考与共同学习。本文主要讲解一步一步开发eclipse插件的过程,没有对每一步进行详细的讲解,如需查看详细介绍请自行百度、Google。
参考网站:
http://www.ibm.com/developerworks/cn/java/os-ecplug/
开发环境:window7、jdk1.6、eclipse4.4
1、新建eclipse插件 File > New > Project
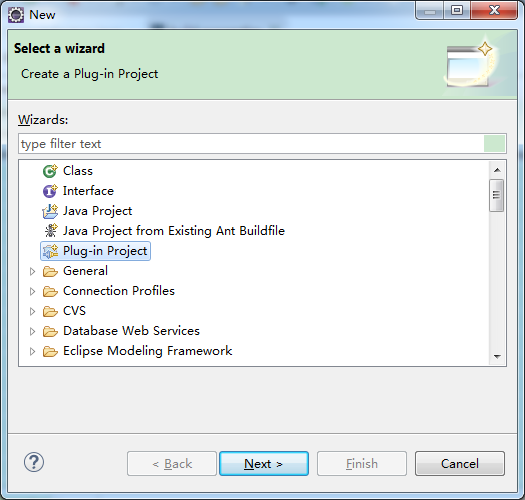
选择 Plug-in Project ,新建一个eclipse插件工程,填入工程名称 TestPlugin,使用默认路径、默认项目设置,选择插件运行在eclipse的版本。
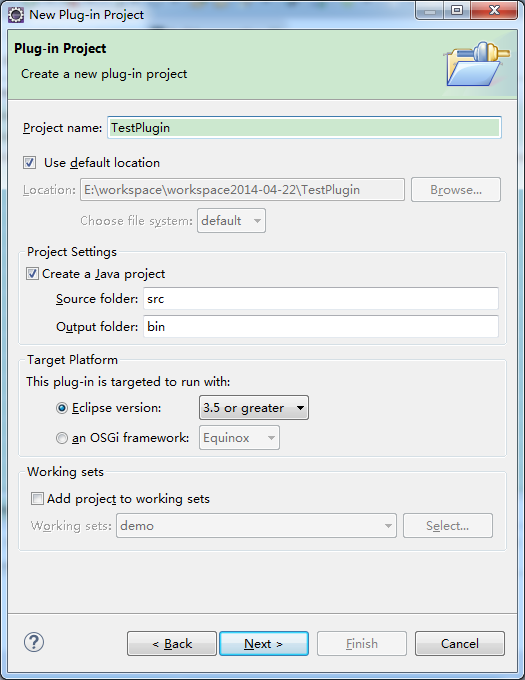
点击下一步进入插件项目的详细设置页面,

ID: 插件的ID
Version: 插件版本号
Name: 插件名称
Vendor: 插件的作者信息
Execution Environment: 插件的执行环境
option中的 Generate an activator, a Java class that controls the plug-in's life cycle ,下面紧跟着有一个 Activator的输入框,这儿选中后代表生成一个启动器,这个java类用来控制插件的声明周期,这个启动器类似java的main方法,Activator后面输入框内的内容代表要生成启动器的java类名称
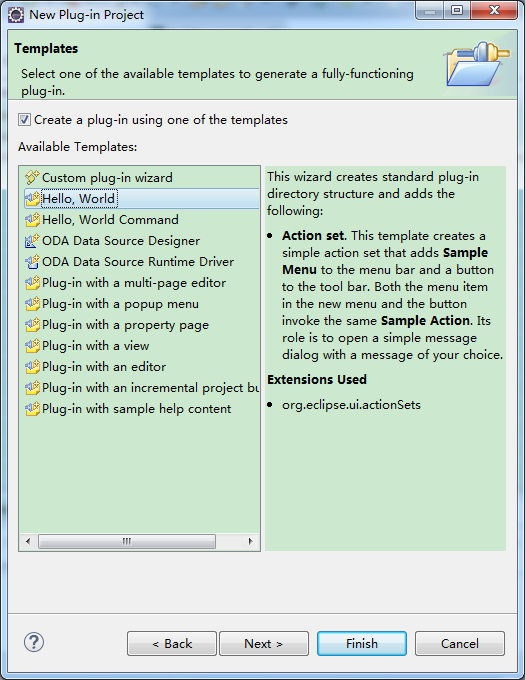
进入下一步后有一些模板可以选择,为了方便选择Hello,World实例项目。
点击完成,项目新建成功。目录如下:
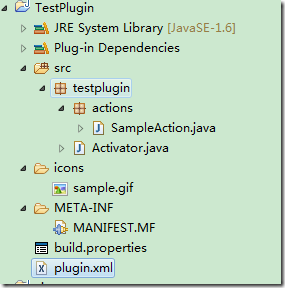
src : 项目源代码目录
icons:项目图片资源目录
META-INF/MANIFEST.MF: 项目基本配置信息,版本、名称、启动器等
build.properties: 项目的编译配置信息,包括,源代码路径、输出路径、
plugin.xml:插件的操作配置信息,包含弹出菜单及点击菜单后对应的操作执行类等,
2、代码分析
MANIFEST.MF:
包含了版本、名称、启动器类、必须加载的插件、运行环境等
Manifest-Version: 1.0
Bundle-ManifestVersion: 2
Bundle-Name: TestPlugin
Bundle-SymbolicName: TestPlugin;singleton:=true
Bundle-Version: 1.0.0.qualifier
Bundle-Activator: testplugin.Activator
Require-Bundle: org.eclipse.ui,
org.eclipse.core.runtime
Bundle-RequiredExecutionEnvironment: JavaSE-1.6
Bundle-ActivationPolicy: lazy
对应的在通过Plug-in Manifest Editor中打开如下:

build.properties
文件包含了源文件路径、编译输出路径及编译包含的目录等
source.. = src/
output.. = bin/
bin.includes = plugin.xml,\
META-INF/,\
.,\
icons/
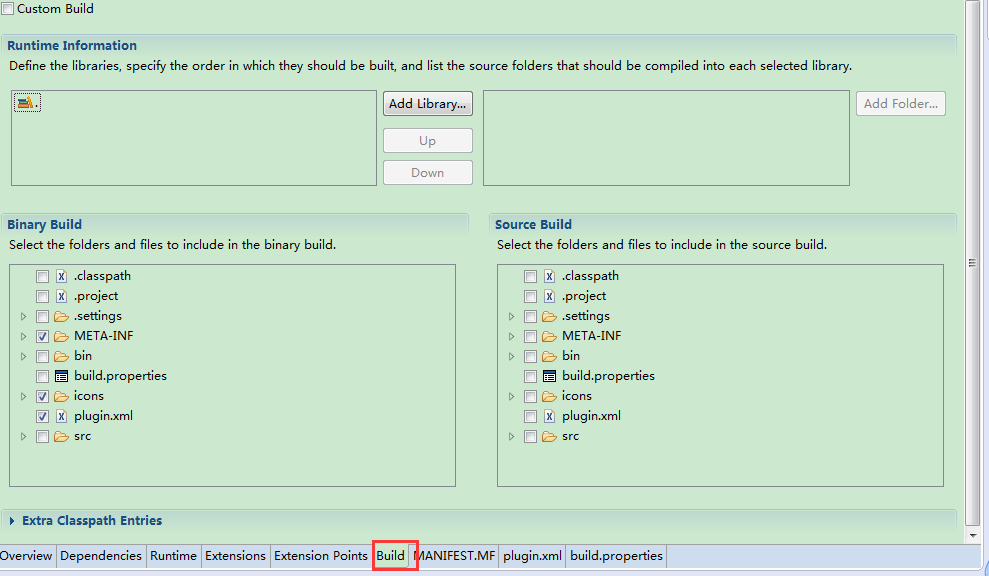
对应的在通过Plug-in Manifest Editor中打开如下:
plugin.xml
相对来讲 plugin.xml 是内容最多也最容易更改的地方,包含了插件的操作集合,内容如下:
<?xml version="1.0" encoding="UTF-8"?>
<?eclipse version="3.4"?>
<plugin>
<extension
point="org.eclipse.ui.actionSets">
<actionSet
label="Sample Action Set"
visible="true"
id="TestPlugin.actionSet">
<menu
label="Sample &Menu"
id="sampleMenu">
<separator
name="sampleGroup">
</separator>
</menu>
<action
label="&Sample Action"
icon="icons/sample.gif"
class="testplugin.actions.SampleAction"
tooltip="Hello, Eclipse world"
menubarPath="sampleMenu/sampleGroup"
toolbarPath="sampleGroup"
id="testplugin.actions.SampleAction">
</action>
</actionSet>
</extension>
</plugin>
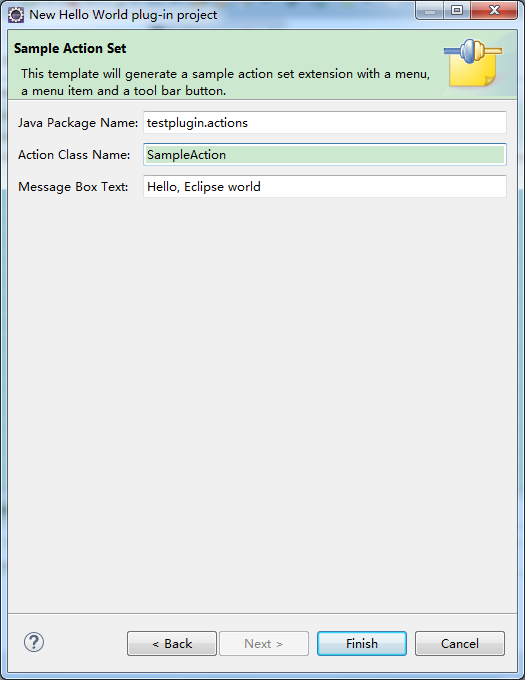
extension: 代表一个扩展点, point=org.eclipse.ui.actionSets 代表改扩展点用来添加菜单、工具栏按钮
actionSet : 一组工具集
menu: 菜单
action: 菜单项,这里的action中有一个属性class=”testplugin.actions.SampleAction”代表在点击该菜单项时将触发此action类的run方法。
SimpleAction:
SimpleAction 为自动生成的一个类,里面包含了一个简单的实现hello world的程序代码,如下:
package testplugin.actions;
import org.eclipse.jface.action.IAction;
import org.eclipse.jface.viewers.ISelection;
import org.eclipse.ui.IWorkbenchWindow;
import org.eclipse.ui.IWorkbenchWindowActionDelegate;
import org.eclipse.jface.dialogs.MessageDialog;
/**
* Our sample action implements workbench action delegate.
* The action proxy will be created by the workbench and
* shown in the UI. When the user tries to use the action,
* this delegate will be created and execution will be
* delegated to it.
* @see IWorkbenchWindowActionDelegate
*/
public class SampleAction implements IWorkbenchWindowActionDelegate {
private IWorkbenchWindow window;
/**
* The constructor.
*/
public SampleAction() {
}
/**
* The action has been activated. The argument of the
* method represents the 'real' action sitting
* in the workbench UI.
* @see IWorkbenchWindowActionDelegate#run
*/
public void run(IAction action) {
MessageDialog.openInformation(
window.getShell(),
"TestPlugin",
"Hello, Eclipse world");
}
/**
* Selection in the workbench has been changed. We
* can change the state of the 'real' action here
* if we want, but this can only happen after
* the delegate has been created.
* @see IWorkbenchWindowActionDelegate#selectionChanged
*/
public void selectionChanged(IAction action, ISelection selection) {
}
/**
* We can use this method to dispose of any system
* resources we previously allocated.
* @see IWorkbenchWindowActionDelegate#dispose
*/
public void dispose() {
}
/**
* We will cache window object in order to
* be able to provide parent shell for the message dialog.
* @see IWorkbenchWindowActionDelegate#init
*/
public void init(IWorkbenchWindow window) {
this.window = window;
}
}
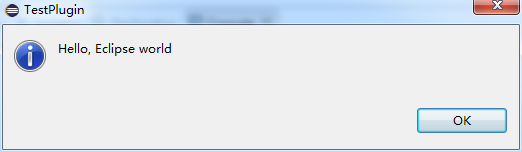
在点击工具栏的按钮时会自动调用此类的run方法,该方法弹出一个提示框,提示Hello, Eclipse world;
Activator:
此类为插件的启动类,控制插件的生命周期,内容如下:
package testplugin;
import org.eclipse.jface.resource.ImageDescriptor;
import org.eclipse.ui.plugin.AbstractUIPlugin;
import org.osgi.framework.BundleContext;
/**
* The activator class controls the plug-in life cycle
*/
public class Activator extends AbstractUIPlugin {
// The plug-in ID
public static final String PLUGIN_ID = "TestPlugin"; //$NON-NLS-1$
// The shared instance
private static Activator plugin;
/**
* The constructor
*/
public Activator() {
}
/*
* (non-Javadoc)
* @see org.eclipse.ui.plugin.AbstractUIPlugin#start(org.osgi.framework.BundleContext)
*/
public void start(BundleContext context) throws Exception {
super.start(context);
plugin = this;
}
/*
* (non-Javadoc)
* @see org.eclipse.ui.plugin.AbstractUIPlugin#stop(org.osgi.framework.BundleContext)
*/
public void stop(BundleContext context) throws Exception {
plugin = null;
super.stop(context);
}
/**
* Returns the shared instance
*
* @return the shared instance
*/
public static Activator getDefault() {
return plugin;
}
/**
* Returns an image descriptor for the image file at the given
* plug-in relative path
*
* @param path the path
* @return the image descriptor
*/
public static ImageDescriptor getImageDescriptor(String path) {
return imageDescriptorFromPlugin(PLUGIN_ID, path);
}
}
3、运行一下,看看效果
首先在项目名称上点击右键 > Run as > Eclipse Application 会新打开一个eclipse窗口,在里面可以看到刚刚新建的插件,如图:
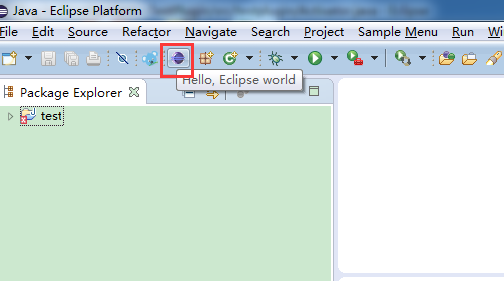
把鼠标移入插件图标的上面会出现提示文字,点击查看效果:
最简单的插件就这样了,后面会在里面添加一些其他的功能,以完成一个代码生成器的基本功能,由于刚接触eclipse插件,文中如有不正确的地方敬请指正。
eclipse 插件编写(一)的更多相关文章
- eclipse 插件编写(四)
前言 前面几篇文章讲了下如果编写简单的eclipse插件,如创建插件项目.编写右键弹出菜单等功能,接下来主要写一下如何生成代码的功能,这一片的功能跟插件本身的编写关联不太大,主要处理插件之后的业务内容 ...
- eclipse 插件编写(三)
参考:http://help.eclipse.org/mars/index.jsp?topic=%2Forg.eclipse.platform.doc.isv%2Fguide%2Fworkbench_ ...
- eclipse 插件编写(二)
上篇文章简单写了下怎么新建一个eclipse插件工程,这次写一下怎么在上次的工程中添加几个菜单,如菜单栏菜单.工具栏菜单.右键菜单等. 创建一个完成的菜单需要了解三个扩展点,即menus.comman ...
- Eclipse 中安装 CDT 插件编写 C/C++
使用到的软件 1.Eclipse 开发工具 2.MinGW 编译器 一.Eclipse 中安装 CDT 插件 打开 Eclipse 插件市场 搜索 CDT,并找到如下的插件.插件的版本名字可能不太一样 ...
- Hadoop2 自己动手编译Hadoop的eclipse插件
前言: 毕业两年了,之前的工作一直没有接触过大数据的东西,对hadoop等比较陌生,所以最近开始学习了.对于我这样第一次学的人,过程还是充满了很多疑惑和不解的,不过我采取的策略是还是先让环 ...
- Eclipse插件 - FindBugs 检查代码隐藏的 Bug
简介 FindBugs 是一个在 Java 程序中查找 bug 的程序,它可以查找可能出错的代码,注意 FindBugs 是检查 Java 字节码,也就是*.class文件.其实准确的 ...
- 25个让Java程序员更高效的Eclipse插件
Eclipse提供了一个可扩展插件的开发系统.这就使得Eclipse在运行系统之上可以实现各种功能.这些插件也不同于其他的应用(插件的功能是最难用代码实现的).拥有合适的Eclipse插件是非常重要的 ...
- 阿里p3c(代码规范,eclipse插件、模版,idea插件)
阿里p3c 一.说明 代码规范检查插件p3c,是根据<阿里巴巴Java开发手册>转化而成的自动化插件. (高级黑:P-3C“Orion”,反潜巡逻机,阿里大概取p3c先进,监测,发现潜在问 ...
- 用 Eclipse 插件提高代码质量
如果能在构建代码前发现代码中潜在的问题会怎么样呢?很有趣的是,Eclipse 插件中就有这样的工具,比如 JDepend 和 CheckStyle,它们能帮您在软件问题暴露前发现这些问题.在 让开发自 ...
随机推荐
- 【codeforces 752F】Santa Clauses and a Soccer Championship
time limit per test2 seconds memory limit per test256 megabytes inputstandard input outputstandard o ...
- 使用多target来构建大量相似App
转自 come from : http://devtang.com/blog/2013/10/17/the-tech-detail-of-ape-client-1/ 猿题库iOS客户端的技术细节(一) ...
- 学习鸟哥的Linux私房菜笔记(16)——Ubuntu中建立ftp服务
1.安装vsftpd,如下图所示:sudo apt-get install vsftpd 2.查看本机是否可以连接ftp 如上图所示,发现login failed了,怎么办呢?我们来看看vsftpd的 ...
- Arcgis api for javascript学习笔记(4.5版本) - 获取FeatureLayer中的graphics集合
在Arcgis api for javascript 3.x 版本中,我们可以直接通过某个FeatureLayer对象中的graphics属性获取要素集合. graphics属性 但是在4.x版本中, ...
- WinFrom - 打开一个窗体关闭另一个窗体
在写Winform程序的时候,经常会遇到“打开一个新的窗体然后关闭本窗体”之类的问题.最常见的就是登陆界面和主窗体了.而最常见的处理方法就是表单判断正确后 new MainForm().Show(); ...
- 深度神经网络(DNN)
深度神经网络(DNN) 深度神经网络(Deep Neural Networks, 以下简称DNN)是深度学习的基础,而要理解DNN,首先我们要理解DNN模型,下面我们就对DNN的模型与前向传播算法做一 ...
- SQL SERVER配置[转]
感谢shuhao,sql server的配置都是他教的,下面是他写的总结,方便自己以后使用 总结一下,感觉比较实用.------------------------------------------ ...
- TBB、OpenCV混合编程
TBB提供了Parallel_for.Parallel_do.Parallel_reduce等通用并行算法,可以应用在不同的并行算法场合,Parallel_for适合用在多个数据或请求之间彼此没有依赖 ...
- python 和为S的连续正数序列
题目描述: 小明很喜欢数学,有一天他在做数学作业时,要求计算出9~16的和,他马上就写出了正确答案是100.但是他并不满足于此,他在想究竟有多少种连续的正数序列的和为100(至少包括两个数).没多久, ...
- Latex 琐碎
χ(\chi),Ξ(\Xi),ξ(\xi) 0. 加颜色 x2+y2=z2({\color{Red} {x^2+y^2=z^2}}) Magenta, Cyan, Emerald(宝石绿) 1. 斜杠 ...