Ubuntu-18.04 下使用Nginx搭建高可用,高并发的asp.net core集群
一.实现前的准备
- 以下是实现简单负载均衡的思路,图中的服务器均为虚拟机
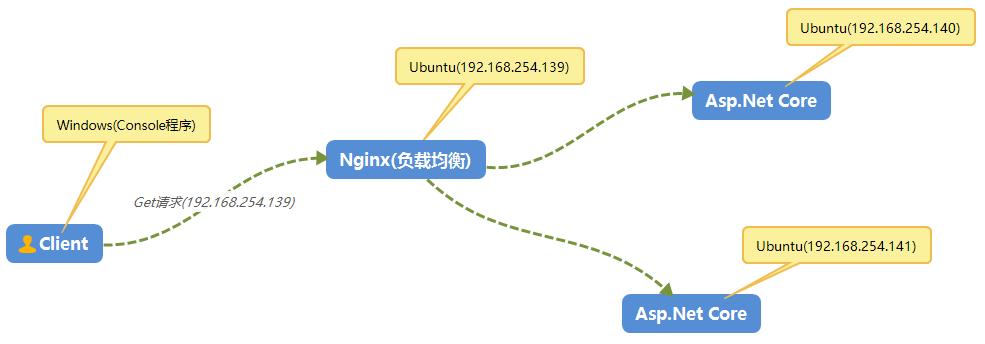
- 三台Linux服务器,一台用作Nginx负载均衡(192.168.254.139),另外两台用作Asp.Net Core应用程序承载的服务器(192.168.254.140,192.168.254.141)
- 一台用作于Client的Windows服务器。
二.环境搭建
1.Asp.Net Core程序
就是一个新建的空web应用程序,然后修改了下Startup的中间件,分别部署到2台Ubuntu上。
    public class Startup

    {

        // This method gets called by the runtime. Use this method to add services to the container.

        // For more information on how to configure your application, visit https://go.microsoft.com/fwlink/?LinkID=398940

        public void ConfigureServices(IServiceCollection services)

        {

        }

        // This method gets called by the runtime. Use this method to configure the HTTP request pipeline.

        public void Configure(IApplicationBuilder app, IHostingEnvironment env)

        {

            if (env.IsDevelopment())

            {

                app.UseDeveloperExceptionPage();

            }

            app.Run(async (context) =>

            {

                //await context.Response.WriteAsync("this is first web application");

                await context.Response.WriteAsync("this is second web application");

            });

        }

    }
2.配置Nginx服务器
- 安装Nginx
- 在Ubuntu终端使用 sudo apt-get install nginx 命令安装Nginx。
- 然后通过 sudo service nginx start 命令启动服务
- 确认浏览器显示Nginx默认登录页。可在http://192.168.254.139/index.nginx-debian.html 访问登录页面。
- 配置Nginx
- 若要将 Nginx 配置为反向代理以将请求转接到 ASP.NET Core 应用,请修改 /etc/nginx/sites-available/default。 sudo vi /etc/nginx/sites-available/default
- 设置proxy_pass后面的参数
- 新增upstream,表示要转接的服务器集合,upstream后面的名字要与proxy_pass后面的参数相对应
- 修改完之后:wq保存,然后 sudo nginx -t 来验证配置文件的语法有没有错误,如果配置文件测试成功,可以通过运行 sudo nginx -s reload 强制 Nginx 选取更改
upstream cluster.com{

        server 192.168.254.140 weight=;

        server 192.168.254.141 weight=;

}

server {

        listen  default_server;

        # listen [::]: default_server deferred;

        # SSL configuration

        #

        # listen  ssl default_server;

        # listen [::]: ssl default_server;

        #

        # Note: You should disable gzip for SSL traffic.

        # See: https://bugs.debian.org/773332

        #

        # Read up on ssl_ciphers to ensure a secure configuration.

        # See: https://bugs.debian.org/765782

        #

        # Self signed certs generated by the ssl-cert package

        # Don't use them in a production server!

        #

        # include snippets/snakeoil.conf;

        root /var/www/html;

        # Add index.php to the list if you are using PHP

        index index.html index.htm index.nginx-debian.html;

        server_name _example.com *.example.com;

        location / {

                proxy_pass         http://cluster.com;

                proxy_http_version 1.1;

                proxy_set_header   Upgrade $http_upgrade;

                proxy_set_header   Connection keep-alive;

                proxy_set_header   Host $host;

                proxy_cache_bypass $http_upgrade;

                proxy_set_header   X-Forwarded-For $proxy_add_x_forwarded_for;

                proxy_set_header   X-Forwarded-Proto $scheme;

                # First attempt to serve request as file, then

                # as directory, then fall back to displaying a .

                try_files $uri $uri/ =;

        }

        # pass PHP scripts to FastCGI server

        #

        #location ~ \.php$ {

        #       include snippets/fastcgi-php.conf;

        #

        #       # With php-fpm (or other unix sockets):

        #       fastcgi_pass unix:/var/run/php/php7.-fpm.sock;

        #       # With php-cgi (or other tcp sockets):

        #       fastcgi_pass 127.0.0.1:;

        #}

        # deny access to .htaccess files, if Apache's document root

        # concurs with nginx's one

        #

        #location ~ /\.ht {

        #       deny all;

        #}

}
2.Client控制台应用程序
    class Program

    {

        static void Main(string[] args)

        {

            HttpClient httpClient = new HttpClient();

            for (int i = ; i < ; i++)

            {

                string result = httpClient.GetStringAsync("http://192.168.254.139").Result;

                Console.WriteLine(result);

            }

            Console.ReadKey();

        }

    }
结果如下:
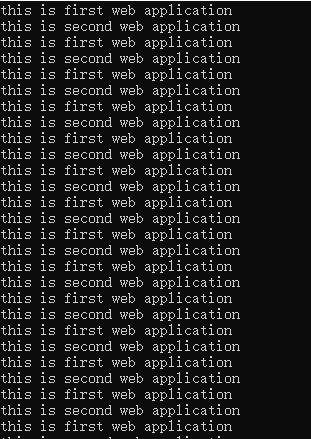
由结果可知,Nginx服务器会根据我们配置Nginx时的权重进行转向,到现在,一个简单的集群已经搭建。
Ubuntu-18.04 下使用Nginx搭建高可用,高并发的asp.net core集群的更多相关文章
- Ubuntu 18.04 下 Redis 环境搭建
一.安装 Redis ① 下载 wget http://download.redis.io/releases/redis-3.2.8.tar.gz ② 解压 tar -zxvf redis-3.2.8 ...
- Ubuntu 18.04 下配置 HAXM 加速 Android模拟器
Ubuntu 18.04 下配置 HAXM 加速 Android模拟器 最近在vmware环境下搭建ubuntu18.04开发环境,开始发现总是运行android模拟器在console提示加载如下错误 ...
- Ubuntu 14.10下基于Nginx搭建mp4/flv流媒体服务器(可随意拖动)并支持RTMP/HLS协议(含转码工具)
Ubuntu 14.10下基于Nginx搭建mp4/flv流媒体服务器(可随意拖动)并支持RTMP/HLS协议(含转码工具) 最近因为项目关系,收朋友之托,想制作秀场网站,但是因为之前一直没有涉及到这 ...
- Ubuntu 18.04 下 emscripten SDK 的安装
Ubuntu 18.04 下 emscripten SDK 的安装http://kripken.github.io/emscripten-site/docs/getting_started/downl ...
- Ubuntu 18.04下安装Steam顶级在线游戏平台
Ubuntu 18.04下安装Steam顶级在线游戏平台 原创: 聆听世界的鱼 Linux公社 今天 Steam是由Valve公司开发的顶级在线游戏平台,是目前全球最大的综合性数字发行平台之一.它让你 ...
- 在Ubuntu 18.04 下安装mysql,没有初始密码,重设root密码
在Ubuntu 18.04 下安装mysql 不知道是由于mysql更新为新版还是.Ubuntu18.04中的特性,安装过程中没有设置密码的环节,在网络上找了半天,总算解决了!特此记录下来,以便以后查 ...
- ubuntu 18.04下Chromium设置为系统代理
前言 在ubuntu 18.04下挂上ss后firefox能直接上google了但是chromium上不去 会出现下面两种情况 # This site can't be reached xxxxxx ...
- Ubuntu 18.04下Couldn't connect to Docker daemon at http+docker://localunixsocket解决办法
一台服务器系统为:Ubuntu 18.04 LTS,上面建了git裸仓库,用于开发吧代码push到这里.同时WEB测试环境通过docker也部署在这台.通过git钩子post-receive,当有新代 ...
- 在ubuntu 18.04下,无线网卡无驱动,连不上wifi,显示wifi没有适配器的解决方法
近来因为做东西要用到linux环境,所以自己的笔记本在win10的系统上又安装了ubuntu 18.04版本的双系统,但是安装好以后,没有无线网卡的驱动,显示wifi没有适配器等字样,很纠结,前后研究 ...
随机推荐
- Chapter 3 Phenomenon——13
"Bella, I'm so sorry!""I'm fine, Tyler — you look awful, are you all right?" “Be ...
- AndroidStudio报错Software caused connection abort: recv failed
Software caused connection abort: recv failed 这个问题网上有一种说法 已知会导致这种异常的一个场景如下: 客户端和服务端建立tcp的短连接,每次客户端发送 ...
- Abp中SwaggerUI的接口说明文档配置
项目中集成了swashbuckle,那么通过访问http://ip:port/swagger/ui/index,可以看到提供的接口列表.接口列表默认是没有提供接口说明信息的,但是swagger内部是集 ...
- 阿里云1核1GIIS都装不上
没有启用虚拟内存启用之后就可以安装了 注意还要把自动更新服务关掉
- Facebook回应追踪无账号用户:源于网站插件漏洞
近日,比利时隐私独立委员一项调查披露Facebook跟踪收集大量网站用户的上网足迹,同时触及那些没有注册Facebook账号的访客. 对此,Facebook公司回应这些恶劣跟踪行为在于社交媒体在安装插 ...
- [PHP] 商品类型规格属性后台管理(代码流程备忘)
实现界面 涉及到四张表,type(商品类型表),type_spec(商品类型规格关联表),attribute(商品属性表),attribute_value(商品属性值表) 新建基控制器BaseCont ...
- Java基础教程(20)--数字和字符串
一.数字 在用到数字时,大多数情况下我们都会使用基本数据类型.例如: int i = 500; float gpa = 3.65f; byte mask = 0xff; 然而,有时候我们既需要 ...
- STS的安装教程-鹏鹏
STS全称Spring Tools Suite. 简介:Spring Tools Suite (STS)其实就是一个被包装过的Eclipse,主要用于快速的开发Spring项目,我们不用再去编辑繁琐的 ...
- spring-boot集成PageHelper和通用Mapper
前提条件:已经集成mybatis 代码生成步骤: 添加依赖 <dependency> <groupId>tk.mybatis</groupId> <artif ...
- 【代码笔记】iOS-左右可滑动的选择条
一,效果图. 二,工程图. 三,代码. RootViewController.h #import <UIKit/UIKit.h> @interface RootViewController ...