centos7 docker安装和使用_入门教程
说明:本文也是参考互联网上的文章写的,感谢相关作者的贡献。
操作系统
64位CentOS Linux release 7.2.1511 (Core)
配置好IP:192.168.1.160
修改yum源
目的是提升对docker的下载速度。
1.备份你的原镜像文件,以免出错后可以恢复。
[root@localhost ~]# mv /etc/yum.repos.d/CentOS-Base.repo /etc/yum.repos.d/CentOS-Base.repo.backup
2.下载新的CentOS-Base.repo 到/etc/yum.repos.d/
[root@localhost ~]# wget -O /etc/yum.repos.d/CentOS-Base.repo http://mirrors.aliyun.com/repo/Centos-7.repo
3.运行yum makecache生成缓存
[root@localhost ~]# yum clean all

[root@localhost ~]# yum makecache
安装Docker
[root@localhost ~]# yum -y install docker-io
要稍等几分钟才能安装好。网速快的话几十秒吧。
启动Docker
[root@localhost ~]# systemctl start docker
发现会报错:
Job for docker.service failed because the control process exited with error code. See "systemctl status docker.service" and "journalctl -xe" for details.
按照提示执行:
[root@localhost ~]# systemctl status docker.service
会有提示信息如下:
● docker.service - Docker Application Container Engine

   Loaded: loaded (/usr/lib/systemd/system/docker.service; disabled; vendor preset: disabled)

   Active: failed (Result: exit-code) since 三 -- :: CST; 52s ago

     Docs: http://docs.docker.com

  Process:  ExecStart=/usr/bin/dockerd-current --add-runtime docker-runc=/usr/libexec/docker/docker-runc-current --default-runtime=docker-runc --exec-opt native.cgroupdriver=systemd --userland-proxy-path=/usr/libexec/docker/docker-proxy-current --seccomp-profile=/etc/docker/seccomp.json $OPTIONS $DOCKER_STORAGE_OPTIONS $DOCKER_NETWORK_OPTIONS $ADD_REGISTRY $BLOCK_REGISTRY $INSECURE_REGISTRY $REGISTRIES (code=exited, status=/FAILURE)

 Main PID:  (code=exited, status=/FAILURE)

5月  :: localhost.localdomain systemd[]: Starting Docker Application Container Engine...

5月  :: localhost.localdomain dockerd-current[]: time="2018-05-02T23:34:45.527821208+08:00" level=warning msg="could not change group /var/run/...t found"

5月  :: localhost.localdomain dockerd-current[]: time="2018-05-02T23:34:45.532650572+08:00" level=info msg="libcontainerd: new containerd proce...: 14421"

5月  :: localhost.localdomain dockerd-current[]: time="2018-05-02T23:34:46.539484373+08:00" level=warning msg="overlay2: the backing xfs filesystem is ...

5月  :: localhost.localdomain dockerd-current[]: Error starting daemon: SELinux is not supported with the overlay2 graph driver on this kernel....d=false)

5月  :: localhost.localdomain systemd[]: docker.service: main process exited, code=exited, status=/FAILURE

5月  :: localhost.localdomain systemd[]: Failed to start Docker Application Container Engine.

5月  :: localhost.localdomain systemd[]: Unit docker.service entered failed state.

5月  :: localhost.localdomain systemd[]: docker.service failed.

Hint: Some lines were ellipsized, use -l to show in full.
红色部分告诉我们此linux的内核中的SELinux不支持 overlay2 graph driver,解决方法有两个,要么启动一个新内核,要么就在docker里禁用selinux,设置--selinux-enabled=false。我们采用第二种方式。
[root@localhost ~]# vi /etc/sysconfig/docker
然后将--selinux-enabled设置成false,保存并退出。
# /etc/sysconfig/docker

# Modify these options if you want to change the way the docker daemon runs

OPTIONS='--selinux-enabled=false --log-driver=journald --signature-verification=false'

if [ -z "${DOCKER_CERT_PATH}" ]; then

    DOCKER_CERT_PATH=/etc/docker

fi

# ......省略N行
重新启动
[root@localhost ~]# systemctl start docker
查看版本号
[root@localhost ~]# docker -v
Docker version 1.13.1, build 774336d/1.13.1
至此docker启动成功
修改Docker镜像加速器
因为国外的docker镜像访问太慢,所以我们需要修改成阿里云的docker镜像。这样从国内镜像拉取速度会快点。
1.打开阿里云docker仓库地址https://dev.aliyun.com/search.html
2.淘宝账号即可登录,登录后点击自己的管理中心。
3.点击管理中心左侧菜单栏的“镜像加速器”,右边面板会有你的加速地址,面板下面有详细设置步骤。如下图:
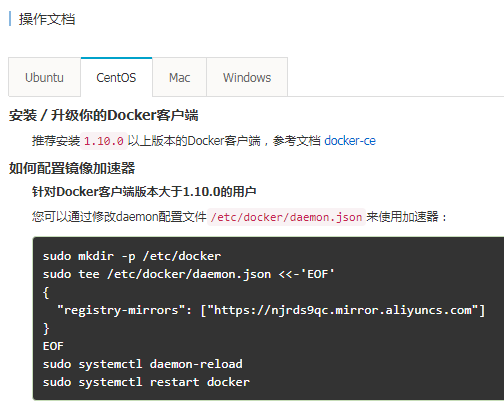
[root@localhost ~]# vi /etc/docker/daemon.json
将下面整行字符拷贝进去,保存并退出。
"registry-mirrors": ["https://njrds9qc.mirror.aliyuncs.com"]
刷新daemon
[root@localhost ~]# systemctl daemon-reload
重启docker
[root@localhost ~]# systemctl restart docker
拉取镜像
以hello-world为例
[root@localhost tmp]# docker pull hello-world

Using default tag: latest

Trying to pull repository docker.io/library/hello-world ...

latest: Pulling from docker.io/library/hello-world

9bb5a5d4561a: Pull complete

Digest: sha256:f5233545e43561214ca4891fd1157e1c3c563316ed8e237750d59bde73361e77

Status: Downloaded newer image for docker.io/hello-world:latest
表示成功拉取
运行镜像
[root@localhost tmp]# docker run hello-world

Hello from Docker!

This message shows that your installation appears to be working correctly.

To generate this message, Docker took the following steps:

 . The Docker client contacted the Docker daemon.

 . The Docker daemon pulled the "hello-world" image from the Docker Hub.

    (amd64)

 . The Docker daemon created a new container from that image which runs the

    executable that produces the output you are currently reading.

 . The Docker daemon streamed that output to the Docker client, which sent it

    to your terminal.

To try something more ambitious, you can run an Ubuntu container with:

 $ docker run -it ubuntu bash

Share images, automate workflows, and more with a free Docker ID:

 https://hub.docker.com/

For more examples and ideas, visit:

 https://docs.docker.com/engine/userguide/
成功运行。
简单操作命令
镜像
docker pull 镜像名称[:版本]
拉取镜像,如果版本为空,则拉取最新的版本
docker run 镜像名称或ID
运行镜像,创建容器
docker run -it 镜像名称或ID
运行镜像,创建容器,并进入该容器。
-i表示以交互模式运行容器,通常与 -t 同时使用;
-t表示为容器重新分配一个伪输入终端,通常与 -i 同时使用;
另外还有很多参数,可参考http://www.runoob.com/docker/docker-run-command.html
docker rmi 镜像名称或ID
根据名称或ID删除镜像
容器
docker ps
列出容器
-a显示所有的容器,包括未运行的
-q 静默模式,只显示容器编号,通常和-a一起使用,docker ps -aq
docker rm 容器名称或ID
根据名称或者ID删除容器,如果带上参数-f,表示强制删除正在运行的容器
docker rm $(docker ps -aq)
表示删除所有容器
docker start 容器名称或ID
根据名称或者ID启动容器
docker stop 容器名称或ID
根据名称或者ID停止容器
docker attach id
进入某个容器(使用exit退出后容器也跟着停止运行)
docker exec -ti id
启动一个伪终端以交互式的方式进入某个容器(使用exit退出后容器不停止运行)
centos7 docker安装和使用_入门教程的更多相关文章
- WordPress安装:零基础入门教程
WordPress安装:零基础入门教程 1主机空间要求要运行 WordPress,主机空间需满足以下条件.不过现在网络上的空间基本都可以,而且还让你随意定制Php和Mysql版本,至于空间和数据库大小 ...
- centos7 docker 安装配置
docker快速入门测试 ########################################## #docker安装配置 #环境centos7 #配置docker阿里源 echo '#D ...
- GDI+_入门教程【一】
GDI For VisualBasic6.0 [一]文件下载:GDI+ For VB6[一] 简单绘图实例演示百度网盘 1 '以下为作者[vIsiaswx]的教程 '(该教程发布的原地址已无法访问,此 ...
- centos7 docker 安装 mysql5.7.24 导入12G的sql
先在CentOS7里面安装docker Docker 要求 CentOS 系统的内核版本高于 3.10 ,查看本页面的前提条件来验证你的CentOS 版本是否支持 Docker .通过 uname - ...
- centos7+docker 安装和部署crawlab分布式爬虫平台,并使用docker-compose管理docker
1.先决条件centos7+docker最新版本 sudo yum updat 2.配置一下镜像源,创建/etc/docker/daemon.conf文件,在其中输入如下内容 { "regi ...
- centos7 docker安装
Docker分为社区版CE和企业版EE. 社区版是免费提供给个人开发者和小型团体使用的,企业版会提供额外的收费服务,比如经过官方测试认证过的基础设施.容器.插件等 社区版按照stable和edge两种 ...
- 4.centos7 docker 安装
参考这个文档进行安装docker: http://www.runoob.com/docker/centos-docker-install.html 开机启动 systemctl enable dock ...
- Centos7 Docker 安装笔记
1. docker官方文档地址:https://docs.docker.com/ 2. centos版本号查看命令:uname -a centos7.3版本 3. 直接yum -install ...
- 【URLOS开发入门】docker官方系统镜像——Alpine入门教程
我们在进行URLOS应用开发时,经常会用到一些基础系统镜像,如:ubuntu.CentOS.Debian等,我们可以通过docker pull命令直接拉取官方镜像. root@ubuntu:~# do ...
随机推荐
- 手动实现图片预览-放大缩小全屏支持IE9以上
#{extends '/Index/index.html' /} #{set title:'意见反馈' /} <script src="/public/mgr/javascripts/ ...
- 转载: Android开源库V - Layout:淘宝、天猫都在用的UI框架,赶紧用起来吧!
阿里的UI库... 分析的很精辟... http://blog.csdn.net/carson_ho/article/details/71077193
- Linux 获取网关地址
route命令的用法:操作或者显示IP路由表route:DESCRIPTION Route manipulates the kernel's IP routing tables. Its primar ...
- SQLAlchemy-介绍安装
一:概述 SQLAlchemy的SQL工具包和对象关系映射是一个全面的工具集,用来处理数据库和Python. 它有几个不同的功能领域,可以单独使用或组合使用. 所示的主要组件,组件依赖关系组织成层: ...
- python网络编程-进程锁
一:进程锁的作用 进程锁是防止多进程并发执行在屏幕打印的时候,其他进程也输出数据到屏幕,而出现混乱现象. 比如:进程池中很多进程会向同一个日志文件中打印日志 二:代码 # -*- coding:utf ...
- python基础--类的方法
一:类的方法说明 类的方法分为实例方法,析构方法,构造方法,类方法,静态方法,属性方法,等等 类方法和静态方法都可以被类和类实例调用,类实例方法仅可以被类实例调用 类方法的隐含调用参数是类,而类实例方 ...
- jersey 过滤器名称绑定的问题 NameBinding Provider
查资料也不容易查,这个问题困扰了我两天. 当没有 @Provider 的时候 过滤器不会被执行.
- AdvStringGrid 固定行、列
- Java - 利用StringEscapeUtils对字符串进行各种转义与反转义
来自:http://blog.csdn.net/chenleixing/article/details/43456987 --------------------------------------- ...
- MAC下安装MAMP后,mysql server无法启动
用MAC下载安装了MAMP,之前使用是很好没问题的,但是突然无法启动mysql server,检查日志,提示InnDB出错,然后删掉了/Application/MAMP/db/mysql56目录下的i ...