FFMPEG 入门
1. 下载网站:
https://ffmpeg.zeranoe.com/builds/
先后下载 Win32 Shared 和 Win32 Dev 两个版本,分别解压缩。
2. 用Visual Studio 创建项目,选择 “Create new project from existing Code files”
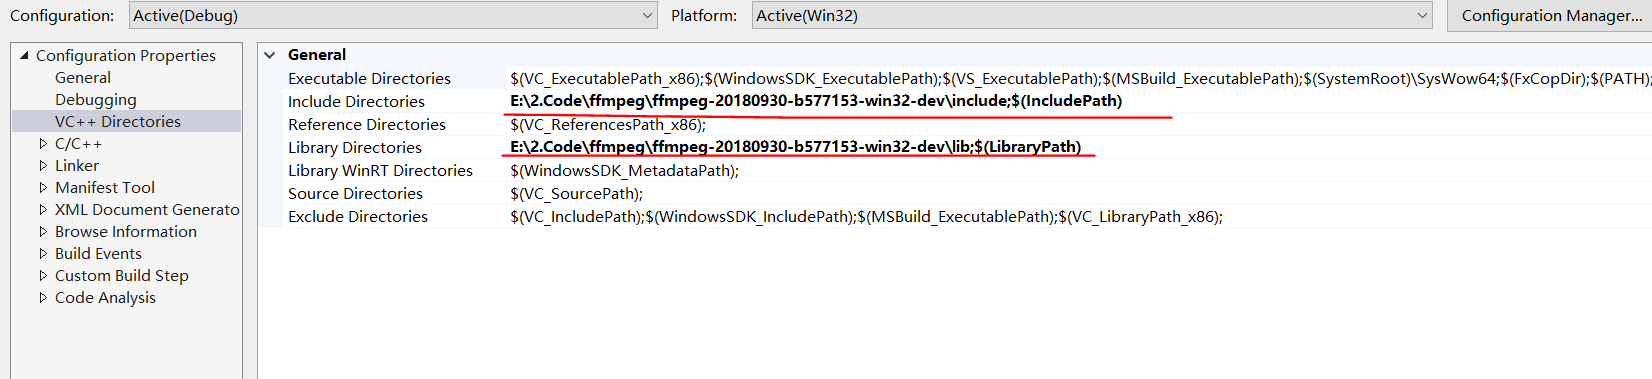
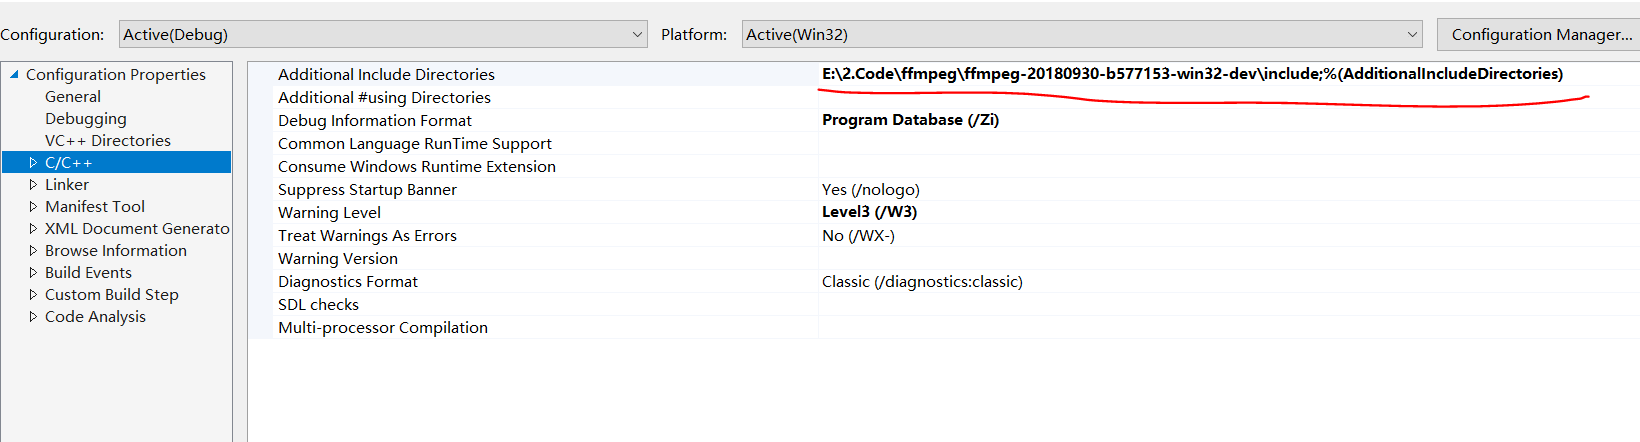
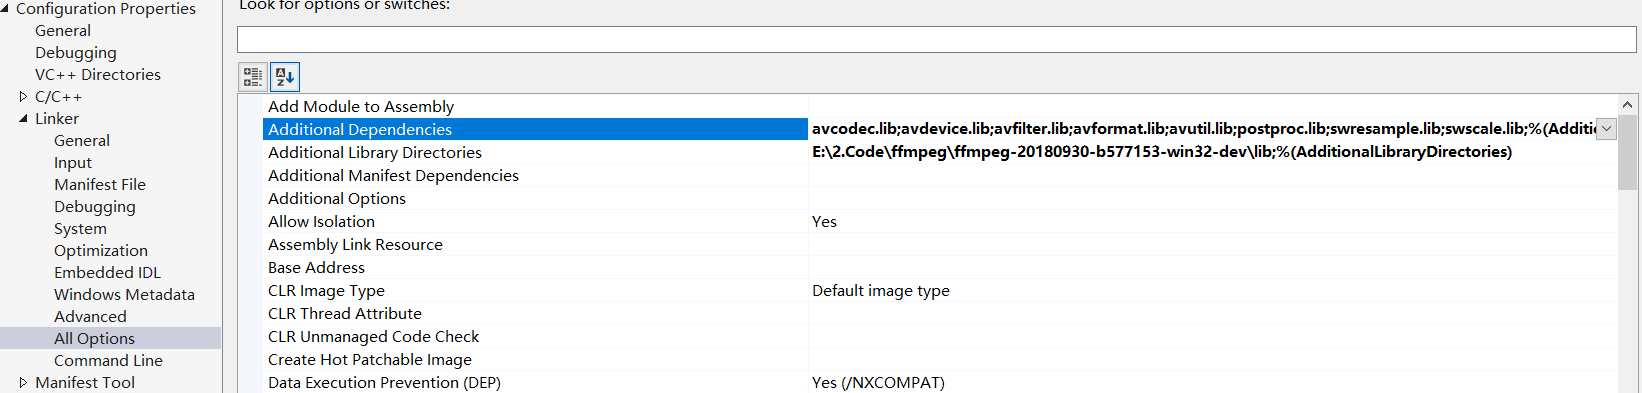
3. 设置 include path 和 library path, sample as follow,
记得把Shared里面的dll 拷贝到 debug目录。
 <?xml version="1.0" encoding="utf-8"?>

 <Project DefaultTargets="Build" ToolsVersion="15.0" xmlns="http://schemas.microsoft.com/developer/msbuild/2003">

   <ItemGroup Label="ProjectConfigurations">

     <ProjectConfiguration Include="Debug|Win32">

       <Configuration>Debug</Configuration>

       <Platform>Win32</Platform>

     </ProjectConfiguration>

     <ProjectConfiguration Include="Release|Win32">

       <Configuration>Release</Configuration>

       <Platform>Win32</Platform>

     </ProjectConfiguration>

     <ProjectConfiguration Include="Debug|x64">

       <Configuration>Debug</Configuration>

       <Platform>x64</Platform>

     </ProjectConfiguration>

     <ProjectConfiguration Include="Release|x64">

       <Configuration>Release</Configuration>

       <Platform>x64</Platform>

     </ProjectConfiguration>

   </ItemGroup>

   <PropertyGroup Label="Globals">

     <VCProjectVersion>15.0</VCProjectVersion>

     <ProjectGuid>{89E103CB-891F-49CF-A157-A1E806687913}</ProjectGuid>

     <Keyword>Win32Proj</Keyword>

     <WindowsTargetPlatformVersion>10.0.17134.0</WindowsTargetPlatformVersion>

   </PropertyGroup>

   <Import Project="$(VCTargetsPath)\Microsoft.Cpp.Default.props" />

   <PropertyGroup Condition="'$(Configuration)|$(Platform)'=='Debug|Win32'" Label="Configuration">

     <ConfigurationType>Application</ConfigurationType>

     <UseDebugLibraries>true</UseDebugLibraries>

     <PlatformToolset>v141</PlatformToolset>

   </PropertyGroup>

   <PropertyGroup Condition="'$(Configuration)|$(Platform)'=='Release|Win32'" Label="Configuration">

     <ConfigurationType>Application</ConfigurationType>

     <UseDebugLibraries>false</UseDebugLibraries>

     <PlatformToolset>v141</PlatformToolset>

   </PropertyGroup>

   <PropertyGroup Condition="'$(Configuration)|$(Platform)'=='Debug|x64'" Label="Configuration">

     <ConfigurationType>Application</ConfigurationType>

     <UseDebugLibraries>true</UseDebugLibraries>

     <PlatformToolset>v141</PlatformToolset>

   </PropertyGroup>

   <PropertyGroup Condition="'$(Configuration)|$(Platform)'=='Release|x64'" Label="Configuration">

     <ConfigurationType>Application</ConfigurationType>

     <UseDebugLibraries>false</UseDebugLibraries>

     <PlatformToolset>v141</PlatformToolset>

   </PropertyGroup>

   <Import Project="$(VCTargetsPath)\Microsoft.Cpp.props" />

   <ImportGroup Label="ExtensionSettings">

   </ImportGroup>

   <ImportGroup Label="Shared">

   </ImportGroup>

   <ImportGroup Label="PropertySheets" Condition="'$(Configuration)|$(Platform)'=='Debug|Win32'">

     <Import Project="$(UserRootDir)\Microsoft.Cpp.$(Platform).user.props" Condition="exists('$(UserRootDir)\Microsoft.Cpp.$(Platform).user.props')" Label="LocalAppDataPlatform" />

   </ImportGroup>

   <ImportGroup Label="PropertySheets" Condition="'$(Configuration)|$(Platform)'=='Release|Win32'">

     <Import Project="$(UserRootDir)\Microsoft.Cpp.$(Platform).user.props" Condition="exists('$(UserRootDir)\Microsoft.Cpp.$(Platform).user.props')" Label="LocalAppDataPlatform" />

   </ImportGroup>

   <ImportGroup Label="PropertySheets" Condition="'$(Configuration)|$(Platform)'=='Debug|x64'">

     <Import Project="$(UserRootDir)\Microsoft.Cpp.$(Platform).user.props" Condition="exists('$(UserRootDir)\Microsoft.Cpp.$(Platform).user.props')" Label="LocalAppDataPlatform" />

   </ImportGroup>

   <ImportGroup Label="PropertySheets" Condition="'$(Configuration)|$(Platform)'=='Release|x64'">

     <Import Project="$(UserRootDir)\Microsoft.Cpp.$(Platform).user.props" Condition="exists('$(UserRootDir)\Microsoft.Cpp.$(Platform).user.props')" Label="LocalAppDataPlatform" />

   </ImportGroup>

   <PropertyGroup Label="UserMacros" />

   <PropertyGroup Condition="'$(Configuration)|$(Platform)'=='Debug|Win32'">

     <LinkIncremental>true</LinkIncremental>

     <IncludePath>E:\2.Code\ffmpeg\ffmpeg-20180930-b577153-win32-dev\include;$(IncludePath)</IncludePath>

     <LibraryPath>E:\2.Code\ffmpeg\ffmpeg-20180930-b577153-win32-dev\lib;$(LibraryPath)</LibraryPath>

   </PropertyGroup>

   <PropertyGroup Condition="'$(Configuration)|$(Platform)'=='Release|Win32'">

     <LinkIncremental>true</LinkIncremental>

   </PropertyGroup>

   <ItemDefinitionGroup Condition="'$(Configuration)|$(Platform)'=='Debug|Win32'">

     <ClCompile>

       <PreprocessorDefinitions>WIN32;_DEBUG;_CONSOLE;%(PreprocessorDefinitions)</PreprocessorDefinitions>

       <RuntimeLibrary>MultiThreadedDebugDLL</RuntimeLibrary>

       <WarningLevel>Level3</WarningLevel>

       <DebugInformationFormat>ProgramDatabase</DebugInformationFormat>

       <Optimization>Disabled</Optimization>

       <AdditionalIncludeDirectories>E:\2.Code\ffmpeg\ffmpeg-20180930-b577153-win32-dev\include;%(AdditionalIncludeDirectories)</AdditionalIncludeDirectories>

     </ClCompile>

     <Link>

       <TargetMachine>MachineX86</TargetMachine>

       <GenerateDebugInformation>true</GenerateDebugInformation>

       <SubSystem>Console</SubSystem>

       <AdditionalLibraryDirectories>E:\2.Code\ffmpeg\ffmpeg-20180930-b577153-win32-dev\lib;%(AdditionalLibraryDirectories)</AdditionalLibraryDirectories>

       <AdditionalDependencies>avcodec.lib;avdevice.lib;avfilter.lib;avformat.lib;avutil.lib;postproc.lib;swresample.lib;swscale.lib;%(AdditionalDependencies)</AdditionalDependencies>

     </Link>

   </ItemDefinitionGroup>

   <ItemDefinitionGroup Condition="'$(Configuration)|$(Platform)'=='Release|Win32'">

     <ClCompile>

       <PreprocessorDefinitions>WIN32;NDEBUG;_CONSOLE;%(PreprocessorDefinitions)</PreprocessorDefinitions>

       <RuntimeLibrary>MultiThreadedDLL</RuntimeLibrary>

       <WarningLevel>Level3</WarningLevel>

       <DebugInformationFormat>ProgramDatabase</DebugInformationFormat>

     </ClCompile>

     <Link>

       <TargetMachine>MachineX86</TargetMachine>

       <GenerateDebugInformation>true</GenerateDebugInformation>

       <SubSystem>Console</SubSystem>

       <EnableCOMDATFolding>true</EnableCOMDATFolding>

       <OptimizeReferences>true</OptimizeReferences>

     </Link>

   </ItemDefinitionGroup>

   <ItemGroup>

     <ClCompile Include="..\examples\transcoding.c" />

   </ItemGroup>

   <Import Project="$(VCTargetsPath)\Microsoft.Cpp.targets" />

   <ImportGroup Label="ExtensionTargets">

   </ImportGroup>

 </Project>
Project
FFMPEG 入门的更多相关文章
- FFmpeg入门,简单播放器
一个偶然的机缘,好像要做直播相关的项目 为了筹备,前期做一些只是储备,于是开始学习ffmpeg 这是学习的第一课 做一个简单的播放器,播放视频画面帧 思路是,将视频文件解码,得到帧,然后使用定时器,1 ...
- FFmpeg 入门(7):Seeking
本文转自:FFmpeg 入门(7):Seeking | www.samirchen.com 处理 seek 命令 我们将为播放器添加 seek 的能力.这个过程中,我们会看到 av_seek_fram ...
- FFmpeg 入门(6):音频同步
本文转自:FFmpeg 入门(6):音频同步 | www.samirchen.com 音频同步 上一节我们做了将视频同步到音频时钟,这一节我们反过来,将音频同步到视频.首先,我们要实现一个视频时钟来跟 ...
- FFmpeg 入门(5):视频同步
本文转自:FFmpeg 入门(5):视频同步 | www.samirchen.com 视频如何同步 在之前的教程中,我们已经可以开始播放视频了,也已经可以开始播放音频了,但是视频和音频的播放还未同步, ...
- FFmpeg 入门(4):线程分治
本文转自:FFmpeg 入门(4):线程分治 | www.samirchen.com 概览 上一节教程中,我们使用 SDL 的音频相关的函数来支持音频播放.SDL 起了一个线程来在需要音频数据的时候去 ...
- FFmpeg 入门(2):输出视频到屏幕
本文转自:FFmpeg 入门(2):输出视频到屏幕 | www.samirchen.com SDL 我们这里使用 SDL 来渲染视频到屏幕.SDL 是 Simple Direct Layer 的缩写, ...
- FFmpeg 入门(3):播放音频
本文转自:FFmpeg 入门(3):播放音频 | www.samirchen.com 音频 SDL 提供了播放音频的方法.SDL_OpenAudio 函数用来让设备播放音频,它需要我们传入一个包含了所 ...
- FFmpeg 入门(1):截取视频帧
本文转自:FFmpeg 入门(1):截取视频帧 | www.samirchen.com 背景 在 Mac OS 上如果要运行教程中的相关代码需要先安装 FFmpeg,建议使用 brew 来安装: // ...
- ffmpeg入门
总入口 http://blog.csdn.net/leixiaohua1020/article/details/15811977 各结构体介绍 http://blog.csdn.net/leixiao ...
随机推荐
- Java 构造器 遇到多个构造器时要考虑用构建器
静态工厂和构造器有个共同的局限性:它们都不能很好地扩展到大量的可选参数. 当一个类中有若干个必选属性和多个可选属性时,采用重叠构造器模式.JavaBeans模式或者Builder模式,但各有优劣. 当 ...
- jQueryUI使用指南
jQuery UI包含了许多维持状态的小部件(Widget),因此,它与典型的 jQuery 插件使用模式略有不同.所有的 jQuery UI 小部件(Widget)使用相同的模式,所以,只要您学会使 ...
- POJ1068 --(模拟)
这题是在看一个书的时候的一个例题,当时并不明白啥意思,于是便找了下原题,以前没在POJ上刷过,这是开了个头,以后努力刷这个网站 题目大概意思是:http://poj.org/problem?id=10 ...
- 三种进程和线程数据共享模块方法Queue》Pipe》manager
>>>>线程中的queue import threading import queue def f(qq): print("in child",qq.qsi ...
- golang 对结构体进行格式化输出
可以使用 `return fmt.Sprintf("%+v", *conf) ` 来打印结构体,包括结构体的key值.但是由于结构体内容较多,都在一行,所以希望可以格式化输出结构体 ...
- Linux压力测试工具stress的参数详解
为了测试服务器的负载情况,可以使用stress这个压力测试工具,可以在环境上验证测试下. stress安装 sudo yum install -y epel-release sudo yum inst ...
- Elasticsearch集群优化
版本配置: ES版本:6.2.4 OS内存64G. 一.参数配置: ES jvm内存31G. vi /etc/sysctl.conf vm.swappiness = 1 elasticsearch.y ...
- ECharts JS应用:图表页面实现
因为要统计数据进行图表展示,所以就简单学习了 ECharts JS 的应用.它是一个纯Javascript图库,它依赖于一个轻量级的Canvas库 ZRender,并提供直观.生动.交互式和高度可定制 ...
- [转]你可能不知道的五个强大HTML5 API
一.全屏 // 找到适合浏览器的全屏方法 function launchFullScreen(element) { if(element.requestFullScreen) { element.re ...
- 单片机成长之路(51基础篇) - 004 STC89C52MCU 软件实现系统复位
用户应用程序在运行过程中,有时会有特殊需求,需要实现单片机系统复位(热启动之一),传统的8051单片机由于硬件上未支持此功能,用户必须用软件模拟实现,实现起来较麻烦.STC单片机增加了相应的硬件功能, ...