
Asp.Net MVC页面显示后台处理进度问题
这个问题的背景是,用户通过浏览器上传文件或Excel数据到系统中,页面需要时时显示后台处理进度,以增强用户的体验。
在GitHub上找到一个一个项目,基本实现了这个功能,具体效果如下图
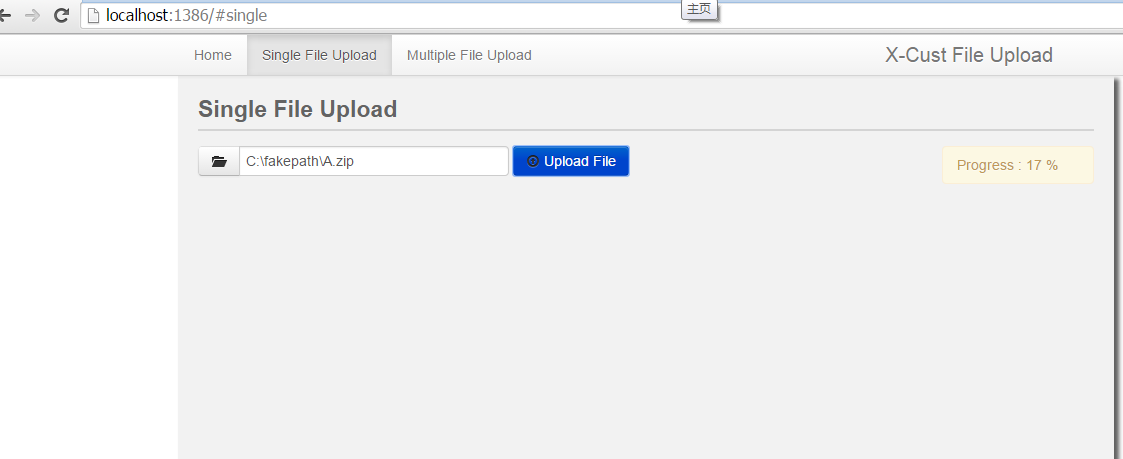
代码实现过程大概如下:
第一步 :定义一个HomeController类,用来处理浏览器的上传文件和进度情况
 public class HomeController : Controller

     {

         //

         // GET: /Home/

         public ActionResult Index()

         {

             return View();

         }

         public ActionResult Homepage()

         {

             return View();

         }

         [HttpPost]

         public ActionResult GetUniqueIdentifier()

         {

             return Json(Guid.NewGuid().ToString());

         }

         [HttpPost]

         public ActionResult SingleFileUpload()

         {

             return View();

         }

         [HttpPost]

         public ActionResult MultipleFileUpload()

         {

             return View();

         }

         [HttpPost]

         public ActionResult DoUploadSingleFile(HttpPostedFileBase berkas, string guid)

         {

             bool result = false;

             string filePath = Server.MapPath("~/Temporary/") + berkas.FileName;

             int fileLength = berkas.ContentLength;

             HttpContext.Cache[guid + "_total"] = fileLength;

             byte[] fileContent = new byte[fileLength];

             int bufferLength =  * ;

             byte[] buffer = new byte[bufferLength];

             int bytesRead = ;

             FileStream outputFileStream = new FileStream(filePath, FileMode.Create, FileAccess.ReadWrite);

             using (Stream inputFileStream = berkas.InputStream)

             {

                 while ((bytesRead = inputFileStream.Read(buffer, , buffer.Length)) > )

                 {

                     outputFileStream.Write(buffer, , bytesRead);

                     outputFileStream.Flush();

                     HttpContext.Cache[guid + "_current"] = Convert.ToInt32(HttpContext.Cache[guid + "_current"]) + bytesRead;

                     Debug.WriteLine(HttpContext.Cache[guid + "_current"].ToString());

                     Thread.Sleep();

                 }

                 inputFileStream.Close();

                 inputFileStream.Dispose();

             }

             outputFileStream.Close();

             outputFileStream.Dispose();

             result = true;

             return Json(result);

         }

         [HttpPost]

         public ActionResult TrackProgress(string guid)

         {

             try

             {

                 double paramCurrentFileSize = Convert.ToDouble(HttpContext.Cache[guid + "_current"]);

                 double paramTotalFileSize = Convert.ToDouble(HttpContext.Cache[guid + "_total"]);

                 int uploadProgress = Convert.ToInt32(paramCurrentFileSize *  / paramTotalFileSize);

                 return Json(uploadProgress);

             }

             catch (Exception)

             {

                 return Json();

             }

         }

     }
DoUploadSingleFile方法用来将用户传来的文件保存到Temporary目录下,将文件的总大小和已经写入的文件数量分别放到Cache中,以便接下来读取这两个数据。
TrackProgress方法就是讲DoUploadSingleFile方法总保存的两个数读出并计算比例。
第二步,Web页面,主要存放三部分,主要是上传组件和进度显示,通过JS绑定了按钮和上传送事件。
@using X_Cust_File_Upload.Helpers

@{

    Layout = null;

    ViewBag.Title = "SingleFileUpload";

}

@*@PageHelper.Script("angular-js/js/angular.js", false)

@PageHelper.Script("underscore-js/js/underscore.js", false)*@

@PageHelper.Script("single-file-upload.js", true)

<div class="title">

    Single File Upload

</div>

<div class="content">

    <form method="post" enctype="multipart/form-data" id="form_upload" name="form_upload" style="display: none;">

        <input type="file" name="berkas" id="berkas" />

    </form>

    <div class="control-group">

        <div class="input-prepend">

            <button class="btn" id="buttonSelectFile"><i class="icon icon-folder-open"></i></button>

            <input type="text" name="berkas_name" id="berkas_name" class="span3 uneditable-input" placeholder="Select File to Upload" />

        </div>

        <button class="btn btn-primary" id="buttonUploadFile"><i class="icon icon-upload"></i> Upload File</button>

        <div id="notification-area" class="alert info pull-right notification-area">

        </div>

    </div>

</div>

<script type="text/javascript">

    $(document).ready(function () {

        $("#buttonSelectFile").on("click", function (event) {

            $("#berkas").trigger("click");

        });

        $("#berkas").on("change", function (event) {

            $("#berkas_name").val($("#berkas").val());

        });

        $("#buttonUploadFile").on("click", function (event) {

            var notificationArea = new NotificationArea($("#notification-area"));

            var fileUpload = new FileUpload();

            fileUpload.uploadSingleFile($("#form_upload"), "87shd-09ld2-9sdkl-09dlp-02kdm", "@Url.Content("~/Home/DoUploadSingleFile")", notificationArea, "@Url.Content("~/Home/TrackProgress")");

        });

    });

</script>
第三步,主要是ajax上传事件,即single-file-upload.js文件,在上传数据的时候,开启一个定时器,每个1s向TrackProgress方法发送一次请求,获取已经上传的进度。
function NotificationArea($container) {

    this.showProgressNotification = function ($progress, $isVisible) {

        $container.html("<span>Progress : " + $progress + " %</span>");

        if ($isVisible == false) {

            $container.fadeIn();

        }

    };

    this.showErrorNotification = function () {

        $container.removeAttr("class");

        $container.addClass("alert error pull-right");

        $container.html("<span>Upload error.</span>");

    };

    this.showSuccessNotification = function () {

        $container.removeAttr("class");

        $container.addClass("alert info pull-right");

        $container.html("<span>Uploaded successfully.</span>");

    };

}

function FileUpload() {

    this.guid = "";

    this.onUploadProgress = false;

    this.notificationObject = null;

    this.trackUrl = "";

    this.uploadSingleFile = function ($form, $guid, $url, $notificationObject, $trackUrl) {

        if ($form != null) {

            this.guid = $guid;

            //this.notificationObject = $notificationObject;

            this.trackUrl = $trackUrl;

            var trackTimer = setInterval(function () {

                trackUploadProgress($trackUrl, $notificationObject, $guid);

            }, 1000);

            $form.ajaxSubmit({

                url: $url,

                data: {

                    guid: $guid

                },

                beforeSend: function () {

                    $notificationObject.showProgressNotification(0, false);

                },

                success: function (data) {

                    console.log("sukses");

                    if (data == true) {

                        clearTimeout(trackTimer);

                        $notificationObject.showSuccessNotification();

                    }

                    else {

                        $notificationObject.showErrorNotification();

                    }

                },

                error: function (xhr, ajaxOptions, error) {

                    $notificationObject.showErrorNotification();

                },

                complete: function () {

                    clearTimeout(trackTimer);

                }

            });

        }

    };

}

function trackUploadProgress($url, $notificationObject, $guid) {

    console.log("Upload progress");

    $.ajax({

        url: $url,

        type: "post",

        data: {

            guid: $guid

        },

        success: function (data) {

            $notificationObject.showProgressNotification(data, true);

        }

    });

}
到此,主要功能已经完成,上传文件可以看到大致的进度。
但是我将这个功能集成到自己的系统时候遇见了一个很奇怪的问题:进度一直不提示,直到数据上传成功了,提示显示100%。这个问题的原因还不确定,请院子里的大牛帮忙分析下。
在原有的系统上增加权限验证功能,如果用户没有登录系统是不能上传数据的,但也就是这个功能,造成了上面的问题。我的做法如下:
第四步,增加AuthorizeAttribute认证子类,主要功能是用来判断用户是否登录系统,如果没有登录,跳转到登录页面,让用户登录。
public class CustomAuthorizeAttribute : AuthorizeAttribute

    {

        public override void OnAuthorization(AuthorizationContext filterContext)

        {

            base.OnAuthorization(filterContext);

        }

        protected override bool AuthorizeCore(HttpContextBase httpContext)

        {

            if (httpContext == null)

            {

                throw new ArgumentNullException("httpContext");

            }

            if (!httpContext.User.Identity.IsAuthenticated)//未登录的话 跳转到登录界面

                return false;

            return true;

        }

        protected override void HandleUnauthorizedRequest(AuthorizationContext filterContext)

        {

            filterContext.Result = new RedirectResult("/Auth/LogOn");

        }

    }
第五步,用户登录成功后,跳转到上传页面,这个工程使用ajax登录,JS代码如下:
$.ajax({

                type: "POST",

                url: "LogOn",

                data: { name: $("#UserName").val(), pwd: $("#Password").val(), vlidateCode: $.trim($("#ValidateCode").val())},

                dataType: "json",

                success: function (data) {

                    if(data.isSuccess)

                    {

                        window.location = data.url;

                    }

                    else

                    {

                        alert(data.message);

                        changeCheckCode();

                    }

                    $("#Loading").hide();

                }

            });
后台登录过程为AuthorController类,主要设置用户已经登录标志,
 [HttpPost]

         public JsonResult LogOn(string name, string pwd, string vlidateCode)

         {

                 FormsAuthentication.SetAuthCookie(name, false);

                 var json = new { isSuccess = true, url = "../Home" };

                 return Json(json);

         }
第六步,在HomeController类上添加认证属性
  [CustomAuthorize(Roles="T1")]

    public class HomeController : Controller

    {

        ........

    }
原作者程序地址:http://files.cnblogs.com/files/crazyguo/x-cust-file-upload-master.zip
我增加后的程序:http://files.cnblogs.com/files/crazyguo/My.7z
Asp.Net MVC页面显示后台处理进度问题的更多相关文章
- ASP.NET MVC搭建项目后台UI框架—5、Demo演示Controller和View的交互
目录 ASP.NET MVC搭建项目后台UI框架—1.后台主框架 ASP.NET MVC搭建项目后台UI框架—2.菜单特效 ASP.NET MVC搭建项目后台UI框架—3.面板折叠和展开 ASP.NE ...
- ASP.NET MVC搭建项目后台UI框架—7、统计报表
ASP.NET MVC搭建项目后台UI框架—1.后台主框架 ASP.NET MVC搭建项目后台UI框架—2.菜单特效 ASP.NET MVC搭建项目后台UI框架—3.面板折叠和展开 ASP.NET M ...
- ASP.NET MVC搭建项目后台UI框架—8、将View中选择的数据行中的部分数据传入到Controller中
目录 ASP.NET MVC搭建项目后台UI框架—1.后台主框架 ASP.NET MVC搭建项目后台UI框架—2.菜单特效 ASP.NET MVC搭建项目后台UI框架—3.面板折叠和展开 ASP.NE ...
- ASP.NET MVC搭建项目后台UI框架—1、后台主框架
目录 ASP.NET MVC搭建项目后台UI框架—1.后台主框架 ASP.NET MVC搭建项目后台UI框架—2.菜单特效 ASP.NET MVC搭建项目后台UI框架—3.面板折叠和展开 ASP.NE ...
- ASP.NET MVC搭建项目后台UI框架—2、菜单特效
目录 ASP.NET MVC搭建项目后台UI框架—1.后台主框架 ASP.NET MVC搭建项目后台UI框架—2.菜单特效 ASP.NET MVC搭建项目后台UI框架—3.面板折叠和展开 ASP.NE ...
- ASP.NET MVC搭建项目后台UI框架—3、面板折叠和展开
目录 ASP.NET MVC搭建项目后台UI框架—1.后台主框架 ASP.NET MVC搭建项目后台UI框架—2.菜单特效 ASP.NET MVC搭建项目后台UI框架—3.面板折叠和展开 ASP.NE ...
- ASP.NET MVC搭建项目后台UI框架—4、tab多页签支持
目录 ASP.NET MVC搭建项目后台UI框架—1.后台主框架 ASP.NET MVC搭建项目后台UI框架—2.菜单特效 ASP.NET MVC搭建项目后台UI框架—3.面板折叠和展开 ASP.NE ...
- ASP.NET MVC搭建项目后台UI框架—6、客户管理(添加、修改、查询、分页)
目录 ASP.NET MVC搭建项目后台UI框架—1.后台主框架 ASP.NET MVC搭建项目后台UI框架—2.菜单特效 ASP.NET MVC搭建项目后台UI框架—3.面板折叠和展开 ASP.NE ...
- jsp实时显示后台批处理进度 - out分块,简单的长连接方式
这两天在实现一个批处理操作,但是想让前台实时显示后台批处理进度,本想着用复杂一些的框架可以实现异步信息调用 但是鉴于是内部管理系统,且只有一两个人用到这个功能,所以做了一个简单的长连接方式的实时响应 ...
随机推荐
- Mobile first! Wijmo 5 + Ionic Framework之:费用跟踪 App
费用跟踪应用采用了Wijmo5和Ionic Framework创建,目的是构建一个hybird app. 我们基于<Mobile first! Wijmo 5 + Ionic Framework ...
- Retrofit2 动态(静态)添加请求头Header
Retrofit提供了两个两种定义HTTP请求头字段的方法即静态和动态.静态头不能改变为不同的请求,头的键和值是固定的且不可改变的,随着程序的打开便已固定. 动态添加 @GET("/&quo ...
- centos7 Linux 安装jdk1.8
在CentOS7上安装JDK1.8 1 通过 xshell 连接到CentOS7 服务器: 2 进入到目录 /usr/local/ 中(一般装应用环境我们都会在这个目录下装,也可自行选择目录): cd ...
- python网络编程:socketserver的基本使用
本文内容: socketserver的介绍 socketserver的使用 socketserver的异步服务端 首发时间:2018-03-21 也可以使用socketserver来创建socket ...
- datagridview 行高列宽的自动设置
1) 设定行高和列宽自动调整 [C#]// 设定包括Header和所有单元格的列宽自动调整 DataGridView1.AutoSizeColumnsMode = DataGridViewAutoSi ...
- 简单易懂的程序语言入门小册子(1):基于文本替换的解释器,lambda演算
最近比较闲,打算整理一下之前学习的关于程序语言的知识.主要的内容其实就是一边设计程序语言一边写解释器实现它.这些知识基本上来自Programming Languages and Lambda Calc ...
- 用Python实现数据结构之栈
栈 栈是最简单的数据结构,也是最重要的数据结构.它的原则就是后进先出(LIFO),栈被使用于非常多的地方,例如浏览器中的后退按钮,文本编辑器中的撤销机制,接下来我们用Python来具体实现这个数据结构 ...
- .net 调用R语言的函数(计算统计值pvalue 对应excel :ttest)
Pvalue 计算 项目设计pvalue计算,但是由于.net 没有类似的公式或者函数,最终决定使用.net 调用R语言 采用.net 调用r语言的公用函数 需要安装 r语言环境 https://mi ...
- Linux 小知识翻译 - 「环境变量」
这次,谈谈关于「环境变量」的话题. 所谓变量,就是在程序中设置的,相当于在内存中准备的「一个用来存放数据的小箱子」. 即,程序通过变量来保存值,通过变量保存的内容来进行各式各样的计算处理. 「环境变量 ...
- 真机测试以及appstore发布流程
一.添加真机测试流程:http://jingyan.baidu.com/article/48b558e33b96a27f38c09aa4.html 二.app发布流程:http://jingyan.b ...