
Xamarin.Android和UWP之MVVM的简单使用(二)
0x01 前言
前面一篇,Xamarin.Android和UWP之MVVM的简单使用(一),主要讲了MvvmLight的简单使用
这篇主要讲讲MvvmCross的简单使用,例子的话,还是和上篇的一样。直接进正题吧,不废话了。
0x02 简单的MVVM(mvvmcross) Demo
新建一个类库项目:Catcher.MVVMDemo.Day01CrossCore
添加一个ViewModels文件夹,同时添加一个MainViewModel
 using MvvmCross.Core.ViewModels;

 namespace Catcher.MVVMDemo.Day01CrossCore.ViewModels

 {

     public class MainViewModel : MvxViewModel

     {

         public MainViewModel() { }

         private string _input;

         public string Input

         {

             get

             {

                 return _input;

             }

             set

             {

                 _input = value;

                 RaisePropertyChanged(() => Input);

             }

         }

     }

 }
这里的ViewModel继承的是MvxViewModel。
在项目根路径添加一个App.cs
 using Catcher.MVVMDemo.Day01CrossCore.ViewModels;

 using MvvmCross.Core.ViewModels;

 namespace Catcher.MVVMDemo.Day01CrossCore

 {

     public class App : MvxApplication

     {

         public override void Initialize()

         {

             RegisterAppStart<MainViewModel>();

         }

     }

 }
注册MainViewModel为启动的第一个视图模型
到这里,Xamarin.Android和UWP的公共部分已经完成了。
第一个例子(Xamarin.Android):
新建一个Android项目:Catcher.MVVMDemo.Day01DroidByMvvmCross
在根目录添加一个Setup.cs
 using Android.Content;

 using MvvmCross.Core.ViewModels;

 using MvvmCross.Droid.Platform;

 using Catcher.MVVMDemo.Day01CrossCore;

 namespace Catcher.MVVMDemo.Day01DroidByMvvmCross

 {

     public class Setup : MvxAndroidSetup

     {

         public Setup(Context applicationContext)

             : base(applicationContext)

         {

         }

         protected override IMvxApplication CreateApp()

         {

             return new App();

         }

     }

 }
在Setup中,主要是返回了我们在Core里面编写的App.cs
然后修改我们的Main.axml
 <?xml version="1.0" encoding="utf-8"?>

 <LinearLayout xmlns:android="http://schemas.android.com/apk/res/android"

     xmlns:local="http://schemas.android.com/apk/res-auto"

     android:orientation="vertical"

     android:layout_width="match_parent"

     android:layout_height="match_parent">

     <EditText

         android:layout_width="match_parent"

         android:layout_height="wrap_content"

         local:MvxBind="Text Input" />

     <TextView

         android:layout_width="match_parent"

         android:layout_height="wrap_content"

         local:MvxBind="Text Input" />

 </LinearLayout>
通过local:MvxBind来实现绑定。
新建一个文件夹Activities,同时添加一个MainActivity
 using Android.App;

 using MvvmCross.Droid.Views;

 namespace Catcher.MVVMDemo.Day01DroidByMvvmCross.Activities

 {

     [Activity(Label = "MvvmCross", MainLauncher = true)]

     public class MainActivity : MvxActivity

     {

         protected override void OnViewModelSet()

         {

             SetContentView(Resource.Layout.Main);

         }

     }

 }
Activity的代码很简单,就是指定视图。
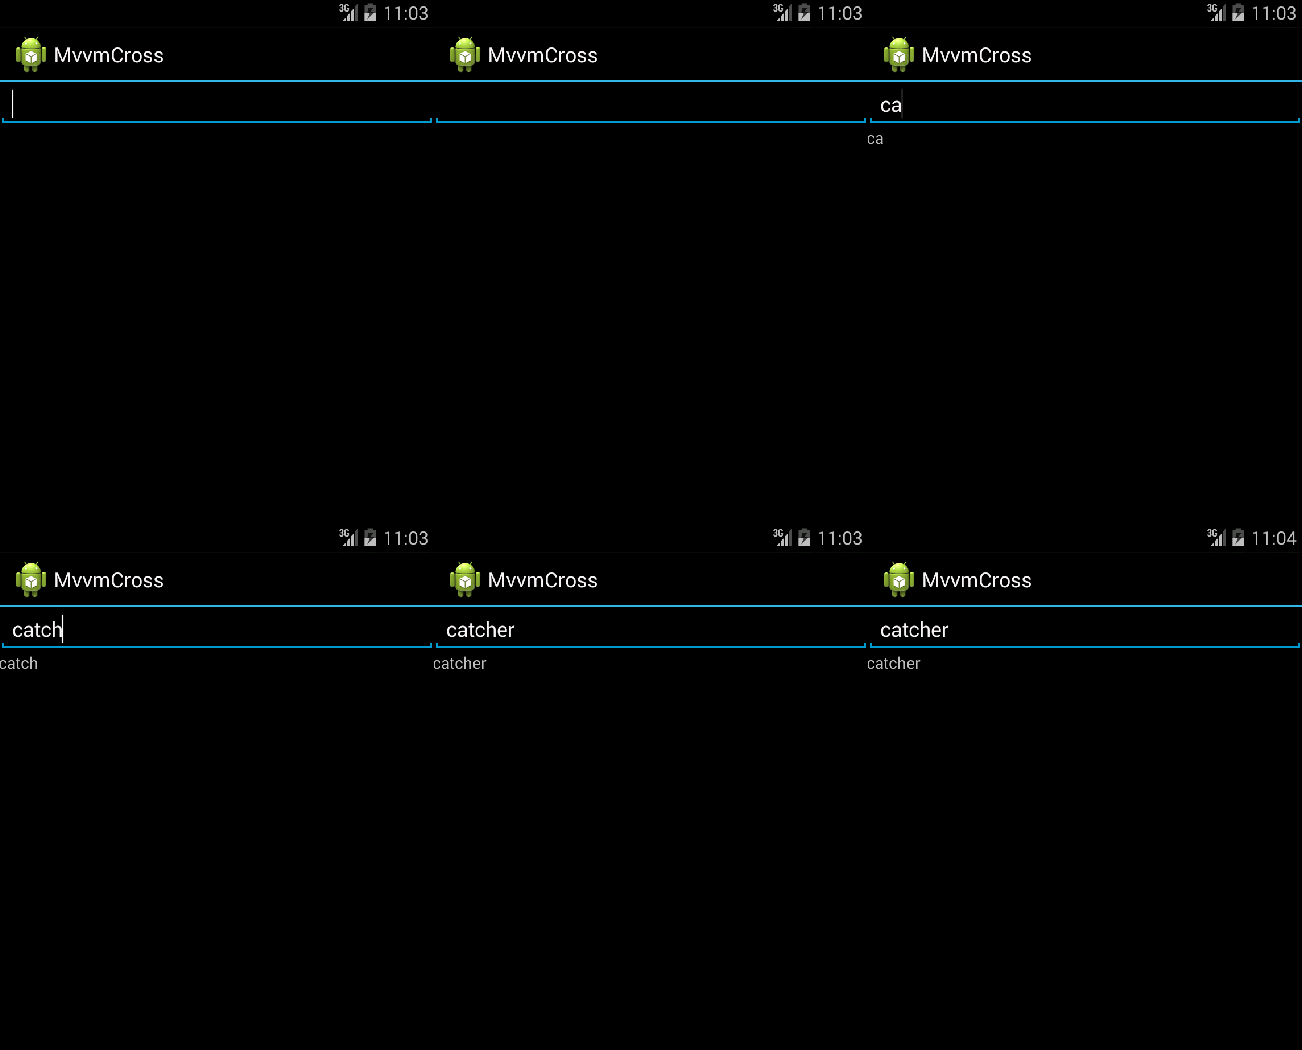
到这里已经可以成功运行了,效果如下:
第二个例子(UWP):
步骤基本与Xamarin.Android一致!
新建一个UWP项目:Catcher.MVVMDemo.Day01UWPByMvvmCross
添加一个Setup.cs
 using MvvmCross.Core.ViewModels;

 using MvvmCross.WindowsUWP.Platform;

 using Windows.UI.Xaml.Controls;

 namespace Catcher.MVVMDemo.Day01UWPByMvvmCross

 {

     public class Setup : MvxWindowsSetup

     {

         public Setup(Frame rootFrame) : base(rootFrame)

         {

         }

         protected override IMvxApplication CreateApp()

         {

             return new Day01CrossCore.App();

         }

     }

 }
注意与Android的区别!!
修改App.xaml.cs,将设置启动页注释掉,换成我们刚才的Setup.cs,具体如下:
           if (e.PrelaunchActivated == false)

             {

                 if (rootFrame.Content == null)

                 {

                     //rootFrame.Navigate(typeof(MainPage), e.Arguments);

                     var setup = new Setup(rootFrame);

                     setup.Initialize();

                     var start = Mvx.Resolve<IMvxAppStart>();

                     start.Start();

                 }

                 Window.Current.Activate();

             }
把新建项目生成的MainPage干掉,同时在根目录添加一个Views文件夹,用来存放我们的Page
新建一个MainPage.xaml,修改布局如下:
 <views:MvxWindowsPage

     x:Class="Catcher.MVVMDemo.Day01UWPByMvvmCross.Views.MainPage"

     xmlns="http://schemas.microsoft.com/winfx/2006/xaml/presentation"

     xmlns:x="http://schemas.microsoft.com/winfx/2006/xaml"

     xmlns:local="using:Catcher.MVVMDemo.Day01UWPByMvvmCross.Views"

     xmlns:d="http://schemas.microsoft.com/expression/blend/2008"

     xmlns:mc="http://schemas.openxmlformats.org/markup-compatibility/2006"

         xmlns:views="using:MvvmCross.WindowsUWP.Views"

     mc:Ignorable="d">

     <Grid Background="{ThemeResource ApplicationPageBackgroundThemeBrush}">

         <StackPanel Margin="20">

             <TextBlock FontSize="14" HorizontalAlignment="Center" Text="MvvmCross UWP Demo" />

             <TextBox

                 x:Name="txtInput"

                 />

             <TextBlock Text="{Binding ElementName=txtInput,Path=Text}" />

         </StackPanel>

     </Grid>

 </views:MvxWindowsPage>
要注意的是,用的是MvvmCross的布局MvxWindosPage
并且,MainPage.xaml.cs也要修改!!
 using MvvmCross.WindowsUWP.Views;

 namespace Catcher.MVVMDemo.Day01UWPByMvvmCross.Views

 {

     public sealed partial class MainPage : MvxWindowsPage

     {

         public MainPage()

         {

             this.InitializeComponent();

         }

     }

 }
都是用MvvmCross自己的东西!如果忘记修改,运行效果是一片黑。
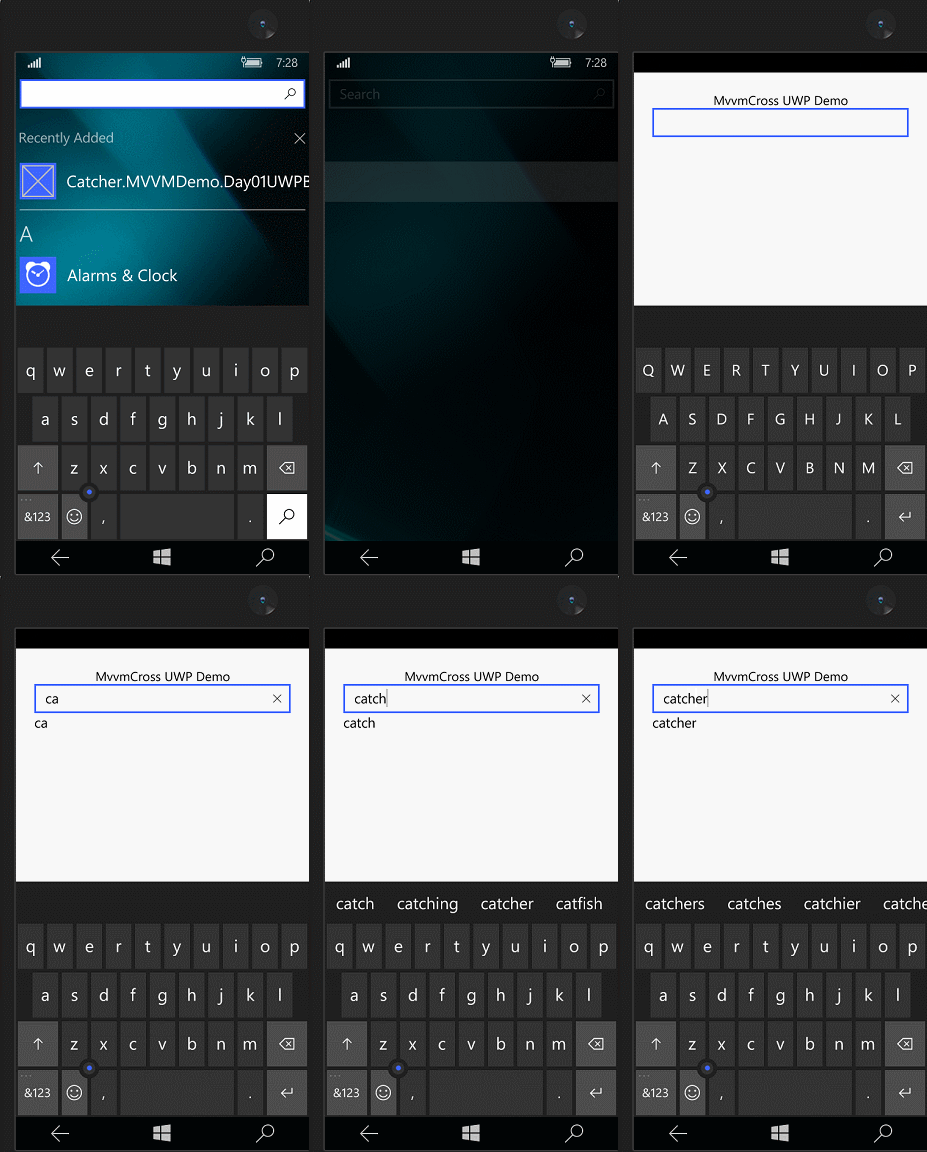
到这里已经OK了,效果如下
0x03 MVVM(mvvmcross) 登陆Demo
登陆失败时要有个对话框提示,我们要先新建一个IDialogService
 namespace Catcher.MVVMDemo.Day01CrossCore

 {

     public interface IDialogService

     {

         void Alert(string message, string title, string okbtnText);

     }

 }
在刚才的类库项目中添加一个LoginViewModel
 using MvvmCross.Core.ViewModels;

 namespace Catcher.MVVMDemo.Day01CrossCore.ViewModels

 {

     public class LoginViewModel : MvxViewModel

     {

         private readonly IDialogService _dialogService;

         public LoginViewModel(IDialogService dialogService)

         {

             _dialogService = dialogService;

         }

         private string _Name;

         public string Name

         {

             get

             {

                 return _Name;

             }

             set

             {

                 _Name = value;

                 RaisePropertyChanged(()=>Name);

             }

         }

         private string _password;

         public string Password

         {

             get

             {

                 return _password;

             }

             set

             {

                 _password = value;

                 RaisePropertyChanged(()=>Password);

             }

         }

         private IMvxCommand _loginCommand;

         public virtual IMvxCommand LoginCommand

         {

             get

             {

                 _loginCommand = _loginCommand ?? new MvxCommand(Login);

                 return _loginCommand;

             }

         }

         private void Login()

         {

             if (Name=="catcher"&&Password=="")

             {

                 ShowViewModel<MainViewModel>();

             }

             else

             {

                 _dialogService.Alert("check your name and password", "Infomation", "OK");

             }

         }

     }

 }
登陆的逻辑处理还是和上一篇一样。
修改我们的App.cs
 using Catcher.MVVMDemo.Day01CrossCore.ViewModels;

 using MvvmCross.Core.ViewModels;

 using MvvmCross.Platform;

 using MvvmCross.Platform.IoC;

 namespace Catcher.MVVMDemo.Day01CrossCore

 {

     public class App : MvxApplication

     {

         public override void Initialize()

         {

             CreatableTypes()

             .EndingWith("Service")

             .AsInterfaces()

             .RegisterAsLazySingleton();

             RegisterAppStart<LoginViewModel>();

             //demo 1

             //RegisterAppStart<MainViewModel>();

         }

     }

 }
第三个例子(Xamarin.Android):
在Catcher.MVVMDemo.Day01DroidByMvvmCross中添加一个Services文件夹
同时添加一个DialogService去实现我们刚才定义的IDialogService接口。
 using Android.App;

 using MvvmCross.Platform;

 using Catcher.MVVMDemo.Day01CrossCore;

 using MvvmCross.Platform.Droid.Platform;

 namespace Catcher.MVVMDemo.Day01DroidByMvvmCross.Services

 {

     public class DialogService : IDialogService

     {

         /// <summary>

         /// show the alert dialog

         /// </summary>

         /// <param name="message">the message of the dialog</param>

         /// <param name="title">the title of the dialog</param>

         /// <param name="okbtnText">the text of the button</param>

         public void Alert(string message, string title, string okbtnText)

         {

             //activity

             var topActivity = Mvx.Resolve<IMvxAndroidCurrentTopActivity>();

             var context = topActivity.Activity;

             //alert dialog

             var adb = new AlertDialog.Builder(context);

             adb.SetTitle(title);

             adb.SetMessage(message);

             adb.SetPositiveButton(okbtnText, (sender, args) => { });

             adb.Create().Show();

         }

     }

 }
这里用到了AlertDialog。
在Setup.cs中注册一下这个Service,重写InitializeFirstChance 方法
       protected override void InitializeFirstChance()

         {

             base.InitializeFirstChance();

             Mvx.RegisterSingleton<IDialogService>(() => new DialogService());

         }
添加一个login.axml
 <?xml version="1.0" encoding="utf-8"?>

 <LinearLayout xmlns:android="http://schemas.android.com/apk/res/android"

     xmlns:local="http://schemas.android.com/apk/res-auto"

     android:orientation="vertical"

     android:layout_width="match_parent"

     android:layout_height="match_parent">

     <EditText

         android:layout_width="match_parent"

         android:layout_height="wrap_content"

         android:hint="enter your name"

         local:MvxBind="Text Name" />

     <EditText

         android:layout_width="match_parent"

         android:layout_height="wrap_content"

         android:inputType="textPassword"

         android:hint="enter your password"

         local:MvxBind="Text Password" />

     <Button

         android:layout_width="match_parent"

         android:layout_height="wrap_content"

         android:text="Login"

         local:MvxBind="Click LoginCommand" />

 </LinearLayout>
在Activities文件夹添加一个LoginActivity
 using Android.App;

 using MvvmCross.Droid.Views;

 namespace Catcher.MVVMDemo.Day01DroidByMvvmCross.Activities

 {

     [Activity(Label = "MvvmCross", MainLauncher = true)]

     public class LoginActivity : MvxActivity

     {

         protected override void OnViewModelSet()

         {

             SetContentView(Resource.Layout.login);

         }

     }

 }
去掉,MainActivity中的Mainlauncher=true
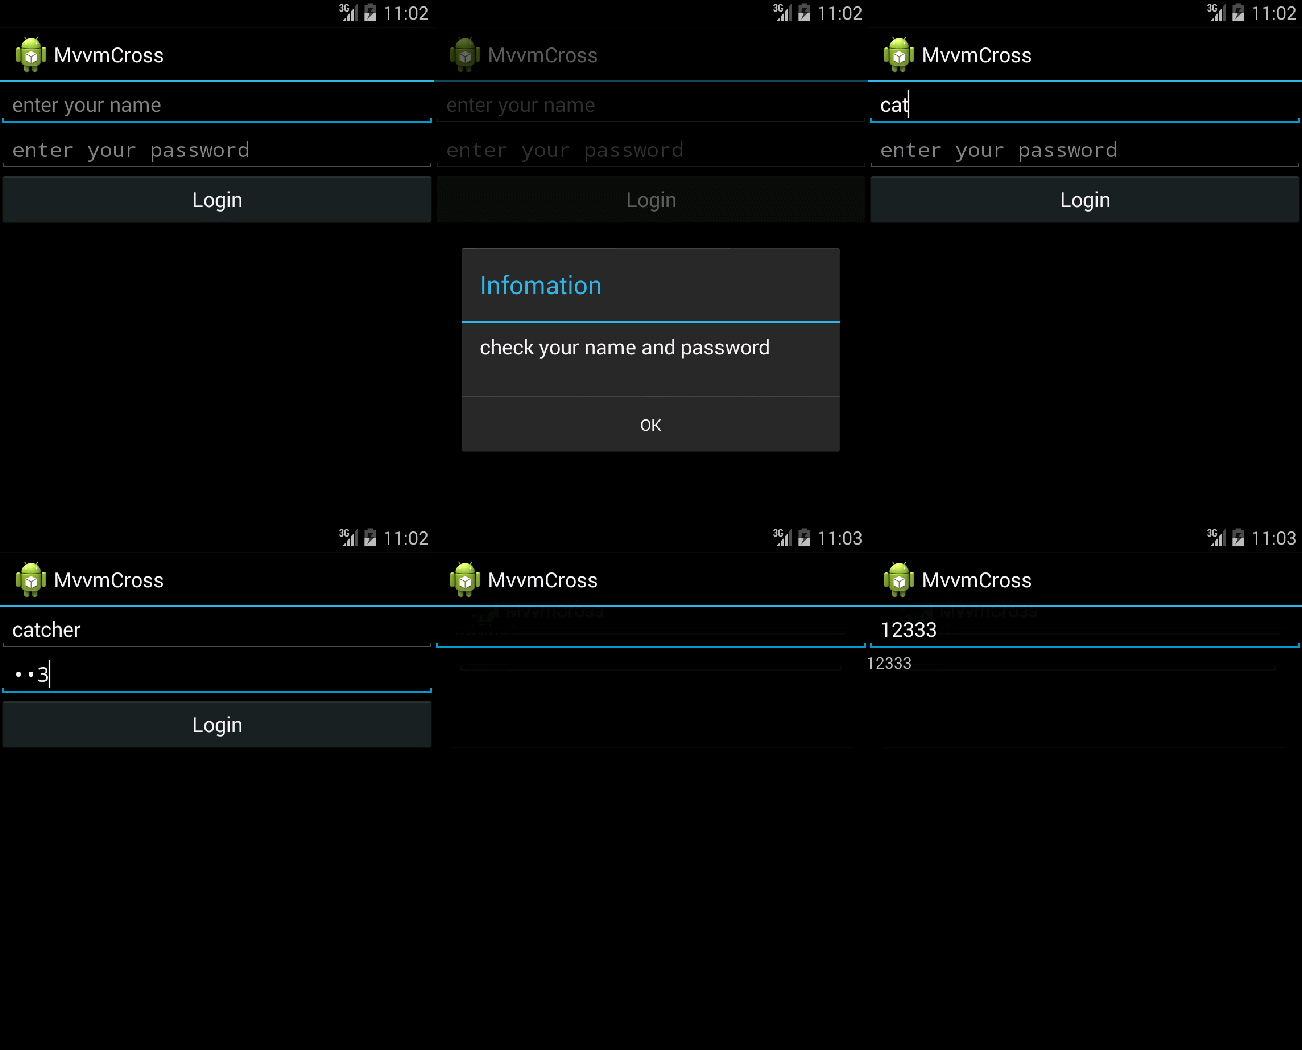
OK,效果如下:
第四个例子(UWP):
在Catcher.MVVMDemo.Day01UWPByMvvmCross中添加一个Services文件夹
同时添加一个DialogService去实现我们刚才定义的IDialogService接口。
 using Catcher.MVVMDemo.Day01CrossCore;

 using System;

 using Windows.UI.Xaml.Controls;

 namespace Catcher.MVVMDemo.Day01UWPByMvvmCross.Services

 {

     public class DialogService : IDialogService

     {

         public async void Alert(string message, string title, string okbtnText)

         {

             var dialog = new ContentDialog()

             {

                 Content = message,

                 Title= title,

                 PrimaryButtonText = okbtnText

             };

             dialog.PrimaryButtonClick += (s, e) => { };

             await dialog.ShowAsync();

         }

     }

 }
这里用ContentDialog去实现这个提示。
在Setup.cs中注册一下这个Service,重写InitializeFirstChance 方法
       protected override void InitializeFirstChance()

         {

             base.InitializeFirstChance();

             Mvx.RegisterSingleton<IDialogService>(() => new DialogService());

         }
在Views文件夹添加一个LoginPage.xaml
 <views:MvxWindowsPage

     x:Class="Catcher.MVVMDemo.Day01UWPByMvvmCross.Views.LoginPage"

     xmlns="http://schemas.microsoft.com/winfx/2006/xaml/presentation"

     xmlns:x="http://schemas.microsoft.com/winfx/2006/xaml"

     xmlns:local="using:Catcher.MVVMDemo.Day01UWPByMvvmCross.Views"

     xmlns:d="http://schemas.microsoft.com/expression/blend/2008"

     xmlns:mc="http://schemas.openxmlformats.org/markup-compatibility/2006"

     xmlns:views="using:MvvmCross.WindowsUWP.Views"

     mc:Ignorable="d">

     <Grid Background="{ThemeResource ApplicationPageBackgroundThemeBrush}">

         <Grid.RowDefinitions>

             <RowDefinition Height="*"></RowDefinition>

             <RowDefinition Height="*"></RowDefinition>

             <RowDefinition Height="*"></RowDefinition>

             <RowDefinition Height="*"></RowDefinition>

             <RowDefinition Height="5*"></RowDefinition>

         </Grid.RowDefinitions>

         <TextBox Grid.Row="1" Margin="15" Height="20" Text="{Binding Name,Mode=TwoWay}" PlaceholderText="enter you name" />

         <PasswordBox Grid.Row="2" Margin="15" Height="20" Password="{Binding Password,Mode=TwoWay}" PasswordChar="*" PlaceholderText="enter your password" />

         <Button Grid.Row="3" Margin="15,10" Content="Login" Command="{Binding LoginCommand}" HorizontalAlignment="Stretch" VerticalAlignment="Stretch"   />

     </Grid>

 </views:MvxWindowsPage>
LoginPage.xaml.cs
 using Catcher.MVVMDemo.Day01CrossCore.ViewModels;

 using MvvmCross.WindowsUWP.Views;

 namespace Catcher.MVVMDemo.Day01UWPByMvvmCross.Views

 {

     public sealed partial class LoginPage :MvxWindowsPage

     {

         public new LoginViewModel ViewModel

         {

             get { return (LoginViewModel)base.ViewModel; }

             set { base.ViewModel = value; }

         }

         public LoginPage()

         {

             this.InitializeComponent();

         }

     }

 }
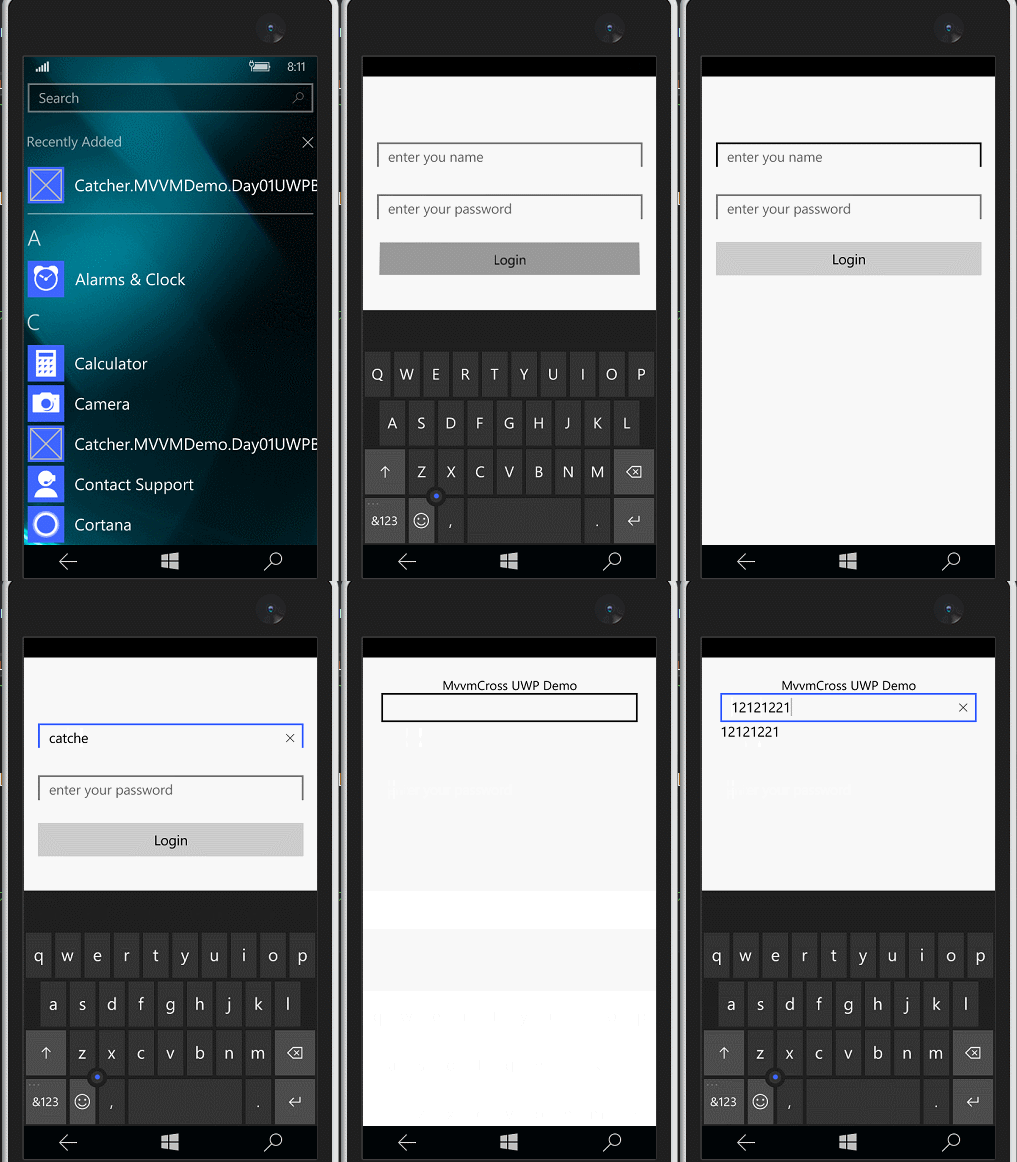
OK,效果如下 :
0x04 简单总结
MvvmCross用起来跟MvvmLight基本是一样
ViewModel这一块与MvvmLight的ViewModel基本没有太大的差别
其他方面,复杂一点的时候,工作量基本差不多,各有各的好,使用的话,都是看个人的兴趣爱好。
MvvmCross也在不断更新,昨天是4.1.5版本,今天就4.1.6了。
Github:https://github.com/MvvmCross
Xamarin.Android和UWP之MVVM的简单使用(二)的更多相关文章
- Xamarin.Android和UWP之MVVM的简单使用(一)
0x01 前言 就目前而言,MVVM可以说是挺流行的,无论是web端还是移动端,web端的主要代表angularjs,avalonjs等, 移动端(xamarin,uwp)的代表应该是mvvmligh ...
- Xamarin.Android之Splash的几种简单实现
对现在的APP软件来说,基本上都会有一个Splash页面,类似大家常说的欢迎页面.启动界面之类的. 正常来说这个页面都会有一些相关的信息,比如一些理念,Logo,版本信息等 下面就来看看在Xamari ...
- Xamarin android spinner的使用方法
<?xml version="1.0" encoding="utf-8"?> <LinearLayout xmlns:android=&quo ...
- Xamarin Android 中Acitvity如何传递数据
在xamarin android的开发中,activity传递数据非常常见,下面我也来记一下在android中activity之间传递数据的几种方式, Xamarin Android中Activity ...
- MVP架构在xamarin android中的简单使用
好几个月没写文章了,使用xamarin android也快接近两年,还有一个月职业生涯就到两个年了,从刚出来啥也不会了,到现在回头看这个项目,真jb操蛋(真辛苦了实施的人了,无数次吐槽怎么这么丑),怪 ...
- Xamarin.Android之引导页的简单制作
0x01 前言 对于现在大部分的APP,第一次打开刚安装或更新安装的APP都会有几个引导界面,通常这几个引导页是告诉用户 APP有些什么功能或者修改了什么bug.新增了什么功能等等等. 下面就用Xam ...
- Xamarin.Android之简单的抽屉布局
0x01 前言 相信对于用过Android版QQ的,应该都不会陌生它那个向右滑动的菜单(虽说我用的是Lumia) 今天就用Xamarin.Android实现个比较简单的抽屉布局.下面直接进正题. 0x ...
- Xamarin.Android之封装个简单的网络请求类
一.前言 回忆到上篇 <Xamarin.Android再体验之简单的登录Demo> 做登录时,用的是GET的请求,还用的是同步, 于是现在将其简单的改写,做了个简单的封装,包含基于Http ...
- 基于Xamarin Android实现的简单的浏览器
最近做了一个Android浏览器,当然功能比较简单,主要实现了自己想要的一些功能……现在有好多浏览器为什么还要自己写?当你使用的时候总有那么一些地方不如意,于是就想自己写一个. 开发环境:Xamari ...
随机推荐
- 关于Node.js的总结
Node是个啥? 1.Node 是一个服务器端 JavaScript 解释器,可是真的以为JavaScript不错的同学学习Node就能轻松拿下,那么你就错了,总结:水深不深我还不知道,不过确实不浅. ...
- Android5.1.1源码 - zygote fork出的子进程如何权限降级
前言 所有Android应用进程都是zygote fork出来的,新fork出来的应用进程还保持着root权限,这显然是不被允许的,所以这个fork出来的子进程的权限需要被降级,本文说的就是Andro ...
- .net core 学习
资源: https://github.com/aspnet/home https://github.com/dotnet/cli
- NoSQL初探之人人都爱Redis:(4)Redis主从复制架构初步探索
一.主从复制架构简介 通过前面几篇的介绍中,我们都是在单机上使用Redis进行相关的实践操作,从本篇起,我们将初步探索一下Redis的集群,而集群中最经典的架构便是主从复制架构.那么,我们首先来了解一 ...
- 推荐:图片轮播插件Nivo Slider
因为项目需要一款切换样式多一些的轮播插件,不经意找到了NivoSlider,非常好用,比bootstrap要好用,而且样式丰富.值得注意的是,这款插件是在MIT协议下免费的. ...
- [Voice communications] 声音的滤波
本系列文章主要是介绍 Web Audio API 的相关知识,以及 web语音通信 中会遇到的一些问题,阐述可能存在错误,还请多多斧正! 通过设备获取音频流会不可避免的渗入一些杂音,这些杂音可能来自你 ...
- adb server is out of date. killing...
1.查看adb端口号 adb nodaemon server 打印:cannot bind 'tcp:5037' 2.查看端口被哪个进程占用 netstat -ano | findstr " ...
- 《Spark快速大数据分析》—— 第六章 Spark编程进阶
这章讲述了Spark编程中的高级部分,比如累加器和广播等,以及分区和管道...
- 剖析twemproxy前言
又是喜闻乐见的新坑,前面的mysql协议,当我在解读go-mysql包的时候,会重新讲到,至于Leetcode的更新会与go语言同步.关于这个redis的新坑,目前打算通过剖析twemproxy源码来 ...
- iOS中多线程知识总结(二)
1.GCD GCD全称是Grand Central Dispatch,译为"强大的中枢管理器" 1)什么是任务?什么是队列? 任务和队列是GCD的核心. 任务: 执行什么操作 队列 ...