TensorFlow基础笔记(9) Tensorboard可视化显示以及查看pb meta模型文件的方法
参考: http://blog.csdn.net/l18930738887/article/details/55000008
http://www.jianshu.com/p/19bb60b52dad
http://blog.csdn.net/sinat_33761963/article/details/62433234
import tensorflow as tf

import numpy as np

def add_layer(inputs, in_size, out_size, n_layer, activation_function=None):

    # add one more layer and return the output of this layer

    layer_name = 'layer%s' % n_layer

    with tf.name_scope(layer_name):

        with tf.name_scope('weights'):

            Weights = tf.Variable(tf.random_normal([in_size, out_size]), name='W')

            tf.summary.histogram(layer_name + '/weights', Weights)

        with tf.name_scope('biases'):

            biases = tf.Variable(tf.zeros([1, out_size]) + 0.1, name='b')

            tf.summary.histogram(layer_name + '/biases', biases)

        with tf.name_scope('Wx_plus_b'):

            Wx_plus_b = tf.add(tf.matmul(inputs, Weights), biases)

        if activation_function is None:

            outputs = Wx_plus_b

        else:

            outputs = activation_function(Wx_plus_b, )

        tf.summary.histogram(layer_name + '/outputs', outputs)

    return outputs

# Make up some real data

x_data = np.linspace(-1,1,300)[:, np.newaxis]

noise = np.random.normal(0, 0.05, x_data.shape)

y_data = np.square(x_data) - 0.5 + noise

# define placeholder for inputs to network

with tf.name_scope('inputs'):

    xs = tf.placeholder(tf.float32, [None, 1],name='input_x')

    ys = tf.placeholder(tf.float32, [None, 1],name='input_y')

# add hidden layer

l1 = add_layer(xs, 1, 10, n_layer=1, activation_function=tf.nn.relu)

# add output layer

prediction = add_layer(l1, 10, 1, n_layer=2, activation_function=None)

# the error between prediciton and real data

with tf.name_scope('loss'):

    loss = tf.reduce_mean(tf.reduce_sum(tf.square(ys - prediction),

                                        reduction_indices=[1]))

    tf.summary.scalar('loss', loss)

with tf.name_scope('train'):

    train_step = tf.train.GradientDescentOptimizer(0.1).minimize(loss)

sess = tf.Session()

merged = tf.summary.merge_all()

# save the logs

writer = tf.summary.FileWriter("logs/", sess.graph)

sess.run(tf.global_variables_initializer())

for i in range(1000):

    # training

    sess.run(train_step, feed_dict={xs: x_data, ys: y_data})

    if i % 50 == 0:

        # to see the step improvement

        result = sess.run(merged,

                          feed_dict={xs: x_data, ys: y_data})

        writer.add_summary(result, i)
到运行python的所在目录下,打一下命令:
$ tensorboard --logdir="logs/"
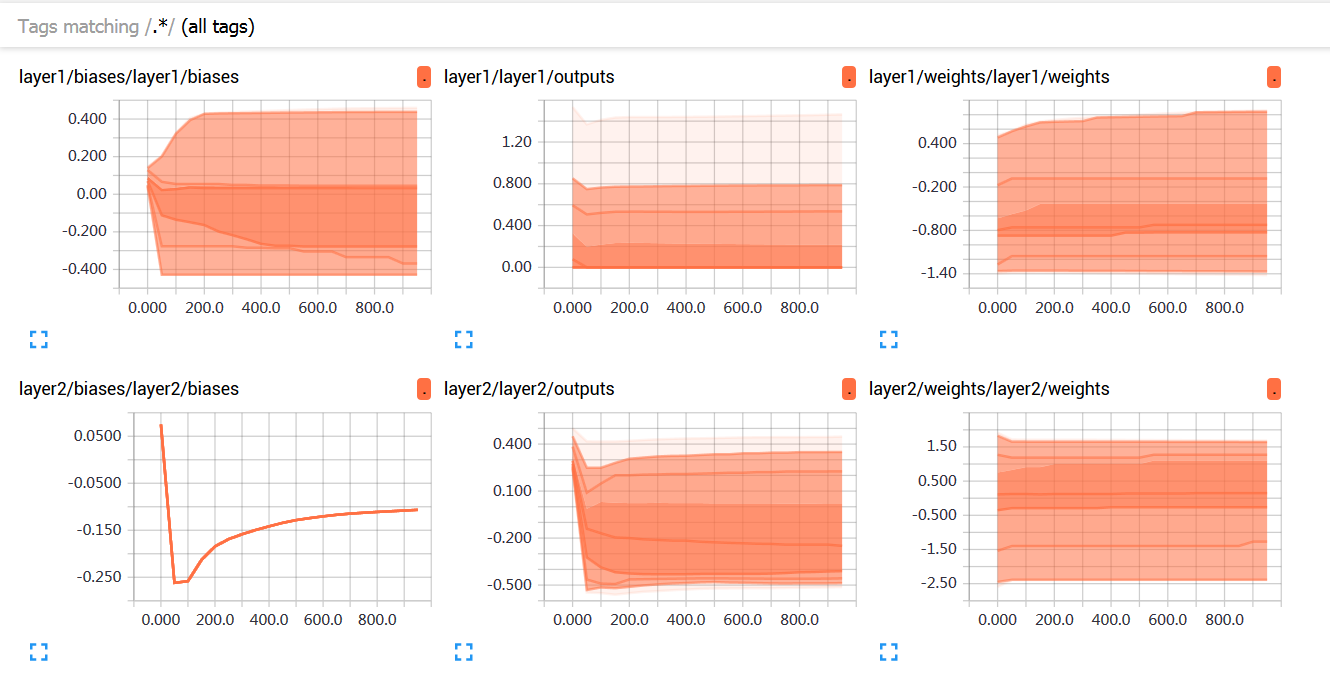
再在网页中输入链接:127.0.1.1:6006 即可获得展示: 推荐使用friefox浏览器,我电脑上chrom浏览器打不开
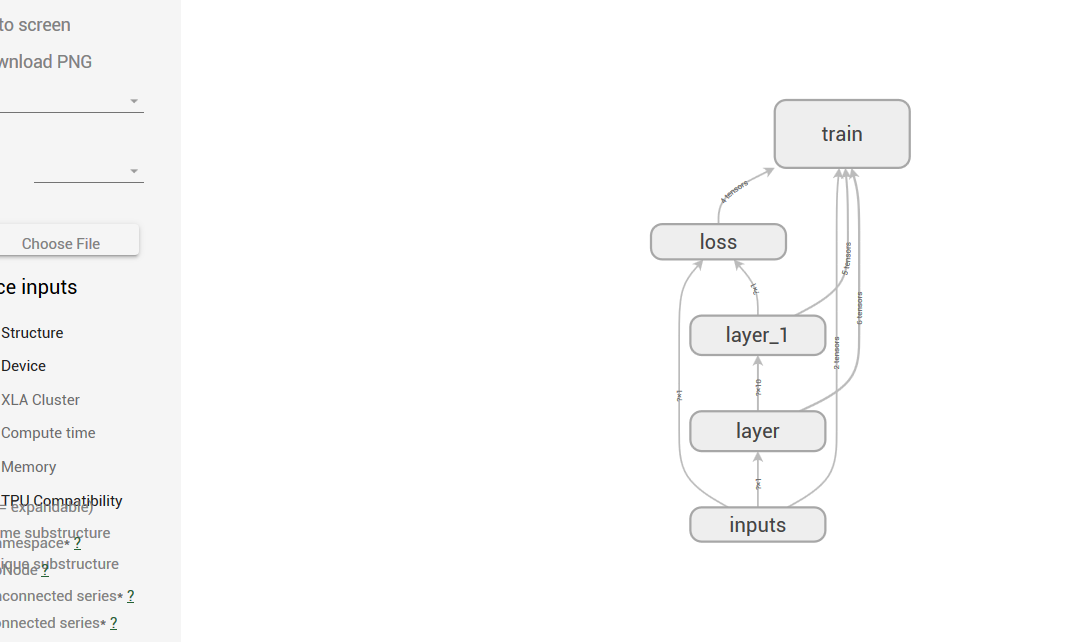

比如,从他人处获得一个Graph,想看看它的结构,怎么弄?
Google提供了一个工具,TensorBoard,它能以图表的方式分析你在训练过程中汇总的各种数据,其中包括Graph结构。
所以我们可以简单的写几行Pyhton,加载Graph,只在logdir里,输出Graph结构数据,并可以查看其图结构。
可参考:http://www.tensorfly.cn/tfdoc/how_tos/summaries_and_tensorboard.html
https://www.tensorflow.org/get_started/summaries_and_tensorboard
代码如下:
import tensorflow as tf

from tensorflow.python.platform import gfile

# 这是从二进制格式的pb文件加载模型

graph = tf.get_default_graph()

graphdef = graph.as_graph_def()

graphdef.ParseFromString(gfile.FastGFile("/data/TensorFlowAndroidMNIST/app/src/main/expert-graph.pb", "rb").read())

_ = tf.import_graph_def(graphdef, name="")
import tensorflow as tf

from tensorflow.python.platform import gfile

#这是从文件格式的meta文件加载模型

graph = tf.get_default_graph()

graphdef = graph.as_graph_def()

# graphdef.ParseFromString(gfile.FastGFile("/data/TensorFlowAndroidMNIST/app/src/main/expert-graph.pb", "rb").read())

# _ = tf.import_graph_def(graphdef, name="")

_ = tf.train.import_meta_graph("./InsightFace_iter_best_1950000.ckpt.meta")

summary_write = tf.summary.FileWriter("./" , graph)
然后再启动tensorboard:
tensorboard --logdir /data/TensorFlowAndroidMNIST/logdir --host 你的ip --port 你端口(默认6006)
一个打开pb文件的实例
import tensorflow as tf

from tensorflow.python.platform import gfile

graph = tf.get_default_graph()

graphdef = graph.as_graph_def()

graphdef.ParseFromString(gfile.FastGFile("./log/mtcnn.pb", "rb").read())

_ = tf.import_graph_def(graphdef, name="")

summary_write = tf.summary.FileWriter("./log" , graph)
TensorFlow基础笔记(9) Tensorboard可视化显示以及查看pb meta模型文件的方法的更多相关文章
- TensorFlow基础笔记(0) 参考资源学习文档
1 官方文档 https://www.tensorflow.org/api_docs/ 2 极客学院中文文档 http://www.tensorfly.cn/tfdoc/api_docs/python ...
- TensorFlow基础笔记(3) cifar10 分类学习
TensorFlow基础笔记(3) cifar10 分类学习 CIFAR-10 is a common benchmark in machine learning for image recognit ...
- 超简单tensorflow入门优化程序&&tensorboard可视化
程序1 任务描述: x = 3.0, y = 100.0, 运算公式 x×W+b = y,求 W和b的最优解. 使用tensorflow编程实现: #-*- coding: utf-8 -*-) im ...
- TensorFlow基础笔记(14) 网络模型的保存与恢复_mnist数据实例
http://blog.csdn.net/huachao1001/article/details/78502910 http://blog.csdn.net/u014432647/article/de ...
- 【转】从Shell脚本内部将所有标准输出及标准错误显示在屏幕并同时写入文件的方法
如果全部都要重定向的话每一条命令后面>>并不方便,可以这么做.在开头就声明 exec 1>>$log_file表示将脚本中所有的正确输出全部追加到$log_file,错误信息会 ...
- Tensorflow 搭建神经网络及tensorboard可视化
1. session对话控制 matrix1 = tf.constant([[3,3]]) matrix2 = tf.constant([[2],[2]]) product = tf.matmul(m ...
- TensorFlow基础笔记(5) VGGnet_test
参考 http://blog.csdn.net/jsond/article/details/72667829 资源: 1.相关的vgg模型下载网址 http://www.vlfeat.org/matc ...
- TensorFlow基础笔记(15) 编译TensorFlow.so,提供给C++平台调用
参考 http://blog.csdn.net/rockingdingo/article/details/75452711 https://www.cnblogs.com/hrlnw/p/700764 ...
- TensorFlow基础笔记(0) tensorflow的基本数据类型操作
import numpy as np import tensorflow as tf #build a graph print("build a graph") #生产变量tens ...
随机推荐
- USB协议及认知
1.USB的拓扑结构决定了主机控制器就是最高统帅,没有主机控制器的要求设备永远不能主动发数据.所以主机控制器在USB 的世界里扮演着重要的角色,它是幕后操纵者. 2.数据包的发送, 这个过程包含很多信 ...
- OpenGL核心之SSAO技术解说(一)
笔者介绍:姜雪伟,IT公司技术合伙人.IT高级讲师,CSDN社区专家,特邀编辑,畅销书作者,国家专利发明人;已出版书籍:<手把手教你架构3D游戏引擎>电子工业出版社和<Unity3D ...
- SqlServer 获取汉字的拼音首字母
一.该函数传入字符串,返回数据为:如果为汉字字符,返回该字符的首字母,如果为非汉字字符,则返回本身.二.用到的知识点:汉字对应的UNICODE值,汉字的排序规则.三.数据库函数: CREATE FUN ...
- WinForm窗体键盘事件,支持方向键和回车键
/// <summary> /// 快捷键操作 /// </summary> protected override bool ProcessCmdKey(ref Message ...
- windows下配置nginx+php环境(转)
刚看到nginx这个词,我很好奇它的读法(engine x),我的直译是“引擎x”,一般引“擎代”表了性能,而“x”大多出现是表示“xtras(额外的效果)”,那么整个词的意思就是类似“极致效果”,“ ...
- django中models阅读笔记
一.使用数据库需要设置settings.py文件. DATABASES = { 'default': { 'ENGINE': 'django.db.backends.', # Add 'postgre ...
- C# 遍历枚举(枚举是目的,遍历(获取)是手段)
C# 遍历枚举 C#中,如何获取(遍历)枚举中所有的值: public enum Suits { Spades, Hearts, Clubs, Diamonds, NumSuits } priva ...
- WCF教程网址
http://www.cnblogs.com/iamlilinfeng/archive/2012/09/25/2700049.html http://www.cnblogs.com/artech/ar ...
- 【Android】4.2 资源限定符和可视化选项
分类:C#.Android.VS2015:创建日期:2016-02-06 在设计界面中,所有资源都可以被限定为使用哪个国家或地区的语言.例如,将字符串资源限定为默认使用中文等. 将字符串资源限定为默认 ...
- [MySQL] MySQL中关于外键报错的解决和建议
一.缘由 今天在恢复从库和主库不同步的数据时,看到关于外键的报错. ERROR 1451 (23000): Connot delete or update a parent row: a foreig ...