TensorFlow基础笔记(9) Tensorboard可视化显示以及查看pb meta模型文件的方法
参考: http://blog.csdn.net/l18930738887/article/details/55000008
http://www.jianshu.com/p/19bb60b52dad
http://blog.csdn.net/sinat_33761963/article/details/62433234
import tensorflow as tf
import numpy as np
def add_layer(inputs, in_size, out_size, n_layer, activation_function=None):
# add one more layer and return the output of this layer
layer_name = 'layer%s' % n_layer
with tf.name_scope(layer_name):
with tf.name_scope('weights'):
Weights = tf.Variable(tf.random_normal([in_size, out_size]), name='W')
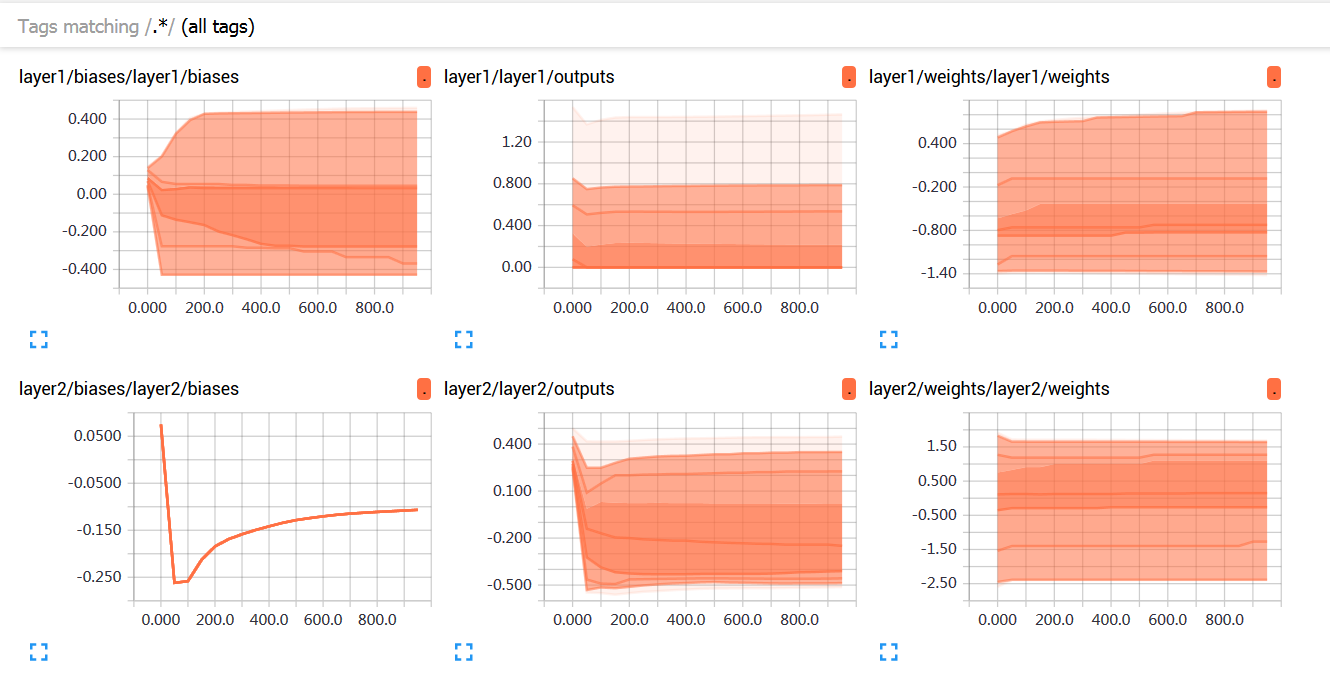
tf.summary.histogram(layer_name + '/weights', Weights)
with tf.name_scope('biases'):
biases = tf.Variable(tf.zeros([1, out_size]) + 0.1, name='b')
tf.summary.histogram(layer_name + '/biases', biases)
with tf.name_scope('Wx_plus_b'):
Wx_plus_b = tf.add(tf.matmul(inputs, Weights), biases)
if activation_function is None:
outputs = Wx_plus_b
else:
outputs = activation_function(Wx_plus_b, )
tf.summary.histogram(layer_name + '/outputs', outputs)
return outputs
# Make up some real data
x_data = np.linspace(-1,1,300)[:, np.newaxis]
noise = np.random.normal(0, 0.05, x_data.shape)
y_data = np.square(x_data) - 0.5 + noise
# define placeholder for inputs to network
with tf.name_scope('inputs'):
xs = tf.placeholder(tf.float32, [None, 1],name='input_x')
ys = tf.placeholder(tf.float32, [None, 1],name='input_y') # add hidden layer
l1 = add_layer(xs, 1, 10, n_layer=1, activation_function=tf.nn.relu)
# add output layer
prediction = add_layer(l1, 10, 1, n_layer=2, activation_function=None) # the error between prediciton and real data
with tf.name_scope('loss'):
loss = tf.reduce_mean(tf.reduce_sum(tf.square(ys - prediction),
reduction_indices=[1]))
tf.summary.scalar('loss', loss)
with tf.name_scope('train'):
train_step = tf.train.GradientDescentOptimizer(0.1).minimize(loss) sess = tf.Session()
merged = tf.summary.merge_all()
# save the logs
writer = tf.summary.FileWriter("logs/", sess.graph)
sess.run(tf.global_variables_initializer())
for i in range(1000):
# training
sess.run(train_step, feed_dict={xs: x_data, ys: y_data})
if i % 50 == 0:
# to see the step improvement
result = sess.run(merged,
feed_dict={xs: x_data, ys: y_data})
writer.add_summary(result, i)
到运行python的所在目录下,打一下命令:
$ tensorboard --logdir="logs/"
再在网页中输入链接:127.0.1.1:6006 即可获得展示: 推荐使用friefox浏览器,我电脑上chrom浏览器打不开
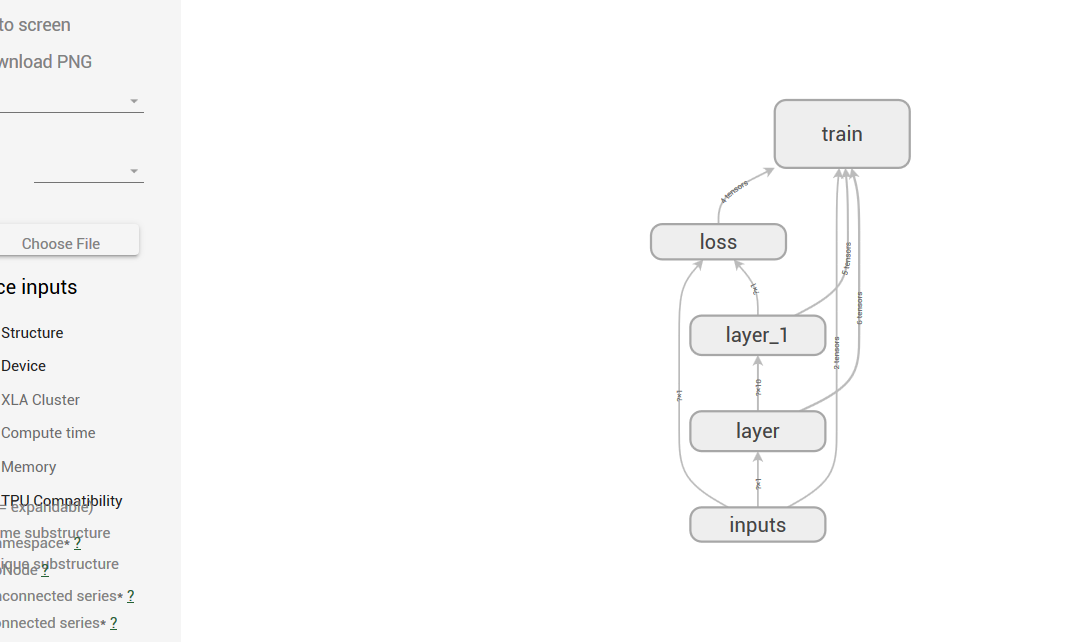

比如,从他人处获得一个Graph,想看看它的结构,怎么弄?
Google提供了一个工具,TensorBoard,它能以图表的方式分析你在训练过程中汇总的各种数据,其中包括Graph结构。
所以我们可以简单的写几行Pyhton,加载Graph,只在logdir里,输出Graph结构数据,并可以查看其图结构。
可参考:http://www.tensorfly.cn/tfdoc/how_tos/summaries_and_tensorboard.html
https://www.tensorflow.org/get_started/summaries_and_tensorboard
代码如下:
import tensorflow as tf

from tensorflow.python.platform import gfile

# 这是从二进制格式的pb文件加载模型

graph = tf.get_default_graph()

graphdef = graph.as_graph_def()

graphdef.ParseFromString(gfile.FastGFile("/data/TensorFlowAndroidMNIST/app/src/main/expert-graph.pb", "rb").read())

_ = tf.import_graph_def(graphdef, name="")
import tensorflow as tf

from tensorflow.python.platform import gfile

#这是从文件格式的meta文件加载模型

graph = tf.get_default_graph()

graphdef = graph.as_graph_def()

# graphdef.ParseFromString(gfile.FastGFile("/data/TensorFlowAndroidMNIST/app/src/main/expert-graph.pb", "rb").read())

# _ = tf.import_graph_def(graphdef, name="")

_ = tf.train.import_meta_graph("./InsightFace_iter_best_1950000.ckpt.meta")

summary_write = tf.summary.FileWriter("./" , graph)
然后再启动tensorboard:
tensorboard --logdir /data/TensorFlowAndroidMNIST/logdir --host 你的ip --port 你端口(默认6006)
一个打开pb文件的实例
import tensorflow as tf

from tensorflow.python.platform import gfile

graph = tf.get_default_graph()

graphdef = graph.as_graph_def()

graphdef.ParseFromString(gfile.FastGFile("./log/mtcnn.pb", "rb").read())

_ = tf.import_graph_def(graphdef, name="")

summary_write = tf.summary.FileWriter("./log" , graph)
TensorFlow基础笔记(9) Tensorboard可视化显示以及查看pb meta模型文件的方法的更多相关文章
- TensorFlow基础笔记(0) 参考资源学习文档
1 官方文档 https://www.tensorflow.org/api_docs/ 2 极客学院中文文档 http://www.tensorfly.cn/tfdoc/api_docs/python ...
- TensorFlow基础笔记(3) cifar10 分类学习
TensorFlow基础笔记(3) cifar10 分类学习 CIFAR-10 is a common benchmark in machine learning for image recognit ...
- 超简单tensorflow入门优化程序&&tensorboard可视化
程序1 任务描述: x = 3.0, y = 100.0, 运算公式 x×W+b = y,求 W和b的最优解. 使用tensorflow编程实现: #-*- coding: utf-8 -*-) im ...
- TensorFlow基础笔记(14) 网络模型的保存与恢复_mnist数据实例
http://blog.csdn.net/huachao1001/article/details/78502910 http://blog.csdn.net/u014432647/article/de ...
- 【转】从Shell脚本内部将所有标准输出及标准错误显示在屏幕并同时写入文件的方法
如果全部都要重定向的话每一条命令后面>>并不方便,可以这么做.在开头就声明 exec 1>>$log_file表示将脚本中所有的正确输出全部追加到$log_file,错误信息会 ...
- Tensorflow 搭建神经网络及tensorboard可视化
1. session对话控制 matrix1 = tf.constant([[3,3]]) matrix2 = tf.constant([[2],[2]]) product = tf.matmul(m ...
- TensorFlow基础笔记(5) VGGnet_test
参考 http://blog.csdn.net/jsond/article/details/72667829 资源: 1.相关的vgg模型下载网址 http://www.vlfeat.org/matc ...
- TensorFlow基础笔记(15) 编译TensorFlow.so,提供给C++平台调用
参考 http://blog.csdn.net/rockingdingo/article/details/75452711 https://www.cnblogs.com/hrlnw/p/700764 ...
- TensorFlow基础笔记(0) tensorflow的基本数据类型操作
import numpy as np import tensorflow as tf #build a graph print("build a graph") #生产变量tens ...
随机推荐
- python 异步编程
Python 3.5 协程究竟是个啥 Yushneng · Mar 10th, 2016 原文链接 : How the heck does async/await work in Python 3.5 ...
- 安装ELK
1. 安装Elasticsearch a. 下载 : https://download.elasticsearch.org/elasticsearch/release/org/elasticsearc ...
- 请教中文的OCR软件哪个最好?
对原件,有这几种:1,全中文(含标点,一些英文符号)2,中英文(英文较多,或英文占大多数)3,全英文(这个用finereader8.0) 針對1.2 紫光 超星阅读器自带的OCR组件 尚书七号搞定全中 ...
- Spring中三种配置Bean的方式
Spring中三种配置Bean的方式分别是: 基于XML的配置方式 基于注解的配置方式 基于Java类的配置方式 一.基于XML的配置 这个很简单,所以如何使用就略掉. 二.基于注解的配置 Sprin ...
- centos 下Qt安装 mysql驱动(亲测可行)
(前半部分没有试过,因为我的有mysql驱动,实在抱歉) 1.预防万一,先安装一下mysql-devel(一定要装!). 不安装的话后面编译会出现找不到-lmysqlclient的问题. 2. 开始编 ...
- 4X4矩阵键盘扫描程序
4X4矩阵键盘扫描: 1. 4根行线的GIO均设为Output,根列线的GIO均设为Input: 2. 4根行线的GIO分别置为0111.1011.1101.1110,读逐一读取列线GIO的值,可确定 ...
- linux快速进入全屏命令行模式
按CTRL+ALT+F1~6就可以了.F7是桌面环境.
- [na]非对称加密方式&带加密的数字签名交互流程
1,对称加密 2,混合加密 3.数字签名 4,带加密的数字签名
- ny27 水池数目
水池数目 时间限制:3000 ms | 内存限制:65535 KB 难度:4 描述 南阳理工学院校园里有一些小河和一些湖泊,现在,我们把它们通一看成水池,假设有一张我们学校的某处的地图,这个地图上 ...
- [流水账]搜索与web-container版本匹配的jar包
刚才发现自己的servlet-api.jar里面的javax.servlet.jsp为空的,但是我又需要做一些JSP tag-lib的编程,所以没办法,只好去下一个新的包 上网找了找,我用的tomca ...