
IOS开发-UI学习-UITabBarController的使用
UITabBarController具体实例如下图
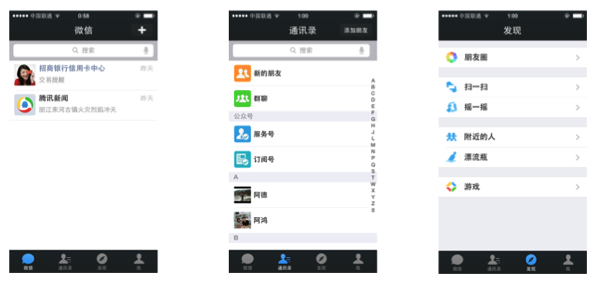
我们最常见的就是微信最下面的四个按钮,通过这四个按钮可以导航到不同的界面。
UITabBarController是一个容器,以下的例程中给UITabBarController这个容器中装了四个UINavigationController,具体代码如下:
1、AppDelegate.m:
#import "AppDelegate.h"

#import "FirstViewController.h"

#import "SecondViewController.h"

#import "ThirdViewController.h"

#import "ForthViewController.h"

@interface AppDelegate (){

    UITabBarController *mytabbar;

}

@end

@implementation AppDelegate

- (BOOL)application:(UIApplication *)application didFinishLaunchingWithOptions:(NSDictionary *)launchOptions {

//    firstVC

    FirstViewController *firstVC = [[FirstViewController alloc]init];

    UINavigationController *firstNC = [[UINavigationController alloc]initWithRootViewController:firstVC];

//    secondVC

    SecondViewController *secondVC = [[SecondViewController alloc]init];

    UINavigationController *secondNC = [[UINavigationController alloc]initWithRootViewController:secondVC];

//    thirdVC

    ThirdViewController *thirdVC = [[ThirdViewController alloc]init];

    UINavigationController *thirdNC = [[UINavigationController alloc]initWithRootViewController:thirdVC];

//    forthVC

    ForthViewController *forthVC = [[ForthViewController alloc]init];

    UINavigationController *forthNC = [[UINavigationController alloc]initWithRootViewController:forthVC];

    NSArray *arr = @[firstNC,secondNC,thirdNC,forthNC];

    mytabbar = [[UITabBarController alloc]init];

    mytabbar.viewControllers = arr;

    self.window.rootViewController =mytabbar;

    [self.window makeKeyAndVisible];

    mytabbar .delegate = self;

    return YES;

}
2、FirstViewController.m:
#import "FirstViewController.h"

@interface FirstViewController (){

    UIImageView *imgV;

    NSMutableArray *imgArray;

    UIButton *myBtn;

}

@end

@implementation FirstViewController

-(instancetype)init{

    if (self = [super init]) {

//        初始化设置

        self.title = @"动画";

        [self.tabBarItem setImage:[UIImage imageNamed:@"movie_projector_filled"]];

    }

//    返回self

    return self;

}

- (void)viewDidLoad {

    [super viewDidLoad];

    imgV = [[UIImageView alloc]initWithFrame:CGRectMake(0, 0, self.view.frame.size.width, self.view.frame.size.height-100)];

    imgV.image = [UIImage imageNamed:@"cat_eat0000.jpg"];

    [self.view addSubview:imgV];

    imgArray = [[NSMutableArray alloc]initWithCapacity:40];

    for (int i = 0; i<40; i++) {

        NSString *pictString = [NSString stringWithFormat:@"cat_eat00%.2d.jpg",i];

        UIImage *img = [UIImage imageNamed:pictString];

        [imgArray addObject:img];

    }

    imgV.animationImages = imgArray;

    imgV.animationDuration = 2;

    imgV.animationRepeatCount =1;

    myBtn  = [[UIButton alloc]initWithFrame:CGRectMake(100, self.view.frame.size.height-100, 214, 51)];

    myBtn.backgroundColor = [UIColor orangeColor];

    myBtn.layer.cornerRadius = 20;

    myBtn.layer.masksToBounds = YES;

    myBtn.enabled = YES;

    [myBtn setTitle:@"开始按钮" forState:UIControlStateNormal];

    [myBtn addTarget:self action:@selector(myBtnAction:) forControlEvents:UIControlEventTouchUpInside];

    [self.view addSubview:myBtn];

}

-(void)myBtnAction :(UIButton*)sender{

    [imgV startAnimating];

}

@end
3、SecondViewController.m:
#import "SecondViewController.h"

@interface SecondViewController (){

    NSMutableArray *btnArray;

}

@end

@implementation SecondViewController

-(instancetype)init{

    if (self = [super init]) {

        self.title = @"灭灯";

        [self.tabBarItem setImage:[UIImage imageNamed:@"paint_palette_filled"]];

    }

    return self;

}

- (void)viewDidLoad {

    [super viewDidLoad];

    for (int i=0; i<3; i++) {

        for (int j=0; j<3; j++) {

            UIButton *btn = [[UIButton alloc]initWithFrame:CGRectMake(j*self.view.frame.size.width/3+20, i*((self.view.frame.size.height-100)/3)+80, self.view.frame.size.width/3-100/3.0, self.view.frame.size.height/3-80)];

            btn.tag = i*3+j+1;

            btn.layer.cornerRadius = 20;

            btn.layer.masksToBounds = YES;

            btn.backgroundColor = [UIColor orangeColor];

            [btn addTarget:self action:@selector(dceAlpha:) forControlEvents:UIControlEventTouchUpInside];

            [self.view addSubview:btn];

            [btnArray addObject:btn];

        }

    }

}

-(void)dceAlpha:(UIButton*)sender{

  [UIView animateWithDuration:0.5 animations:^{

      sender.alpha = 0;

  } completion:^(BOOL finished) {

      ;

  }];

}

@end
4、ThirdViewController.m
#import "ThirdViewController.h"
#import "ThirdtwoViewController.h"

@interface ThirdViewController (){

    UITextField *nameField;

    UITextField *passwordField;

    UIButton *loginBtn;

    UIButton *resignBtn;

    ThirdtwoViewController *thirdtwoVC;

}

@end

@implementation ThirdViewController

-(instancetype)init{

    if (self = [super init]) {

        self.title = @"登陆";

        self.view.backgroundColor = [UIColor colorWithPatternImage:[UIImage imageNamed:@"22.jpg"]];

        [self.tabBarItem setImage:[UIImage imageNamed:@"lock_filled"]];

    }

    return self;

}

- (void)viewDidLoad {

    [super viewDidLoad];

    nameField = [[UITextField alloc]initWithFrame:CGRectMake(100, 100, 264, 50)];

    nameField.backgroundColor = [UIColor lightGrayColor];

    nameField.layer.cornerRadius = 10;

    nameField.layer.masksToBounds = YES;

    nameField.placeholder = @"请输入用户名:";

    nameField.font = [UIFont fontWithName: @"Helvetica-Light" size:18];

    nameField.autocorrectionType = UITextAutocorrectionTypeNo;

    nameField.keyboardType = UIKeyboardTypeDefault;

    nameField.returnKeyType = UIReturnKeyDone;

    nameField.clearButtonMode = UITextFieldViewModeWhileEditing;

    [self.view addSubview:nameField];

    UILabel *namelabel = [[UILabel alloc]initWithFrame:CGRectMake(50, 100, 100, 50)];

    namelabel.text = @"帐号:";

    [self.view addSubview:namelabel];

    passwordField = [[UITextField alloc]initWithFrame:CGRectMake(100, 180, 264, 50)];

    passwordField.backgroundColor = [UIColor lightGrayColor];

    passwordField.layer.cornerRadius = 10;

    passwordField.layer.masksToBounds = YES;

    passwordField.placeholder = @"请输入六位数字密码:";

    passwordField.secureTextEntry = YES;

    passwordField.font = [UIFont fontWithName: @"Helvetica-Light" size:18];

    passwordField.keyboardType = UIKeyboardTypeNumberPad;

    passwordField.returnKeyType = UIReturnKeyDone;

    passwordField.clearButtonMode = UITextFieldViewModeWhileEditing;

    [self.view addSubview:passwordField];

    UILabel *psdlabel = [[UILabel alloc]initWithFrame:CGRectMake(50, 180, 100, 50)];

    psdlabel.text = @"密码:";

    [self.view addSubview:psdlabel];

    resignBtn = [[UIButton alloc]initWithFrame:CGRectMake(100, 280, 80, 50)];

    resignBtn.backgroundColor = [UIColor orangeColor];

    resignBtn.layer.cornerRadius = 20;

    resignBtn.layer.masksToBounds = YES;

    resignBtn.enabled = YES;

    [resignBtn setTitle:@"注册" forState:UIControlStateNormal];

    [resignBtn addTarget:self action:@selector(myBtnAction:) forControlEvents:UIControlEventTouchUpInside];

    [self.view addSubview:resignBtn];

    loginBtn = [[UIButton alloc]initWithFrame:CGRectMake(234, 280, 80, 50)];

    loginBtn.backgroundColor = [UIColor orangeColor];

    loginBtn.layer.cornerRadius = 20;

    loginBtn.layer.masksToBounds = YES;

    loginBtn.enabled = YES;

    [loginBtn setTitle:@"登陆" forState:UIControlStateNormal];

    [loginBtn addTarget:self action:@selector(myBtnAction:) forControlEvents:UIControlEventTouchUpInside];

    [self.view addSubview:loginBtn];

}

-(void)myBtnAction :(UIButton*)sender{

    if (sender== loginBtn){

        if ([nameField.text isEqualToString:@"Mazhongwei"]&&[passwordField.text isEqualToString:@"123456"]) {

            thirdtwoVC =[[ThirdtwoViewController alloc]init];

            [self.navigationController pushViewController: thirdtwoVC animated:YES];

        }else{

            UIAlertController *alt = [UIAlertController alertControllerWithTitle:@"错误信息" message:@"账户名或密码错误" preferredStyle:UIAlertControllerStyleAlert];

            [alt addAction:[UIAlertAction actionWithTitle:@"取消" style:UIAlertActionStyleDefault handler:^(UIAlertAction * _Nonnull action) {

            }]];

            [self presentViewController:alt animated:YES completion:nil];

        }

    }

}

-(void)touchesBegan:(NSSet *)touches withEvent:(UIEvent *)event{

    [nameField resignFirstResponder];

    [passwordField resignFirstResponder];

}

@end
5、ForthViewController.h:
#import "ForthViewController.h"

@interface ForthViewController ()

@end

@implementation ForthViewController

-(instancetype)init{

    if (self = [super init]) {

        self.title = @"文字展示";

        self.view.backgroundColor = [UIColor grayColor];

        [self.tabBarItem setImage:[UIImage imageNamed:@"pin_2_filled"]];

//        self.view.backgroundColor = [UIColor colorWithPatternImage:[UIImage imageNamed:@"4845745_195609329636_2.jpg"]];

    }

    return self;

}

- (void)viewDidLoad {

    [super viewDidLoad];

    UILabel *lab = [[UILabel alloc]initWithFrame:CGRectMake(0, 66, 414, 500)];

    lab.text = @"iOS7风格扁平化之后,圆角和圆形控件也随之被设计到APP中。最常见的是QQ应用中的用户头像,淘宝、天猫、京东应用的圆角和圆形按钮。APP使用圆角和圆形控件会让界面简介,也让用户视觉上有更好的感观。个人觉得圆角相比于正方形、长方形有棱角的界面美观。效果图说明:外面红色边框一个UIView的边框,其内紫色的圆是图片UIImageView,橙色的为一个标签UILabel。iOS7风格扁平化之后,圆角和圆形控件也随之被设计到APP中。最常见的是QQ应用中的用户头像,淘宝、天猫、京东应用的圆角和圆形按钮。APP使用圆角和圆形控件会让界面简介,也让用户视觉上有更好的感观。个人觉得圆角相比于正方形、长方形有棱角的界面美观。效果图说明:外面红色边框一个UIView的边框,其内紫色的圆是图片UIImageView,橙色的为一个标签UILabel。";

    lab.numberOfLines = 0;

    lab.lineBreakMode = NSLineBreakByClipping;

    [self.view addSubview:lab];

}

- (void)didReceiveMemoryWarning {

    [super didReceiveMemoryWarning];

}

/*

#pragma mark - Navigation

// In a storyboard-based application, you will often want to do a little preparation before navigation

- (void)prepareForSegue:(UIStoryboardSegue *)segue sender:(id)sender {

    // Get the new view controller using [segue destinationViewController].

    // Pass the selected object to the new view controller.

}

*/

@end
5、ForthViewController.m
 #import "ForthViewController.h"

 @interface ForthViewController ()

 @end

 @implementation ForthViewController

 -(instancetype)init{

     if (self = [super init]) {

         self.title = @"文字展示";

         self.view.backgroundColor = [UIColor grayColor];

         [self.tabBarItem setImage:[UIImage imageNamed:@"pin_2_filled"]];

 //        self.view.backgroundColor = [UIColor colorWithPatternImage:[UIImage imageNamed:@"4845745_195609329636_2.jpg"]];

     }

     return self;

 }

 - (void)viewDidLoad {

     [super viewDidLoad];

     UILabel *lab = [[UILabel alloc]initWithFrame:CGRectMake(, , , )];

     lab.text = @"iOS7风格扁平化之后,圆角和圆形控件也随之被设计到APP中。最常见的是QQ应用中的用户头像,淘宝、天猫、京东应用的圆角和圆形按钮。APP使用圆角和圆形控件会让界面简介,也让用户视觉上有更好的感观。个人觉得圆角相比于正方形、长方形有棱角的界面美观。效果图说明:外面红色边框一个UIView的边框,其内紫色的圆是图片UIImageView,橙色的为一个标签UILabel。iOS7风格扁平化之后,圆角和圆形控件也随之被设计到APP中。最常见的是QQ应用中的用户头像,淘宝、天猫、京东应用的圆角和圆形按钮。APP使用圆角和圆形控件会让界面简介,也让用户视觉上有更好的感观。个人觉得圆角相比于正方形、长方形有棱角的界面美观。效果图说明:外面红色边框一个UIView的边框,其内紫色的圆是图片UIImageView,橙色的为一个标签UILabel。";

     lab.numberOfLines = ;

     lab.lineBreakMode = NSLineBreakByClipping;

     [self.view addSubview:lab];

 }

 - (void)didReceiveMemoryWarning {

     [super didReceiveMemoryWarning];

 }

 /*

 #pragma mark - Navigation

 // In a storyboard-based application, you will often want to do a little preparation before navigation

 - (void)prepareForSegue:(UIStoryboardSegue *)segue sender:(id)sender {

     // Get the new view controller using [segue destinationViewController].

     // Pass the selected object to the new view controller.

 }

 */

 @end
IOS开发-UI学习-UITabBarController的使用的更多相关文章
- iOS开发UI篇—UITabBarController简单介绍
iOS开发UI篇—UITabBarController简单介绍 一.简单介绍 UITabBarController和UINavigationController类似,UITabBarControlle ...
- iOS开发UI篇—UITabBarController生命周期(使用storyoard搭建)
iOS开发UI篇—UITabBarController生命周期(使用storyoard搭建) 一.UITabBarController在storyoard中得搭建 1.新建一个项目,把storyb ...
- 文顶顶 iOS开发UI篇—UITabBarController简单介绍 iOS开发UI篇—UITabBarController简单介绍
一.简单介绍 UITabBarController和UINavigationController类似,UITabBarController也可以轻松地管理多个控制器,轻松完成控制器之间的切换,典型的例 ...
- iOS开发UI篇—多控制器和导航控制器简单介绍
iOS开发UI篇—多控制器和导航控制器简单介绍 一.多控制器 一个iOS的app很少只由一个控制器组成,除非这个app极其简单.当app中有多个控制器的时候,我们就需要对这些控制器进行管理 有多个vi ...
- iOS开发UI篇—APP主流UI框架结构
iOS开发UI篇—APP主流UI框架结构 一.简单示例 说明:使用APP主流UI框架结构完成简单的界面搭建 搭建页面效果: 二.搭建过程和 ...
- 关于iOS开发的学习
关于iOS开发的学习,打个比方就像把汽车分解: 最底层的原料有塑料,钢铁 再用这些底层的东西造出来发动机,座椅 最后再加上写螺丝,胶水等,把汽车就拼起来了 iOS基本都是英文的资料, ...
- iOS开发UI篇—CAlayer(自定义layer)
iOS开发UI篇—CAlayer(自定义layer) 一.第一种方式 1.简单说明 以前想要在view中画东西,需要自定义view,创建一个类与之关联,让这个类继承自UIView,然后重写它的Draw ...
- iOS开发-UI 从入门到精通(三)
iOS开发-UI 从入门到精通(三)是对 iOS开发-UI 从入门到精通(一)知识点的综合练习,搭建一个简单地登陆界面,增强实战经验,为以后做开发打下坚实的基础! ※在这里我们还要强调一下,开发环境和 ...
- iOS开发-UI 从入门到精通(二)
iOS开发-UI 从入门到精通(二)是对 iOS开发-UI 从入门到精通(一)知识点的巩固,主要以习题练习为主,增强实战经验,为以后做开发打下坚实的基础! ※开发环境和注意事项: 1.前期iOS-UI ...
- iOS开发UI篇—懒加载
iOS开发UI篇—懒加载 1.懒加载基本 懒加载——也称为延迟加载,即在需要的时候才加载(效率低,占用内存小).所谓懒加载,写的是其get方法. 注意:如果是懒加载的话则一定要注意先判断是否已经有了, ...
随机推荐
- 配置Notepad++直接运行Python、Perl、C、C++、Java
运行(F5),输入命令并保存 cmd /k python "$(FULL_CURRENT_PATH)" & ECHO. & PAUSE & EXIT cmd ...
- Nginx配置proxy_pass【转载】
在nginx中配置proxy_pass时,当在后面的url加上了/,相当于是绝对根路径,则nginx不会把location中匹配的路径部分代理走;如果没有/,则会把匹配的路径部分也给代理走. 下面四种 ...
- stock 当天盘势
看盘 (一)怎样看大盘当天的指数收阴.收阳 投资者每天都看大盘,但多数人看不准大盘.大盘到底当天是收阴,还是收阳?我通过很长时间的记录.验证,发现大盘在正常时间内,收阴.收阳是有规律的.我判断的准确率 ...
- java集合框架工具类Collections,集合的操作
1 import java.util.*; public class asList { public static void main(String args[]) { // int arr[] = ...
- zf-关于注册码过期
Webroot-index.jsp下 少写了个函数 导致登陆进去不能弹出注册码过期的对话框,函数如下 window.onload = function() { <ww:iterator valu ...
- TCP/IP网络协议栈(转载)
原文:http://www.cnblogs.com/xuanku/p/tcpip.html TCP/IP网络协议栈分为四层, 从下至上依次是: 链路层 其实在链路层下面还有物理层, 指的是电信号的传输 ...
- iOS7以后的侧滑返回上一页
我们知道,iOS7以后,导航控制器默认带了侧滑返回功能,但是仅限于屏幕边缘.而且在你自定义leftBarButtonItem等之后侧滑效果就会消失.这种问题怎么解决呢? 首先,我们先来看看系统的这种手 ...
- Autolayout 第三方开源库
转载自:http://blog.csdn.net/hmt20130412/article/details/46638625 今天才发现CSDN支持markdown了…还是给出新博客地址:Autolay ...
- 找礼物(find)
找礼物(find) 题目描述 新年到了,你的好友和你(共K个人)的周围满是礼物,你让你的好友先拿,但是每个人只能拿当前离自己最近的礼物[当然如果有并列的多个礼物离你的距离相等(精确到小数点后四位,所有 ...
- 2016"百度之星" - 资格赛(Astar Round1) Problem E
简单模拟题,耐心写就能过. #include <stdio.h> #include <math.h> #include<cstring> #include<c ...