
springboot(七).springboot整合jedis实现redis缓存
我们在使用springboot搭建微服务的时候,在很多时候还是需要redis的高速缓存来缓存一些数据,存储一些高频率访问的数据,如果直接使用redis的话又比较麻烦,在这里,我们使用jedis来实现redis缓存来达到高效缓存的目的,接下来,让我们一起来使用jedis来实现redis缓存
1.在pom.xml文件中添加依赖
<!-- jedis -->

    <dependency>

	<groupId>redis.clients</groupId>

	<artifactId>jedis</artifactId>

	<version>2.8.2</version>

    </dependency>
2. 在springboot的配置文件中加入redis的配置信息
#redis jedis配置

# Redis数据库索引(默认为0)

spring.redis.database=0

# Redis服务器地址

spring.redis.host=10.100.140.84

# Redis服务器连接端口

spring.redis.port=6379

# Redis服务器连接密码(默认为空)

#spring.redis.password=

# 连接池最大连接数(使用负值表示没有限制)

spring.redis.pool.max-active=200

# 连接池最大阻塞等待时间(使用负值表示没有限制)

spring.redis.pool.max-wait=-1

# 连接池中的最大空闲连接

spring.redis.pool.max-idle=8

# 连接池中的最小空闲连接

spring.redis.pool.min-idle=0

# 连接超时时间(毫秒)

spring.redis.timeout=0

#spring-session 使用

spring.session.store-type=none
3.创建jedis配置文件,配置文件的作用是在项目启动的时候将jedis注入,接着我们就可以在其他类中获取到JedisPool类的信息
@Configuration

public class JedisConfig extends CachingConfigurerSupport{

    private Logger logger = LoggerFactory.getLogger(JedisConfig.class);

    /**

     * SpringSession  需要注意的就是redis需要2.8以上版本,然后开启事件通知,在redis配置文件里面加上

     * notify-keyspace-events Ex

     * Keyspace notifications功能默认是关闭的(默认地,Keyspace 时间通知功能是禁用的,因为它或多或少会使用一些CPU的资源)。

     * 或是使用如下命令:

     * redis-cli config set notify-keyspace-events Egx

     * 如果你的Redis不是你自己维护的,比如你是使用阿里云的Redis数据库,你不能够更改它的配置,那么可以使用如下方法:在applicationContext.xml中配置

     * <util:constant static-field="org.springframework.session.data.redis.config.ConfigureRedisAction.NO_OP"/>

     * @return

     */

    @Value("${spring.redis.host}")

    private String host;

    @Value("${spring.redis.port}")

    private int port;

    @Value("${spring.redis.timeout}")

    private int timeout;

    @Value("${spring.redis.pool.max-active}")

    private int maxActive;

    @Value("${spring.redis.pool.max-idle}")

    private int maxIdle;

    @Value("${spring.redis.pool.min-idle}")

    private int minIdle;

    @Value("${spring.redis.pool.max-wait}")

    private long maxWaitMillis;

    @Bean

    public JedisPool redisPoolFactory(){

        JedisPoolConfig jedisPoolConfig = new JedisPoolConfig();

        jedisPoolConfig.setMaxIdle(maxIdle);

        jedisPoolConfig.setMaxWaitMillis(maxWaitMillis);

        jedisPoolConfig.setMaxTotal(maxActive);

        jedisPoolConfig.setMinIdle(minIdle);

        JedisPool jedisPool = new JedisPool(jedisPoolConfig,host,port,timeout,null);

        logger.info("JedisPool注入成功!");

        logger.info("redis地址:" + host + ":" + port);

        return  jedisPool;

    }

}
接下来,我们启动项目,gogogo

Jedis注入成功了!!!
然后我们可以定义一个工具类,用于对redis进行各种操作
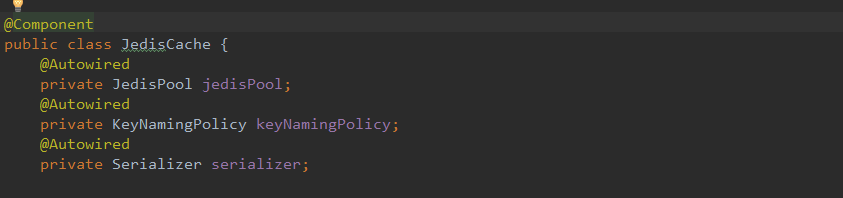
这里我们通过@Autowired将JedisPool注入到工具类中,其他两个是命名、序列化的类
这里,我们列举一下平常最常用的几个方法
//给某个key设值

public void set(String key, Object value) {

        Jedis client = getJedis();

        try {

            byte[] keyBytes = serializer.serializeKey(keyNamingPolicy.getKeyName(key));

            byte[] valueBytes = serializer.serializeValue(value);

            client.set(keyBytes, valueBytes);

        } finally {

            returnJedis(client);

        }

    }

//根据key获取value

 public Object get(String key) {

        Jedis client = getJedis();

        try {

            byte[] keyBytes = serializer.serializeKey(keyNamingPolicy.getKeyName(key));

            byte[] valueBytes = client.get(keyBytes);

            return serializer.deserializeValue(valueBytes);

        } finally {

            returnJedis(client);

        }

    }

//根据键值获取value

    public Object hashGet(String key, String field) {

        Jedis client = getJedis();

        try {

            byte[] keyBytes = serializer.serializeKey(keyNamingPolicy.getKeyName(key));

            byte[] fieldBytes = serializer.serializeKey(field);

            byte[] valueBytes = client.hget(keyBytes, fieldBytes);

            return serializer.deserializeValue(valueBytes);

        } finally {

            returnJedis(client);

        }

    }

    public void hashSet(String key, String field, Object value) {

        Jedis client = getJedis();

        try {

            byte[] keyBytes = serializer.serializeKey(keyNamingPolicy.getKeyName(key));

            byte[] fieldBytes = serializer.serializeKey(field);

            byte[] valueBytes = serializer.serializeValue(value);

            client.hset(keyBytes, fieldBytes, valueBytes);

        } finally {

            returnJedis(client);

        }

    }

public Map<String, Object> hashAllGet(String key) {

        Jedis client = getJedis();

        try {

            byte[] keyBytes = serializer.serializeKey(keyNamingPolicy.getKeyName(key));

            Map<byte[], byte[]> map = client.hgetAll(keyBytes);

            Map<String, Object> valueMap = Maps.newHashMap();

            Set<Map.Entry<byte[], byte[]>> valueSet = map.entrySet();

            for (Map.Entry<byte[], byte[]> entry : valueSet) {

                valueMap.put(serializer.deserializeKey(entry.getKey()), serializer.deserializeValue(entry.getValue()));

            }

            return valueMap;

        } finally {

            returnJedis(client);

        }

    }

//判断key是否存在

    public boolean existKey(String key) {

        Jedis client = getJedis();

        try {

            byte[] keyBytes = serializer.serializeKey(keyNamingPolicy.getKeyName(key));

            return client.exists(keyBytes);

        } finally {

            returnJedis(client);

        }

    }
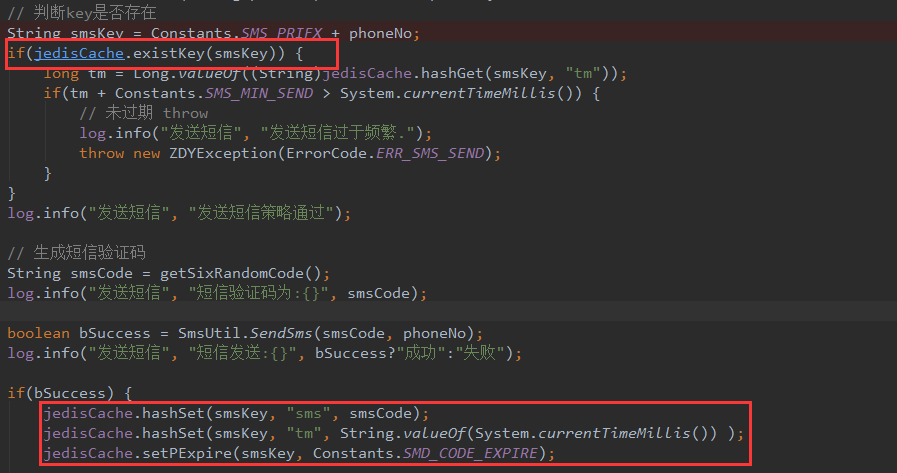
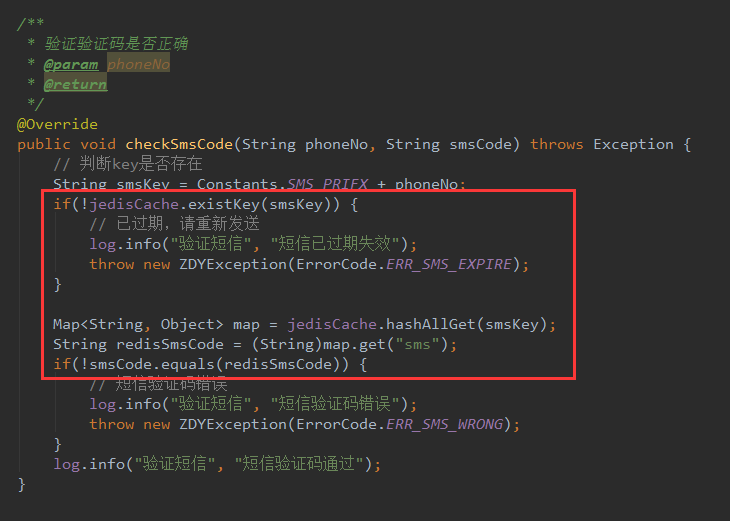
在该项目中,我们发送短信验证码后会将验证码存在redis中去,然后校验的时候会判断用户输入的验证码和缓存中的验证码是否一致,达到目的。
springboot(七).springboot整合jedis实现redis缓存的更多相关文章
- spring-boot的spring-cache中的扩展redis缓存的ttl和key名
原文地址:spring-boot的spring-cache中的扩展redis缓存的ttl和key名 前提 spring-cache大家都用过,其中使用redis-cache大家也用过,至于如何使用怎么 ...
- SpringBoot(七)-SpringBoot JPA-Hibernate
步骤 1.在pom.xml添加mysql,spring-data-jpa依赖2.在application.properties文件中配置mysql连接配置文件3.在application.proper ...
- 使用Jedis操作redis 缓存
案例:http://blog.csdn.net/linlzk/article/details/41801391 Redis是一个开源的Key-Value数据缓存,和Memcached类似. Redis ...
- Java通过jedis操作redis缓存
package com.wodexiangce.util; import java.util.Set; import redis.clients.jedis.Jedis; /** * redis工具类 ...
- SpringBoot(七) SpringBoot中的缓存机制
随着时间的积累,应用的使用用户不断增加,数据规模也越来越大,往往数据库查询操作会成为影响用户使用体验的瓶颈,此时使用缓存往往是解决这一问题非常好的手段之一.Spring 3开始提供了强大的基于注解的缓 ...
- SpringBoot(七):SpringBoot中如何使用过滤器(Filter)?
方式一: 通过注解方式实现: 1.编写一个Servlet3的注解过滤器(和上一章Servlet相似) 贴代码: package com.example.springbootweb.filter; im ...
- redis集群配置,spring整合jedis,缓存同步
前台的商品数据(图片等加载缓慢)查询,先从redis缓存查询数据. redis是一个nosql数据库,内存版数据库,读取速度11w/s.本身具有内存淘汰机制,是单线程服务器(分时操作系统),线程安全. ...
- SpringBoot系列: SpringBoot Web项目中使用Shiro
注意点有:1. 不要启用 spring-boot-devtools, 如果启用 devtools 后, 不管是热启动还是手工重启, devtools总是试图重新恢复之前的session数据, 很有可能 ...
- 转:Redis 缓存策略
转:http://api.crap.cn/index.do#/web/article/detail/web/ARTICLE/7754a002-6400-442d-8dc8-e76e72d948ac 目 ...
随机推荐
- 优化方法总结以及Adam存在的问题(SGD, Momentum, AdaDelta, Adam, AdamW,LazyAdam)
优化方法总结以及Adam存在的问题(SGD, Momentum, AdaDelta, Adam, AdamW,LazyAdam) 2019年05月29日 01:07:50 糖葫芦君 阅读数 455更多 ...
- 怎样测试nginx.conf配置文件的正确性
方法: 使用 nginx -t 命令 nginx -t 如果一切正常, 则会显示:
- 08Dockerfile基本使用
使用Dockerfile创建镜像 Dockerfile是一个文本格式的配置文件,用户可以使用Dockerfile赖快速创建自定义的镜像. Dockerfile由一行行命令组成,#开头为注释. 1:Do ...
- vue学习【一、开发环境搭建】
一.安装node.js https://nodejs.org/en/ 建议安装LTS版本 安装完毕之后cmd命令查看node版本,如果不识别,记住设置环境变量 显示上面信息则安装成功 二.设置node ...
- Myatis中的OGNL和bind标签的结合用法
1.MyBatis常用的OGNL e1 or e2 e1 and e2 e1 == e2,e1 eq e2 e1 != e2,e1 neq e2 e1 lt e2:小于 e1 lte e2:小于等于, ...
- HTTP协议探究(三):HTTPS
一 复习与目标 1 复习 代理:转发通信数据(一般协议不变,作为中间人,可对报文进行过滤修改) 网关:转发通信数据(协议改变,作为资源拥有者) 隧道:转发通信数据(协议不变,作为管道,不对报文进行过滤 ...
- excel 导入
public static DataTable ExcelToDataTable(string fileName, string sheetName, bool isFirstRowColumn) { ...
- js重点——作用域——内部原理(二)
本篇是深入分析和理解作用域的第一篇——内部原理和工作模型. 我们知道作用域是变量,对象,函数可访问的一个范围.这说明了我们需要一套良好的规则来存储变量,之后方便查找.所以我们首先要理解的是在哪里而且怎 ...
- IDEA GIT 忽略文件
1.装插件 .igore 2.新建忽略文件格式 3.编辑忽略后缀文件 可以是文件夹 也可以是 具体文件类型
- mock.js学习之路一(Vue中使用)
1.安装mockjs 2.配置mockjs在开发环境中启用,生产环境中禁用 3.创建mock文件夹,以及mock数据文件 4.在main.js中引入与否 5.页面获取数据 testMock(){ th ...