MySQL 04
python操作mysql
mysql
'''

mysql> select * from user_info;

+----+------+----------+

| id | name | password |

+----+------+----------+

|  1 | bigb | 123456   |

+----+------+----------+

1 row in set (0.00 sec)

'''

import pymysql

user_name = input('请输入用户名: ').strip()

password = input('请输入密码: ').strip()

# 连接数据库

conn = pymysql.connect(

    host='localhost',

    user='root',

    password='123',

    database='db3',

    charset='utf8'

)

# 游标

cursor = conn.cursor()  # 默认以元祖返回

# cursor = conn.cursor(cursor=pymysql.cursors.DictCursor)  # 以字典返回

# 拼接sql语句

sql = "select * from user_info where name = '%s' and password = '%s'" % (user_name, password)

print(sql)

# 执行sql语句

res = cursor.execute(sql)  # 返回执行sql语句影响成功的记录条数

print(res)

cursor.close()

conn.close()

if res:

    print('登录成功!')

else:

    print('登录失败!')

'''

请输入用户名: bigb

请输入密码: 123456

select * from user_info where name = 'bigb' and password = '123456'

1

登录成功!

'''
sql注入问题
问题描述
- 对于上面的登录脚本, 如果我们在输入用户名时, 在用户名在后面加上
' #, 这样即使密码错误也能登录成功 (绕过密码)
请输入用户名: bigb' #

请输入密码: 234235

select * from user_info where name = 'bigb' #' and password = '234235'

1

登录成功!
- 甚至用户名输错也能登录成功 (绕过用户名和密码)
请输入用户名: blake' or 1=1 #

请输入密码: 4647723

select * from user_info where name = 'blake' or 1=1 #' and password = '4647723'

1

登录成功!
- 上面描述的就是sql注入问题, 原因是我们可以通过输入特殊符号改变where后的筛选条件 (
#可以让后面的内容变成注释)
解决办法
- pymysql对sql针对注入问题进行了优化, 我们将sql语句的拼接工作交给
cursor.execute(sql, (user_name, password))即可
import pymysql

user_name = input('请输入用户名: ').strip()

password = input('请输入密码: ').strip()

# 连接数据库

conn = pymysql.connect(

    host='localhost',

    user='root',

    password='123',

    database='db3',

    charset='utf8'

)

# 游标

cursor = conn.cursor()  # 默认以元祖返回

# cursor = conn.cursor(cursor=pymysql.cursors.DictCursor)  # 以字典返回

# sql语句

sql = "select * from user_info where name = %s and password = %s"

print(sql)

# 拼接并执行sql语句

res = cursor.execute(sql, (user_name, password))

print(res)

cursor.close()

conn.close()

if res:

    print('登录成功!')

else:

    print('登录失败!')
增/删/改
- 在通过mysql进行增删改的时候, 要在最后加上
conn.commit()提交
'''

mysql> select * from user_info;

+----+-------+----------+

| id | name  | password |

+----+-------+----------+

|  1 | bigb  | 123456   |

|  3 | alpha | 111111   |

+----+-------+----------+

2 rows in set (0.00 sec)

'''

import pymysql

# 连接数据库

conn = pymysql.connect(

    host='localhost',

    user='root',

    password='123',

    database='db3',

    charset='utf8'

)

# 游标

cursor = conn.cursor()

# 增加

sql = "insert into user_info (name, password) values ('%s', '%s')" % ('blake', '654321')

print(sql)

res = cursor.execute(sql)

print(res)

# 修改

sql = "update user_info set password='%s' where name='%s'" % ('222222', 'bigb')

print(sql)

res = cursor.execute(sql)

print(res)

# 删除

sql = "delete from user_info where name='%s' " % ('alpha')

print(sql)

res = cursor.execute(sql)

print(res)

conn.commit()

cursor.close()

conn.close()

'''

mysql> select * from user_info;

+----+-------+----------+

| id | name  | password |

+----+-------+----------+

|  1 | bigb  | 222222   |

|  5 | blake | 654321   |

+----+-------+----------+

2 rows in set (0.00 sec)

'''
查询
cursor.fetchone()返回一条记录cursor.fetchmany(n)返回n条记录cursor.fetchall()返回所有记录- 注意
fetch会记录光标位置,fetchone()和fetchmany()会使光标向后移动相应条数,fetchall()直接将光标移动到末尾
'''

+----+---------+----------+

| id | name    | password |

+----+---------+----------+

|  1 | bigb    | 111111   |

|  2 | blake   | 222222   |

|  3 | black   | 333333   |

|  4 | alpha   | 111111   |

|  5 | bravo   | 222222   |

|  6 | charlie | 333333   |

|  7 | delta   | 111111   |

|  8 | echo    | 222222   |

|  9 | foxtrot | 333333   |

+----+---------+----------+

'''

import pymysql

# 连接

conn = pymysql.connect(

    host='localhost',

    user='root',

    password='123',

    database='db3',

    charset='utf8'

)

# 游标

cursor = conn.cursor()

sql = "select * from user_info"

# 执行sql语句

rows = cursor.execute(sql)

print(rows)

res1 = cursor.fetchone()

res2 = cursor.fetchone()

res3 = cursor.fetchone()

res4 = cursor.fetchmany(3)

res5 = cursor.fetchall()

print(res1)

print(res2)

print(res3)

print(res4)

print(res5)

'''

9

(1, 'bigb', '111111')

(2, 'blake', '222222')

(3, 'black', '333333')

((4, 'alpha', '111111'), (5, 'bravo', '222222'), (6, 'charlie', '333333'))

((7, 'delta', '111111'), (8, 'echo', '222222'), (9, 'foxtrot', '333333'))

'''
索引
基本概念
- 索引相当于字典的音序表, 如果查某个字, 可以根据音序表快速定位这个字在字典中的位置, 如果不使用音序表则要一页一页查找
- 优点: 索引可以提升查询数据的速度
- 缺点: 增加索引会消耗很多内存资源
索引的原理
原理: 不断缩小搜索范围, 把随机事件变顺序事件
底层数据结构: B+树
mysql索引种类
普通索引
- index 加速查找
唯一索引
- primary key 主键唯一索引, 加速查找, 不为空, 不重复
- unique 普通唯一索引, 加速查找, 不重复
联合索引
- primary key (id, name) 联合主键索引
- unique (id, name) 联合唯一索引
- index (id, name) 联合普通索引
创建索引
- 在创建表时添加
creat table 表名 (

列名1 列类型 [列约束],

列名2 列类型 [列约束],

index/primary key/unique [索引名] (列名1)

);

mysql> create table user (

    -> id int auto_increment,

    -> name char(10) not null default '',

    -> email char(20) not null default '',

    -> primary key pk_id (id)

    -> );

Query OK, 0 rows affected (0.05 sec)
- 在已创建的表上添加
alter table 表名 add index/unique index [索引名] (列名)

create index/unique index [索引名] on 表名(列名)
- 删除索引
alter table 表名 drop 索引名

drop index 索引名 on 表名
正确使用索引
索引未命中
- 进行四则运算
- 使用函数
- 条件不明确 :
> >= < <= != between...and... like
最左前缀
- 基于联合索引的情况下
- 假设我们创建index(clo1, clo2, clo3)这样的一个联合索引, 相当于 (clo1), (clo1, clo2), (clo1, clo2, clo3) 三非索引
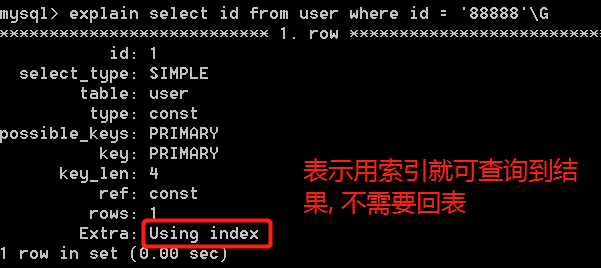
索引覆盖
- 在查询的时候,利用到的索引已经完全包含需要查询数据,在这种情况下,查询结果直接就是索引的值,并不需要再利用索引回表查询了
- 如
select id from user where id = '88888'
explain
可以模拟优化器执行SQL查询语句,从而知道MySQL是如何处理你的SQL语句的
explain sql语句
慢查询日志
基本概念
MySQL提供的一种日志记录,它用来记录在MySQL中响应时间超过阀值的语句
show varibles like %slow%;查看当前日志状态 (是否开启, 日志文件保存位置)
mysql> show variables like '%slow%';

+---------------------------+-----------------------------------------------------+

| Variable_name             | Value                                               |

+---------------------------+-----------------------------------------------------+

| log_slow_admin_statements | OFF                                                 |

| log_slow_slave_statements | OFF                                                 |

| slow_launch_time          | 2                                                   |

| slow_query_log            | OFF                                                 |

| slow_query_log_file       | D:\MySQL\mysql-5.6.46-winx64\data\Black-PC-slow.log |

+---------------------------+-----------------------------------------------------+
show varibles like %long%;查看慢查询设定的时间(10秒)
mysql> show variables like '%long%';

+--------------------------------------------------------+-----------+

| Variable_name                                          | Value     |

+--------------------------------------------------------+-----------+

| long_query_time                                        | 10.000000 |

| performance_schema_events_stages_history_long_size     | 10000     |

| performance_schema_events_statements_history_long_size | 10000     |

| performance_schema_events_waits_history_long_size      | 10000     |

+--------------------------------------------------------+-----------+

4 rows in set (0.00 sec)
配置
set global 变量名 = 值
mysql> set global slow_query_log = on;

mysql> set global slow_query_log_file = "D:/MySQL/myslow.log";

mysql> set global long_query_time = 1;
MySQL 04的更多相关文章
- day47 Pyhton 数据库Mysql 04
# 表结构 # 建表 - 表的增加 # create table # 删表 - 表的删除 # drop table # 改表 - 表的修改 # alter table 表名 # rename 新表名 ...
- 第 13 章 可扩展性设计之 MySQL Replication
前言: MySQL Replication 是 MySQL 非常有特色的一个功能,他能够将一个 MySQL Server 的 Instance 中的数据完整的复制到另外一个 MySQL Server ...
- MySql(十三):MySql架构设计——可扩展性设计之 MySQL Replication
一.前言 MySQL Replication能够将一个 MySQL Server 的 Instance 中的数据完整的复制到另外一个 MySQL Server 的 Instance 中.虽然复制过程并 ...
- MySQL性能调优与架构设计——第13章 可扩展性设计之 MySQL Replication
第13章 可扩展性设计之 MySQL Replication 前言: MySQL Replication 是 MySQL 非常有特色的一个功能,他能够将一个 MySQL Server 的 Instan ...
- Liunx 安装 Mysql 5.7
#[安装 Mysql 5.7] # 00.系统目录说明# 安装文件下载目录:/data/software# Mysql目录安装位置:/usr/local/mysql# 数据库保存位置:/data/my ...
- 搭建mysql主从集群的步骤
前提条件是:须要在linux上安装4个mysql数据库,都须要配置完对应的信息. 须要搭建: mysql 01: 主数据库 master mysql 02 : ...
- kali 系列学习10-渗透攻击MySQL数据库服务、PostgreSQL数据库服务、Tomcat服务和PDF文件
介绍使用MSFCONSOLE工具渗透攻击MySQL数据库服务.PostgreSQL数据库服务.Tomcat服务和PDF文件等. 6.4.1 渗透攻击MySQL数据库服务 MySQL是一个关系型数据库管 ...
- MySQL必知必会学习笔记(详细)
目录 01 了解SQL 02 MySQL简介 03 使用MySQL 04 检索数据 select, from, distinct, limit, offset 05 排序 order by 06 过滤 ...
- mariadb多实例搭建
测试环境基于centos7.2,腾讯云实验室,学习搭建! https://www.qcloud.com/developer 多实例mysql,能更加理解mysql安装的基本过程!及简单使用... ma ...
随机推荐
- PHP7中的异常与错误处理
PHP 中的 Exception, Error, Throwable PHP 中将代码自身异常(一般是环境或者语法非法所致)称作错误 Error,将运行中出现的逻辑错误称为异常 Exception 错 ...
- win10 visual studio 2017环境中安装CUDA8
从https://developer.nvidia.com/cuda-toolkit-archive下载CUDA 8 安装 从https://developer.nvidia.com/gamework ...
- 从静态代理,jdk动态代理到cglib动态代理-一文搞懂代理模式
从代理模式到动态代理 代理模式是一种理论上非常简单,但是各种地方的实现往往却非常复杂.本文将从代理模式的基本概念出发,探讨代理模式在java领域的应用与实现.读完本文你将get到以下几点: 为什么需要 ...
- 源码分析RocketMQ消息轨迹
目录 1.发送消息轨迹流程 1.1 DefaultMQProducer构造函数 1.2 SendMessageTraceHookImpl钩子函数 1.3 TraceDispatcher实现原理 2. ...
- 为React绑定事件,并修改state中的值
import React from 'react' export default class ClickS extends React.Component { constructor () { sup ...
- python_day04
今日内容: 一.爬虫三部曲: 1.发送请求 2.解析数据 3.保存数据 4.解析详情页,获取视频地址 mport requests import re #正则模块 import uuid #uuid. ...
- GeoServer 修改端口
准备内容 安装环境:win10*64位专业版 安装文件:geoserver-2.15.2 操作步骤 1.找到文件夹下的start.ini,并用记事本打开 2.找到jetty.port,修改为自己需要的 ...
- python3 之 匿名函数
一.语法: lambda 参数:方法(或三元运算) #最多支持3元运算 二.实例1:基础 #函数1: a = lambda x:x*x print(a(2)) #函数2: def myfun(x): ...
- 【论文阅读】Clustering Convolutional Kernels to Compress Deep Neural Networks
文章:Clustering Convolutional Kernels to Compress Deep Neural Networks 链接:http://openaccess.thecvf.com ...
- .Net Core3.1下使用Swagger搭建web api项目
前言:微软于前天发布.net core 3.1正式版,并将长期支持3.1.所以我听到这个消息后就急忙下载.net core 3.1的SDK和Runtime,应该是公司最先用3.1的攻城狮了