
跟我学SpringCloud | 第三篇:服务的提供与Feign调用
SpringCloud系列教程 | 第三篇:服务的提供与Feign调用
Springboot: 2.1.6.RELEASE
SpringCloud: Greenwich.SR1
如无特殊说明,本系列教程全采用以上版本
上一篇,我们介绍了注册中心的搭建,包括集群环境吓注册中心的搭建,这篇文章介绍一下如何使用注册中心,创建一个服务的提供者,使用一个简单的客户端去调用服务端提供的服务。
本篇文章中需要三个角色,分别是服务的提供者,服务的消费者,还有一个是上一篇文章的主角——注册中心Eureka(使用单机版本即可,本篇的示例也会使用单机版本的Eureka)。
整体流程为:
- 先启动注册中心Eureka
- 启动服务的提供者将提供服务,并将服务注册到注册中心Eureka上
- 启动服务的消费者,在注册中心中找到服务并完成消费
1. 服务提供者
1. pom.xml
<?xml version="1.0" encoding="UTF-8"?>

<project xmlns="http://maven.apache.org/POM/4.0.0" xmlns:xsi="http://www.w3.org/2001/XMLSchema-instance"

	xsi:schemaLocation="http://maven.apache.org/POM/4.0.0 http://maven.apache.org/xsd/maven-4.0.0.xsd">

	<modelVersion>4.0.0</modelVersion>

	<parent>

		<groupId>org.springframework.boot</groupId>

		<artifactId>spring-boot-starter-parent</artifactId>

		<version>2.1.6.RELEASE</version>

		<relativePath/> <!-- lookup parent from repository -->

	</parent>

	<groupId>com.springcloud</groupId>

	<artifactId>producer</artifactId>

	<version>0.0.1-SNAPSHOT</version>

	<name>producer</name>

	<description>Demo project for Spring Boot</description>

	<properties>

		<java.version>1.8</java.version>

		<spring-cloud.version>Greenwich.SR1</spring-cloud.version>

	</properties>

	<dependencies>

		<dependency>

			<groupId>org.springframework.boot</groupId>

			<artifactId>spring-boot-starter-web</artifactId>

		</dependency>

		<dependency>

			<groupId>org.springframework.cloud</groupId>

			<artifactId>spring-cloud-starter-netflix-eureka-client</artifactId>

		</dependency>

		<dependency>

			<groupId>org.springframework.boot</groupId>

			<artifactId>spring-boot-starter-test</artifactId>

			<scope>test</scope>

		</dependency>

	</dependencies>

	<dependencyManagement>

		<dependencies>

			<dependency>

				<groupId>org.springframework.cloud</groupId>

				<artifactId>spring-cloud-dependencies</artifactId>

				<version>${spring-cloud.version}</version>

				<type>pom</type>

				<scope>import</scope>

			</dependency>

		</dependencies>

	</dependencyManagement>

	<build>

		<plugins>

			<plugin>

				<groupId>org.springframework.boot</groupId>

				<artifactId>spring-boot-maven-plugin</artifactId>

			</plugin>

		</plugins>

	</build>

</project>
2. 配置文件application.yml
server:

  port: 8080

spring:

  application:

    name: spring-cloud-producer

eureka:

  client:

    service-url:

      defaultZone: http://localhost:8761/eureka/
3. 启动类ProducerApplication.java
增加@EnableEurekaClient,如果是其他注册中心可以使用注解@EnableDiscoveryClient来进行服务的注册
package com.springcloud.producer;

import org.springframework.boot.SpringApplication;

import org.springframework.boot.autoconfigure.SpringBootApplication;

import org.springframework.cloud.netflix.eureka.EnableEurekaClient;

@SpringBootApplication

@EnableEurekaClient

public class ProducerApplication {

	public static void main(String[] args) {

		SpringApplication.run(ProducerApplication.class, args);

	}

}
4. Controller
package com.springcloud.producer.controller;

import org.springframework.web.bind.annotation.RequestMapping;

import org.springframework.web.bind.annotation.RequestParam;

import org.springframework.web.bind.annotation.RestController;

/**

 * Created with IntelliJ IDEA.

 *

 * @Date: 2019/7/2

 * @Time: 0:02

 * @email: inwsy@hotmail.com

 * Description:

 */

@RestController

public class HelloController {

    @RequestMapping("/hello")

    public String hello(@RequestParam String name) {

        return "hello "+name+",producer is ready";

    }

}
先在可以先启动上一篇当中单机版的Eureka,再启动我们刚写好的producer服务提供者,启动成功后,访问链接http://localhost:8761/,可以看到我们的的服务提供者producer已经成功注册在注册中心上了。
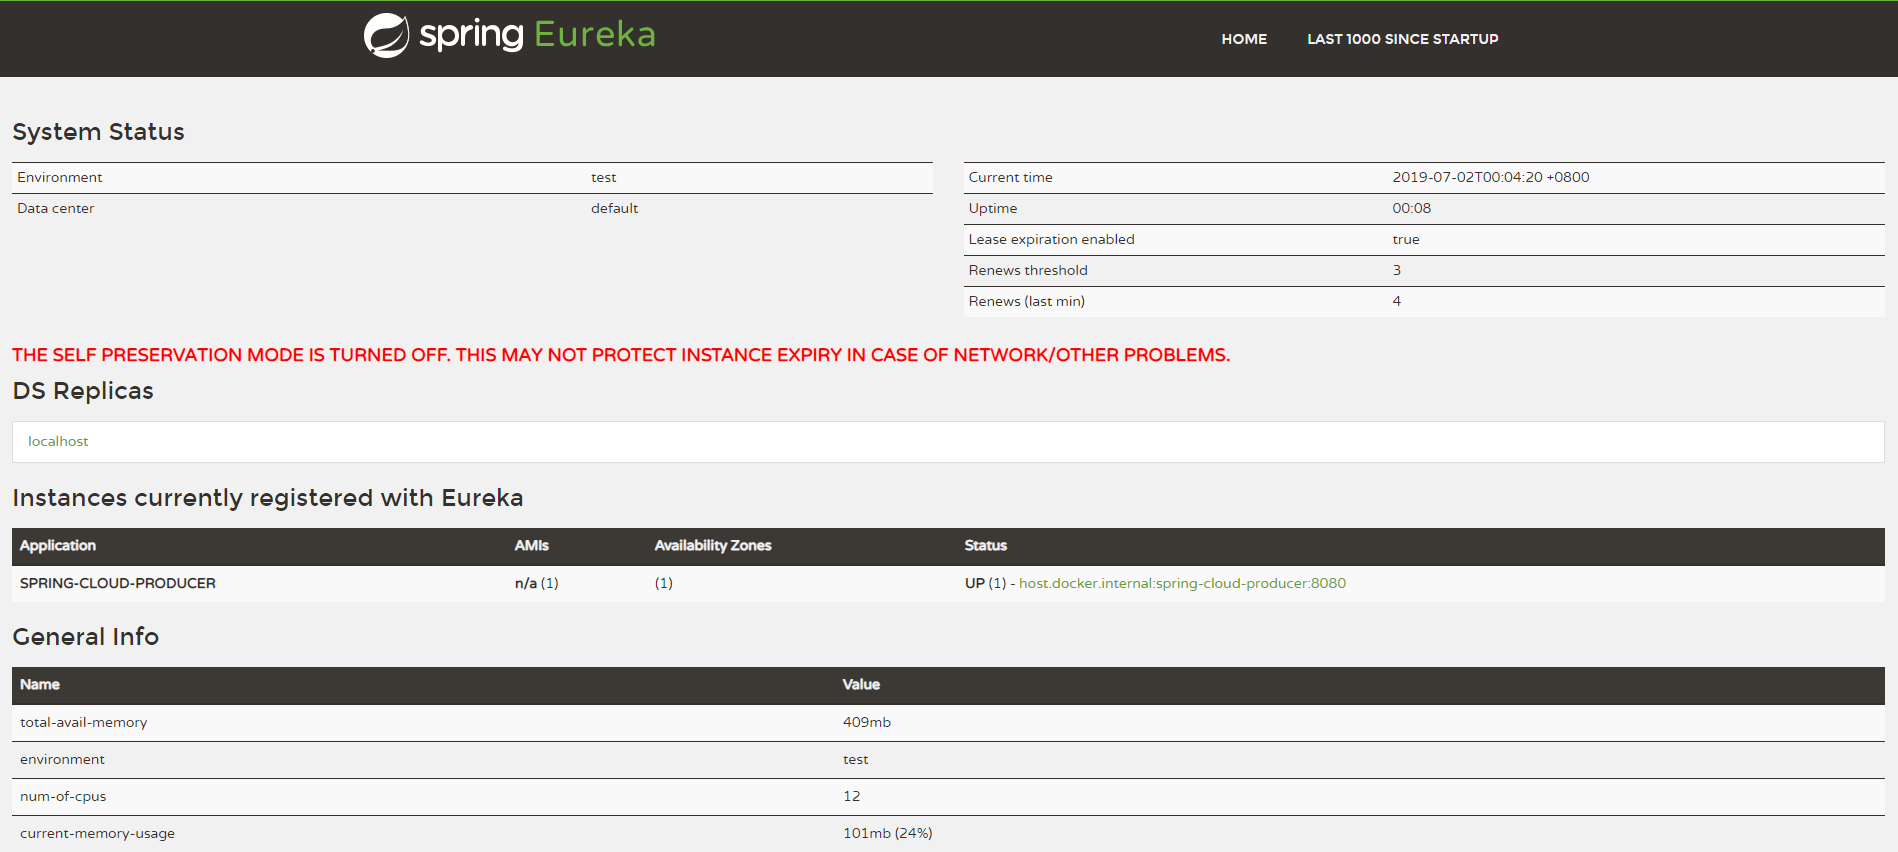
至此,服务的提供者已经配置完成。
2. 服务消费者
1. pom.xml
<?xml version="1.0" encoding="UTF-8"?>

<project xmlns="http://maven.apache.org/POM/4.0.0" xmlns:xsi="http://www.w3.org/2001/XMLSchema-instance"

	xsi:schemaLocation="http://maven.apache.org/POM/4.0.0 http://maven.apache.org/xsd/maven-4.0.0.xsd">

	<modelVersion>4.0.0</modelVersion>

	<parent>

		<groupId>org.springframework.boot</groupId>

		<artifactId>spring-boot-starter-parent</artifactId>

		<version>2.1.6.RELEASE</version>

		<relativePath/> <!-- lookup parent from repository -->

	</parent>

	<groupId>com.springcloud</groupId>

	<artifactId>consumers</artifactId>

	<version>0.0.1-SNAPSHOT</version>

	<name>consumers</name>

	<description>Demo project for Spring Boot</description>

	<properties>

		<java.version>1.8</java.version>

		<spring-cloud.version>Greenwich.SR1</spring-cloud.version>

	</properties>

	<dependencies>

		<dependency>

			<groupId>org.springframework.cloud</groupId>

			<artifactId>spring-cloud-starter-netflix-eureka-client</artifactId>

		</dependency>

		<dependency>

			<groupId>org.springframework.boot</groupId>

			<artifactId>spring-boot-starter-web</artifactId>

		</dependency>

		<dependency>

			<groupId>org.springframework.cloud</groupId>

			<artifactId>spring-cloud-starter-openfeign</artifactId>

		</dependency>

		<dependency>

			<groupId>org.springframework.boot</groupId>

			<artifactId>spring-boot-starter-test</artifactId>

			<scope>test</scope>

		</dependency>

	</dependencies>

	<dependencyManagement>

		<dependencies>

			<dependency>

				<groupId>org.springframework.cloud</groupId>

				<artifactId>spring-cloud-dependencies</artifactId>

				<version>${spring-cloud.version}</version>

				<type>pom</type>

				<scope>import</scope>

			</dependency>

		</dependencies>

	</dependencyManagement>

	<build>

		<plugins>

			<plugin>

				<groupId>org.springframework.boot</groupId>

				<artifactId>spring-boot-maven-plugin</artifactId>

			</plugin>

		</plugins>

	</build>

</project>
spring-boot-starter-web: 这个包是通用的web开发包,里面包含了spring-web、spring-webmvc等包
spring-cloud-starter-openfeign: 这个包是springcloud对于Feign的封装,Feign是一个声明式的Web服务客户端。它支持Feign本身的注解、JAX-RS注解以及SpringMVC的注解。Spring Cloud集成Ribbon和Eureka以在使用Feign时提供负载均衡的http客户端。
2. 配置文件application.yml
server:

  port: 8081

spring:

  application:

    name: spring-cloud-consumers

eureka:

  client:

    service-url:

      defaultZone: http://localhost:8761/eureka/
3. 启动类ConsumersApplication.java
同上,增加@EnableEurekaClient,如果是其他注册中心可以使用注解@EnableDiscoveryClient来进行服务的注册
package com.springcloud.consumers;

import org.springframework.boot.SpringApplication;

import org.springframework.boot.autoconfigure.SpringBootApplication;

import org.springframework.cloud.netflix.eureka.EnableEurekaClient;

import org.springframework.cloud.openfeign.EnableFeignClients;

@SpringBootApplication

@EnableEurekaClient

@EnableFeignClients

public class ConsumersApplication {

	public static void main(String[] args) {

		SpringApplication.run(ConsumersApplication.class, args);

	}

}
@EnableFeignClients: 这个注解是通知SpringBoot在启动的时候,扫描被 @FeignClient 修饰的类,@FeignClient这个注解在进行远程调用的时候会用到。
4. Feign远程调用
Feign是一个声明式Web Service客户端。使用Feign能让编写Web Service客户端更加简单, 它的使用方法是定义一个接口,然后在上面添加注解,同时也支持JAX-RS标准的注解。Feign也支持可拔插式的编码器和解码器。Spring Cloud对Feign进行了封装,使其支持了Spring MVC标准注解和HttpMessageConverters。Feign可以与Eureka和Ribbon组合使用以支持负载均衡。
创建一个remote接口
package com.springcloud.consumers.remote;

import org.springframework.cloud.openfeign.FeignClient;

import org.springframework.web.bind.annotation.RequestMapping;

import org.springframework.web.bind.annotation.RequestParam;

/**

 * @Author: shiyao.wei

 * @Date: 2019/7/2 11:14

 * @Version: 1.0

 * @Desc:

 */

@FeignClient(name= "spring-cloud-producer")

public interface HelloRemote {

    @RequestMapping(value = "/hello")

    String hello(@RequestParam(value = "name") String name);

}
- name:远程服务名,及spring.application.name配置的名称
- 此类中的方法和远程服务中contoller中的方法名和参数需保持一致
5. web层调用远程接口 Controller
package com.springcloud.consumers.controller;

import com.springcloud.consumers.remote.HelloRemote;

import org.springframework.beans.factory.annotation.Autowired;

import org.springframework.web.bind.annotation.PathVariable;

import org.springframework.web.bind.annotation.RequestMapping;

import org.springframework.web.bind.annotation.RestController;

/**

 * @Author: shiyao.wei

 * @Date: 2019/7/2 11:25

 * @Version: 1.0

 * @Desc:

 */

@RestController

public class HelloController {

    @Autowired

    HelloRemote helloRemote;

    @RequestMapping("/hello/{name}")

    public String index(@PathVariable("name") String name) {

        return helloRemote.hello(name);

    }

}
现在,一个最简单的服务注册和调用的例子就完成了。
3. 测试
简单调用
顺次启动eureka、producer、consumer三个项目
启动成功后,先在浏览器输入http://localhost:8080/hello?name=springcloud
可以看到页面显示:hello springcloud,producer is ready
证明我们的producer已经正常启动,提供的服务也正常
接下来,我们测试服务消费者,在浏览器中输入:http://localhost:8081/hello/spring
可以看到页面显示:hello spring,producer is ready
说明客户端已经成功的通过feign调用了远程服务hello,并且将结果返回到了浏览器。
负载均衡
将上面的producer复制一份,修改名称为producer2,修改pom.xml中的<name></name>为producer2,修改其中的Controller:
package com.springcloud.producer.controller;

import org.springframework.web.bind.annotation.RequestMapping;

import org.springframework.web.bind.annotation.RequestParam;

import org.springframework.web.bind.annotation.RestController;

/**

 * Created with IntelliJ IDEA.

 *

 * @Date: 2019/7/2

 * @Time: 0:02

 * @email: inwsy@hotmail.com

 * Description:

 */

@RestController

public class HelloController {

    @RequestMapping("/hello")

    public String hello(@RequestParam String name) {

        return "hello "+name+",producer2 is ready";

    }

}
修改application.yml配置文件启动端口为8082
启动我们刚复制好的producer2,这时可以看一下注册中心Eureka,我们现在已经有两个producer服务了。

这时我们再去访问:http://localhost:8081/hello/spring
第一次返回结果:hello spring,producer is ready
第二次返回结果:hello spring,producer2 is ready
连续刷新页面,两个结果会交替出现,说明注册中心提供了服务负载均衡功能。将服务数提高到N个,会发现测试结果一样,请求会自动轮询到每个服务端来处理。
好了,现在可以将代码打包扔到Github上去了,欢迎大家前往Github骚扰:)
系列回顾
跟我学SpringCloud | 第三篇:服务的提供与Feign调用的更多相关文章
- [老老实实学WCF] 第三篇 在IIS中寄存服务
老老实实学WCF 第三篇 在IIS中寄宿服务 通过前两篇的学习,我们了解了如何搭建一个最简单的WCF通信模型,包括定义和实现服务协定.配置服务.寄宿服务.通过添加服务引用的方式配置客户端并访问服务.我 ...
- 史上最简单的SpringCloud教程 | 第三篇: 服务消费者(Feign)
转载请标明出处: https://www.fangzhipeng.com/springcloud/2017/07/12/sc03-feign/ 本文出自方志朋的博客 最新Finchley版本请访问: ...
- 跟我学SpringCloud | 第十七篇:服务网关Zuul基于Apollo动态路由
目录 SpringCloud系列教程 | 第十七篇:服务网关Zuul基于Apollo动态路由 Apollo概述 Apollo相比于Spring Cloud Config优势 工程实战 示例代码 Spr ...
- SpringCloud教程 | 第三篇: 服务消费者(Feign)
上一篇文章,讲述了如何通过RestTemplate+Ribbon去消费服务,这篇文章主要讲述如何通过Feign去消费服务.一.Feign简介 Feign是一个声明式的伪Http客户端,它使得写Http ...
- SpringCloud教程 | 第三篇: 服务消费者(Feign)(Finchley版本)
上一篇文章,讲述了如何通过RestTemplate+Ribbon去消费服务,这篇文章主要讲述如何通过Feign去消费服务. 一.Feign简介 Feign是一个声明式的伪Http客户端,它使得写Htt ...
- 史上最简单的SpringCloud教程 | 第三篇: 服务消费者(Feign)(Finchley版本)
转载请标明出处: 原文首发于:https://www.fangzhipeng.com/springcloud/2018/08/30/sc-f3-feign/ 本文出自方志朋的博客 上一篇文章,讲述了如 ...
- 跟我学SpringCloud | 第十篇:服务网关Zuul高级篇
SpringCloud系列教程 | 第十篇:服务网关Zuul高级篇 Springboot: 2.1.6.RELEASE SpringCloud: Greenwich.SR1 如无特殊说明,本系列教程全 ...
- (转) [老老实实学WCF] 第三篇 在IIS中寄存服务
第三篇 在IIS中寄宿服务 通过前两篇的学习,我们了解了如何搭建一个最简单的WCF通信模型,包括定义和实现服务协定.配置服务.寄宿服务.通过添加服务引用的方式配置客户端并访问服务.我们对WCF的编程生 ...
- 史上最简单的SpringCloud教程 | 第九篇: 服务链路追踪(Spring Cloud Sleuth)(Finchley版本)
转载请标明出处: 原文首发于:>https://www.fangzhipeng.com/springcloud/2018/08/30/sc-f9-sleuth/ 本文出自方志朋的博客 这篇文章主 ...
随机推荐
- 4.生产者 消费者模式的RabbitMQ
1.生产者: using RabbitMQ.Client; using System; using System.Text; namespace Publisher1 { class Program ...
- Latex 琐碎
χ(\chi),Ξ(\Xi),ξ(\xi) 0. 加颜色 x2+y2=z2({\color{Red} {x^2+y^2=z^2}}) Magenta, Cyan, Emerald(宝石绿) 1. 斜杠 ...
- 使用xtrabackup实现MySQL主从复制
环境描写叙述 主从环境 项目 Master Slave OS版本号 SuSE 11sp1 x86_64 SuSE 11sp1 x86_64 MySQL版本号 官方版本号5.5.37 官方版本号5.5. ...
- WinEdt && LaTex(三)—— 宏包
amsmath:最常用的数学宏包 1. bm:bold math 数学字体加粗 \documentclass{article} \usepackage{bm} \begin{document} \[ ...
- wpf 屏蔽热键
原文:wpf 屏蔽热键 版权声明:本文为博主原创文章,未经博主允许不得转载. https://blog.csdn.net/a771948524/article/details/9428923 us ...
- word 软换行与硬换行
word 下的软回车,就是按住 Shift+Enter 之后产生的一种效果,通常在文字后面会有一个向下的箭头: 硬回车就是只敲击回车(enter)产生的一种效果了,通常就会在文字后面产生一个向左弯区的 ...
- Win10 如何以管理员身份设置开机自启程序(1)
原文:Win10 如何以管理员身份设置开机自启程序(1) 最近一个项目在win10上部署时遇到问题,即如何设置以管理员身份开机自启.现把解决方法整理如下: 首先,为了进行验证,我编了一个简单的程序te ...
- 将RDL报表转换成RDLC报表的函数
原文:将RDL报表转换成RDLC报表的函数 近日研究RDLC报表,发现其不能与RDL报表兼容,尤其是将RDL报表转换成RDLC报表.网上的资料贴出的的转换方式复杂且不切实际,遂决定深入研究.经研究发现 ...
- MVC 行为过滤器
using FilterExam.Fiter;using System;using System.Collections.Generic;using System.Linq;using System. ...
- C#代码中设置 控件的触发器
Style style = new Style(); style.TargetType = typeof(TextBox); MultiDataTrigger trigger = new MultiD ...