
21.Nginx代理缓存
1.环境准备
| 操作系统 | 应用服务 | 外网地址 | 内网地址 |
|---|---|---|---|
| CentOS7.6 | LB01 | 10.0.0.5 | 172.16.1.5 |
| CentOS7.6 | Web01 | 10.0.0.7 | 172.16.1.7 |
2.web01操作
2.1建立相关目录

[root@web01 ~]# mkdir -p /soft/code{1..3}

2.2建立相关html文件

[root@web01 ~]# for i in {1..3};do echo Code1-Url$i > /soft/code1/url$i.html;done

[root@web01 ~]# for i in {1..3};do echo Code2-Url$i > /soft/code2/url$i.html;done

[root@web01 ~]# for i in {1..3};do echo Code3-Url$i > /soft/code3/url$i.html;done

2.3配置Nginx

[root@web01 conf.d]# cat node.conf

server {

	listen 8081;

	server_name web.cheng.com;

	root /soft/code1;

	index index.html;

}

server {

	listen 8082;

	server_name web.cheng.com;

	root /soft/code2;

	index index.html;

}

server {

	listen 8083;

	server_name web.cheng.com;

	root /soft/code3;

	index index.html;

}

2.4检查端口是否开启

[root@web01 conf.d]# netstat -lntup

tcp        0      0 0.0.0.0:8081            0.0.0.0:*               LISTEN      1597/nginx: master

tcp        0      0 0.0.0.0:8082            0.0.0.0:*               LISTEN      1597/nginx: master

tcp        0      0 0.0.0.0:8083            0.0.0.0:*               LISTEN      1597/nginx: master
3.LB01配置代理缓存
-------->配置详解:

proxy_cache		存放缓存临时文件

levels     		按照两层目录分级

keys_zone  		开辟空间名, 10m:开辟空间大小, 1m可存放8000key

max_size   		控制最大大小, 超过后Nginx会启用淘汰规则

inactive   		60分钟没有被访问缓存会被清理

use_temp_path   临时文件, 会影响性能, 建议关闭

[root@lb01 conf.d]# cat proxy_cache.conf

proxy_cache_path /soft/cache levels=1:2 keys_zone=code_cache:10m max_size=10g inactive=60m use_temp_path=off;

upstream cache {

	server 172.16.1.7:8081;

	server 172.16.1.7:8082;

	server 172.16.1.7:8083;

}

server {

	listen 80;

	server_name 10.0.0.5;

	index index.html;

	location / {

		proxy_pass http://cache;

                proxy_cache code_cache;

                proxy_cache_valid 200 304 12h;

                proxy_cache_valid any 10m;

                add_header Nginx-Cache "$upstream_cache_status";

                proxy_next_upstream error timeout invalid_header http_500 http_502 http_503  http_504;

                include proxy_params;

	}

}

------------------------------------------------------------------------------

proxy_cache        		开启缓存

proxy_cache_valid  		状态码200|304的过期为12h, 其余状态码10分钟过期

proxy_cache_key    		缓存key

add_header         		增加头信息, 观察客户端respoce是否命中

proxy_next_upstream 	出现502-504或错误, 会跳过此台服务器访问下台
4.LB01通过浏览器测试
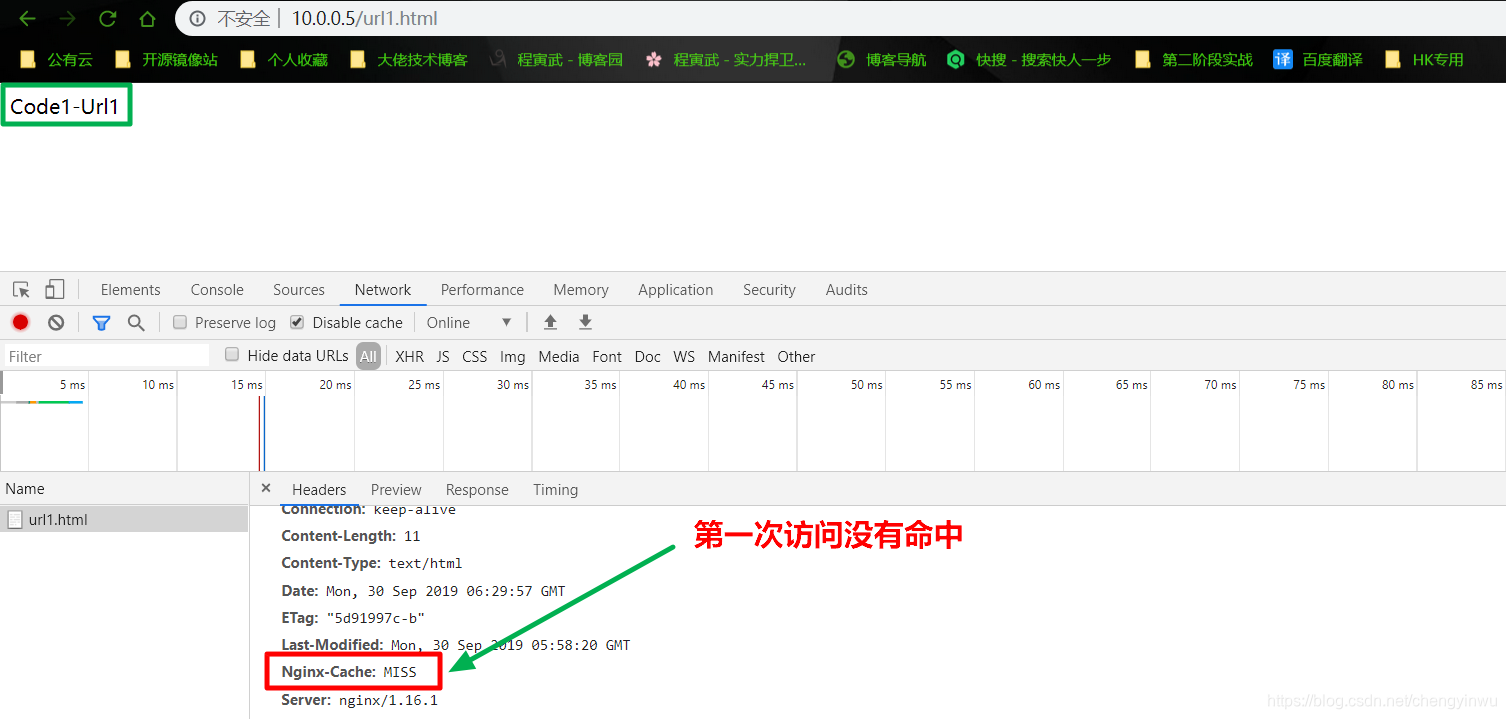
1.第一次访问没有命中;
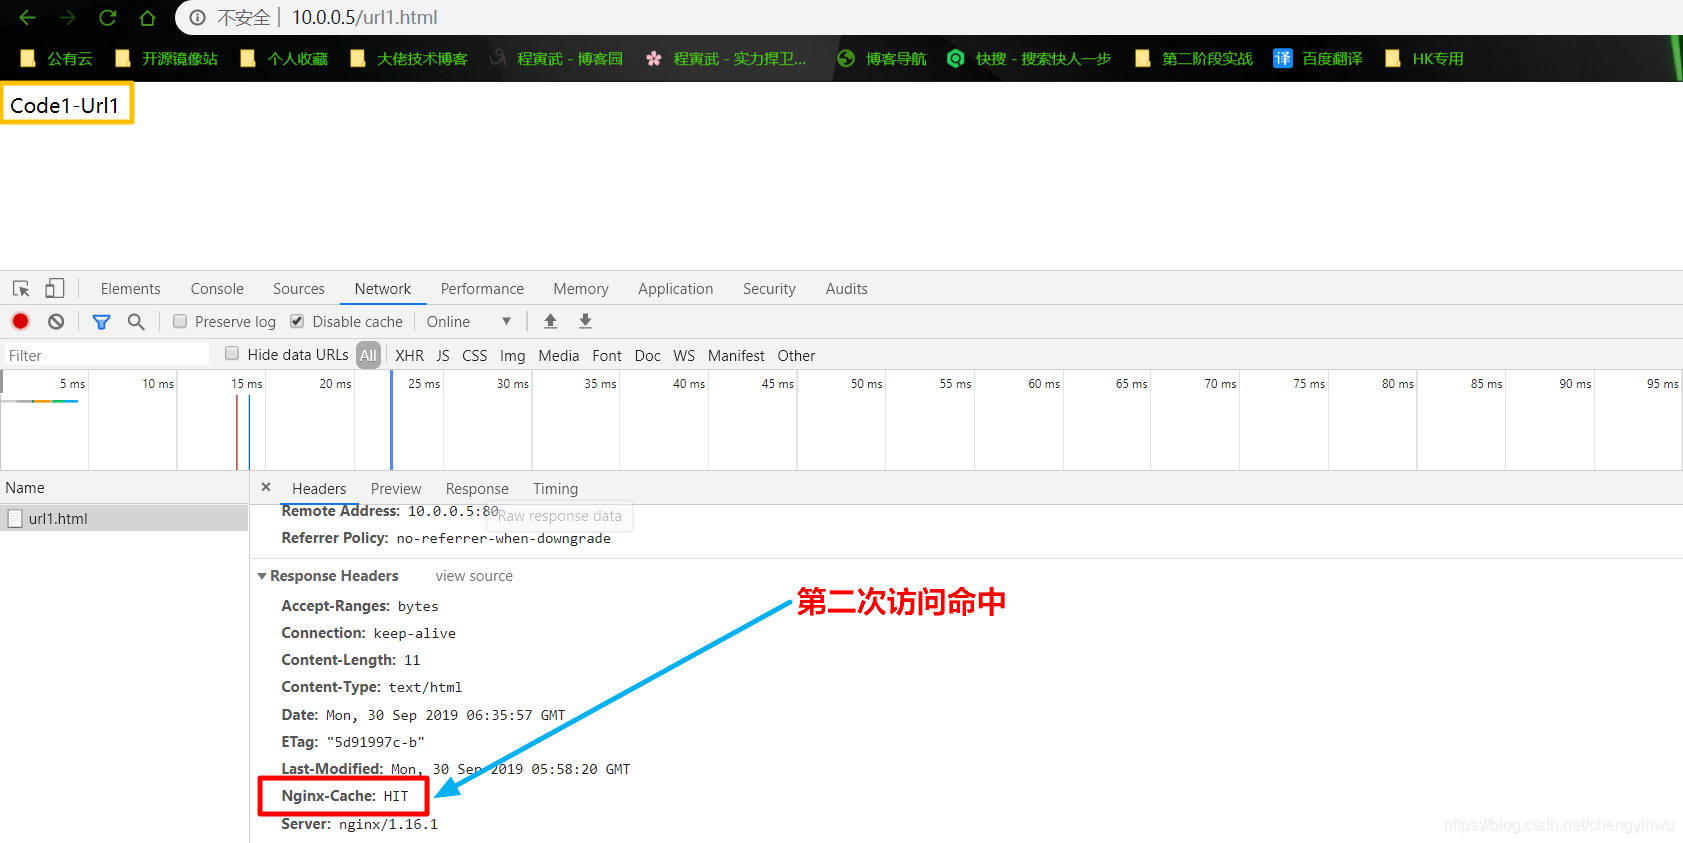
2.第二次访问命中;
[root@lb01 conf.d]# tree /soft/cache/

/soft/cache/

├── 7

│   └── 06

│       └── 289114bc31bdbeab995daebbcd107067

├── 8

│   └── c5

│       └── b39aea32bccf0c3e468f726ae9c75c58

└── d

    └── f1

        └── 002e95b5414ffb82dacc2e914ee3df1d
5.清理proxy_cache代理的缓存
方式一:使用rm删除已缓存数据
[root@lb01 cache]# rm -rf /soft/cache/*

[root@lb01 cache]# curl -s -I http://10.0.0.5/url1.html |grep "Nginx-Cache"

Nginx-Cache: MISS
方式二:使用ngx_cache_purge扩展模块清理, 需要编译安装Nginx
1.创建对应的目录

[root@lb01 ~]# mkdir /soft/src && cd /soft/src/

2.上传nginx源码包

[root@lb01 src]# rz nginx-1.16.1.tar.gz

[root@lb01 src]# tar xf nginx-1.16.1.tar.gz

3.下载ngx_cache_purge模块

[root@lb01 ~]# wget http://labs.frickle.com/files/ngx_cache_purge-2.3.tar.gz

[root@lb01 ~]# tar xf ngx_cache_purge-2.3.tar.gz

4.编译Nginx

[root@lb01 nginx-1.12.2]# yum -y install pcre-devel openssl openssl-devel

[root@lb01 ~]# cd /soft/src/nginx-1.12.2/

[root@lb01 nginx-1.12.2]# ./configure --prefix=/server/nginx --add-module=/root/ngx_cache_purge-2.3 --with-http_stub_status_module --with-http_ssl_module

[root@lb01 ~]# make && make install

5.停掉之前的nginx

[root@lb01 nginx-1.12.2]# cd /server/

[root@lb01 server]# systemctl stop nginx

6.拷贝文件至

[root@lb01 ~]# cp /etc/nginx/conf.d/proxy_cache.conf /server/nginx/conf/conf.d/

[root@web01 conf.d]# scp -rp /etc/nginx/conf.d/node.conf root@172.16.1.5:/server/nginx/conf.d/

[root@lb01 conf]# vim nginx.conf     注释掉server相关的配置

在注释掉的server之上新增   include conf.d/*.conf;

[root@lb01 conf]# cp /etc/nginx/proxy_params /server/nginx/conf/proxy_params

[root@lb01 conf]# /server/nginx/sbin/nginx -t

[root@lb01 conf.d]# /server/nginx/sbin/nginx

[root@lb01 conf.d]# /server/nginx/sbin/nginx -s reload

[root@lb01 conf.d]# netstat -lntup

tcp        0      0 0.0.0.0:8081            0.0.0.0:*               LISTEN      24583/nginx: master

tcp        0      0 0.0.0.0:8082            0.0.0.0:*               LISTEN      24583/nginx: master

tcp        0      0 0.0.0.0:8083            0.0.0.0:*               LISTEN      24583/nginx: master

[root@lb01 conf.d]# rm -rf /soft/cache/*

编写配置文件

[root@lb01 conf.d]# vim proxy_cache.conf

[root@lb01 conf.d]# /server/nginx/sbin/nginx -t

[root@lb01 conf.d]# /server/nginx/sbin/nginx -s reload

7.使用浏览器访问建立缓存

8.通过访问purge/url地址,删除对应的缓存

9.再次刷新就会因为缓存内容已清理,而出现404错误
6.配置指定的页面不缓存
[root@lb01 conf.d]# cat proxy_cache.conf

proxy_cache_path /soft/cache levels=1:2 keys_zone=code_cache:10m max_size=10g inactive=60m use_temp_path=off;

upstream cache {

	server 172.16.1.7:8081;

	server 172.16.1.7:8082;

	server 172.16.1.7:8083;

}

server {

	listen 80;

	server_name 10.0.0.5;

	index index.html;

	if ($request_uri ~ ^/(url3|login|register|password)) {

        set $nocache 1;

    }

	location / {

		proxy_pass http://cache;

                proxy_cache code_cache;

                proxy_cache_valid 200 304 12h;

                proxy_cache_valid any 10m;

                add_header Nginx-Cache "$upstream_cache_status";

		proxy_no_cache $nocache $arg_nocache $arg_comment;  #不缓存变量为nocache

        	proxy_no_cache $http_pargma $http_authorization;    #不缓存http参数以及http认证

          	proxy_next_upstream error timeout invalid_header http_500 http_502 http_503  http_504;

                include proxy_params;

	}

	location ~ /purge(/.*) {

		allow   127.0.0.1;

		allow   10.0.0.0/24;

		deny    all;

		proxy_cache_purge code_cache $host$1$is_args$args;

		}

}

提前先清理缓存

[root@lb01 conf.d]# rm -rf /soft/cache/*

无论如何请求url3都无法命中

[root@lb01 conf.d]# curl -s -I http://10.0.0.5/url3.html|grep "Nginx-Cache"

Nginx-Cache: MISS

[root@lb01 conf.d]# curl -s -I http://10.0.0.5/url3.html|grep "Nginx-Cache"

Nginx-Cache: MISS

[root@lb01 conf.d]# curl -s -I http://10.0.0.5/url3.html|grep "Nginx-Cache"

Nginx-Cache: MISS
7.配置缓存日志记录
- 修改nginx的log_format格式,增加"$upstream_cache_status"c
[root@lb01 conf.d]# vim /etc/nginx/nginx.conf

 log_format  main  '$remote_addr - $remote_user [$time_local] "$request" '

                      '$status $body_bytes_sent "$http_referer" '

                      '"$http_user_agent" "$http_x_forwarded_for"' '"$upstream_cache_status"';

    access_log  /var/log/nginx/access.log  main;
- 在server标签中添加对应的access日志
server {

    ...

    access_log /var/log/nginx/proxy_cache.log main;

    ...

}
- 通过浏览器访问, 最后检查日志命令情况
21.Nginx代理缓存的更多相关文章
- nginx代理缓存
(1)缓存介绍 1.代理服务器端缓存作用 减少后端压力,提高网站并发延时 2.缓存常见类型 服务器端缓存:代理缓存,获取服务器端内容进行缓存 浏览器端缓存 3.nginx代理缓存:proxy_cach ...
- Nginx代理缓存功能
Nginx代理缓存功能 Nginx缓存主要是用于减轻后端服务器的负载,提高网站并发量,提升用户体验度. 注意:Nginx反向代理的缓存功能是由ngx_http_proxy_module提供, ...
- 12、Nginx代理缓存服务
通常情况下缓存是用来减少后端压力, 将压力尽可能的往前推, 减少后端压力,提高网站并发延时 1.缓存常见类型 服务端缓存 代理缓存, 获取服务端内容进行缓存 客户端浏览器缓存 Nginx代理缓存原理 ...
- 网站集群架构(LVS负载均衡、Nginx代理缓存、Nginx动静分离、Rsync+Inotify全网备份、Zabbix自动注册全网监控)--技术流ken
前言 最近做了一个不大不小的项目,现就删繁就简单独拿出来web集群这一块写一篇博客.数据库集群请参考<MySQL集群架构篇:MHA+MySQL-PROXY+LVS实现MySQL集群架构高可用/高 ...
- 使用Nginx压缩文件、设置反向代理缓存提高响应速度
Gzip压缩: 最开始,这个竟然要6m多(大到不寻常),响应的速度3分多钟. 所以先对返回的文件进行gzip压缩.判断返回的资源是否有使用gzip压缩,观察响应头部里面,如果没有 Content-En ...
- nginx的缓存服务
都知道缓存的目的是为了减小服务端的压力,可以在客户端直接取到数据 客户端---------------nginx(代理缓存)------------------服务端 代理缓存的描述: 就是客户端发送 ...
- Nginx做缓存
查看服务 netstat -lntp|grep 80 Nginx作为缓存WEB服务 通常情况下缓存是用来减少后端压力, 将压力尽可能的往前推, 减少后端压力,提高网站并发延时 Nginx代理缓存原理 ...
- Nginx - 代理、缓存
Nginx 标签 : nginx 代理 代理服务可简单的分为正向代理和反向代理: 正向代理: 用于代理内部网络对Internet的连接请求(如VPN/NAT),客户端指定代理服务器,并将本来要直接发送 ...
- nginx反向代理+缓存开启+url重写+负载均衡(带健康探测)的部署记录
在日常运维工作中,运维人员会时常使用到nginx的反向代理,负载均衡以及缓存等功能来优化web服务性能. 废话不多说,下面对测试环境下的nginx反向代理+缓存开启+url重写+负载均衡(带健康探测) ...
随机推荐
- ogeek线下赛web分析1-python-web
1.python from flask import Flask, request, render_template,send_from_directory, make_response from A ...
- 36 (OC)* MVC和MVVM
1:MVC (Modal View Controller)(模型 视图 控制器) 一.MVC 从字面意思来理解,MVC 即 Modal View Controller(模型 视图 控制器),是 Xe ...
- scrapy框架来爬取壁纸网站并将图片下载到本地文件中
首先需要确定要爬取的内容,所以第一步就应该是要确定要爬的字段: 首先去items中确定要爬的内容 class MeizhuoItem(scrapy.Item): # define the fields ...
- 检查图片是否损坏、图片后缀是否与实际图片类型对应 - Python
图片工具 检查图片是否损坏 日常工作中,时常会需要用到图片,有时候图片在下载.解压过程中会损坏,而如果一张一张点击来检查就太不Cool了,因此我想大家都需要一个检查脚本: 测试图片,0.jpg是正常的 ...
- Linux下查看版本信息
Linux下如何查看版本信息, 包括位数.版本信息以及CPU内核信息.CPU具体型号等. 1.# uname -a (Linux查看版本当前操作系统内核信息) 2.# cat /proc/ ...
- vue使用readAsDataURL实现选择图片文件后预览
vue实现选择图片文件后预览 利用h5的api可以实现选择文件并实现预览 readAsDataURL 方法会读取指定的 Blob 或 File 对象.读取操作完成的时候,readyState 会变成已 ...
- Linux——基本命令
目录 一.目录切换命令 二.目录操作命令(增删改查) 2.1增加目录 2.2查看目录 2.3寻找目录(搜索) 2.4修改目录名称 2.5移动目录位置(剪切) 2.6拷贝目录 2.7删除目录 三.文件的 ...
- 什么是VR中的Locomotion?
Locomotion,本文中我称之为移位,是VR研究中最重要的话题之一.因为它属于VR中三大元老级操作(Selection选择,Manipulation操纵物体,Locomotion移位),其中,前两 ...
- ABP vNext 不使用工作单元为什么会抛出异常
一.问题 该问题经常出现在 ABP vNext 框架当中,要复现该问题十分简单,只需要你注入一个 IRepository<T,TKey> 仓储,在任意一个地方调用 IRepository& ...
- [Python] Python 学习记录(2)
1.range(x,y) [x,y) >>> range(0,4) #0,1,2,3 >>> range(1,4) #1,2,3 2.dics dics.get(k ...