Resnet网络--BasicBlock与BottleNeck
ResNetV2的网络深度有18,34,50,101,152。50层以下的网络基础块是BasicBlock,50层及以上的网络基础块是BottleNeck。
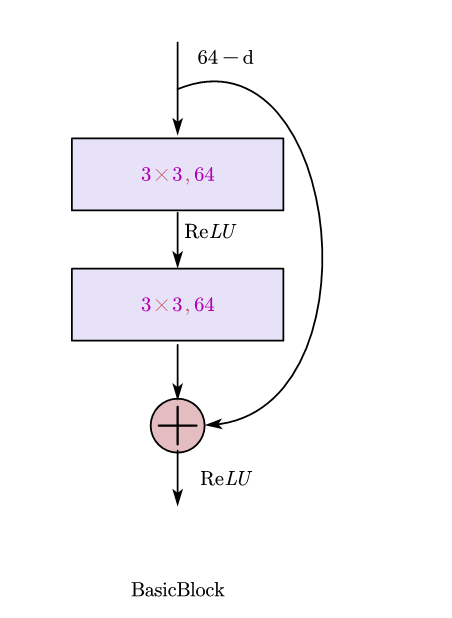
BasicBlock
图示如下
代码实现
 1 class BasicBlock(nn.Module):

 2     expansion = 1

 3     def __init__(self, in_channel, out_channel, stride=1, downsample=None):

 4         super(BasicBlock, self).__init__()

 5         self.conv1 = conv3x3(in_channel, out_channel, stride)

 6         self.bn1 = nn.BatchNorm2d(out_channel)

 7         self.relu = nn.ReLU(inplace=True)

 8         self.conv2 = conv3x3(out_channel, out_channel)

 9         self.bn2 = nn.BatchNorm2d(out_channel)

10         self.downsample = downsample

11         self.stride =stride

12

13     def forward(self, x):

14         residual = x

15         out = self.conv1(x)

16         out = self.bn1(out)

17         out = self.relu(out)

18         out = self.conv2(out)

19         out = self.bn2(out)

20         if self.downsample is not None:

21             residual = self.downsample(x)

22

23         out = out + residual

24         out = self.relu(out)

25

26         return out
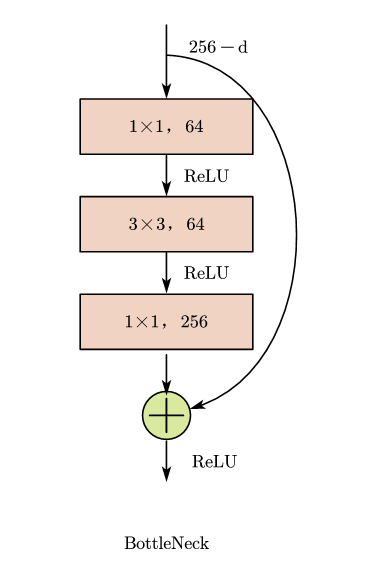
BottleNeck
图示如下
代码实现:
 1 class Bottleneck(nn.Module):

 2

 3     expansion = 4

 4

 5     def __init__(self, in_channel, out_channel, stride=1, downsample=None):

 6         super(Bottleneck, self).__init__()

 7

 8         self.conv1 = nn.Conv2d(in_channel, out_channel, kernel_size=1, stride=stride, bias=False)

 9         self.bn1 = nn.BatchNorm2d(out_channel)

10

11         self.conv2 = nn.Conv2d(out_channel, out_channel, kernel_size=3, stride=1, padding=1, bias=False)  # stride = 3

12         self.bn2 = nn.BatchNorm2d(out_channel)

13

14         self.conv3 = nn.Conv2d(out_channel, out_channel * 4, kernel_size=1, bias=False)

15         self.bn3 = nn.BatchNorm2d(out_channel * 4)

16

17         self.relu = nn.ReLU(inplace=True)

18         self.stride = stride

19         self.downsample =downsample

20

21

22     def forward(self, x):

23         residual = x

24

25         out = self.conv1(x)

26         out = self.bn1(out)

27         out = self.relu(out)

28

29         out = self.conv2(out)

30         out = self.bn2(out)

31         out = self.relu(out)

32

33         out = self.conv3(out)

34         out = self.bn3(out)

35

36         if self.downsample is not None:

37             residual = self.downsample(x)

38

39         out = out + residual

40         out = self.relu(out)

41

42         return out
Resnet网络--BasicBlock与BottleNeck的更多相关文章
- 深度学习之ResNet网络
介绍 Resnet分类网络是当前应用最为广泛的CNN特征提取网络. 我们的一般印象当中,深度学习愈是深(复杂,参数多)愈是有着更强的表达能力.凭着这一基本准则CNN分类网络自Alexnet的7层发展到 ...
- PyTorch对ResNet网络的实现解析
PyTorch对ResNet网络的实现解析 1.首先导入需要使用的包 import torch.nn as nn import torch.utils.model_zoo as model_zoo # ...
- Resnet网络详细结构(针对Cifar10)
Resnet网络详细结构(针对Cifar10) 结构 具体结构(Pytorch) conv1 (conv1): Conv2d(3, 64, kernel_size=(3, 3), stride=(1, ...
- 学习笔记-ResNet网络
ResNet网络 ResNet原理和实现 总结 一.ResNet原理和实现 神经网络第一次出现在1998年,当时用5层的全连接网络LetNet实现了手写数字识别,现在这个模型已经是神经网络界的“hel ...
- ResNet网络再剖析
随着2018年秋季的到来,提前批和内推大军已经开始了,自己也成功得当了几次炮灰,不过在总结的过程中,越是了解到自己的不足,还是需要加油. 最近重新复习了resnet网络,又能发现一些新的理念,感觉很f ...
- 0609-搭建ResNet网络
0609-搭建ResNet网络 目录 一.ResNet 网络概述 二.利用 torch 实现 ResNet34 网络 三.torchvision 中的 resnet34网络调用 四.第六章总结 pyt ...
- ResNet网络的训练和预测
ResNet网络的训练和预测 简介 Introduction 图像分类与CNN 图像分类 是指将图像信息中所反映的不同特征,把不同类别的目标区分开来的图像处理方法,是计算机视觉中其他任务,比如目标检测 ...
- ResNet网络的Pytorch实现
1.文章原文地址 Deep Residual Learning for Image Recognition 2.文章摘要 神经网络的层次越深越难训练.我们提出了一个残差学习框架来简化网络的训练,这些 ...
- 深度残差网络(DRN)ResNet网络原理
一说起“深度学习”,自然就联想到它非常显著的特点“深.深.深”(重要的事说三遍),通过很深层次的网络实现准确率非常高的图像识别.语音识别等能力.因此,我们自然很容易就想到:深的网络一般会比浅的网络效果 ...
- 深度残差网络——ResNet学习笔记
深度残差网络—ResNet总结 写于:2019.03.15—大连理工大学 论文名称:Deep Residual Learning for Image Recognition 作者:微软亚洲研究院的何凯 ...
随机推荐
- redis geo 做距离计算排序分页
redis geo 做距离计算排序分页 // 添加经纬度和店铺id geoadd store_list lng lat store_id 计算距离排序和生成临时文件 georadius store_l ...
- Echarts实现不均匀刻度的方法,自定义刻度(转)
原文地址 今天突然有个我们的咨询公司找我问一个echarts问题,这个问题确实值得一解决,很有意思. 问题是这样的.数据中有很多低于100的数值,但是最高值却能达到14000. data = [93. ...
- 使用JavaHTTPClient发送请求
import org.apache.http.Header; import org.apache.http.HttpEntity; import org.apache.http.HttpHeaders ...
- SpringCloud组件:搭建Eureka服务注册中心,搭建的时候一定要确保springboot和springCloud的版本对应
搭建的时候一定要确保springboot和springCloud的版本对应,不然会报下面的错 查看版本对应得地址:https://start.spring.io/actuator/info 改了对应得 ...
- jni调用
花了三天时间,终于把这个环境和实现都弄通了一遍. 先来个总纲: 准备工作:jdk环境,eclipse,gcc环境,cdt插件 a.编写带有native声明的java类, b.编译java类 c.用ja ...
- rust在windows上编译成liunx可执行程序
一.rust编译文件 cargo build 或 cargo build --release 发布构建 二.安装 x86_64-unknown-liunx-musl target rustup tar ...
- c++内存分配函数
c语言中: 动态分配内存: malloc()函数; 释放内存: free()函数; c++中: 上述函数仍然可以使用; 动态分配内存: new关键字; 释放内存: delete关键字; int *p ...
- k8s master高可用
每台master都要部署haproxy,keepalived keepalived 配置文件:! Configuration File for keepalivedglobal_defs { rout ...
- 前端循环及跳出for循环
前端循环语句与方法 while循环 语法 1.初始化变量 2.while(条件表达式){逻辑代码循环体} 执行过程: 1.执行初始化变量 2.变量是否满足条件表达式 3.满足执行循环体 4.条件不满足 ...
- MYSQL实现排名函数RANK,DENSE_RANK和ROW_NUMBER
1. 排名分类 1.1 区别RANK,DENSE_RANK和ROW_NUMBER RANK并列跳跃排名,并列即相同的值,相同的值保留重复名次,遇到下一个不同值时,跳跃到总共的排名. DENSE_RAN ...