Navicate 链接 MySQL8.0版本 连接报错问题 1251错误,Clinent does not support authentication protocol requested by server

网上查到的原因是:
mysql8 之前的版本中加密规则是mysql_native_password;
mysql8之后,加密规则是caching_sha2_password;
找到的解决方法是:
把mysql用户登录密码加密规则还原成mysql_native_password;

【自定义密码】如“password”
输入sql语句:
#修改加密规则
ALTER USER 'root'@'localhost' IDENTIFIED WITH mysql_native_password BY 'password';
#更新一下用户的密码:
ALTER USER 'root'@'localhost' IDENTIFIED BY 'password' PASSWORD EXPIRE NEVER;
#刷新权限
FLUSH PRIVILEGES;

连接成功
补充【如果报错如图】:
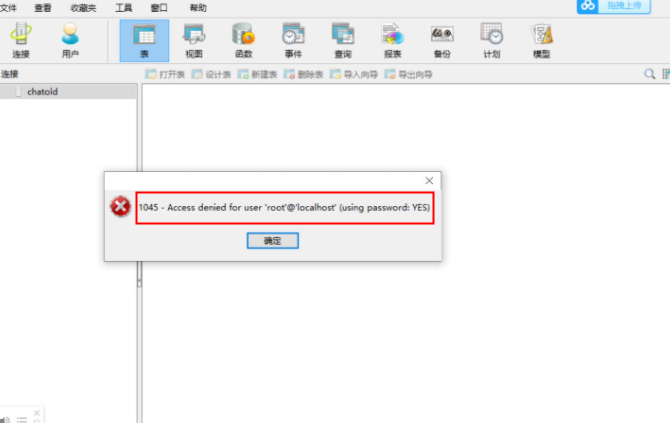
是因为密码没有替换! password
修改密码为123456语句:
ALTER USER 'root'@'localhost' IDENTIFIED BY '123456';
Navicate 链接 MySQL8.0版本 连接报错问题 1251错误,Clinent does not support authentication protocol requested by server的更多相关文章
- MySQL Server8.0版本时出现Client does not support authentication protocol requested by server
MySQL Server8.0版本时出现Client does not support authentication protocol requested by server 解决方法: 1.roo ...
- navicat连接远程数据库报错'client does not support authentication protocol requested by server consider ...'解决方案
[1.cmd终端连接远程mysql数据库方法] mysql -uhello -pworld -h192.168.1.88 -P3306 -Dmysql_oa mysql -u用户名 -p密码 -h ...
- MySQL安装教程及Navicat连接MySQL报错:1251-Client does not support authentication protocol requested by server
MySQL安装可参考: MySql 8.0.18安装 此参考文章后面涉及到的密码修改,对本标题碰到的错误同样适用. 本文先讲如何安装,在讲碰到的1251问题.要直接看解决方案的朋友可以直接通过目录链接 ...
- Navicat连接Mysql报错:Client does not support authentication protocol requested by server;
Navicat连接Mysql报错:Client does not support authentication protocol requested by server: 刚安装Mysql,想用Nav ...
- egg 连接 mysql 的 docker 容器,报错:Client does not support authentication protocol requested by server; consider upgrading MySQL client
egg 连接 mysql 的 docker 容器,报错:Client does not support authentication protocol requested by server; con ...
- nodejs连接mysql数据库,报错Client does not support authentication protocol requested by server的解决方法
最近想要尝试nodejs连接本地数据库,往全栈方向做一个小小的尝试,于是下载了一个 MySQL8.0,发现Navicat连接不上,结果就下载了mysql自身的Workbench,继续使用. 然而,难受 ...
- Navicat连接MySQL8.0出现1251-Client does not support authentication protocol requested by server;
因为安装的MySQL是8.0版本的,因为在安装的时候采用了新的加密方式. 我们需要使用 cmd命令,连接mysql 1. 更改加密方式 mysql> ALTER USER 'root'@'l ...
- Navicat连接mysql8.0.1版本出现1251--Client does not support authentication protocol requested by server的解决
转载自:https://blog.csdn.net/XDMFC/article/details/80263215 好不容易安装好mysql,但又出现了mysql客户端版本太低的问题.根据参考的这篇博客 ...
- 安装mysql8.0.17时候报错1251-Client does not support authentication protocol requested by server; consider upgrading MySQL client
当mysql数据库安装时候选择的是加密密码时候,用navicat连接时候报错1521,这时候可以cmd之后登陆mysql执行下列代码就可以了 代码: mysql> alter user root ...
- navicat for mysql 链接时报错:1251-Client does not support authentication protocol requested by server
客户端使用navicat for mysql.本地安装了mysql 8.0.但是在链接的时候提示: 主要原因是mysql服务器要求的认证插件版本与客户端不一致造成的. 打开mysql命令行输入如下命令 ...
随机推荐
- 7.29关灯游戏,用script实现
<!DOCTYPE html> <html lang="en"> <head> <meta charset="UTF-8 ...
- solve--NAT模式下配置静态IP地址
第一步 打开虚拟机的虚拟网络编辑器:
- Go--解析yaml文件
yaml 文件是目前最常用的配置文件,使用go语言编写代码和工具时,也会用到yaml文件,将服务配置及中间件等信息定义到yaml文件中,后续可根据实际场景来选用. //先下载外部包 go get -u ...
- 软件工程日报二——gradle的安装与环境配置
昨天下载了android studio 今天想要进行学习的时候,发现还需要下载gradle 一.进入官网,https://gradle.org/,点击下载 二.进入下载界面 三.选择相应的版本,点击b ...
- VMware导入ovf报错
如下图所示报错 在网上查找了一些解决方案,大都说是ovftool版本兼容问题,但是我这里好像并不行,最后的解决的办法是对导入的位置默认不做改动. 报错原因:改变了默认路径.
- Camstar获取回参
public static bool SplitQty(string Username, string Password, string Container, int splitQty,int pla ...
- [转]idea 试用30天“无限续费”idea破解
首先打开idea设置 左上角点击file-->setting-->Plugins https://plugins.zhile.io 然后点击 确定 ("OK") 点 ...
- Linux常用命令-Java web环境
Linux 常用命令 大部分命令推荐sudo运行 端口和PID互查 # 根据端口查询PID $ lsof -i:8080 # 根据端口查询PID $ fuser -i 8080/tcp # 根据PID ...
- centos7.4系统: redis配置密码
背景:因为安全需要,对redis进行密码配置 说明:默认redis没有密码,需要自己配置密码 一.配置临时密码(重启后失效) 以下以密码:wangzy 为例 1.1 连接客户端 [root@wangz ...
- 什么叫SSH?原理详解。
SSH(Secure Shell,安全外壳)是一种网络安全协议,通过加密和认证机制实现安全的访问和文件传输等业务.传统远程登录或文件传输方式,例如Telnet.FTP,使用明文传输数据,存在很多的安全 ...