大数据入门第十二天——flume入门
一、概述
1.什么是flume
官网的介绍:http://flume.apache.org/
Flume is a distributed, reliable, and available service for efficiently collecting, aggregating, and moving large amounts of log data. It has a simple and flexible architecture based on streaming data flows. It is robust and fault tolerant with tunable reliability mechanisms and many failover and recovery mechanisms. It uses a simple extensible data model that allows for online analytic application.
简明的介绍:
u Flume是一个分布式、可靠、和高可用的海量日志采集(对实时支持)、聚合和传输的系统。
u Flume可以采集文件,socket数据包等各种形式源数据,又可以将采集到的数据输出到HDFS、hbase、hive、kafka等众多外部存储系统中
u 一般的采集需求,通过对flume的简单配置即可实现
u Flume针对特殊场景也具备良好的自定义扩展能力,因此,flume可以适用于大部分的日常数据采集场景
2.flume运行机制
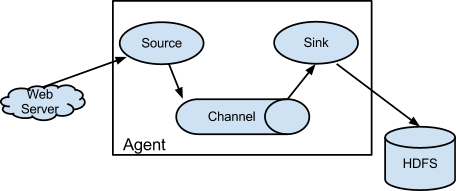
1、 Flume分布式系统中最核心的角色是agent,flume采集系统就是由一个个agent所连接起来形成
2、 每一个agent相当于一个数据传递员,内部有三个组件:
a) Source:采集源,用于跟数据源对接,以获取数据
b) Sink:下沉地,采集数据的传送目的,用于往下一级agent传递数据或者往最终存储系统传递数据
c) Channel:angent内部的数据传输通道,用于从source将数据传递到sink
并且,多个之间支持串联:
二、安装与配置
1.上传安装包

2.解压
tar -zxvf apache-flume-1.6.-bin.tar.gz -C apps/
3.配置环境变量
[hadoop@mini1 apache-flume-1.6.-bin]$ sudo vim /etc/profile
追加内容:
export FLUME_HOME=/home/hadoop/apps/apache-flume-1.6.-bin

export PATH=$PATH:$FLUME_HOME/bin
[hadoop@mini1 apache-flume-1.6.-bin]$ source /etc/profile
//如要查看环境变量的值,推荐使用export或者env
4.配置flume-env.sh
[hadoop@mini1 ~]$ cd apps/apache-flume-1.6.-bin/

[hadoop@mini1 apache-flume-1.6.-bin]$ cd conf/

[hadoop@mini1 conf]$ ls

flume-conf.properties.template  flume-env.sh.template

flume-env.ps1.template          log4j.properties

[hadoop@mini1 conf]$ cp flume-env.sh.template flume-env.sh
追加配置:
[hadoop@mini1 conf]$ vim flume-env.sh
export JAVA_HOME=/opt/java/jdk1..0_151

export HADOOP_HOME=/home/hadoop/apps/hadoop-2.6.
5.验证
[hadoop@mini1 conf]$ flume-ng version
三、简单部署
1.新建采集方案配置文件
conf目录下flume-conf.properties.template 是模板配置文件,我们在此目录新建的自己的配置方案:
vim netcat-logger.conf
# Name the components on this agent

#给那三个组件取个名字,a1是agent的名字

a1.sources = r1

a1.sinks = k1

a1.channels = c1

# Describe/configure the source

#类型, 从网络端口接收数据,在本机启动, 所以localhost, type=spoolDir采集目录源,目录里有就采

a1.sources.r1.type = netcat

a1.sources.r1.bind = localhost

a1.sources.r1.port =

# Describe the sink

a1.sinks.k1.type = logger

# Use a channel which buffers events in memory

#下沉的时候是一批一批的, 下沉的时候是一个个eventChannel参数解释:

#capacity:默认该通道中最大的可以存储的event数量

#trasactionCapacity:每次最大可以从source中拿到或者送到sink中的event数量

a1.channels.c1.type = memory

a1.channels.c1.capacity =

a1.channels.c1.transactionCapacity =

# Bind the source and sink to the channel

a1.sources.r1.channels = c1

a1.sinks.k1.channel = c1
# Name the components on this agent

a1.sources = r1

a1.sinks = k1

a1.channels = c1

# Describe/configure the source

a1.sources.r1.type = netcat

a1.sources.r1.bind = localhost

a1.sources.r1.port =

# Describe the sink

a1.sinks.k1.type = logger

# Use a channel that buffers events in memory

a1.channels.c1.type = memory

a1.channels.c1.capacity =

a1.channels.c1.transactionCapacity =

# Bind the source and sink to the channel

a1.sources.r1.channels = c1

a1.sinks.k1.channel = c1
精简配置
当然,如果想要别的机器可以连过来,可以通过设置r1.bind处的localhost改为主机名(此处为mini1)即可!
2.启动
bin/flume-ng agent --conf conf --conf-file conf/netcat-logger.conf --name a1 -Dflume.root.logger=INFO,console
其中,--conf指定指定配置文件目录,--conf-file指定配置方案,--name,指定agent名称,-D的为JVM参数,当然--conf等可以简写如下:
bin/flume-ng agent -c conf -f conf/netcat-logger.conf -n a1 -Dflume.root.logger=INFO,console
//注意这里conf是相对路径了
3.登录
打开另外一个终端(复制SSH隧道):
telnet localhost
// 这里本机没有安装telnet,故先安装telnet:https://www.cnblogs.com/lixuwu/p/6102444.html
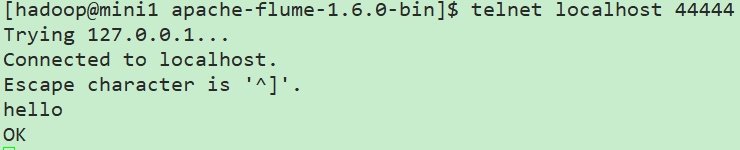
这里在flume服务端就可以看到接收的信息了,如果消息太长被截断,可以通过参数设置:
max-line-length Max line length per event body (in bytes)
完整的参照官网configuration下的sources下的netcat相关的参数设置!
以上这些完整的介绍,都在官方文档中:http://flume.apache.org/FlumeUserGuide.html
配置采集源为spool目录
在conf下新建spool.conf
# Name the components on this agent

a1.sources = r1

a1.sinks = k1

a1.channels = c1

# Describe/configure the source

#监听目录,spoolDir指定目录, fileHeader要不要给文件夹前坠名

a1.sources.r1.type = spooldir

a1.sources.r1.spoolDir = /home/hadoop/flumespool

a1.sources.r1.fileHeader = true

# Describe the sink

a1.sinks.k1.type = logger

# Use a channel which buffers events in memory

a1.channels.c1.type = memory

a1.channels.c1.capacity =

a1.channels.c1.transactionCapacity =

# Bind the source and sink to the channel

a1.sources.r1.channels = c1

a1.sinks.k1.channel = c1
启动
bin/flume-ng agent -c ./conf -f ./conf/spool-logger.conf -n a1 -Dflume.root.logger=INFO,console
此时通过cp等命令往flumespool中添加文件即可看到效果!
但是不能有相同的文件名,否则会报错!
四、采集文件到HDFS
1.conf下新建tail-hdfs.conf
# Name the components on this agent

a1.sources = r1

a1.sinks = k1

a1.channels = c1

#exec 指的是命令

# Describe/configure the source

a1.sources.r1.type = exec

#F根据文件名追踪, f根据文件的nodeid追踪

a1.sources.r1.command = tail -F /home/hadoop/log/test.log

a1.sources.r1.channels = c1

# Describe the sink

#下沉目标

a1.sinks.k1.type = hdfs

a1.sinks.k1.channel = c1

#指定目录, flum帮做目的替换

a1.sinks.k1.hdfs.path = /flume/events/%y-%m-%d/%H%M/

#文件的命名, 前缀

a1.sinks.k1.hdfs.filePrefix = events-

# 分钟就改目录

a1.sinks.k1.hdfs.round = true

a1.sinks.k1.hdfs.roundValue =

a1.sinks.k1.hdfs.roundUnit = minute

#文件滚动之前的等待时间(秒)

a1.sinks.k1.hdfs.rollInterval =

#文件滚动的大小限制(bytes)

a1.sinks.k1.hdfs.rollSize =

#写入多少个event数据后滚动文件(事件个数)

a1.sinks.k1.hdfs.rollCount =

#5个事件就往里面写入

a1.sinks.k1.hdfs.batchSize =

#用本地时间格式化目录

a1.sinks.k1.hdfs.useLocalTimeStamp = true

#下沉后, 生成的文件类型,默认是Sequencefile,可用DataStream,则为普通文本

a1.sinks.k1.hdfs.fileType = DataStream

# Use a channel which buffers events in memory

a1.channels.c1.type = memory

a1.channels.c1.capacity =

a1.channels.c1.transactionCapacity =

# Bind the source and sink to the channel

a1.sources.r1.channels = c1

a1.sinks.k1.channel = c1
注意这里换成exec命令形式了,不采用之前的spoolDir,只是采集源不同而已
2.准备测试数据
[hadoop@mini1 conf]$ mkdir /home/hadoop/log

[hadoop@mini1 conf]$ touch /home/hadoop/log/test.log
[hadoop@mini1 ~]$ while true

> do

> echo  >> /home/hadoop/log/test.log

> sleep 0.5

> done
//当然,通过常规的新建.sh文件运行也是可以的
新开终端可以查看效果
[hadoop@mini1 ~]$ tail -F /home/hadoop/log/test.log
3.启动HDFS
start-dfs.sh
4.启动flume
bin/flume-ng agent -c conf -f conf/tail-hdfs.conf -n a1
5.查看效果
通过网页mini1:50070直接可以查看到相关目录的生成
如果为spoolDir形式,参考:https://www.cnblogs.com/cnmenglang/p/6543927.html
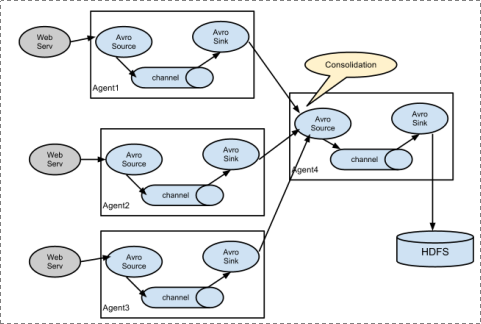
五、多agent串联
主要就是一个的sink为另外一个的source即可!
参考:http://blog.csdn.net/killy_uc/article/details/22916479
大数据入门第十二天——flume入门的更多相关文章
- 大数据入门第十二天——sqoop入门
一.概述 1.sqoop是什么 从其官网:http://sqoop.apache.org/ Apache Sqoop(TM) is a tool designed for efficiently tr ...
- 大数据入门第十二天——azkaban入门
一.概述 1.azkaban是什么 通过官方文档:https://azkaban.github.io/ Azkaban is a batch workflow job scheduler create ...
- 大数据入门第二十天——scala入门(一)入门与配置
一.概述 1.什么是scala Scala是一种多范式的编程语言,其设计的初衷是要集成面向对象编程和函数式编程的各种特性.Scala运行于Java平台(Java虚拟机),并兼容现有的Java程序. ...
- 大数据入门第二十一天——scala入门(二)并发编程Akka
一.概述 1.什么是akka Akka基于Actor模型,提供了一个用于构建可扩展的(Scalable).弹性的(Resilient).快速响应的(Responsive)应用程序的平台. 更多入门的基 ...
- 大数据入门第二十一天——scala入门(一)并发编程Actor
注:我们现在学的Scala Actor是scala 2.10.x版本及以前版本的Actor. Scala在2.11.x版本中将Akka加入其中,作为其默认的Actor,老版本的Actor已经废弃 一. ...
- 大数据入门第二十天——scala入门(二)scala基础01
一.基础语法 1.变量类型 // 上表中列出的数据类型都是对象,也就是说scala没有java中的原生类型.在scala是可以对数字等基础类型调用方法的. 2.变量声明——能用val的尽量使用val! ...
- 大数据入门第二十天——scala入门(二)scala基础02
一. 类.对象.继承.特质 1.类 Scala的类与Java.C++的类比起来更简洁 定义: package com.jiangbei //在Scala中,类并不用声明为public. //Scala ...
- 大数据入门第十九天——推荐系统与mahout(一)入门与概述
一.推荐系统概述 为了解决信息过载和用户无明确需求的问题,找到用户感兴趣的物品,才有了个性化推荐系统.其实,解决信息过载的问题,代表性的解决方案是分类目录和搜索引擎,如hao123,电商首页的分类目录 ...
- 大数据入门第十七天——storm上游数据源 之kafka详解(一)入门与集群安装
一.概述 1.kafka是什么 根据标题可以有个概念:kafka是storm的上游数据源之一,也是一对经典的组合,就像郭德纲和于谦 根据官网:http://kafka.apache.org/intro ...
随机推荐
- jsp登录显示
1.登录成功设置session request.getSession().setAttribute("user", user); 2.前台test <div class=&q ...
- SAP Overview
SAP的全称: Anwendungen Produkte in der Datenverarbeitung (德文,这是原西德产品),翻译成英文就是:System,Applications ...
- 学习笔记(3)——实验室集群WMS服务配置
1.启动mgt结点的tomcat服务: [root@mgt zmq]# /home/geohpc/softwares/apache-tomcat-/bin/startup.sh 关闭为 [root@m ...
- 常用的第三方模块 Pillow url
Pillow PIL:Python Imaging Library,已经是Python平台事实上的图像处理标准库了.PIL功能非常强大,但API却非常简单易用. 由于PIL仅支持到Python 2.7 ...
- Python+Selenium笔记(四):unittest的Test Suite(测试套件)
(一) Test Suite测试套件 一个测试套件是多个测试或测试用例的集合,是针对被测程序的对应的功能和模块创建的一组测试,一个测试套件内的测试用例将一起执行. 应用unittest的TestSui ...
- MySQL 性能监控4大指标——第一部分
[编者按]本文作者为 John Matson,主要介绍 mysql 性能监控应该关注的4大指标. 第一部分将详细介绍前两个指标: 查询吞吐量与查询执行性能.文章系国内 ITOM 管理平台 OneAPM ...
- 忘了mysql密码咋么办?
一.已知mysql数据库root的密码,修改root的方法如下: 1. mysqladmin 命令直接修改: ~]#mysqladmin -u root -p password "newpa ...
- 一般处理程序HttpHandler的应用
ashx 一般处理程序(HttpHandler)是·NET众多web组件的一种,ashx是其扩展名.一个httpHandler接受并处理一个http请求,类比于Java中的servlet.类比于在Ja ...
- PowerShell发送邮件(587)
#定义邮件服务器 $smtpServer = "mail.xx.com" $smtpUser = "sender" $smtpPassword = " ...
- python设计模式之工厂模式
一.理解工厂模式 在面向对象编程中,术语“工厂”表示一个负责创建替他类型对象的类.通常情况下,作为一个工厂的类有一个对象以及与它关联的多个方法.客户端使用某些参数调用此方法,之后,工厂会据此创建所需类 ...