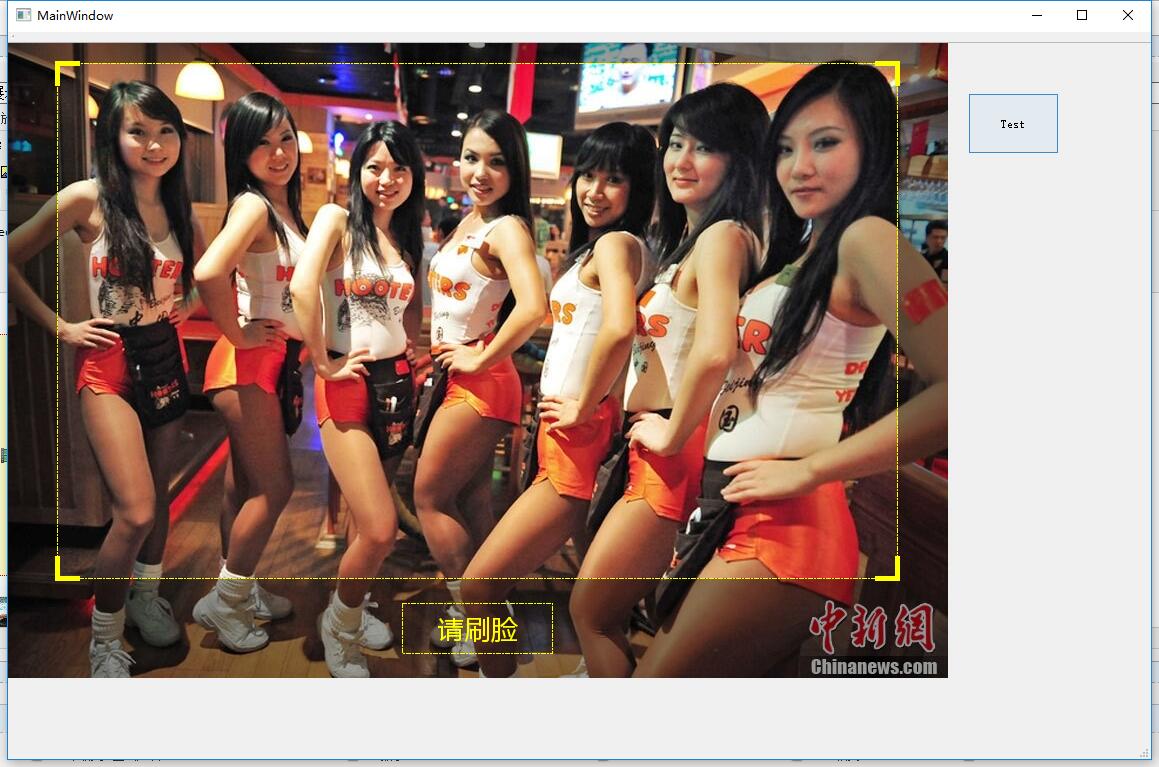
【Qt】QOpenGLWidget展示蒙版效果
关键代码是派生QOpenGLWidget,覆写paintEvent函数
QPainter p;

    p.begin(this);

    p.drawImage(QPoint(, ), m_Img);

    QLinearGradient grad(, , rect().width(), rect().height());

           {

                   QGradientStops gs;

                   gs << QGradientStop(0.0, QColor(,,,))

                           << QGradientStop(0.5, QColor(,,,))

                           << QGradientStop(1.0, QColor(,,,));

                   grad.setStops(gs);

           }

    //定义顶部蒙版高度

     int m_topHeight = ;

     //定义双侧蒙版宽度

     int m_sideWidth = ;

     //定义底部蒙版高度

     int m_bottomHeight = ;

     //线条长度

     int iLineLen = ;

     //底部文字框的宽高

     int iTxtHeight = ;

     int iTxtWidth = ;

   //填充周围蒙版

   //顶部

   p.fillRect(, , rect().width(), m_topHeight, grad);

   //底部

   p.fillRect(, rect().height() - m_bottomHeight, rect().width(), m_bottomHeight, grad);

   //左侧

   p.fillRect(, m_topHeight, m_sideWidth, rect().height() - m_topHeight - m_bottomHeight, grad);

   //右侧

   p.fillRect(rect().width() - m_sideWidth,  m_topHeight, m_sideWidth, rect().height() - m_topHeight - m_bottomHeight, grad);

   QPen pen;

   pen.setStyle(Qt::DashDotLine);

    pen.setWidth();

    if(m_status == )

    {

        pen.setBrush(Qt::green);

    }

    else if(m_status == )

    {

        pen.setBrush(Qt::yellow);

    }

    else if(m_status == )

    {

        pen.setBrush(Qt::red);

    }

    pen.setCapStyle(Qt::RoundCap);

    pen.setJoinStyle(Qt::RoundJoin);

    p.setPen(pen);

    //绘制中间高亮区域矩形

    //矩形宽高

    int iWith =rect().width()-m_sideWidth*;

    int iHeight = rect().height() -m_topHeight - m_bottomHeight;

    p.drawRect(m_sideWidth, m_topHeight, iWith,iHeight);

    QPen pen2;

    pen2.setWidth();

    if(m_status == )

    {

        pen2.setBrush(Qt::green);

    }

    else if(m_status == )

    {

        pen2.setBrush(Qt::yellow);

    }

    else if(m_status == )

    {

        pen2.setBrush(Qt::red);

    }

    p.setPen(pen2);

    //画四角的线条

    //左上横线

    p.drawLine(m_sideWidth,m_topHeight,m_sideWidth +iLineLen, m_topHeight);

    //左上竖线

    p.drawLine(m_sideWidth,m_topHeight+iLineLen,m_sideWidth,m_topHeight);

    //右上横线

    p.drawLine(rect().width() - m_sideWidth - iLineLen,m_topHeight, rect().width() - m_sideWidth,m_topHeight);

    //右上竖线

    p.drawLine(rect().width() - m_sideWidth,m_topHeight, rect().width() - m_sideWidth, m_topHeight + iLineLen);

    //右下竖线

    p.drawLine(rect().width() - m_sideWidth,rect().height()-m_bottomHeight,rect().width() - m_sideWidth,rect().height()-m_bottomHeight - iLineLen);

    //右下横线

    p.drawLine(rect().width() - m_sideWidth,rect().height()-m_bottomHeight, rect().width() - m_sideWidth - iLineLen,rect().height()-m_bottomHeight);

    //左下横线

    p.drawLine(m_sideWidth,rect().height()-m_bottomHeight,m_sideWidth+iLineLen, rect().height()-m_bottomHeight);

    //左下竖线

    p.drawLine(m_sideWidth,rect().height()-m_bottomHeight, m_sideWidth,rect().height()-m_bottomHeight -iLineLen);

    //绘制底部提示消息

    QString strMsg = "";

    if(m_status == )

    {

        strMsg=QStringLiteral("请通行");

    }

    else if(m_status == )

    {

        strMsg=QStringLiteral("请刷脸");

    }

    else if(m_status == )

    {

        strMsg=QStringLiteral("请对准红框");

    }

    p.setPen(pen);

    p.drawRect(rect().width()/ - iTxtWidth/, rect().height()-m_bottomHeight + (m_bottomHeight/-iTxtHeight/), iTxtWidth, iTxtHeight );

    QRect txtRect;

    txtRect.setX(rect().width()/ - iTxtWidth/);

    txtRect.setY(rect().height()-m_bottomHeight + (m_bottomHeight/-iTxtHeight/));

    txtRect.setWidth(iTxtWidth);

    txtRect.setHeight(iTxtHeight);

    p.setPen(pen2);

    QFont font;

    font.setFamily("Microsoft YaHei");

    // 大小

    font.setPointSize();

    // 使用字体

    p.setFont(font);

    p.drawText(txtRect, Qt::AlignCenter , strMsg);

    p.end();
使用QMoive播放Gif的代码
 m_movie =new QMovie("F:/TestProject/QMoveTest/timg.gif");

    m_timer =new QTimer(this);
 ui->lblMove->setVisible(true);

        ui->lblMove->setMovie(m_movie);

        m_movie->start();

        //m_timer->start(3000);

        QTimer::singleShot(, this, SLOT(StopMovie()));
void MainWindow::StopMovie()

{

    m_movie->stop();

    ui->lblMove->setVisible(false);

}
最终效果:
 +
+

【Qt】QOpenGLWidget展示蒙版效果的更多相关文章
- css遮罩蒙版效果 分栏效果
mask遮罩蒙版效果 来看一下效果图: 这是两张原图: 遮罩层图像 注意,白色区域为透明状态 要展示的图像 使用mask之后产生的效果图 首先来解释一下遮罩.蒙版.和PS中的蒙版.Flash中 ...
- jQuery图片旋转展示收缩效果
<!DOCTYPE html PUBLIC "-//W3C//DTD XHTML 1.0 Transitional//EN" "http://www.w3.org/ ...
- CorelDRAW 实现蒙版效果的方法
CorelDRAW能够实现很多意想不到的小效果,其中包括了位图图像软件的处理功能,蒙版效果就是其中的一项.作为矢量图形处理软件,从理论上讲它并不具备蒙板技术,然而只是我们平常没有用到而已,利用图框精确 ...
- 浅谈css蒙版效果
我们进网站浏览时经常看到当鼠标悬浮在图片上或者某一个地方时,会出现一层朦胧现象覆盖着悬浮位置,简单的理解为“蒙版效果”.下面简单列举实现过程: HTML: CSS:
- 浅谈图片蒙版效果-webkit-mask
会用PS的童鞋一定知道“蒙版”的概念,它可以在图片上实现一定的遮罩效果,当然这里我们不介绍ps里的蒙版,而是介绍利用CSS3的新属性-webkit-mask来实现网页中的图片遮罩效果. 大家对-web ...
- QT窗口渐现效果,窗口震动效果,鼠标移动窗口
//窗口渐现效果void MainWindow::closeWindowAnimation() //关闭窗口效果 { QPropertyAnimation *animation = new QProp ...
- Qt实现悬浮窗效果
当鼠标移动到头像控件时,显示悬浮窗,当鼠标离开时,悬浮窗隐藏. 1.控件选择 悬浮窗可以从QDialog派生,并将窗口的属性设置为无边框 this->setWindowFlags(this- ...
- Qt实现半透明遮罩效果
本文索引: 需求 原理 实现遮罩控件 遮罩的使用 需求 我们在显示一些模态对话框的时候,往往需要将对话框的背景颜色调暗以达到突出当前对话框的效果,例如: 对话框的父窗口除了标题栏以外的部分都变暗了,在 ...
- 后端数据中含有html标签和css样式,前端如何转译展示样式效果。
后端含有html标签和css样式的数据: domain="<span style='color:red'>www.baidu.com</span>" (vu ...
随机推荐
- 13 款惊艳的 Node.js 框架——第1部分
[编者按]本文作者为 Peter Wayner,主要介绍13款至精至简的 Node.js 框架,帮助你简化高速网站.丰富 API 以及实时应用的开发流程.本文系国内 ITOM 管理平台 OneAPM ...
- SQL Server 的 RowGuid/RowGuidCol 是什么意思?
SQL Server 中设计表时,有个属性叫 RowGuid(用 SQL 时,关键词是 RowGuidCol),这个是什么意思呢?这个是全局唯一标识符,与“标识”不同,标识是只在本表中唯一,全局唯一标 ...
- jQuery Validate 介绍
jQuery Validate jQuery Validate 插件为表单提供了强大的验证功能,让客户端表单验证变得更简单,同时提供了大量的定制选项,满足应用程序各种需求.该插件捆绑了一套有用的验证方 ...
- MSCRM2016 取消邮箱强制SSL
在新建电子邮件服务器配置文件时Advanced中的Use SSL for Incoming/Outgoing Connection默认都是启用的而且无法编辑,启用SSL当然是为了安全的考虑,但当客户的 ...
- PTA-B 1039 到底买不买 解题思路记录
#include <cstdio> #include <string> #include <iostream> using namespace std; int m ...
- 异步IO的概念
同步IO是阻塞IO: 异步IO分为两种:1.主动查询是否有数据:2.被动监听是否有数据状态. https://www.cnblogs.com/euphie/p/6376508.html
- [笔记] 整除分块 & 异或性质
整除分块 参考资料:整除分块_peng-ym OI生涯中的各种数论算法的证明 公式 求:\(\sum_{i=1}^{n}\lfloor\frac{n}{i}\rfloor\) 对于每个\(\lfloo ...
- java 计算百分数方法
俗话说好记性不如烂笔头,故记之. DecimalFormat decimalFormat = new DecimalFormat("##.00%"); System.out.pri ...
- MyBatis的javaType和ofType的区别
javaType和ofType都是用来指定对象类型,保证了类型安全.反向用select是必须要用ofType.javaType是指POJO类中的属性类型,比如下面的id,text,url,parent ...
- Postman-常用方法集合
postman常用方法集合: 1.设置环境变量 postman.setEnvironmentVariable("key", "value"); pm.envir ...