SpringBoot入门 (十三) WebSocket使用
本文记录在SpringBoot中使用WebSocket。
一 什么是WebSocket
WebSocket是基于TCP协议的一种网络协议,它实现了浏览器与服务器全双工通信,支持客户端和服务端之间相互发送信息。在有WebSocket之前,如果服务端数据发生了改变,客户端想知道的话,只能采用定时轮询的方式去服务端获取,这种方式很大程度上增大了服务器端的压力,有了WebSocket之后,如果服务端数据发生改变,可以立即通知客户端,客户端就不用轮询去换取,降低了服务器的压力。目前主流的浏览器都已经支持WebSocket协议了。
WebSocket使用ws和wss作资源标志符,它们两个类似于http和https,wss是使用TSL的ws。主要有4个事件:
onopen 创建连接时触发
onclose 连接断开时触发
onmessage 接收到信息时触发
onerror 通讯异常时触发
二 简单使用示例
SpringBoot对WebSocket也做了支持,需要使用的话引入依赖所需要的包spring-boot-starter-websocket就可以了。我们利用它可以双向通信的特性来实现一个简单的聊天室功能。主要功能如下
1 用户在浏览器端进入聊天室(创建WebSocket连接);
2 用户端发送消息到服务端(客户端像服务端发信息);
3 服务端将消息转发到客户端(服务端向客户端发信息);
4 用户退出聊天室(断开WebSocket连接)。
修改pom.xml文件,引入WebSocket的支持
<dependency>

            <groupId>org.springframework.boot</groupId>

            <artifactId>spring-boot-starter-web</artifactId>

        </dependency>

        <dependency>

            <groupId>org.springframework.boot</groupId>

            <artifactId>spring-boot-starter-websocket</artifactId>

        </dependency>
修改application.properties文件,配置服务相关信息
server.port=8090

server.servlet.context-path=/websocket
要使用WebSocket,我们需要在启动来开启对WebSocket的支持功能,使用@EnableWebSocket注解
@SpringBootApplication

@EnableWebSocket

public class WebSocketApplication {

    public static void main(String[] args) {

        SpringApplication.run(WebSocketApplication.class, args);

    }

    /**

     * 初始化Bean,它会自动注册使用了 @ServerEndpoint 注解声明的 WebSocket endpoint

     * @return

     */

    @Bean

    public ServerEndpointExporter serverEndpointExporter(){

        return new ServerEndpointExporter();

    }

}
聊天时,我们需要知道有哪些用户在线,所以我们创建一个工具类来记录在线用户和实现服务端向客户端发送消息
public class WebSocketUtil {

    /**

     * 模拟存储   在线用户

     */

    public static final Map<String, Session> USERS_ONLINE = new ConcurrentHashMap<>();

    /**

     * 向所有在线用户发送消息(遍历 向每一个用户发送)

     * @param message

     */

    public static void sendMessageToAllOnlineUser(String message){

        USERS_ONLINE.forEach((username, Session) -> sendMessage(Session, message));

    }

    /**

     * 向指定用户发送消息

     * @param session 用户session

     * @param message 发送消息内容

     */

    private static void sendMessage(Session session, String message) {

        if (session == null) {

            return;

        }

        final RemoteEndpoint.Basic basic = session.getBasicRemote();

        if (basic == null) {

            return;

        }

        try {

            basic.sendText(message);

        } catch (IOException e) {

            e.printStackTrace();

        }

    }

}
服务端类,使用@ServerEndpoint("")说明服务端监听此地址的消息
@Controller

@ServerEndpoint("/chat/{username}") //说明创建websocket的endpoint

public class ChatServerEndpoint {

  /**

     * 访问聊天室页面

     * @return

     */

    @GetMapping("/chatPage")

    public String chatPage(){

        return "chat.html";

    }

}
WebSocket有4个事件,我们对每个事件做监听,使用对应的注解即可实现监听
onopen 在连接创建(用户进入聊天室)时触发
@OnOpen

    public void openSession(@PathParam("username") String username, Session session){

        //存储用户

        WebSocketUtil.USERS_ONLINE.put(username, session);

        //向所有在线用户发送用户上线通知消息

        String message = "["+username+"]进入聊天室";

        System.out.println(message);

        WebSocketUtil.sendMessageToAllOnlineUser(message);

    }
onclose 在连接断开(用户离开聊天室)时触发
@OnClose

    public void closeSession(@PathParam("username") String username, Session session){

        //删除用户

        WebSocketUtil.USERS_ONLINE.remove(username);

        //向所有在线用户发送用户下线通知消息

        String message = "["+username+"]离开了聊天室";

        System.out.println(message);

        WebSocketUtil.sendMessageToAllOnlineUser(message);

        //下线后关闭session

        try {

            session.close();

        } catch (IOException e) {

            e.printStackTrace();

        }

    }
onmessage 在接收到消息时触发
@OnMessage

    public void onMessage(@PathParam("username") String username, String message){

        //向聊天室中的人发送消息

        message = "["+username+"]:" + message;

        System.out.println(message);

        WebSocketUtil.sendMessageToAllOnlineUser(message);

    }
orerror 在连接发生异常时触发
@OnError

    public void sessionError(Session session, Throwable throwable){

        try {

            session.close();

        } catch (IOException e) {

            e.printStackTrace();

        }

        System.out.println("WebSocket连接发生异常,message:"+throwable.getMessage());

    }
聊天室页面
<!DOCTYPE html>

<html>

<head>

    <meta charset="UTF-8">

    <title>Title</title>

    <script src="jquery-1.9.1.min.js"></script>

</head>

<body>

<table>

    <tr><td>

        <label for="messageArea">聊天信息:</label><textarea id="messageArea" cols="50" rows="30"></textarea></br>

    </td></tr>

    <tr><td>

        <label for="username">用  户  名:</label><input type="text" id="username" ></br>

    </td></tr>

    <tr><td>

        <input type="button" id="joinRoomBtn" value="进入聊天室" />

        <input type="button" id="leaveRoomBtn" value="离开聊天室" /></br>

    </td></tr>

    <tr><td>

        <label for="sendMessage">输入消息:</label><textarea id="sendMessage" cols="50" rows="3"></textarea></br>

    </td></tr>

    <tr><td>

        <input type="button" id="sendBtn" value="发送消息" />

    </td></tr>

</table>

</body>

</html>
WebSocket客户端连接服务端及相关事件方法
<script>

        $(function(){

            var webSocket;

            var url = 'ws://localhost:8090/websocket/chat/';

            //进入聊天室

            $('#joinRoomBtn').click(function(){

                var username = $('#username').val();

                webSocket = new WebSocket(url+username);

                webSocket.onopen = function (){

                    console.log('webSocket连接创建。。。');

                }

                webSocket.onclose = function(){

                    $('#messageArea').append('['+username+']离开了聊天室\n');

                }

                webSocket.onmessage = function(event){

                    $('#messageArea').append(event.data + '\n');

                }

                webSocket.onerror = function (event) {
            console.log('webSocket连接异常。。。');

                }

            });

            //退出聊天室

            $('#leaveRoomBtn').click(function(){

                if(webSocket){

                    //关闭连接

                    webSocket.close();

                }

            });

            //发送消息

            $('#sendBtn').click(function(){

                var msg = $('#sendMessage').val();

                webSocket.send(msg);

                $('#sendMessage').val('');

            });

        });

    </script>
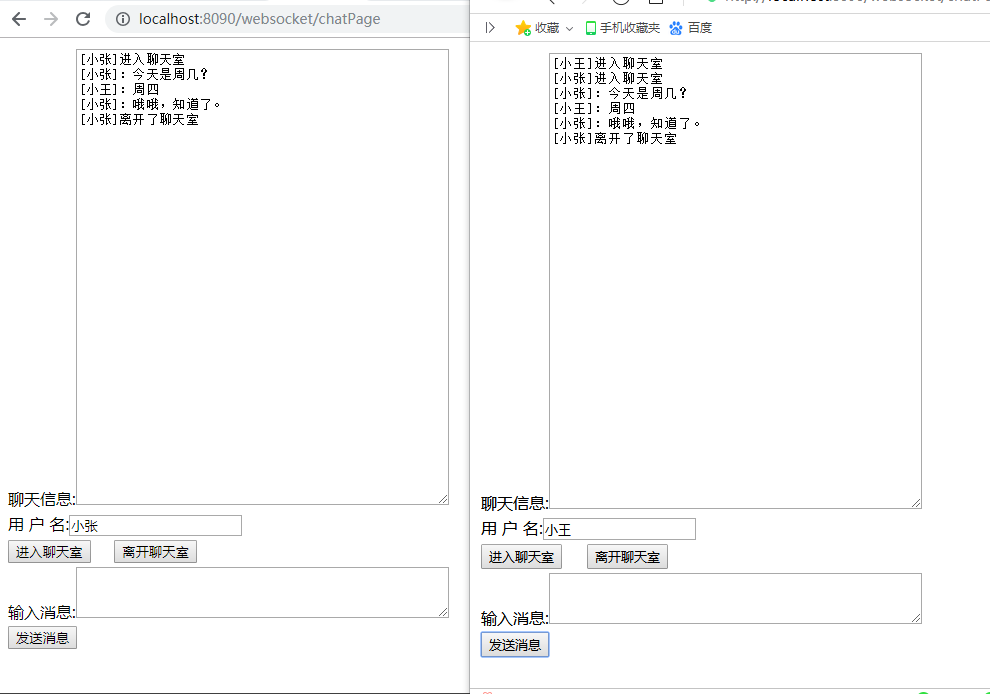
启动项目,访问聊天室页面,先输入用户名加入聊天室,再发送消息及退出聊天室,为了效果,打开两个浏览器,如下图
SpringBoot入门 (十三) WebSocket使用的更多相关文章
- SpringBoot入门及深入
一:SpringBoot简介 当前互联网后端开发中,JavaEE占据了主导地位.对JavaEE开发,首选框架是Spring框架.在传统的Spring开发中,需要使用大量的与业务无关的XML配置才能使S ...
- SpringBoot入门教程(二)CentOS部署SpringBoot项目从0到1
在之前的博文<详解intellij idea搭建SpringBoot>介绍了idea搭建SpringBoot的详细过程, 并在<CentOS安装Tomcat>中介绍了Tomca ...
- SpringBoot入门基础
目录 SpringBoot入门 (一) HelloWorld. 2 一 什么是springboot 1 二 入门实例... 1 SpringBoot入门 (二) 属性文件读取... 16 一 自定义属 ...
- SpringBoot入门示例
SpringBoot入门Demo SpringBoot可以说是Spring的简化版.配置简单.使用方便.主要有以下几种特点: 创建独立的Spring应用程序 嵌入的Tomcat,无需部署WAR文件 简 ...
- Spring全家桶系列–[SpringBoot入门到跑路]
//本文作者:cuifuan Spring全家桶————[SpringBoot入门到跑路] 对于之前的Spring框架的使用,各种配置文件XML.properties一旦出错之后错误难寻,这也是为什么 ...
- springboot入门之一:环境搭建(续)
在上篇博客中从springboot的入门到运行一个springboot项目进行了简单讲述,详情请查看“springboot入门之一”.下面继续对springboot做讲述. 开发springboot测 ...
- 【Java】SpringBoot入门学习及基本使用
SpringBoot入门及基本使用 SpringBoot的介绍我就不多说了,核心的就是"约定大于配置",接下来直接上干货吧! 本文的实例: github-LPCloud,欢迎sta ...
- SpringBoot入门(三)——入口类解析
本文来自网易云社区 上一篇介绍了起步依赖,这篇我们先来看下SpringBoot项目是如何启动的. 入口类 再次观察工程的Maven配置文件,可以看到工程的默认打包方式是jar格式的. <pack ...
- SpringBoot入门(五)——自定义配置
本文来自网易云社区 大部分比萨店也提供某种形式的自动配置.你可以点荤比萨.素比萨.香辣意大利比萨,或者是自动配置比萨中的极品--至尊比萨.在下单时,你并没有指定具体的辅料,你所点的比萨种类决定了所用的 ...
随机推荐
- Codeforces822 B. Crossword solving
B. Crossword solving time limit per test 1 second memory limit per test 256 megabytes input standard ...
- Digital Roots—HDU1013 2016-05-06 10:25 85人阅读 评论(0) 收藏
Digital Roots Time Limit: 2000/1000 MS (Java/Others) Memory Limit: 65536/32768 K (Java/Others) To ...
- CentOS下下载软件,不安装的方法
今天来说下在CentOS下下载软件,不安装的方法: 方法一:通过yum自带一个工具:yumdownloader[root@web1 ~]# rpm -qa |grep yum-utils[root@ ...
- vlookup返回多个结果
http://www.360doc.com/content/12/1021/15/7665211_242782107.shtml =IFERROR(VLOOKUP(D2&ROW(A1),IF( ...
- Delphi 在DLL中使用DevExpress控件时出错解决办法
测试环境 DevExpress VCL 14.1.3 和XE7 问题:在dll使用cxGrid控件时 如果不添加列标题 则不报错 查询无数据集显示,如果加上标题 就报错了 这段为报错部分 fun ...
- PHP内存溢出Allowed memory size of 解决办法
PHP内存溢出Allowed memory size of 解决办法 博客分类: php ============================Allowed memory size of x ...
- XAMPP配置基于虚拟目录、多域名的环境
打开Apache 2.x 配置文件 http.conf 搜索Include etc/extra/httpd-vhosts.conf,然后去掉前面的#号 再编辑extra/httpd-vhosts. ...
- .net中的SelectList在Html.DropdownList中的使用
.net中的SelectList可以用于前端下拉框的内容填充 譬如:Html.DropdownList(下拉框标签名称, SelectList实例) 实际上,上述Html.DropdownList的第 ...
- this与$(this)对象
this与$(this)对象.前者是Javascript对象,而后者是jQuery是对象.两者分清楚,它们只能使用自己的方法.Javascript对象使用Javascript的方法,jQuery对象使 ...
- Deque(队列)
目录 Deque 概述 特点 常用方法 双向队列操作 ArrayDeque Deque 概述 一个线性 collection,支持在两端插入和移除元素.名称 deque 是"double e ...