Facebook 调试工具Stetho配置入门
I decided to spend a few hours on Stetho.
Stetho is a sophisticated debug bridge for Android applications.
How to enable it
It is very simple to enable Stetho.
Just add these lines to your build.gradle:
dependencies {

    // Stetho core

    compile 'com.facebook.stetho:stetho:1.1.1'

    //If you want to add a network helper

    compile 'com.facebook.stetho:stetho-okhttp:1.1.1'

}
Then in your Application you can enable the tool just adding:
Stetho.initialize(

                    Stetho.newInitializerBuilder(this)

                            .enableDumpapp(

                                    Stetho.defaultDumperPluginsProvider(this))

                            .enableWebKitInspector(

                                    Stetho.defaultInspectorModulesProvider(this))

                            .build());
In my simple application, I have a network call with okhttp-client , a simple value in the shared preferences, and a small db with one table.
Now the last step: Run the application and just open Chrome on your pc (where the device is plugged).
In your chrome just navigate on chrome://inspect 
As you can see in the image you can see 2 apps running in my device (I love Nexus4 for this kind of tests....)
- Chrome
- My Stetho Test App
How can I use it
Here you can open a magical world...clicking the inspect link.
First of all you can see the elements tab.
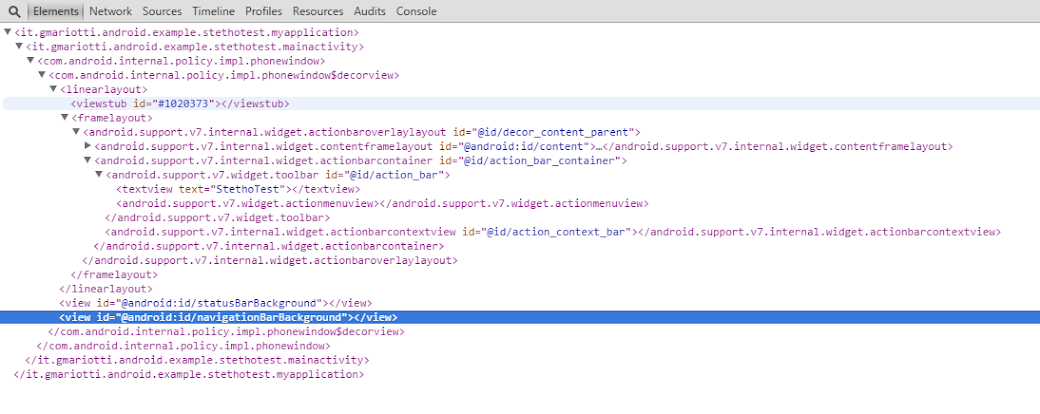
Here you can navigate in the elements inside your Activity......
Here a first surprise...clicking on the entry on the tab, the element is highlighted on the device !
The network tab.
If you work with the Chrome Developer Tools, you know it very well. Here you can see the network calls with their data.
In my app I do a simple call with okhttp
  OkHttpClient client = new OkHttpClient();

        client.networkInterceptors().add(new StethoInterceptor());

        Request request = new Request.Builder()

                .url("https://google.com")

                .build();

        client.newCall(request).enqueue(new Callback() {

            @Override

            public void onFailure(Request request, IOException e) {

                //do something

            }

            @Override

            public void onResponse(Response response) throws IOException {

                //do something

            }

        });
Here the tab: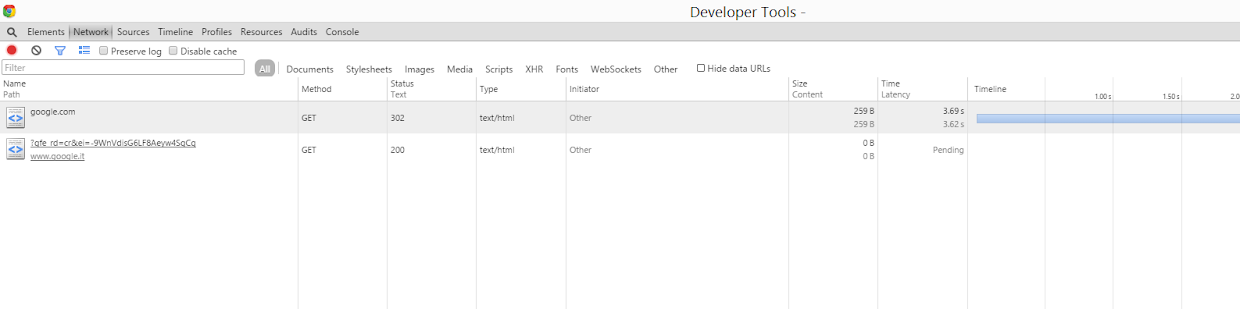
The Resources tab.
In my sample app I am setting a simple value in the SharedPreferences.
 SharedPreferences.Editor editor = getSharedPreferences("TEST", MODE_PRIVATE).edit();

        editor.putString("name", "Paolo");

        editor.putInt("idName", 12);

        editor.commit();
You can check this value in the navigating in the Local Storage entry.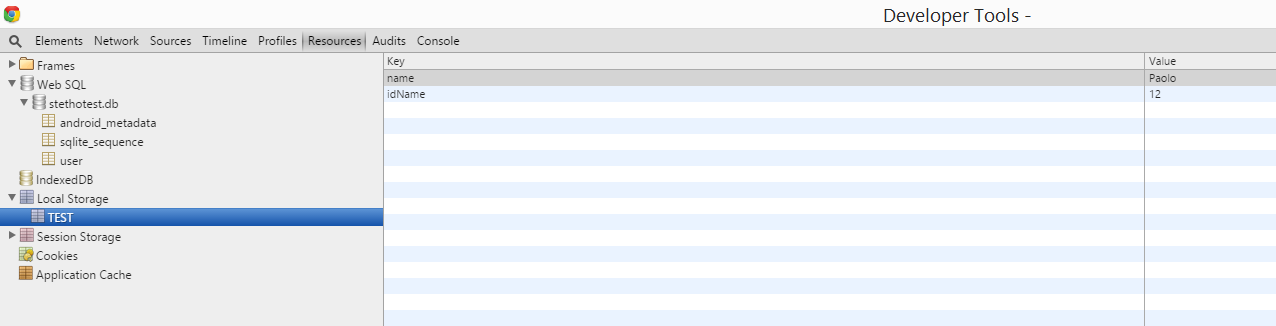
Also I use a simple SQLiteOpenHelper to manage a very small database with just a table.
private static final String CREATE_DATABASE = "CREATE TABLE " + TBL_USR + " ( " +

            TBL_USR_CLMN_ID + " INTEGER PRIMARY KEY AUTOINCREMENT NOT NULL, " +

            TBL_USR_CLMN_NAME + " TEXT NOT NULL, " +

            TBL_USR_CLMN_SURNAME + " TEXT NOT NULL, " +

            TBL_USR_CLMN_CODE + " INTEGER NOT NULL DEFAULT 0 " +

            ")";

@Override

    public void onCreate(SQLiteDatabase db) {

        db.execSQL(CREATE_DATABASE);

        db.execSQL("INSERT INTO " + TBL_USR + " " + "("+ TBL_USR_CLMN_NAME  +" , " + TBL_USR_CLMN_SURNAME +" , " + TBL_USR_CLMN_CODE  +")" + "  VALUES('PAOLO1','ROSSI1', 233432 )");

        db.execSQL("INSERT INTO " + TBL_USR + " " + "("+ TBL_USR_CLMN_NAME  +" , " + TBL_USR_CLMN_SURNAME +" , " + TBL_USR_CLMN_CODE  +")" + "  VALUES('PAOLO2','ROSSI2', 103213 )");

        db.execSQL("INSERT INTO " + TBL_USR + " " + "("+ TBL_USR_CLMN_NAME  +" , " + TBL_USR_CLMN_SURNAME +" , " + TBL_USR_CLMN_CODE  +")" + "  VALUES('PAOLO3','ROSSI3', 5454331 )");

        db.execSQL("INSERT INTO " + TBL_USR + " " + "("+ TBL_USR_CLMN_NAME  +" , " + TBL_USR_CLMN_SURNAME +" , " + TBL_USR_CLMN_CODE  +")" + "  VALUES('PAOLO4','ROSSI4', 5454444 )");

        db.execSQL("INSERT INTO " + TBL_USR + " " + "("+ TBL_USR_CLMN_NAME  +" , " + TBL_USR_CLMN_SURNAME +" , " + TBL_USR_CLMN_CODE  +")" + "  VALUES('PAOLO5','ROSSI5', 1231232 )");

        db.execSQL("INSERT INTO " + TBL_USR + " " + "("+ TBL_USR_CLMN_NAME  +" , " + TBL_USR_CLMN_SURNAME +" , " + TBL_USR_CLMN_CODE  +")" + "  VALUES('PAOLO6','ROSSI6', 4443343 )");

    }
You can navigate on the data on the WebSQL entry.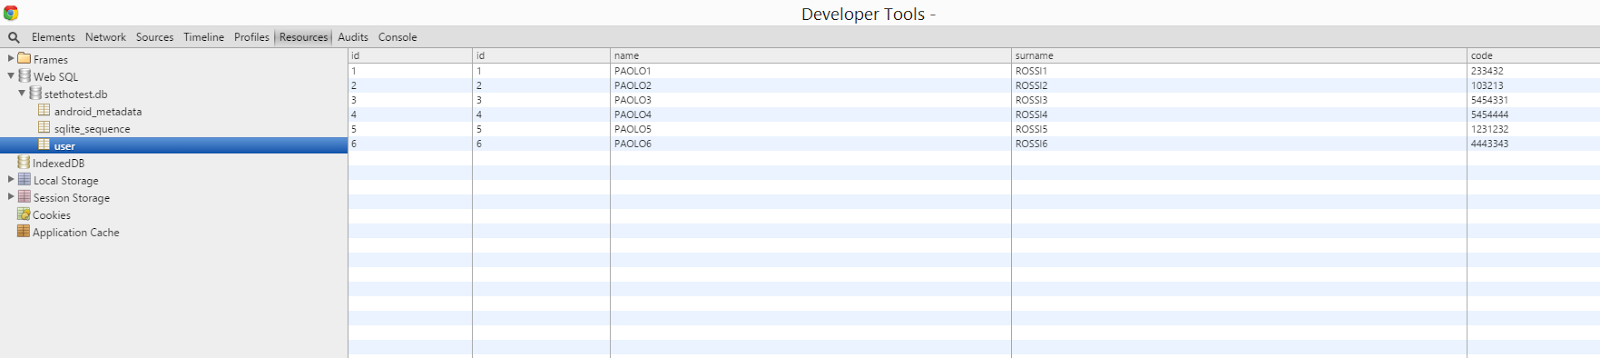
And you can run queries on your db...(!)
Of course it is only a first glance at this tool but it is enough to check the power of this debug tool.
转自:http://gmariotti.blogspot.it/2015/07/a-first-glance-at-stetho-tool.html
Facebook 调试工具Stetho配置入门的更多相关文章
- nginx配置入门
谢谢作者的分享精神,原文地址:http://www.nginx.cn/591.html nginx配置入门 之前的nginx配置是对nginx配置文件的具体含义进行讲解,不过对于nginx的新手可能一 ...
- echart图表控件配置入门(二)常用图表数据动态绑定
上一节 <echart图表控件配置入门(一)>介绍了echarts图表控件的入门配置,使开发人员可以快速搭建出一个静态的图表.但是在实际开发过程这还是不够的,不可能所有的图表控件都是静态数 ...
- echart图表控件配置入门(一)
现在主流的web图表控件主要有hightchart.fusionchart.echart: echart作为百度前端部门近期推出的一个基于html5的免费图表控件,以其丰富图表类型和良好的兼容性速度得 ...
- spring的Java配置入门(Spring Boot学习笔记之一)
spring的Java配置 1.创建maven项目 使用idea创建maven项目,这里顺便提一下,idea真的比eclipse好用,早点熟悉吧.然后就是maven是java项目管理最主流的工具,自己 ...
- nginx 配置入门
之前的nginx配置是对nginx配置文件的具体含义进行讲解,不过对于nginx的新手可能一头雾水. 今天看到个文档不错,翻译过来分享给大家,可以让新手更详细地了解nginx配置,可以说是nginx配 ...
- Git客户端的安装与配置入门
GitLab与Git客户端的安装与配置入门,每次配置完一段时间,就忘记配置过程了,为了自己和同学们以后有所参照,特记录了本次下载和配置,其实Git就是一个版本控制系统,类似于SVN,CVS等 下载:W ...
- 转载:Vim 配置入门
转载:Vim 配置入门 原文地址:http://www.ruanyifeng.com/blog/2018/09/vimrc.html 作者: 阮一峰 Vim 是最重要的编辑器之一,主要有下面几个优点. ...
- fis3前端工程构建配置入门教程
一.前言 fis3是百度推出的一款前端工程构建工具,类似的还有webpack,gulp等工具:无论大家有没有使用过,从事前端行业应该都略知一二了,所以对于此类工具用干嘛的我这里就不做重复了. 其实对于 ...
- Maven学习归纳(一)——简单的环境配置入门
一.Maven的基本概念 Maven是基于项目对象模型(POM),可以通过一小段描述信息来管理项目的编译,测试,构建,报告和文档的软件项目管理工具和解决依赖关系的工具. 1.1 项目的构建 项目的构建 ...
随机推荐
- Chrome浏览器切换到之前打开的标签页会重新加载
这是谷歌的一种策略.当系统内存不足时,系统会自动从内存中舍弃标签页 在地址栏输入chrome://flags/#automatic-tab-discarding,设置为停用即可.
- jQuery--checkbox全选/取消全选
用JavaScript使页面上的一组checkbox全选/取消全选,逻辑很简单,实现代码也没有太难的语法.但使用jQuery实现则更简单,代码也很简洁,精辟! jQuery版本:1.3.2 <h ...
- node.js querystring处理参数
C:\Documents and Settings\Administrator\WebstormProjects\untitled6>node> url{ parse: [Function ...
- Log4net 参数详解
<log4net> <!-- 错误日志类--> <logger name="logerror"> <level value="A ...
- python基础之 re(正则表达式)模块学习
今天学习了Python中有关正则表达式的知识.关于正则表达式的语法,不作过多解释,网上有许多学习的资料.这里主要介绍Python中常用的正则表达式处理函数. re.match re.match 尝试从 ...
- wamp出现You don’t have permission to access/on this server提示(转)
转自http://blog.csdn.net/hong0220/article/details/40262729 ,转载方便以后查看. 今天搭建wamp集成环境,本来已经搭建好了,但是在访问local ...
- yum 安装软件时报Public key for * is not installed
这个是由于没有导入rpm签名信息引起的 解决方案: rpm --import /etc/pki/rpm-gpg/RPM-GPG-KEY-redhat-release
- 在Linux上怎么安装和配置DenyHosts工具
使用DenyHosts能够进行自动屏ip的功能,掌握DenyHosts在Linux系统中的安装是很有必要的,那么在Linux系统中要如何安装DenyHosts工具呢?安装后又要如何配置呢?这都是用户需 ...
- mit java open course assignment #4
package come; public class Library { // Add the missing implementation to this class String realLoca ...
- ubuntu KDE/GNOME vnc