从零搭建K8S测试集群
环境准备
本文介绍从零开始创建多个虚拟机,组建一个测试k8s集群的完整过程,并记录中间踩过的坑
创建虚拟机
安装vagrant和virtualbox
创建两个目录(一个目录对应一个虚拟机),进入执行vagrant init centos/7初始化,以及vagrant up,然后去吃饭,等待虚拟机装好
D:\vm2>vagrant init centos/7

A `Vagrantfile` has been placed in this directory. You are now

ready to `vagrant up` your first virtual environment! Please read

the comments in the Vagrantfile as well as documentation on

`vagrantup.com` for more information on using Vagrant.

D:\vm2>vagrant up

Bringing machine 'default' up with 'virtualbox' provider...

==> default: Importing base box 'centos/7'...

==> default: Matching MAC address for NAT networking...

==> default: Checking if box 'centos/7' version '2004.01' is up to date...

==> default: Setting the name of the VM: vm2_default_1608174748422_96033

==> default: Fixed port collision for 22 => 2222. Now on port 2200.

==> default: Clearing any previously set network interfaces...

==> default: Preparing network interfaces based on configuration...

    default: Adapter 1: nat

==> default: Forwarding ports...

    default: 22 (guest) => 2200 (host) (adapter 1)

==> default: Booting VM...

==> default: Waiting for machine to boot. This may take a few minutes...

    default: SSH address: 127.0.0.1:2200

    default: SSH username: vagrant

    default: SSH auth method: private key

    default:

    default: Vagrant insecure key detected. Vagrant will automatically replace

    default: this with a newly generated keypair for better security.

    default:

    default: Inserting generated public key within guest...

    default: Removing insecure key from the guest if it's present...

    default: Key inserted! Disconnecting and reconnecting using new SSH key...

==> default: Machine booted and ready!

==> default: Checking for guest additions in VM...

    default: No guest additions were detected on the base box for this VM! Guest

    default: additions are required for forwarded ports, shared folders, host only

    default: networking, and more. If SSH fails on this machine, please install

    default: the guest additions and repackage the box to continue.

    default:

    default: This is not an error message; everything may continue to work properly,

    default: in which case you may ignore this message.

==> default: Rsyncing folder: /cygdrive/d/vm2/ => /vagrant
vagrant会帮我们把虚拟机装好并启动,创建一个vagrant账号,密码vagrant,root账号的密码也是vagrant。同时,在当前的目录下生成一个Vagrantfile文件,我们需要对这个文件做一点小小的修改来保证虚拟机的设置满足k8s需求,以及虚拟机之间的网络可以互通。
  # 配置一个公共网络(bridge网络,可以指定ip,也可以不指定,使用默认的dhcp分配地址)

  config.vm.network "public_network", ip: "192.168.56.10"

  config.vm.provider "virtualbox" do |vb|

    # Display the VirtualBox GUI when booting the machine

    # vb.gui = true

    # 指定内存和cpu核数

    # Customize the amount of memory on the VM:

    vb.memory = "4096"

	vb.cpus = 2

  end
修改好后执行vagrant reload即可重启虚拟机,让配置生效
bridge网络默认虚拟机可以ping其它虚拟机,但宿主机无法ping通虚拟机,如果指定了和宿主机同一个网段(需要确认指定的ip是空闲的),宿主机可以ping通虚拟机,但虚拟机无法ping通宿主机,包括默认的dhcp无法为虚拟机分配ip,这应该和公司的网络有关,如果这台虚拟机想要访问其它机器,应该需要先入域才有权限访问!
关于虚拟机的网络
这里介绍一下虚拟机几种主要的网络模型:
- NAT(Network Address Translatation)
- 桥接(Bridge)
- 主机(Host-only)
- 内部(Internal)
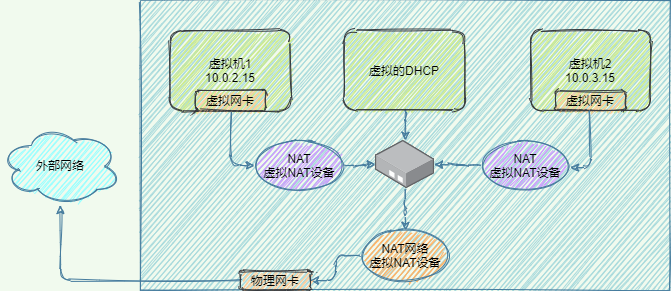
NAT
Nat是Vagrant默认设置的网络模型,虚拟机与物理机并不在同一个网段,虚拟机可以访问外网,访问时需要用NAT虚拟设备进行地址转换,严格来讲NAT有2种实现方式:
- NAT:NAT上的虚拟机互相隔离,彼此不能通信,如下图所示,每个虚拟机的虚拟网卡连接着一个虚拟NAT设备(图中紫色NAT,没有橙色的NAT)
- NAT网络:NAT网络上的虚拟机可以互通,共享虚拟NAT设备(图中橙色NAT,没有紫色NAT)
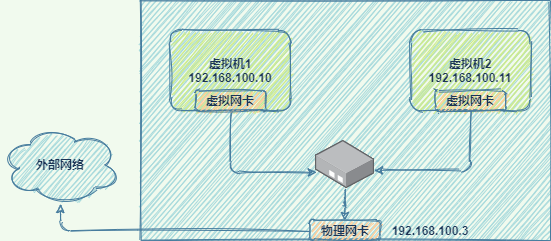
桥接网络
桥接网络简单方便,所有虚拟机和宿主机都在同一个网络中,与宿主机组网的其它机器也可以像访问宿主机一样访问虚拟机,如同一个真实的网络设备一样,是功能最完整的一种网络模型,但缺点是如果虚拟机过多,广播的成本很高
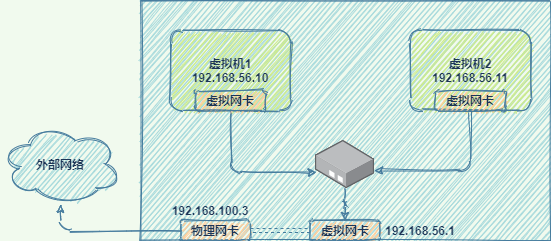
Host-only
主机网络将网络环境限制在主机内部,默认不能访问外网,主机和虚拟机不在同一个网段,但主机与虚拟机之间、虚拟机和虚拟机之间是互通的(通过配置也可以实现对外网的访问)。在主机上设置物理网卡的属性/共享,将物理网卡和虚拟网卡桥接或共享即可访问外网。
内部网络
这是一种简单的网络模型,虚拟机和外部环境完全断开,只允许虚拟机之间互相访问,用的比较少
小结
| Model | VM -> host | host -> VM | VM <-> VM | VM -> Internet | Internet -> VM |
|---|---|---|---|---|---|
| Bridged | + | + | + | + | + |
| NAT | + | Port Forwarding | - | + | Port Forwarding |
| NAT Network | + | Port Forwarding | + | + | Port Forwarding |
| Host-only | + | + | + | - | - |
| Internal | - | - | + | - | - |
关于vagrant的网络
vagrant支持3种网络配置,可以在Vagrantfile中进行配置:
- 端口映射,比如访问本机的8080端口、转发到虚拟机的80端口(默认为tcp,如果需要转发udp则指定Protocol为udp)
config.vm.network "forwarded_port", guest: 80, host: 8080
- 私有网络,对应Host-only网络,允许主机访问虚拟机,以及虚拟机之间互相访问,其它机器无法访问虚拟机,安全性高
config.vm.network "private_network", ip: "192.168.21.4"
- 共有网络,对应bridge网络,相当于一个独立的网络设备
config.vm.network "public_network", ip: "192.168.1.120"
docker安装
docker官方文档 https://docs.docker.com/engine/install/
- 设置官方的软件源
$ sudo yum install -y yum-utils

$ sudo yum-config-manager \

    --add-repo \

    https://download.docker.com/linux/centos/docker-ce.repo
- 安装docker引擎
$ sudo yum install docker-ce docker-ce-cli containerd.io
- 启动docker
$ sudo systemctl start docker
k8s安装
k8s官方文档 https://kubernetes.io/docs/setup/production-environment/tools/kubeadm/install-kubeadm/
- 确保 iptables 工具不使用 nftables 后端
update-alternatives --set iptables /usr/sbin/iptables-legacy

update-alternatives --set ip6tables /usr/sbin/ip6tables-legacy

update-alternatives --set arptables /usr/sbin/arptables-legacy

update-alternatives --set ebtables /usr/sbin/ebtables-legacy
- 设置源,并安装 kubelet kubeadm kubectl
cat <<EOF > /etc/yum.repos.d/kubernetes.repo

[kubernetes]

name=Kubernetes

baseurl=https://packages.cloud.google.com/yum/repos/kubernetes-el7-x86_64

enabled=1

gpgcheck=1

repo_gpgcheck=1

gpgkey=https://packages.cloud.google.com/yum/doc/yum-key.gpg https://packages.cloud.google.com/yum/doc/rpm-package-key.gpg

EOF

# 将 SELinux 设置为 permissive 模式(相当于将其禁用)

setenforce 0

sed -i 's/^SELINUX=enforcing$/SELINUX=permissive/' /etc/selinux/config

yum install -y kubelet kubeadm kubectl --disableexcludes=kubernetes

systemctl enable --now kubelet
初始化集群
kubeadm init
在主节点上执行kubeadm初始化
[root@localhost vagrant]# kubeadm init

[init] Using Kubernetes version: v1.20.0

[preflight] Running pre-flight checks

        [WARNING Service-Docker]: docker service is not enabled, please run 'systemctl enable docker.service'

        [WARNING IsDockerSystemdCheck]: detected "cgroupfs" as the Docker cgroup driver. The recommended driver is "systemd". Please follow the guide at https://kubernetes.io/docs/setup/cri/

        [WARNING SystemVerification]: this Docker version is not on the list of validated versions: 20.10.1. Latest validated version: 19.03

error execution phase preflight: [preflight] Some fatal errors occurred:

        [ERROR NumCPU]: the number of available CPUs 1 is less than the required 2

        [ERROR Mem]: the system RAM (486 MB) is less than the minimum 1700 MB

        [ERROR FileContent--proc-sys-net-bridge-bridge-nf-call-iptables]: /proc/sys/net/bridge/bridge-nf-call-iptables contents are not set to 1

        [ERROR Swap]: running with swap on is not supported. Please disable swap

[preflight] If you know what you are doing, you can make a check non-fatal with `--ignore-preflight-errors=...`

To see the stack trace of this error execute with --v=5 or higher
- docker service is not enabled的告警,直接执行
systemctl enable docker.service解决,docker会被设置为开机自启动 - cgroupfs 问题告警,意思是systemd作为cgroup驱动更加稳定,让你用这个,不同的cri的设置可以参考
https://kubernetes.io/docs/setup/cri/ - docker版本问题告警,我的docker版本过新了,官方还没有测试过,最后一个验证过的版本是19.03
- Error部分CPU和内存不足的问题,打开VirtualBox,在虚拟机的设置中将CPU的核数调整为2或以上、内存大小调整为1700MB或以上即可

- FileContent--proc-sys-net-bridge-bridge-nf-call-iptables问题,iptable被绕过而导致流量无法正确路由,执行下面的命令解决
cat <<EOF >  /etc/sysctl.d/k8s.conf

net.bridge.bridge-nf-call-ip6tables = 1

net.bridge.bridge-nf-call-iptables = 1

EOF

sysctl --system
- Swap问题,执行
sudo swapoff -a禁用swap即可,但每次重启都需要重新设置,可以修改/etc/fstab目录下,注释掉swap那行即可
vagrant网络设置
vagrant默认使用nat网络,虽然在虚拟机中可以访问主机和外网,但多个虚拟机之间无法互相访问,
加入集群
我们在主节点上执行kubeadm,注意2点:
- --apiserver-advertise-address "192.168.205.10",指定我们的vm1的eth1网卡,这个网卡才可以和其它vm互通
- --pod-network-cidr=10.244.0.0/16 为使用flannel网络插件做准备
[root@vm1 vagrant]# kubeadm init --apiserver-advertise-address "192.168.205.10" --pod-network-cidr=10.244.0.0/16

[init] Using Kubernetes version: v1.20.0

[preflight] Running pre-flight checks

        [WARNING IsDockerSystemdCheck]: detected "cgroupfs" as the Docker cgroup driver. The recommended driver is "systemd". Please follow the guide at https://kubernetes.io/docs/setup/cri/

        [WARNING SystemVerification]: this Docker version is not on the list of validated versions: 20.10.1. Latest validated version: 19.03

[preflight] Pulling images required for setting up a Kubernetes cluster

[preflight] This might take a minute or two, depending on the speed of your internet connection

[preflight] You can also perform this action in beforehand using 'kubeadm config images pull'

[certs] Using certificateDir folder "/etc/kubernetes/pki"

[certs] Generating "ca" certificate and key

[certs] Generating "apiserver" certificate and key

[certs] apiserver serving cert is signed for DNS names [kubernetes kubernetes.default kubernetes.default.svc kubernetes.default.svc.cluster.local vm1] and IPs [10.96.0.1 192.168.205.10]

[certs] Generating "apiserver-kubelet-client" certificate and key

[certs] Generating "front-proxy-ca" certificate and key

[certs] Generating "front-proxy-client" certificate and key

[certs] Generating "etcd/ca" certificate and key

[certs] Generating "etcd/server" certificate and key

[certs] etcd/server serving cert is signed for DNS names [localhost vm1] and IPs [192.168.205.10 127.0.0.1 ::1]

[certs] Generating "etcd/peer" certificate and key

[certs] etcd/peer serving cert is signed for DNS names [localhost vm1] and IPs [192.168.205.10 127.0.0.1 ::1]

[certs] Generating "etcd/healthcheck-client" certificate and key

[certs] Generating "apiserver-etcd-client" certificate and key

[certs] Generating "sa" key and public key

[kubeconfig] Using kubeconfig folder "/etc/kubernetes"

[kubeconfig] Writing "admin.conf" kubeconfig file

[kubeconfig] Writing "kubelet.conf" kubeconfig file

[kubeconfig] Writing "controller-manager.conf" kubeconfig file

[kubeconfig] Writing "scheduler.conf" kubeconfig file

[kubelet-start] Writing kubelet environment file with flags to file "/var/lib/kubelet/kubeadm-flags.env"

[kubelet-start] Writing kubelet configuration to file "/var/lib/kubelet/config.yaml"

[kubelet-start] Starting the kubelet

[control-plane] Using manifest folder "/etc/kubernetes/manifests"

[control-plane] Creating static Pod manifest for "kube-apiserver"

[control-plane] Creating static Pod manifest for "kube-controller-manager"

[control-plane] Creating static Pod manifest for "kube-scheduler"

[etcd] Creating static Pod manifest for local etcd in "/etc/kubernetes/manifests"

[wait-control-plane] Waiting for the kubelet to boot up the control plane as static Pods from directory "/etc/kubernetes/manifests". This can take up to 4m0s

[apiclient] All control plane components are healthy after 17.508748 seconds

[upload-config] Storing the configuration used in ConfigMap "kubeadm-config" in the "kube-system" Namespace

[kubelet] Creating a ConfigMap "kubelet-config-1.20" in namespace kube-system with the configuration for the kubelets in the cluster

[upload-certs] Skipping phase. Please see --upload-certs

[mark-control-plane] Marking the node vm1 as control-plane by adding the labels "node-role.kubernetes.io/master=''" and "node-role.kubernetes.io/control-plane='' (deprecated)"

[mark-control-plane] Marking the node vm1 as control-plane by adding the taints [node-role.kubernetes.io/master:NoSchedule]

[bootstrap-token] Using token: 2ckaow.r0ed8bpcy7sdx9kj

[bootstrap-token] Configuring bootstrap tokens, cluster-info ConfigMap, RBAC Roles

[bootstrap-token] configured RBAC rules to allow Node Bootstrap tokens to get nodes

[bootstrap-token] configured RBAC rules to allow Node Bootstrap tokens to post CSRs in order for nodes to get long term certificate credentials

[bootstrap-token] configured RBAC rules to allow the csrapprover controller automatically approve CSRs from a Node Bootstrap Token

[bootstrap-token] configured RBAC rules to allow certificate rotation for all node client certificates in the cluster

[bootstrap-token] Creating the "cluster-info" ConfigMap in the "kube-public" namespace

[kubelet-finalize] Updating "/etc/kubernetes/kubelet.conf" to point to a rotatable kubelet client certificate and key

[addons] Applied essential addon: CoreDNS

[addons] Applied essential addon: kube-proxy

Your Kubernetes control-plane has initialized successfully!

#1.1 特别注意!在开始使用之前,请执行下面这段命令

To start using your cluster, you need to run the following as a regular user:

  mkdir -p $HOME/.kube

  sudo cp -i /etc/kubernetes/admin.conf $HOME/.kube/config

  sudo chown $(id -u):$(id -g) $HOME/.kube/config

#1.2 或者执行下面这一行(如果你是root用户的话)

Alternatively, if you are the root user, you can run:

  export KUBECONFIG=/etc/kubernetes/admin.conf

#2 接下来需要部署一个pod网络到集群中

You should now deploy a pod network to the cluster.

Run "kubectl apply -f [podnetwork].yaml" with one of the options listed at:

  https://kubernetes.io/docs/concepts/cluster-administration/addons/

#3 然后执行下面的命令将worker节点加入集群

Then you can join any number of worker nodes by running the following on each as root:

kubeadm join 192.168.205.10:6443 --token paattq.r3qp8kksjl0yukls \

    --discovery-token-ca-cert-hash sha256:f18d1e87c8b1d041bc7558eedd2857c2ad7094b1b2c6aa8388d0ef51060e4c0f
配置kubeconfig
按照kubeadm的提示,需要先执行下面这段代码配置kubeconfig才可以正常访问到集群
  mkdir -p $HOME/.kube

  sudo cp -i /etc/kubernetes/admin.conf $HOME/.kube/config

  sudo chown $(id -u):$(id -g) $HOME/.kube/config
否则会出现以下问题,执行完上面的方法后再执行kubectl get nodes就正常了
[root@vm1 vagrant]# kubectl get nodes

The connection to the server localhost:8080 was refused - did you specify the right host or port?

或者:

[root@vm1 vagrant]# kubectl get nodes

Unable to connect to the server: x509: certificate signed by unknown authority (possibly because of "crypto/rsa: verification error" while trying to verify candidate authority certificate "kubernetes")
此时查看以下k8s内部pod的运行状态,可以发现,只有kube-proxy和kube-apiserver处于就绪状态
[root@vm1 vagrant]# kubectl get pods -n kube-system

NAME                          READY   STATUS              RESTARTS   AGE

coredns-74ff55c5b-4ndtt       0/1     ContainerCreating   0          43s

coredns-74ff55c5b-tmc7n       0/1     ContainerCreating   0          43s

etcd-vm1                      0/1     Running             0          51s

kube-apiserver-vm1            1/1     Running             0          51s

kube-controller-manager-vm1   0/1     Running             0          51s

kube-proxy-5mvwf              1/1     Running             0          44s

kube-scheduler-vm1            0/1     Running             0          51s
部署pod网络
接下来需要部署Pod网络,否则我们观察到的节点会是NotReady的状态,如下所示
[root@vm1 vagrant]# kubectl get nodes

NAME   STATUS     ROLES                  AGE     VERSION

vm1    NotReady   control-plane,master   4m      v1.20.0
具体使用哪一个网络,可以参考https://kubernetes.io/docs/concepts/cluster-administration/addons/,这里选择了大名鼎鼎的flannel插件,在使用kubeadm时,flannel要求我们在kubeadm init时指定--pod-network-cidr参数来初始化cidr。
NOTE: If kubeadm is used, then pass --pod-network-cidr=10.244.0.0/16 to kubeadm init to ensure that the podCIDR is set.
另外,由于这里我们使用的是vagrant创建的虚拟机,默认的eth0网卡是一个nat网卡,只能从虚拟机访问外部,不能从外部访问虚拟机内部,所以我们需要指定一个可以和外部通信的bridge网卡——eth1,修改kube-flannel.yml,添加--iface=eth1参数指定网卡。
      containers:

      - name: kube-flannel

        image: quay.io/coreos/flannel:v0.13.1-rc1

        command:

        - /opt/bin/flanneld

        args:

        - --ip-masq

        - --kube-subnet-mgr

        - --iface=eth1 # 为kube-flannel容器指定额外的启动参数!
执行下面的命令,可以创建flannel网络
wget https://raw.githubusercontent.com/coreos/flannel/master/Documentation/k8s-manifests/kube-flannel.yml

kubectl apply -f kube-flannel.yml
部署完网络后,再过一会儿查看k8s的pod状态可以发现,所有的pod都就绪了,并且启动了一个新的kube-flannel-ds
[root@vm1 vagrant]# kubectl get pods -n kube-system

NAME                          READY   STATUS    RESTARTS   AGE

coredns-74ff55c5b-4ndtt       1/1     Running   0          88s

coredns-74ff55c5b-tmc7n       1/1     Running   0          88s

etcd-vm1                      1/1     Running   0          96s

kube-apiserver-vm1            1/1     Running   0          96s

kube-controller-manager-vm1   1/1     Running   0          96s

kube-flannel-ds-dnw4d         1/1     Running   0          19s

kube-proxy-5mvwf              1/1     Running   0          89s

kube-scheduler-vm1            1/1     Running   0          96s
加入集群
最后在vm2上执行kubeadm join加入集群
[root@vm2 vagrant]# kubeadm join 192.168.205.10:6443 --token paattq.r3qp8kksjl0yukls \

>     --discovery-token-ca-cert-hash sha256:f18d1e87c8b1d041bc7558eedd2857c2ad7094b1b2c6aa8388d0ef51060e4c0f

[preflight] Running pre-flight checks

        [WARNING IsDockerSystemdCheck]: detected "cgroupfs" as the Docker cgroup driver. The recommended driver is "systemd". Please follow the guide at https://kubernetes.io/docs/setup/cri/

        [WARNING SystemVerification]: this Docker version is not on the list of validated versions: 20.10.1. Latest validated version: 19.03

[preflight] Reading configuration from the cluster...

[preflight] FYI: You can look at this config file with 'kubectl -n kube-system get cm kubeadm-config -o yaml'

[kubelet-start] Writing kubelet configuration to file "/var/lib/kubelet/config.yaml"

[kubelet-start] Writing kubelet environment file with flags to file "/var/lib/kubelet/kubeadm-flags.env"

[kubelet-start] Starting the kubelet

[kubelet-start] Waiting for the kubelet to perform the TLS Bootstrap...

This node has joined the cluster:

* Certificate signing request was sent to apiserver and a response was received.

* The Kubelet was informed of the new secure connection details.

Run 'kubectl get nodes' on the control-plane to see this node join the cluster.
加入之后,运行ip a可以查看到我们的网络,k8s为我们额外启动了flannel.1、cni0、以及veth设备
[root@vm2 vagrant]# ip a

1: lo: <LOOPBACK,UP,LOWER_UP> mtu 65536 qdisc noqueue state UNKNOWN group default qlen 1000

    link/loopback 00:00:00:00:00:00 brd 00:00:00:00:00:00

    inet 127.0.0.1/8 scope host lo

       valid_lft forever preferred_lft forever

    inet6 ::1/128 scope host

       valid_lft forever preferred_lft forever

2: eth0: <BROADCAST,MULTICAST,UP,LOWER_UP> mtu 1500 qdisc pfifo_fast state UP group default qlen 1000

    link/ether 52:54:00:4d:77:d3 brd ff:ff:ff:ff:ff:ff

    inet 10.0.2.15/24 brd 10.0.2.255 scope global noprefixroute dynamic eth0

       valid_lft 85901sec preferred_lft 85901sec

    inet6 fe80::5054:ff:fe4d:77d3/64 scope link

       valid_lft forever preferred_lft forever

3: eth1: <BROADCAST,MULTICAST,UP,LOWER_UP> mtu 1500 qdisc pfifo_fast state UP group default qlen 1000

    link/ether 08:00:27:f1:20:55 brd ff:ff:ff:ff:ff:ff

    inet 192.168.205.11/24 brd 192.168.205.255 scope global noprefixroute eth1

       valid_lft forever preferred_lft forever

    inet6 fe80::a00:27ff:fef1:2055/64 scope link

       valid_lft forever preferred_lft forever

4: docker0: <NO-CARRIER,BROADCAST,MULTICAST,UP> mtu 1500 qdisc noqueue state DOWN group default

    link/ether 02:42:6f:03:4a:68 brd ff:ff:ff:ff:ff:ff

    inet 172.17.0.1/16 brd 172.17.255.255 scope global docker0

       valid_lft forever preferred_lft forever

5: flannel.1: <BROADCAST,MULTICAST,UP,LOWER_UP> mtu 1450 qdisc noqueue state UNKNOWN group default

    link/ether 6e:99:9d:7b:08:ec brd ff:ff:ff:ff:ff:ff

    inet 10.244.1.0/32 brd 10.244.1.0 scope global flannel.1

       valid_lft forever preferred_lft forever

    inet6 fe80::6c99:9dff:fe7b:8ec/64 scope link

       valid_lft forever preferred_lft forever

6: cni0: <BROADCAST,MULTICAST,UP,LOWER_UP> mtu 1450 qdisc noqueue state UP group default qlen 1000

    link/ether 4a:fe:72:33:fc:85 brd ff:ff:ff:ff:ff:ff

    inet 10.244.1.1/24 brd 10.244.1.255 scope global cni0

       valid_lft forever preferred_lft forever

    inet6 fe80::48fe:72ff:fe33:fc85/64 scope link

       valid_lft forever preferred_lft forever

7: veth7981bae1@if3: <BROADCAST,MULTICAST,UP,LOWER_UP> mtu 1450 qdisc noqueue master cni0 state UP group default

    link/ether 1a:87:b6:82:c7:5c brd ff:ff:ff:ff:ff:ff link-netnsid 0

    inet6 fe80::1887:b6ff:fe82:c75c/64 scope link

       valid_lft forever preferred_lft forever

8: veth54bbbfd5@if3: <BROADCAST,MULTICAST,UP,LOWER_UP> mtu 1450 qdisc noqueue master cni0 state UP group default

    link/ether 46:36:5d:96:a0:69 brd ff:ff:ff:ff:ff:ff link-netnsid 1

    inet6 fe80::4436:5dff:fe96:a069/64 scope link

       valid_lft forever preferred_lft forever
此时再在vm1上查看节点状态,可以看到有2个就绪的节点
[root@vm1 vagrant]# kubectl get nodes

NAME   STATUS   ROLES                  AGE     VERSION

vm1    Ready    control-plane,master   5h58m   v1.20.0

vm2    Ready    <none>                 5h54m   v1.20.0
部署一个服务
现在我们有了一个简单的k8s环境,来部署一个简单的nginx服务测试一下吧,首先准备一个nginx-deployment.yaml文件,内容如下
apiVersion: apps/v1

kind: Deployment

metadata:

  name: nginx-deployment

  labels:

    app: nginx

spec:

  replicas: 2

  selector:

    matchLabels:

      app: nginx

  template:

    metadata:

      labels:

        app: nginx

    spec:

      containers:

      - name: nginx

        image: nginx:latest

        ports:

        - containerPort: 80
执行kubectl apply进行部署
[root@vm1 vagrant]# kubectl apply -f nginx-deployment.yaml

deployment.apps/nginx-deployment created
可以查看一下Pod有没有起来
[root@vm1 vagrant]# kubectl get pods

NAME                               READY   STATUS    RESTARTS   AGE

nginx-deployment-585449566-bqls4   1/1     Running   0          20s

nginx-deployment-585449566-n8ssk   1/1     Running   0          20s
再执行kubectl expose添加一个service导出
[root@vm1 vagrant]# kubectl expose deployment nginx-deployment --port=80 --type=NodePort

service/nginx-deployment exposed
kubectl get svc查看一下映射的端口
[root@vm1 vagrant]# kubectl get svc

NAME               TYPE        CLUSTER-IP      EXTERNAL-IP   PORT(S)        AGE

kubernetes         ClusterIP   10.96.0.1       <none>        443/TCP        4m19s

nginx-deployment   NodePort    10.98.176.208   <none>        80:32033/TCP   8s
指定导出的端口用curl进行测试
[root@vm1 vagrant]# curl -I 192.168.205.11:32033

HTTP/1.1 200 OK

Server: nginx/1.19.6

Date: Mon, 21 Dec 2020 07:09:40 GMT

Content-Type: text/html

Content-Length: 612

Last-Modified: Tue, 15 Dec 2020 13:59:38 GMT

Connection: keep-alive

ETag: "5fd8c14a-264"

Accept-Ranges: bytes
参考
- https://github.com/rootsongjc/kubernetes-vagrant-centos-cluster/blob/master/README-cn.md
- https://my.oschina.net/xuthus/blog/3131077
- https://my.oschina.net/u/3683692/blog/3025611
- https://cloud.tencent.com/developer/article/1460094
- https://www.kubernetes.org.cn/5551.html
- https://cloud.tencent.com/developer/article/1432433
从零搭建K8S测试集群的更多相关文章
- 从零搭建mongo分片集群的简洁方法
一.目录 1.mongo路径,config数据路径,shard数据路径
- CentOS完美搭建Redis3.0集群并附测试
线上的统一聊天和推送项目使用的是redis主从,redis版本2.8.6 redis主从和mysql主从目的差不多,但redis主从配置很简单,主要在从节点配置文件指定主节点ip和端口:slaveof ...
- redis安装、测试&集群的搭建&踩过的坑
1 redis的安装 1.1 安装redis 版本说明 本教程使用redis3.0版本.3.0版本主要增加了redis集群功能. 安装的前提条件: 需要安装gcc:yum install gcc- ...
- centos7搭建ELK Cluster集群日志分析平台(四):Fliebeat-简单测试
续之前安装好的ELK集群 各主机:es-1 ~ es-3 :192.168.1.21/22/23 logstash: 192.168.1.24 kibana: 192.168.1.25 测试机:cli ...
- .net core i上 K8S(一)集群搭建
1.前言 以前搭建集群都是使用nginx反向代理,但现在我们有了更好的选择——K8S.我不打算一上来就讲K8S的知识点,因为知识点还是比较多,我打算先从搭建K8S集群讲起,我也是在搭建集群的过程中熟悉 ...
- 简单了解一下K8S,并搭建自己的集群
距离上次更新已经有一个月了,主要是最近工作上的变动有点频繁,现在才暂时稳定下来.这篇博客的本意是带大家从零开始搭建K8S集群的.但是我后面一想,如果是我看了这篇文章,会收获什么?就是跟着步骤一步一走吗 ...
- 使用国内的镜像源搭建 kubernetes(k8s)集群
1. 概述 老话说的好:努力学习,提高自己,让自己知道的比别人多,了解的别人多. 言归正传,之前我们聊了 Docker,随着业务的不断扩大,Docker 容器不断增多,物理机也不断增多,此时我们会发现 ...
- 使用Rancher搭建K8S测试环境
使用Rancher搭建K8S测试环境 http://blog.csdn.net/csdn_duomaomao/article/details/75316926 环境准备(4台主机,Ubuntu16.0 ...
- ZooKeeper环境搭建(单机/集群)(转)
前提: 配置文件主要是在$ZOOKEEPER_HOME/conf/zoo.cfg,刚解压时为zoo_sample.cfg,重命名zoo.cfg即可. 配置文件常用项参考:http://www.cnbl ...
随机推荐
- 合并2个数组为1个无重复元素的有序数组--Go对比Python
Go实现: 1 package main 2 3 import ( 4 "fmt" 5 "sort" 6 ) 7 8 func main() { 9 var a ...
- 使用javaxmail发送文字邮件
package com.rupeng.javaMail; import java.util.Properties; import javax.mail.Authenticator;import jav ...
- Jinja2语法自动补全配置
Jinja2语法自动补全配置 说明 在使用Pycharm社区版进行Web开发时,Jiaja2的语法是不会自动提示补全的,为了提高开发效率,需要根据个人习惯进行一些常用语法的自动补全配置,具体如下. 配 ...
- Java基础教程——Set
Set·无序,不重复 HashSet 特点:没有重复数据,数据不按存入的顺序输出. HashSet由Hash表结构支持.不支持set的迭代顺序,不保证顺序. 但是Hash表结构查询速度很快. 创建集合 ...
- 【Golang】基础-操作 csv 文件
1. csv plugins,自带极简 1.1 写数据到csv文件 知识点:encoding/csv 库的 Write 方法使用[]string的切片格式追加方式写入数据 1.1.1 追加写入 pac ...
- 我与PHP,ULM和Vue.js不得不说的故事(一个放荡不羁与一个神神秘秘一个似曾相识,从入门到放弃记录第二章)
·关于UML(git) 究竟是命运在茫茫语言之中遇到了你,还是我的魅力让你向我奔涌而来.好吧都不是,我俩就像古代包办婚姻,被专业牢牢的绑在一起了,既然都是一条绳上的蚂蚱.我我们应该能体谅彼此的不容易, ...
- 第一次个人编程作业:我的分数我做主 - 软件工程与 UML
博客班级 https://edu.cnblogs.com/campus/fzzcxy/2018SE1 作业要求 https://edu.cnblogs.com/campus/fzzcxy/2018SE ...
- websocket简单实现五子棋即时对战功能
几年前做的一个小demo,代码比较老,先上下html显示效果图 因为代码中注释比较详细,所以就直接上代码了 html代码,也就是上图展示的效果页面 <!DOCTYPE html> < ...
- 解决右键notepad++打开时提示, ShellExecute failed (2): Is this command correct?
错误如下图: 解决方法: 右键notepad++.exe; 去掉管理员方式
- 学习PKI技术【理论+实战】
1.预备知识 PKI(Public Key Infrastructure)定义 PKI:利用公钥理论和技术建立的提供网络信息安全服务的基础设施.为用户提供所需的密钥和证书管理,用户可以利用PKI平台提 ...