Qiskit 安装指南
内容参考官方文档 https://qiskit.org/documentation/install.html
conda create -n name_of_my_env python=3
创建虚拟环境,如果后面要下载qiskit[visualization],这里的python要安装3.6版本,不然后面安装pywinpty时,会有冲突,目前3.7和3.8版本都有问题。
conda activate name_of_my_env
激活虚拟环境,然后在虚拟环境里安包
pip install qiskit
这里可以直接安装,目前的qiskit已经到了0.16版本,目前有人安装的时候numpy的版本可能不匹配,需要安装对应版本。
pip install qiskit[visualization]
如果希望能够把线路图画出来,那么需要安装visualization,安装python3.6版本就不会有冲突。
至此,Qiskit的安装成功,如果要检验的话,这里有一段最为简单的代码,使用的是IBM的量子模拟器,如果你安装成功,将能直接运行得到答案。
import numpy as np

from qiskit import(

  QuantumCircuit,

  execute,

  Aer)

from qiskit.visualization import plot_histogram

# Use Aer's qasm_simulator

simulator = Aer.get_backend('qasm_simulator')

# Create a Quantum Circuit acting on the q register

circuit = QuantumCircuit(2, 2)

# Add a H gate on qubit 0

circuit.h(0)

# Add a CX (CNOT) gate on control qubit 0 and target qubit 1

circuit.cx(0, 1)

# Map the quantum measurement to the classical bits

circuit.measure([0,1], [0,1])

# Execute the circuit on the qasm simulator

job = execute(circuit, simulator, shots=1000)

# Grab results from the job

result = job.result()

# Returns counts

counts = result.get_counts(circuit)

print("\nTotal count for 00 and 11 are:",counts)

# Draw the circuit

circuit.draw()
关于python的小伙伴,有一个常用的网页交互的小伙伴,Jupyter notebook。
关于安装,因为我直接采用的就是anaconda,所以直接就安装好了,不过现在直接使用jupyter notebook有一个问题,那就是,不能找到我们先前创造的conda环境,这里就需要进一步的配置。
conda install ipykernel
在base的环境里安装ipykernel,问y/n的那就都y了
python -m ipykernel install --user --name 环境名称 --display-name "在jupyter中显示的环境名称"
前一个环境名称是刚刚conda创建的虚拟环境的名字,后一个是jupyter中显示的名字,可以和前面的不一样。
这个时候再打开jupyter notebook : jupyter notebook,在new的地方就能看见新的环境了。
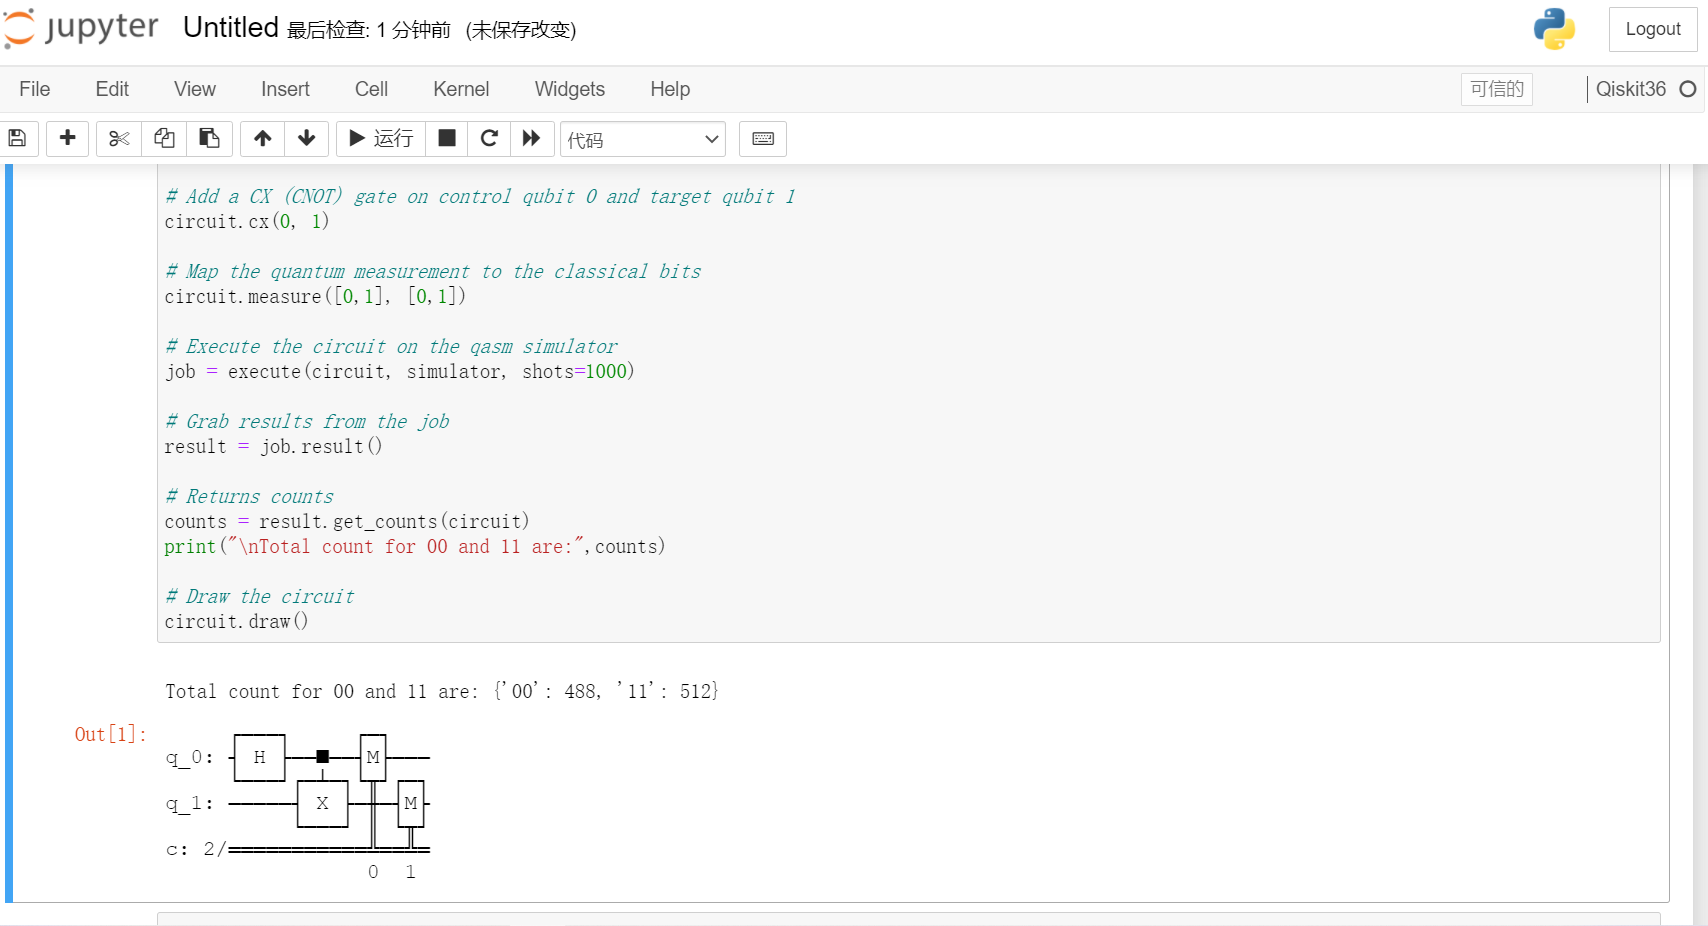
执行一下先前的代码,得到结果:
目前我们使用的是simulator,但是我们选择IBM一定是眼馋他的量子计算机,而不仅仅是个模拟,所以我们的下一步,就是想要来连上我们的真机器。
创建一个IBM的账号 https://quantum-computing.ibm.com/login
在My Account的地方复制自己的API token
运行以下语句:把引号中的字符串替换成自己的token
from qiskit import IBMQ

IBMQ.save_account('MY_API_TOKEN')
运行以下语句:
IBMQ.load_account() # Load account from disk 前面我们已经把账号存好了,现在直接加载下来就好。

IBMQ.providers()    # List all available providers
不过这里可能出现一下问题
SSLEOFError: EOF occurred in violation of protocol (_ssl.c:852)
我搜到的解决方法有:
pip install ndg-httpsclient

pip install pyopenssl

pip install pyasn1
但是这样也可能解决不了问题,因为ssl的问题还有可能是开了代理(比如你的fq),当你关了代理的时候,SSLEOFError的问题就解决了。
这个时候你再查一查有哪些机器是可以给你用的,得到结果:
[<AccountProvider for IBMQ(hub='ibm-q', group='open', project='main')>]
这个时候,我们已经愉快地和真的机器有了联系。
我们重跑上面的代码,但是这次我们选择真的机器来跑,IBM有不止一个的机器还有自己的名字:ibmq_qasm_simulator,ibmq_16_melbourne,ibmq_ourense,ibmqx2,ibmq_vigo等等
import numpy as np

from qiskit import(

  QuantumCircuit,

  execute,

  Aer)

from qiskit.visualization import plot_histogram

from qiskit import IBMQ

provider = IBMQ.load_account()

backend = provider.get_backend('ibmq_16_melbourne')

# Create a Quantum Circuit acting on the q register

circuit = QuantumCircuit(2, 2)

# Add a H gate on qubit 0

circuit.h(0)

# Add a CX (CNOT) gate on control qubit 0 and target qubit 1

circuit.cx(0, 1)

# Map the quantum measurement to the classical bits

circuit.measure([0,1], [0,1])

# Execute the circuit on the qasm simulator

job = execute(circuit, backend, shots=1000)

# Grab results from the job

result = job.result()

# Returns counts

counts = result.get_counts(circuit)

print("\nTotal count for 00 and 11 are:",counts)

# Draw the circuit

circuit.draw()
在真的机器上跑要等一会,排个队,等前面的人跑完了再轮到你,让我们来看看这个期待的结果:
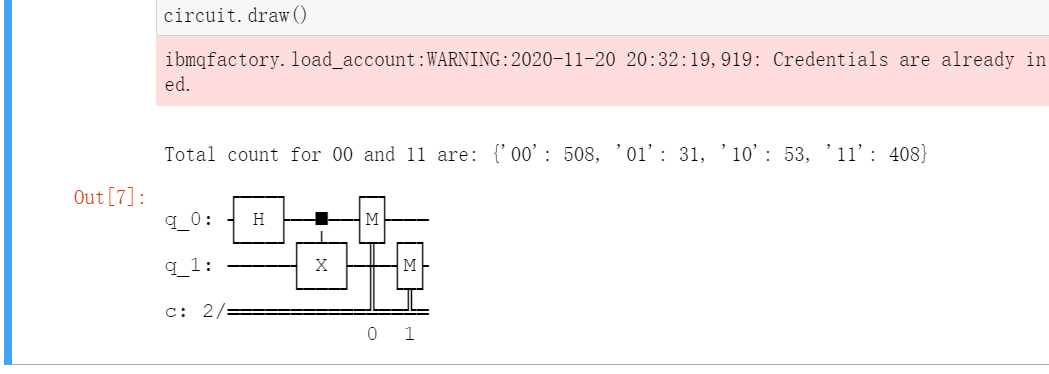
因为有噪声的存在,所以原本不该出现的01,10也会产生,这也是真机和模拟器的区别。
Qiskit 安装指南的更多相关文章
- nGrinder安装指南
NGrinder 由两个模块组成,其运行环境为 Oracle JDK 1.6 nGrinder controller web 应用程序,部署在Tomcat 6.x 或更高的版本 nGrinder A ...
- postgresql pgsql最新版安装指南及数据存储路径更改及主从配置
postgresql pgsql最新版安装指南及数据存储路径更改及主从配置 安装指南 首先在apt的list添加你当前系统版本对应的apt列表 目前官网有16.04,14.04,12.04 分别对应下 ...
- 全新 Mac 安装指南(编程篇)(环境变量、Shell 终端、SSH 远程连接)
注:本文专门用于指导对计算机编程与设计(尤其是互联网产品开发与设计)感兴趣的 Mac 新用户,如何在 Mac OS X 系统上配置开发与上网环境,另有<全新 Mac 安装指南(通用篇)>作 ...
- 全新 Mac 安装指南(通用篇)(推荐设置、软件安装、推荐软件)
注:本文将会不定期维护与更新,有需要的朋友请在 Github 上订阅该条 Issues:<全新 Mac 安装指南(通用篇)>. 在 Mac 电脑上只用 Windows 操作系统的同学请看到 ...
- ArchLinux安装指南
将ArchLinux作为进阶Linux发行版,主要看重滚动更新和深入理解Linux的安装过程. 由于是新手,所以先选择在公司电脑上用VMware来安装.然后渐进到借助U盘在win10笔记本上安装双系统 ...
- Linux环境中Openfire安装指南
Linux环境中Openfire安装指南 安装环境: 安装软件:Openfire 4_1_0 http://download.igniterealtime.org/openfire/openfire_ ...
- scrapy3_ 安装指南
安装指南 安装Scrapy 注解 请先阅读 平台安装指南. 下列的安装步骤假定您已经安装好下列程序: Python 2.7 Python Package: pip and setuptools. 现在 ...
- storm 原理简介及单机版安装指南——详细版【转】
storm 原理简介及单机版安装指南 本文翻译自: https://github.com/nathanmarz/storm/wiki/Tutorial 原文链接自:http://www.open-op ...
- mac osx 系统 brew install hadoop 安装指南
mac osx 系统 brew install hadoop 安装指南 brew install hadoop 配置 core-site.xml:配置hdfs文件地址(记得chmod 对应文件夹 ...
随机推荐
- centos8上添加sudoer用户
一,检查服务器是否已安装sudo的rpm包? 1,查询rpm包列表 [root@yjweb ~]# rpm -qa | grep sudo libsss_sudo-2.0.0-43.el8_0.3.x ...
- Go语言中Goroutine与线程的区别
1.什么是Goroutine? Goroutine是建立在线程之上的轻量级的抽象.它允许我们以非常低的代价在同一个地址空间中并行地执行多个函数或者方法.相比于线程,它的创建和销毁的代价要小很多,并且它 ...
- XSS攻击 js 脚本注入
原文地址:http://www.cnblogs.com/robot/archive/2009/04/15/1436107.html 1.不要相信Request.QueryString: 相信在asp时 ...
- C# URL编码
#region URL编码 /// <summary> /// URL编码 /// </summary> /// <param name="str"& ...
- 设备屏幕与Size Class对应
- OpenCV(c++)-1 安装和配置OpenCV4.4(Windows+visual studio 2019)
@ 目录 安装OpenCV4 在Windows系统安装OpenCV4 配置visual studio 2019 配置包含路径 验证配置结果 安装OpenCV4 OpenCV是一个基于BSD许可(开源) ...
- R语言学习网站(分享)
1. https://www.r-bloggers.com/ 2. https://www.kaggle.com/datasets 3. RStudio download: https://www.r ...
- Apache POI 合并单元格--简单解释版带Demo
合并单元格所使用的方法: sheet.addMergedRegion( CellRangeAddress cellRangeAddress ); CellRangeAddress 对象的构造 ...
- Github优质库分享-01算法小抄 基于LeetCode
Github 优质库分享-01 算法小抄 该库总共 60 多篇原创文章,都是基于 LeetCode 的题目,涵盖了所有题型和技巧,而且一定要做到举一反三,通俗易懂,绝不是简单的代码堆砌. 目前 sta ...
- 04 . Go+Vue开发一个线上外卖应用(用户名密码和图形验证码)
图形化验证码生成和验证 功能介绍 在使用用户名和密码登录功能时,需要填写验证码,验证码是以图形化的方式进行获取和展示的. 验证码使用原理 验证码的使用流程和原理为:在服务器端负责生成图形化验证码,并以 ...