
【CSS】Sticky Footer 布局
什么是 Sticky Footer 布局?
Sticky Footer 布局是一种将 footer 吸附在底部的CSS布局。
footer 可以是任意的元素,该布局会形成一种当内容不足,footer 会定位在视口的最低部,当内容充足,footer 会紧跟在内容后面的效果。
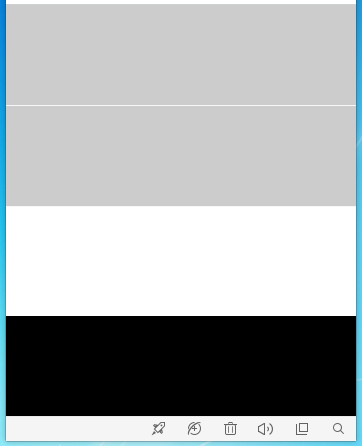
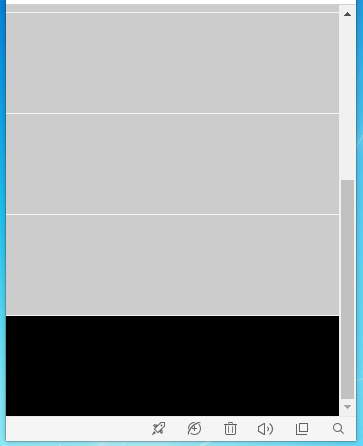
position实现 效果1
<!DOCTYPE html>

<html>

<head>

    <meta charset="UTF-8">

    <title>Sticky Footer 布局</title>

    <style>

        * {

            margin: 0;

            padding: 0;

        }

        html, body {

            height: 100%;

        }

        .wrapper {

            position: relative;

            /*border-box: 为元素指定的任何 padding 和 border 都将在已设定的宽度和高度内进行绘制

            这里的作用是浏览器视口被当成了 border ,如果不设置该属性则无法将 footer 置于浏览器视口的底部*/

            box-sizing: border-box;

            /*这里的作用是将 .wrapper 的高度撑满整个浏览器的视口,当内容不足的时候,也能保证 .wrapper 的高度是浏览器视口的高度*/

            min-height: 100%;

            /*这里的作用是为 .footer 预留空间,防止 .wrapper 的内容被 .footer 遮盖到,值是 .footer 的高度*/

            padding-bottom: 100px;

        }

        .content ul {

            list-style: none;

        }

        .content ul li {

            height: 100px;

            background-color: #ccc;

            border-bottom: 1px solid #f6f6f6;

        }

        .footer {

            position: absolute;

            bottom: 0;

            width: 100%;

            height: 100px;

            background-color: #000;

        }

    </style>

</head>

<body>

    <div class="wrapper">

        <div class="content">

            <ul>

                <li></li>

            </ul>

        </div>

        <div class="footer"></div>

    </div>

</body>

</html>
position实现 效果2
<!DOCTYPE html>

<html>

<head>

    <meta charset="UTF-8">

    <title>Sticky Footer 布局</title>

    <style>

        * {

            margin: 0;

            padding: 0;

        }

        html, body {

            height: 100%;

        }

        .wrapper {

            /*border-box: 为元素指定的任何 padding 和 border 都将在已设定的宽度和高度内进行绘制

            这里的作用是浏览器视口被当成了 border ,如果不设置该属性则无法将 footer 置于浏览器视口的底部*/

            box-sizing: border-box;

            /*这里的作用是将 .wrapper 的高度撑满整个浏览器的视口,当内容不足的时候,也能保证 .wrapper 的高度是浏览器视口的高度*/

            min-height: 100%;

            /*这里的作用是为 .footer 预留空间,防止 .wrapper 的内容被 .footer 遮盖到,值是 .footer 的高度*/

            padding-bottom: 100px;

        }

        .content ul {

            list-style: none;

        }

        .content ul li {

            height: 100px;

            background-color: #ccc;

            border-bottom: 1px solid #f6f6f6;

        }

        .footer {

            position: fixed;

            bottom: 0;

            width: 100%;

            height: 100px;

            background-color: #000;

        }

    </style>

</head>

<body>

    <div class="wrapper">

        <div class="content">

            <ul>

                <li></li>

            </ul>

        </div>

        <div class="footer"></div>

    </div>

</body>

</html>
flex实现 效果1
<!DOCTYPE html>

<html>

<head>

    <meta charset="UTF-8">

    <title>Sticky Footer 布局</title>

    <style>

        * {

            margin: 0;

            padding: 0;

        }

        html, body {

            height: 100%;

        }

        .wrapper {

            /*使用 flex 布局 子元素列排布*/

            display: flex;

            flex-direction: column;

            /*这里的作用是将 .wrapper 的高度撑满整个浏览器的视口,当内容不足的时候,也能保证 .wrapper 的高度是浏览器视口的高度*/

            min-height: 100%;

        }

        .content {

            /*因为父元素使用了 flex 布局,这里设置使 .content 的高度是 .wrapper 的高度减去 .footer 的高度*/

            flex: 1;

        }

        .content ul {

            list-style: none;

        }

        .content ul li {

            height: 100px;

            background-color: #ccc;

            border-bottom: 1px solid #f6f6f6;

        }

        .footer {

            height: 100px;

            background-color: #000;

        }

    </style>

</head>

<body>

    <div class="wrapper">

        <div class="content">

            <ul>

                <li></li>

            </ul>

        </div>

        <div class="footer"></div>

    </div>

</body>

</html>
flex实现 效果2
<!DOCTYPE html>

<html>

<head>

    <meta charset="UTF-8">

    <title>Sticky Footer 布局</title>

    <style>

        * {

            margin: 0;

            padding: 0;

        }

        html, body {

            height: 100%;

        }

        .wrapper {

            /*使用 flex 布局 子元素列排布*/

            display: flex;

            flex-direction: column;

            /*这里的作用是将 .wrapper 的高度撑满整个浏览器的视口,当内容不足的时候,也能保证 .wrapper 的高度是浏览器视口的高度*/

            min-height: 100%;

        }

        .content {

            /*因为父元素使用了 flex 布局,这里设置使 .content 的高度是 .wrapper 的高度减去 .footer 的高度*/

            flex: 1;

        }

        .content ul {

            list-style: none;

        }

        .content ul li {

            height: 100px;

            background-color: #ccc;

            border-bottom: 1px solid #f6f6f6;

        }

        .footer {

            position: fixed;

            bottom: 0;

            width: 100%;

            height: 100px;

            background-color: #000;

        }

    </style>

</head>

<body>

    <div class="wrapper">

        <div class="content">

            <ul>

                <li></li>

            </ul>

        </div>

        <div class="footer"></div>

    </div>

</body>

</html>
calc实现 效果1
<!DOCTYPE html>

<html>

<head>

    <meta charset="UTF-8">

    <title>Sticky Footer 布局</title>

    <style>

        * {

            margin: 0;

            padding: 0;

        }

        html, body {

            height: 100%;

        }

        .wrapper {

            /*使用 calc 需要显示的设置 height ,如果使用 min-height 则会是跟随的效果*/

            min-height: 100%;

        }

        .content {

            /*min-height 是CSS的计算函数*/

            min-height: calc(100% - 100px);

        }

        .content ul {

            list-style: none;

        }

        .content ul li {

            height: 100px;

            background-color: #ccc;

            border-bottom: 1px solid #f6f6f6;

        }

        .footer {

            height: 100px;

            background-color: #000;

        }

    </style>

</head>

<body>

    <div class="wrapper">

        <div class="content">

            <ul>

                <li></li>

            </ul>

        </div>

        <div class="footer"></div>

    </div>

</body>

</html>
calc实现 效果2
<!DOCTYPE html>

<html>

<head>

    <meta charset="UTF-8">

    <title>Sticky Footer 布局</title>

    <style>

        * {

            margin: 0;

            padding: 0;

        }

        html, body {

            height: 100%;

        }

        .wrapper {

            height: 100%;

        }

        .content {

            /*min-height 是CSS的计算函数*/

            min-height: calc(100% - 100px);

        }

        .content ul {

            list-style: none;

        }

        .content ul li {

            height: 100px;

            background-color: #ccc;

            border-bottom: 1px solid #f6f6f6;

        }

        .footer {

            position: fixed;

            bottom: 0;

            width: 100%;

            height: 100px;

            background-color: #000;

        }

    </style>

</head>

<body>

    <div class="wrapper">

        <div class="content">

            <ul>

                <li></li>

            </ul>

        </div>

        <div class="footer"></div>

    </div>

</body>

</html>
【CSS】Sticky Footer 布局的更多相关文章
- css sticky footer 布局 手机端
什么是css sticky footer 布局? 通常在手机端写页面 会遇到如下情况 页面长度很短不足以撑起一屏,此时希望页脚在页面的底部 而当页面超过一屏时候,页脚会在文章的底部 ,网上有许多办法, ...
- css sticky footer 布局
方法一:footer 上用负的 margin-top 在内容外面需要额外包一层元素(wrap)来让它产生对应的 padding-bottom.是为了防止负 margin 导致 footer 覆盖任何实 ...
- css sticky footer布局
Sticky footers设计是最古老和最常见的效果之一,大多数人都曾经经历过.它可以概括如下:如果页面内容不够长的时候,页脚块粘贴在视窗底部:如果内容足够长时,页脚块会被内容向下推送.套路为:内容 ...
- 【css技能提升】完美的 Sticky Footer 布局
在总结之前所做的项目时,遇到过下面这种情况. 在主体内容不足够多或者未完全加载出来之前,就会导致出现左边的这种情况,原因是因为没有足够的垂直空间使得页脚推到浏览器窗口最底部.但是,我们期望的效果是页脚 ...
- CSS Sticky Footer
----CSS Sticky Footer 当正文内容很少时,底部位于窗口最下面.当改变窗口高度时,不会出现重叠问题. ----另一个解决方法是使用:flexBox布局 http://www.w3c ...
- 两种最常用的Sticky footer布局方式
Sticky footer布局是什么? 我们所见到的大部分网站页面,都会把一个页面分为头部区块.内容区块和页脚区块,当头部区块和内容区块内容较少时,页脚能固定在屏幕的底部,而非随着文档流排布.当页面内 ...
- 前端经典布局:Sticky footer 布局
什么是Sticky footer布局?前端开发中大部分网站,都会把一个页面分为头部区块.内容区块.页脚区块,这也是比较.往往底部都要求能固定在屏幕的底部,而非随着文档流排布.要实现的样式可以概括如下: ...
- CSS Sticky Footer: 完美的CSS绝对底部
CSS的简单在于它易学,CSS的困难在于寻找更好的解决方案.在CSS的世界里,似乎没有完美这种说法.所以,现在介绍的CSS绝对底部,只是目前个人见过的方案中比较完美的吧. 先说我们为什么会使用到这个C ...
- sticky footer布局,定位底部footer
其作用就是当内容区域比较少时,让footer也能正常定位到底部,以前我们使用js来达到这种效果,其实用css也是完全可以的 <!DOCTYPE html> <html lang=&q ...
随机推荐
- JavaScript 正则表达式学习笔记
定义规则让计算机去处理字符串正则表达式写法: //第一种 var reg = new RegExp('ab'); //第二种 var reg = /ab/; 量词:{} [a-z] 从小写a-z [A ...
- Tomcat修改service.xml性能调优 增加最大并发连接数
详细配置: <Connector executor="tomcatThreadPool" port="80" protocol ...
- Delphi 7启动后提示Unable to rename delphi32.dro的解决办法
在Win10 64 上安装完Delphi 7,每次打开报错: Unable to rename 'C:\Program Files (x86)\Borland\Delphi7\Bin\delphi32 ...
- (简单)华为M3青春 CPN-AL10的Usb调试模式在哪里打开的步骤
每次我们使用PC通过数据线连接到安卓手机的时候,如果手机没有开启usb开发者调试模式,PC则没能成功检测到我们的手机,有时候我们使用的一些功能比较强的的应用软件比如以前我们使用的一个应用软件引号精灵, ...
- ELK日志监控平台安装部署简介--Elasticsearch安装部署
最近由于工作需要,需要搭建一个ELK日志监控平台,本次采用Filebeat(采集数据)+Elasticsearch(建立索引)+Kibana(展示)架构,实现日志搜索展示功能. 一.安装环境描述: 1 ...
- bootstrap的使用集锦
在使用div样式的时候可以根据页面布局来调整大小 <div class="col-md-8 col-md-offset-3"># col-md-8 div所占的空间大小 ...
- 6.3 基于二分搜索树、链表的实现的集合Set复杂度分析
两种集合类的复杂度分析 在[6.1]节与[6.2]节中分别以二分搜索树和链表作为底层实现了集合Set,在本节就两种集合类的复杂度分析进行分析:测试内容:6.1节与6.2节中使用的书籍.测试方法:测试两 ...
- Python多线程thread、threading(一)
Python多线程(一) Python多线程,类似于同时执行多个不同程序,多线程运行的有点: 1.使用线程可以把占据长时间的程序中的任务放到后台去处理 2.用户界面可以更加吸引人,这样比如用户点击了一 ...
- Canvas 实现绘制图表
这里用canvas实现了两个简单的图表,用到了canvas的基本用法,效果如下 新建 chart.js 文件,封装绘制方法 构造方法 function myChart(config){ this.wi ...
- java高并发实战(二)——线程(并行程序)基础
转自:https://blog.csdn.net/gududedabai/article/details/80815666