cartographer安装--Ubuntu14.04--indigo
0.安装所有依赖项
sudo apt-get install -y google-mock libboost-all-dev libeigen3-dev libgflags-dev libgoogle-glog-dev liblua5.2-dev libprotobuf-dev libsuitesparse-dev libwebp-dev ninja-build protobuf-compiler python-sphinx ros-indigo-tf2-eigen libatlas-base-dev libsuitesparse-dev liblapack-dev
1.首先安装ceres solver,选择的版本是1.11,路径随意
1. git clone https://github.com/hitcm/ceres-solver-1.11.0.git
2. cd ceres-solver-1.11.0/build
3. cmake ..
4 . make
5. sudo make install
2.然后安装 cartographer,路径随意
1. git clone https://github.com/hitcm/cartographer.git
2 . cd cartographer/build
3. cmake ..
4 . make
5. sudo make install
3.安装cartographer_ros。
mkdir ~/catkin_ws/src
cd ~/catkin_ws/src
git clone https://github.com/hitcm/cartographer_ros.git
然后到catkin_ws下面运行catkin_make即可:
cd ..
catkin_make
(=。=,如果编译过程出错internal compiler error: Killed,请看此链接https://blog.csdn.net/qq_29573053/article/details/69665996)
4.数据下载测试
2d数据,大概500M,用迅雷下载
https://storage.googleapis.com/cartographer-public-data/bags/backpack_2d/cartographer_paper_deutsches_museum.bag
3d数据,8G左右,同样用迅雷下载
https://storage.googleapis.com/cartographer-public-data/bags/backpack_3d/cartographer_3d_deutsches_museum.bag
有同学反映上面链接失效了,请用下面的即可。
https://storage.googleapis.com/cartographer-public-data/bags/backpack_3d/b3-2016-04-05-14-14-00.bag
然后运行launch文件即可。
roslaunch cartographer_ros demo_backpack_2d.launch bag_filename:=${HOME}/Downloads/cartographer_paper_deutsches_museum.bag
roslaunch cartographer_ros demo_backpack_3d.launch bag_filename:=${HOME}/Downloads/cartographer_3d_deutsches_museum.bag
刚开始使用ROS的同学运行下面两句是无法工作的,可能出现的错误如下。
[demo_backpack_2d.launch] is neither a launch file in package [cartographer_ros] nor is [cartographer_ros] a launch file name
The traceback for the exception was written to the log file
这种错误的主要原因是ros的catkin_ws配置问题,可以运行rospack profile试试。
实在不行还有如下所示的两种解决方法。推荐第二种。
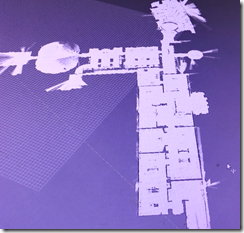
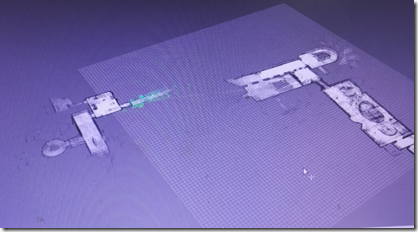
最终结果如下图,左侧为2d,右侧为3d。
Good luck!关于代码的原理解析,接下来的文章可能会详细探讨。
cartographer安装--Ubuntu14.04--indigo的更多相关文章
- Ubuntu14.04(indigo)实现RGBDSLAMv2(数据集和实时Kinect)
Ubuntu14.04(indigo)实现RGBDSLAMv2(数据集和实时Kinect v2) 一.在.bag数据集上跑RGBDSLAMv2 RGBDSLAMv2指的是Felix Endres大神在 ...
- win8.1硬盘安装ubuntu14.04双系统
在网上找了很多方法都失败了,原因是大多数方法都是用mbr方式安装的,如grub4dos,easybcd.以至于连自己都怀疑win8能不能用硬盘安装,差点就去买个u盘来安装了,就在打算放弃的时候在ubu ...
- windows7下硬盘安装ubuntu14.04
windows7 ubuntu1404双系统 准备软件 安装步骤 step 1 step 2 step 3 step 4 windows7 + ubuntu14.04双系统 准备软件 1)grub4d ...
- Win7下通过easyBCD引导安装Ubuntu14.04
Ubuntu14.04作为目前最新版本的ubuntu系统,相信很多人都想在自己的电脑上安装一下,然而系统的安装方法各式各样,u盘法.grub引导法等等,这里我将介绍在win7系统下用easyBCD软件 ...
- VirtualBox安装ubuntu14.04和文件共享
因为机器的VMware使用很卡,占用更多的内存,所以我想,以取代VirtualBox.已安装ubuntu14.04使用与VMware在相同的. VirtualBox下载链接:https://www.v ...
- Windows8.1硬盘安装Ubuntu14.04双系统参考教程和多硬盘的注意事项[画画]
硬盘安装.无需光盘.U盘:Win8.1为主,Ubuntu14.04为辅,可将Windows或Ubuntu设置为开机默认启动项.在Ubuntu下可查看.操作Windows系统下的文件:适用于安装和14. ...
- 虚拟机安装Ubuntu14.04打开FireFox提示Server not found
虚拟机安装Ubuntu14.04打开FireFox提示Server not found 我采用VMware安装ubuntu14.04的,VMware的网络是配置采用NAT模式(用于共享主机的IP地址) ...
- Linux,在不使用U盘的情况下使用wubi.exe程序在Win7上安装ubuntu-14.04.3版系统
本文介绍如何在不使用U盘的情况下使用wubi.exe程序在Win7上安装ubuntu-14.04.3版系统. 花了一天的时间终于安装上了Ubuntu14.04,过程坎坷,是血泪史,开始报“cannot ...
- VirtualBox安装Ubuntu14.04
创建虚拟机 点击 新建(N) 设置虚拟机的名称,类型与版本,如下图所示: 分配虚拟机的内存大小,受PC实际内存影响,暂时设置为2G,如下图所示: 分配虚拟机的硬盘大小,默认即可,如下图所示: 分配虚拟 ...
- Windows 8.1 硬盘安装 Ubuntu14.04 双系统参考教程及注意事项
硬盘安装,无需光盘.U盘:Win8.1为主,Ubuntu14.04为辅,可将Windows或Ubuntu设置为开机默认启动项:在Ubuntu下可查看.操作Windows系统下的文件:适用于安装和14. ...
随机推荐
- JAVA 实现XML与JSON 相互转换
原文地址https://blog.csdn.net/congcong68/article/details/39029907 在工作中,经常碰到XML转为JSON或者JSON转为XML,在这过程中有时嵌 ...
- python处理图片验证码
WebDriver中实现对特定的Web区域截图方法 import pytesseract from PIL import Image image=Image.open('new.jpg') vcode ...
- ajax课1 源码
<!DOCTYPE html PUBLIC "-//W3C//DTD HTML 4.01 Transitional//EN" "http://www.w3.org/ ...
- discuz formhash
class.core.php中 $this->var['formhash'] = formhash();define('FORMHASH', $this->var['formhash']) ...
- memcache图形管理工具
http://www.junopen.com/memadmin/其中有使用截图和介绍 https://github.com/junstor/memadmin 下载地址
- AVPlayerLayer
AVPlayerLayer 最后一个图层类型是AVPlayerLayer.尽管它不是Core Animation框架的一部分(AV前缀看上去像),AVPlayerLayer是有别的框架(AVFound ...
- Python:re.sub()实现字符串替换
re.sub的功能 re是regular expression的缩写,表示正则表达式:sub是substitude的缩写,表示替换 re.sub是正则表达式的函数,实现比普通字符串更强大的替换功能 s ...
- Python2 和Python3 的差异总结
一.基本语法差异 1.1 核心类差异 Python3对Unicode字符的原生支持 Python2中使用 ASCII 码作为默认编码方式导致string有两种类型str和unicode,Python3 ...
- 数据仓库基础(四)ODS、元数据
本文转载自:http://www.cnblogs.com/evencao/archive/2013/06/14/3135691.html ODS的概念:是一个面向主题的.集成的.可变的.反应当前细节的 ...
- 论文笔记之《Event Extraction via Dynamic Multi-Pooling Convolutional Neural Network》
1. 文章内容概述 本人精读了事件抽取领域的经典论文<Event Extraction via Dynamic Multi-Pooling Convolutional Neural Networ ...