spring整合axis2(最小配置化)的示例
参考文档:
http://blog.csdn.net/xinhaoluan/article/details/3605234
环境配置:
实现步骤:
1.eclipse新建Dynamic Web Project,本例工程名为:ws-sample
2.将spring-framework和axis2的lib加入工程中
3.编写测试服务:
IHello.java(interface)
package com.lichmama.ws.demo.intf;

public interface IHello {

    public String sayHello(String name);

}
HelloImpl.java(class)
package com.lichmama.ws.demo.service;

import org.springframework.stereotype.Service;

import com.lichmama.ws.demo.intf.IHello;

@Service("helloService")

public class HelloImpl implements IHello {

    @Override

    public String sayHello(String name) {

        if((name == null) || (name == "")) {

            name = "anonymous";

        }

        return "hello, " + name;

    }

}
3.新建spring配置文件/WEB-INF/applicationContext.xml:
<?xml version="1.0" encoding="UTF-8"?>

<beans xmlns="http://www.springframework.org/schema/beans"

    xmlns:xsi="http://www.w3.org/2001/XMLSchema-instance"

    xmlns:context="http://www.springframework.org/schema/context"

    xsi:schemaLocation="http://www.springframework.org/schema/beans

        http://www.springframework.org/schema/beans/spring-beans-3.0.xsd

        http://www.springframework.org/schema/context

        http://www.springframework.org/schema/context/spring-context-3.0.xsd">

    <context:annotation-config />

    <context:component-scan base-package="com.lichmama.ws.demo" />

    <bean id="applicationContext"

        class="org.apache.axis2.extensions.spring.receivers.ApplicationContextHolder" />

</beans>
4.新建/WEB-INF/services/axis2/META-INF/services.xml:
<?xml version="1.0" encoding="UTF-8" ?>

<serviceGroup>

    <service name="HelloService" scope="application">

        <description>simple spring example</description>

        <parameter name="ServiceObjectSupplier">

            org.apache.axis2.extensions.spring.receivers.SpringAppContextAwareObjectSupplier

        </parameter>

        <parameter name="SpringBeanName">helloService</parameter>

        <messageReceivers>

            <messageReceiver mep= "http://www.w3.org/2004/08/wsdl/in-only"

                 class = "org.apache.axis2.rpc.receivers.RPCInOnlyMessageReceiver"  />

            <messageReceiver mep= "http://www.w3.org/2004/08/wsdl/in-out"

                 class = "org.apache.axis2.rpc.receivers.RPCMessageReceiver"  />

        </messageReceivers>

    </service>

</serviceGroup>
5.配置/WEB-INF/web.xml:
<?xml version="1.0" encoding="UTF-8"?>

<web-app xmlns:xsi="http://www.w3.org/2001/XMLSchema-instance"

    xmlns="http://java.sun.com/xml/ns/javaee"

    xmlns:web="http://java.sun.com/xml/ns/javaee/web-app_2_5.xsd"

    xsi:schemaLocation="http://java.sun.com/xml/ns/javaee

        http://java.sun.com/xml/ns/javaee/web-app_3_0.xsd"

        id="WebApp_ID" version="3.0">

      <display-name>ws-sample</display-name>

    <listener>

        <listener-class>org.springframework.web.context.ContextLoaderListener

        </listener-class>

    </listener>

    <context-param>

        <param-name>contextConfigLocation</param-name>

        <param-value>/WEB-INF/applicationContext.xml</param-value>

    </context-param>

    <servlet>

        <servlet-name>AxisServlet</servlet-name>

        <servlet-class>org.apache.axis2.transport.http.AxisServlet</servlet-class>

    </servlet>

    <servlet-mapping>

        <servlet-name>AxisServlet</servlet-name>

        <url-pattern>/services/*</url-pattern>

    </servlet-mapping>

   <welcome-file-list>

      <welcome-file>index.jsp</welcome-file>

      <welcome-file>index.html</welcome-file>

    </welcome-file-list>

</web-app>
6.完成以上工作后工程目录结构如下:

7.发布工程,启动tomcat
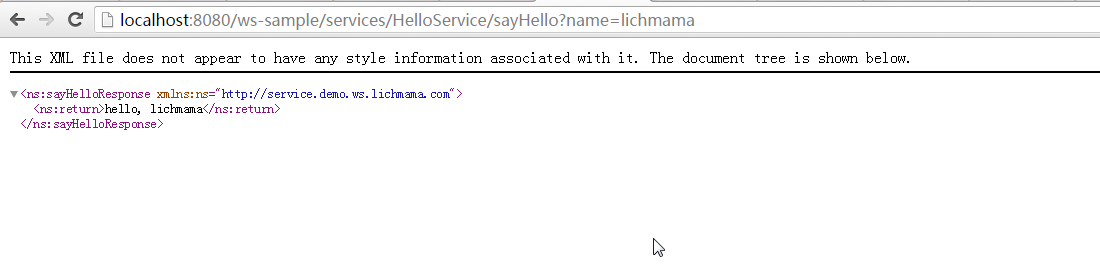
8.访问http://localhost:8080/ws-sample/services/HelloService?wsdl,查看服务是否发布成功。
如果发布成功的话,访问http://localhost:8080/ws-sample/services/HelloService/sayHello?name=lichmama结果应该如下:
9.*简易的做法是下载axis2-war.zip(http://archive.apache.org/dist/axis/axis2/java/core/1.6.2/axis2-1.6.2-war.zip),复制WEB-INF下的文件到工程对应目录。
然后再根据实际情况修改各配置文件(application.xml, services.xml, web.xml)。
10.*上述示例工程下载地址:http://pan.baidu.com/s/1hrBsZ4o
spring整合axis2(最小配置化)的示例的更多相关文章
- 初识quartz 并分析 项目中spring整合quartz的配置【原创+转载】
初识quartz 并分析 项目中spring整合quartz的配置[原创+转载]2018年01月29日 12:08:07 守望dfdfdf 阅读数:114 标签: quartz 更多个人分类: 工具 ...
- spring整合mybatis(hibernate)配置
一.Spring整合配置Mybatis spring整合mybatis可以不需要mybatis-config.xml配置文件,直接通过spring配置文件一步到位.一般需要具备如下几个基本配置. 1. ...
- spring 整合 hibernate xml配置
spring 整合 hibernate: hibernate :对数据库交互 spring: ioc aop 整合点: 1.sessionFactory对象不再由hibernate生成,交由spr ...
- Spring第十一篇——–Spring整合Hibernate之配置数据源
DataSource(数据源)提供了一个标准化的取得数据库连接的方式,通过getConnection()方法即可取得数据库的连接,Spring也提供了数据库连接池(DataBase connectio ...
- Spring整合Struts2的配置与测试
整合目的 让Spring的IOC容器管理Struts2的Action 整合步骤 1.新建一个Web项目 2.加入Spring的jar包和添加Spring的配置文件 3.在Web.xml中配置Conte ...
- spring 整合 struts2 xml配置
整合之前要搞清楚struts2是什么; struts2:表现层框架 增删改查 作用域 页面跳转 异常处理 ajax 上传下载 excel 调用service spring :IOC/ ...
- mybatis和spring整合的关键配置
spring配置文件 applicationContext.xml: <beans xmlns="http://www.springframework.org/schema/beans ...
- 阶段3 3.SpringMVC·_07.SSM整合案例_09.ssm整合之Spring整合MyBatis框架配置事务
spring加入声明式的事物 配置事物 配置事物管理器 需要一个dataSource,引入上面的dataSource 配置事务通知 引入上面的transactionManager事物管理器 find开 ...
- Spring 整合 Redis (零配置) 的简单使用
pom.xml <!--jedis--> <dependency> <groupId>redis.clients</groupId> <artif ...
随机推荐
- Struts2 设置global timer
设置全局的timer需要在web.xml中添加servlet, 并设置load-on-startup 为 1, 然后在servlet的init()中开启timer, 具体代码如下: 1. web.xm ...
- Handler线程间通信
package com.hixin.appexplorer; import java.util.List; import android.app.Activity; import android.ap ...
- struts2.1.6教程四_2、ActionContext 、ValueStack 、Stack Context
ActionContext 一次Action调用都会创建一个ActionContext 调用:ActionContext context = ActionContext.getContext() Va ...
- esclipse连接mysql数据库
怎样在eclipse开发环境中连接数据库并测试连接是否成功 1)eclipse开发环境里没有集成mysql的驱动,需要从以下地址下载连接驱动程序mysql-connector-java-XX-XX-X ...
- Smart.coder每日站立会议08
站立会议内容: 完善小程序的查找功能,打算考虑一下信息自动输入分类的功能. 1.站立会议照片: 2.任务展板 3.燃尽图
- mxnet:结合R与GPU加速深度学习(转)
近年来,深度学习可谓是机器学习方向的明星概念,不同的模型分别在图像处理与自然语言处理等任务中取得了前所未有的好成绩.在实际的应用中,大家除了关心模型的准确度,还常常希望能比较快速地完成模型的训练.一个 ...
- Ace Admin 使用教程
(原) 公司项目要换框架,然后丢了一套国外的给我,ace admin,本想着拿来改改,翻翻百度就能用的,可它是国外的啊,国内普及率又不高,没办法,硬着头皮一点点啃英文文档吧. File(文件) 简介: ...
- Ajax请求汇总(一)
刚开始结束Ajax请求的时候,那真的是迷迷糊糊,昏天暗地,通过学习的深入和翻阅各种资料.求助度娘,总结一下Ajax请求,与大家分享一下,希望能给学习Ajax的同学一些帮助,废话不多手,直接开始~~~ ...
- 一天搞定CSS:css选择器--07
选择器:是指选择标签的方法 1.选择器类型 2.id选择器 代码演示 <!DOCTYPE html> <html> <head> <meta charset= ...
- div的替代品
人们在标签使用中最常见到的错误之一就是随意将HTML5的<section>等价于<div>--具体地说,就是直接用作替代品(用于样式).在XHTML或者HTML4中,我们常看到 ...