使用duilib开发简单的Window安装包
一、具体思路
安装过程:安装包的制作包括资源文件的打包,资源文件打包到安装包exe中,安装的时候需要从exe中提取出对应的资源文件,
然后解压文件安装到指定目录,然后就是对安装的可执行程序进行注册表的注册,以及快捷方式的注册。
卸载过程:安装包安装时,通常会带有一个卸载程序,此程序的功能就是执行对安装程序目录文件的删除和注册表的清除。
二、实现
安装过程分为三部分实现,安装配置,安装过程,安装结束启动程序。
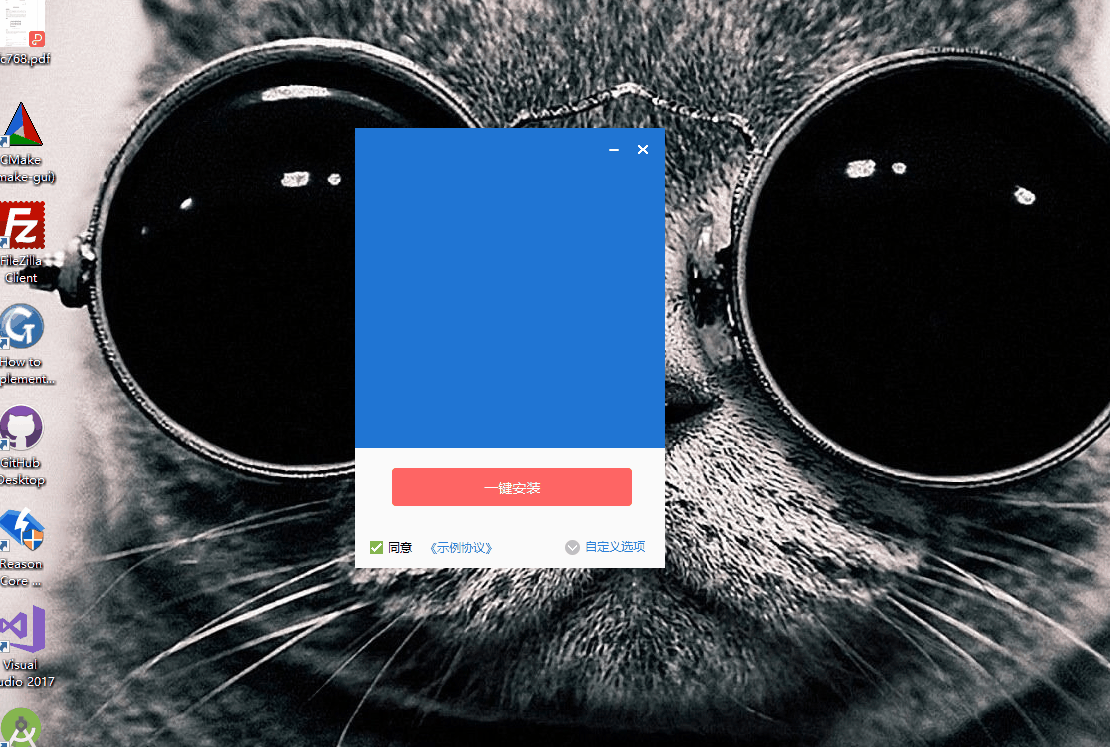
安装配置界面如下:
安装过程实现:
Install类负责对打包文件的释放,注册表的写入,快捷方式的写入,以及回调界面进度的职责:
 #pragma once

 #include<string>

 #include<functional>

 class Install

 {

 public:

     Install();

     virtual ~Install();

     static Install& getInstance(){

         static Install instance;

         return instance;

     }

     void setStop(){

         m_stop = true;

     }

     bool install(const std::string & install_path, bool is_shortcut);

     void setCallBack(const std::function<void(int, const std::string &)>  &fun_1,const std::function<void()> &fun_2){

         process_fun = fun_1;

         process_end = fun_2;

     }

 private:

     bool releaseRes(const std::string & file_name, unsigned short res_id, const std::string & file_type);

     bool setShortCutLink(const std::string & path, const std::string & link_name, bool is_desktop);

     bool writeToReg();

     std::string getDesktopPath();

     std::string getStartMenuPath();

 private:

     std::function<void(int, const std::string &)> process_fun;

     std::function<void()> process_end;

     std::string m_install_path;

     bool m_stop;

 };
1)导入资源到exe,
.rc文件添加资源,
 IDR_en_US              APK                    "res\\bin\\locales\\en-US.pak"

 IDR_zh_CN              APK                    "res\\bin\\locales\\zh-CN.pak"

 /////////////////////////////////////////////////////////////////////////////

 //

 // EXE

 //

 IDR_YDDemo                  EXE                     "res\\bin\\YDDemo.exe"

 IDR_Unstall_App             EXE                     "res\\bin\\Unstall_App.exe"

 IDR_debug                   LOG                     "res\\bin\\debug.log"

 IDR_icudtl                  DAT                     "res\\bin\\icudtl.dat"

 IDR_natives_blob            BIN                     "res\\bin\\natives_blob.bin"

 IDR_snapshot_blob           BIN                     "res\\bin\\snapshot_blob.bin"

 IDR_cef                     APK                     "res\\bin\\cef.pak"

 IDR_cef_100_percent         APK                     "res\\bin\\cef_100_percent.pak"

 IDR_cef_200_percent         APK                     "res\\bin\\cef_200_percent.pak"

 IDR_cef_extensions          APK                     "res\\bin\\cef_extensions.pak"

 IDR_devtools_resources      APK                     "res\\bin\\devtools_resources.pak"

 /////////////////////////////////////////////////////////////////////////////

 //

 // DLL

 //

 IDR_d3dcompiler_43          DLL                     "res\\bin\\d3dcompiler_43.dll"

 IDR_d3dcompiler_47          DLL                     "res\\bin\\d3dcompiler_47.dll"

 IDR_DuiLib_u                DLL                     "res\\bin\\DuiLib_u.dll"

 IDR_libcef                  DLL                     "res\\bin\\libcef.dll"

 IDR_libEGL                  DLL                     "res\\bin\\libEGL.dll"

 IDR_libGLESv2               DLL                     "res\\bin\\libGLESv2.dll"

 IDR_widevinecdmadapter      DLL                     "res\\bin\\widevinecdmadapter.dll"
定义资源ID
 #define IDR_en_US                       152

 #define IDR_zh_CN                       153

 #define IDR_YDDemo                      154

 #define IDR_Unstall_App                 155

 #define IDR_debug                       156

 #define IDR_icudtl                      157

 #define IDR_natives_blob                158

 #define IDR_snapshot_blob               159

 #define IDR_cef                         160

 #define IDR_cef_100_percent             161

 #define IDR_cef_200_percent             162

 #define IDR_cef_extensions              163

 #define IDR_devtools_resources          164

 #define IDR_d3dcompiler_43              165

 #define IDR_d3dcompiler_47              166

 #define IDR_DuiLib_u                    167

 #define IDR_libcef                      168

 #define IDR_libEGL                      169

 #define IDR_libGLESv2                   170

 #define IDR_widevinecdmadapter          171
2)释放资源,并且回调安装进度,更新界面的显示
bool releaseRes(const std::string & file_name, unsigned short res_id, const std::string & file_type);
releaseRes负责释放资源
 bool Install::releaseRes(const std::string & file_name, unsigned short res_id, const std::string & file_type){

     DWORD   dwWrite = ;

     HANDLE  hFile = CreateFile(Ecoder::stringToWstring(file_name).c_str(), GENERIC_WRITE, FILE_SHARE_WRITE, NULL,

         CREATE_ALWAYS, FILE_ATTRIBUTE_NORMAL, NULL);

     if (hFile == INVALID_HANDLE_VALUE){

         return FALSE;

     }

     HRSRC   hrsc = FindResource(NULL, MAKEINTRESOURCE(res_id), Ecoder::stringToWstring(file_type).c_str());

     HGLOBAL hG = LoadResource(NULL, hrsc);

     DWORD   dwSize = SizeofResource(NULL, hrsc);

     WriteFile(hFile, hG, dwSize, &dwWrite, NULL);

     CloseHandle(hFile);

     return true;

 }
设置回调函数
    std::function<void(int, const std::string &)> process_fun;

    std::function<void()> process_end;
 Install::getInstance().setCallBack(std::bind(&MainFrame::setProcessCallBack,this,std::placeholders::_1,std::placeholders::_2),

                                        std::bind(&MainFrame::setupEndCallBack,this));
两个回调函数负责更新资源释放的进度,当然也可以用一个回调函数。
3)注册表操作
写入exe到注册表
bool writeToReg();
创建快捷方式
bool setShortCutLink(const std::string & path, const std::string & link_name, bool is_desktop);
结束安装,启动程序。
     std::string str_tmp = m_install_path + "\\";

         m_install_path += "\\YDDemo.exe";

         ShellExecute(NULL, L"open", Ecoder::stringToWstring(m_install_path).c_str(), NULL, Ecoder::stringToWstring(str_tmp).c_str(), SW_SHOWNORMAL);
卸载过程也是分三部分实现:卸载选择,卸载过程,卸载结束,界面操作如下

界面卸载是通过UnInstall类实现,主要负责注册表的清理,目录文件的删除,程序的自删除以及更新界面进度的职责
 #pragma once

 #include<string>

 #include<functional>

 class UnInstall

 {

 public:

     UnInstall();

     virtual ~UnInstall();

     static UnInstall& getInstance(){

         static UnInstall instance;

         return instance;

     }

     void setCallBack(const std::function<void(int, const std::string &)>  &fun_1, const std::function<void()> &fun_2){

         process_fun = fun_1;

         process_end = fun_2;

     }

     bool unInstall();

     bool deleteRegKey();

     bool deleteDirFile(const std::string & path);

     bool deleteApplicationSelf();

 private:

     std::function<void(int, const std::string &)> process_fun;

     std::function<void()> process_end;

 };
具体代码可以参考https://github.com/karllen/cef3-duilib-YDDemo/tree/master/Setup_App,因为这个是我学习的Demo,
功能还不是特别完善,图片素材取自网络,如有侵权,联系作者删除。此程序适合入门duilib的C++ 程序员来学习,
程序实现用了C++11的std::thread,std::share_ptr,std::bind等。
技术交流QQ群,欢迎大家加入:347769318
使用duilib开发简单的Window安装包的更多相关文章
- 使用Squirrel创建基于Electron开发的Windows 应用安装包
我们把自己开发的Electron应用发布之前,需要把app打包成简单的安装包,这样app更容易被获取,以此来发布我们的应用.我们可以参考Wix或其他的安装程序,但是对于Electron应用更好的打包程 ...
- Ubuntu 18.04安装arm-linux-gcc交叉编译器(超简单,附安装包下载地址)
目前网上搜索发现,最多人安装的是4.4.3版本的: arm-linux-gcc-4.4.3.tar.gz下载地址:https://pan.baidu.com/s/1rAIBASIRZAXl-P1UOW ...
- ANDROID 开发,安装离线安装包的下载地址及安装方法。
前言: 建议采用离线安装的方法安装SDK包,在线的方式实在是.....多了不解释. 下面说一下离线安装的方法: 1.下载地址:http://pan.baidu.com/s/1sjuJwYD#path= ...
- 为自己编写的windows应用程序制作安装包
1 写好了一个windows程序之后如何制作安装包 这个在vs中就可以直接发布了,可以制作msi的安装包和exe的安装包. 2 window应用程序安装包做了哪些事情 rpm安装包的话,只是把相应的文 ...
- Electron实战:创建ELectron开发的window应用安装包
前言:研究electron自动更新的时候,在electron的官方文档auto-updater 中,提到了在几个平台mac,Linux,windows下electron 的自动更新方法,其中winds ...
- iOS开发——程序员必备&iOS安装包的三种格式 deb、ipa 和 pxl的解释和说明
iOS安装包的三种格式 deb.ipa 和 pxl的解释和说明 目前 iOS 平台上常见的安装包有三种,deb.ipa 和 pxl.转自链接:http://fanlb.blogbus.com/logs ...
- WPF开发时光之痕日记本——终于完工了。。晒晒截图(三)(已上传安装包)
由于是业余时间学习的 WPF 的相关开发且不怎么会使用 Blend 软件,所以开发这个客户端着实花费了我很长时间,比如文本编辑器的开发,最初是在 Simple.HtmlEditor 的基础上做的修改, ...
- 在Visual Studio 2013/2015上使用C#开发Android/IOS安装包和操作步骤
Xamarin 配置手册和离线包下载 http://pan.baidu.com/s/1eQ3qw8a 具体操作: 安装前提条件 1. 安装Visual Studio 2013,安装过程省略,我这里安装 ...
- DevExpress控件库 开发使用经验总结3 制作项目安装包
2015-01-27 使用DevExpress控件包开发C/S项目完成后,部署前需要制作本地安装包.本文还是使用“SetupFactory”安装工厂来制作安装包.在以前的系列文章中详细介绍过该工具的使 ...
随机推荐
- ZOJ2724 Windows Message Queue 裸queue的模拟
题目要求FIFO #include<cstdio> #include<cstdlib> #include<iostream> #include<queue&g ...
- win10 UWP 序列化
将对象的状态信息转换为可以存储或传输的形式的过程.在序列化期间,对象将其当前状态写入到临时或持久性存储区.以后,可以通过从存储区中读取或反序列化对象的状态,重新创建该对象. .NET Framewor ...
- JavaScript HTML Dom改变HTML
本人为小白,首次写博客 有不正确的地方望多多指点与见谅!! 一,改变HTML的内容 语法: document.getElementById(id).innerHTML=new HTML: 具体用法: ...
- Hibernate映射类型
- struts2(五)之struts2拦截器与自定义拦截器
前言 前面介绍了struts2的输入验证,如果让我自己选的话,肯定是选择xml配置校验的方法,因为,能使用struts2中的一些校验规则,就无需自己编写了, 不过到后面应该都有其他更方便的校验方法,而 ...
- 在你的网站实现qq登陆(php)
这个qq的oauth2.1有个坑,坑了我半天,后来查了不少资料总算弄通了,现在把详细步骤记录下来. 步骤一.登陆http://connect.qq.com/ 步骤二.创建应用.我创建的是wen ...
- 走近 Python (类比 JS)
Python 是一门运用很广泛的语言,自动化脚本.爬虫,甚至在深度学习领域也都有 Python 的身影.作为一名前端开发者,也了解 ES6 中的很多特性借鉴自 Python (比如默认参数.解构赋值. ...
- Day1作业要求
Day1作业 作业需求 博客 模拟登录 三级菜单 博客地址 杨振伟Day1博客地址 模拟登录 1.程序说明 实现功能如下 用户输入密码,密码验证后登录成功 用户登录成功后提示登录信息 用户输入3次错误 ...
- 【DG】利用闪回数据库(flashback)修复Failover后的DG环境
利用闪回数据库(flashback)修复Failover后的DG环境 1.1 BLOG文档结构图 1.2 前言部分 1.2.1 导读和注意事项 各位技术爱好者,看完本文后,你可以掌握如下的技能, ...
- Problem F: 多少个最大值?
Description 输入若干个int类型的整数,求它们的最大值及其个数. Input 输入 若干个int类型的整数,至文件尾为止. Output 输出只有一行:There are # maximu ...