
笔记(json)实现前后端交互案例
1:首先创建一个项目如:(说明:此项目是在eclipse创建的)

2.在创建相对应的包如:
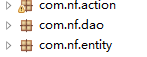
3.创建写好相对应的配置文件如:
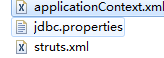
applicationContext.xml具体内容如下:
<?xml version="1.0" encoding="UTF-8"?>
<beans xmlns="http://www.springframework.org/schema/beans"
xmlns:context="http://www.springframework.org/schema/context"
xmlns:tx="http://www.springframework.org/schema/tx"
xmlns:xsi="http://www.w3.org/2001/XMLSchema-instance"
xsi:schemaLocation="
http://www.springframework.org/schema/beans
http://www.springframework.org/schema/beans/spring-beans.xsd
http://www.springframework.org/schema/context
http://www.springframework.org/schema/context/spring-context-4.0.xsd
http://www.springframework.org/schema/tx
http://www.springframework.org/schema/tx/spring-tx-4.0.xsd
">
<!--自动注入processor解释器(此行不写)-->
<context:annotation-config></context:annotation-config>
<!--自动扫描包-->
<context:component-scan base-package="com.nf"></context:component-scan>
<!--加载JDBC的配置文件-->
<context:property-placeholder location="classpath:jdbc.properties"></context:property-placeholder>
<bean id="myDataSource" class="com.mchange.v2.c3p0.ComboPooledDataSource">
<property name="driverClass" value="${driverClass}"></property>
<property name="jdbcUrl" value="${jdbcUrl}"></property>
<property name="user" value="${user}"></property>
<property name="password" value="${password}"></property>
<!--几个个性化的信息-->
<!--每300秒检查所有连接池中空闲的连接-->
<property name="idleConnectionTestPeriod" value="300"></property>
<!--最大的空闲时间-->
<property name="maxIdleTime" value="2000"></property>
<!--最大连接数-->
<property name="maxPoolSize" value="5"></property>
</bean>
<!--构造SessionFactory,需要3项内容:1.连接 2.配置 3.实体类映射关系-->
<bean id="sessionFactory" class="org.springframework.orm.hibernate5.LocalSessionFactoryBean">
<!--1.数据库连接池-->
<property name="dataSource" ref="myDataSource"></property>
<!--2.相关hibernate的配置信息-->
<property name="hibernateProperties">
<props>
<prop key="hibernate.dialect">org.hibernate.dialect.MySQL57InnoDBDialect</prop>
<prop key="hibernate.show_sql">true</prop>
<prop key="hibernate.format_sql">true</prop>
<prop key="hibernate.connection.autocommit">false</prop>
<prop key="hibernate.hbm2ddl.auto">update</prop>
</props>
</property>
<!--3.实体类映射关系-->
<property name="packagesToScan" value="com.nf"></property>
</bean>
<!--事务管理器配置,Hibernate单数据源事务-->
<bean id="defaultTransactionManager" class="org.springframework.orm.hibernate5.HibernateTransactionManager">
<property name="sessionFactory" ref="sessionFactory"></property>
</bean>
<!--使用注解annotation定义事务-->
<tx:annotation-driven transaction-manager="defaultTransactionManager" ></tx:annotation-driven>
</beans>
 具体内容如下:(这是与MySQL数据库连接的配置)
#database information
driverClass=com.mysql.cj.jdbc.Driver
jdbcUrl=jdbc:mysql://localhost:3306/lib?serverTimezone=UTC
user=root
password=
struts.xml配置文件如下:
<?xml version="1.0" encoding="UTF-8"?>
<!DOCTYPE struts PUBLIC
"-//Apache Software Foundation//DTD Struts Configuration 2.5//EN"
"http://struts.apache.org/dtds/struts-2.5.dtd">
<struts>
<constant name="struts.objectFactory" value="spring"></constant>
<package name="myPackage" extends="struts-default,json-default">
<action name="bookAction_*" class="bookAction" method="{1}">
<result type="json" name="jsonOK">
<param name="root">jsonMap</param>
</result>
<allowed-methods>getAllBook</allowed-methods>
</action>
</package>
</struts>
配置web.xml过滤文件
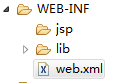
web.xml具体内容如下:
<?xml version="1.0" encoding="UTF-8"?>
<web-app xmlns:xsi="http://www.w3.org/2001/XMLSchema-instance"
xmlns="http://xmlns.jcp.org/xml/ns/javaee"
xsi:schemaLocation="http://xmlns.jcp.org/xml/ns/javaee http://xmlns.jcp.org/xml/ns/javaee/web-app_3_1.xsd"
id="WebApp_ID" version="3.1">
<display-name>Archetype Created Web Application</display-name>
<!--2个struts的过滤器-->
<filter>
<filter-name>struts-prepare</filter-name>
<filter-class>org.apache.struts2.dispatcher.filter.StrutsPrepareFilter</filter-class>
</filter>
<filter>
<filter-name>struts-execute</filter-name>
<filter-class>org.apache.struts2.dispatcher.filter.StrutsExecuteFilter</filter-class>
</filter>
<filter-mapping>
<filter-name>struts-prepare</filter-name>
<url-pattern>/*</url-pattern>
</filter-mapping>
<filter-mapping>
<filter-name>struts-execute</filter-name>
<url-pattern>/*</url-pattern>
</filter-mapping>
<!--1个spring的监听器-->
<context-param>
<param-name>contextConfigLocation</param-name>
<param-value>classpath:applicationContext.xml</param-value>
</context-param>
<listener>
<listener-class>org.springframework.web.context.ContextLoaderListener</listener-class>
</listener>
</web-app>
4.在web目录下创建个js文件夹来存放这俩个js文件(注:这俩个文件是第三方的js文件):
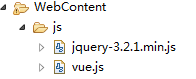

在webContext目录下建个jsp文件,如:test.jsp
(具体内容如下:)
<%@ page language="java" contentType="text/html; charset=UTF-8"
pageEncoding="UTF-8"%>
<!DOCTYPE html PUBLIC "-//W3C//DTD HTML 4.01 Transitional//EN" "http://www.w3.org/TR/html4/loose.dtd">
<html>
<head>
<meta http-equiv="Content-Type" content="text/html; charset=UTF-8">
<title>Insert title here</title>
</head>
<body>
<table border="1px" id="myView">
<tr>
<th>ID</th>
<th>书名</th>
<th>价格</th>
</tr>
<tr v-for="book in bookList">
<td>{{book.id}}</td>
<td>{{book.name}}</td>
<td>{{book.price}}</td>
</tr>
</table>
</body>
<script src="${pageContext.request.contextPath}/js/vue.js"></script>
<script src="${pageContext.request.contextPath}/js/jquery-3.2.1.min.js"></script>
<script type="text/javascript">
var myModel = {bookList:[]};
var myViewModel = new Vue({
el:"#myView" ,
data:myModel
}) ;
/*
var myViewModel = new Vue({
el:'#myView',
data:myModel
});
*/
//写成函数的目的,为了【复用】
function getData(){
$.ajax({
url:"bookAction_getAllBook", //后端的API地址
type:'GET', //http:POST/GET
//data:postData, //指客户端提交给后台的参数
dataType:'json', //服务端返回类型text,json
timeout:3000,
success:function(result){
//alert(result);
//$.extend(true, result, myModel);
//失败
//myViewModel.data = result;
//失败
//myModel = result;
myModel.bookList = result.bookList ;
},
error:function(){
alert('服务器忙,请不要说脏话,理论上大家都是文明人');
}
});
}
getData();
</script>
</html>
6.开始在src目录下写后台代码了
先从 开始:
开始:
创建Book.java文件
具体内容如下:
package com.nf.entity;
import javax.persistence.*;
@Entity
@Table(name = "book")
public class Book {
private Integer id;
private String name;
private Integer price;
@Id
@GeneratedValue(strategy= GenerationType.IDENTITY)
@Column(name="id")
public Integer getId() {
return id;
}
public void setId(Integer id) {
this.id = id;
}
@Column(name = "name",length = 50,nullable = false)
public String getName() {
return name;
}
public void setName(String name) {
this.name = name;
}
@Column(name = "price",nullable = false)
public Integer getPrice() {
return price;
}
public void setPrice(Integer price) {
this.price = price;
}
}
然后在创建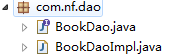 dao模层,
先创建个BookDao接口,具体内容如下:
package com.nf.dao;
import com.nf.entity.Book;
import java.util.List;
public interface BookDao {
public List<Book> getAllBook();
}
在创建个BookDaoImpl类并实现BookDao接口,内容如下:
package com.nf.dao;
import com.nf.entity.Book;
import org.hibernate.Session;
import org.hibernate.SessionFactory;
import org.hibernate.query.Query;
import org.springframework.beans.factory.annotation.Autowired;
import org.springframework.context.annotation.Scope;
import org.springframework.stereotype.Repository;
import java.util.List;
@Repository
@Scope("prototype")
public class BookDaoImpl implements BookDao {
@Autowired
private SessionFactory sessionFactory;
public List<Book> getAllBook() {
Session session = sessionFactory.getCurrentSession();
Query<Book> query = session.createQuery("from Book", Book.class);
List<Book> bookList = query.getResultList();
return bookList;
}
}
最后写 模块
模块
(具体内容如下:)
package com.nf.action;
import com.nf.entity.Book;
import com.nf.service.BookService;
import com.opensymphony.xwork2.ActionContext;
import com.opensymphony.xwork2.ActionSupport;
import org.springframework.beans.factory.annotation.Autowired;
import org.springframework.context.annotation.Scope;
import org.springframework.stereotype.Controller;
import java.util.HashMap;
import java.util.List;
import java.util.Map;
@Controller
@Scope("prototype")
public class BookAction extends ActionSupport {
//姝sonMap鐢ㄤ簬瀛樺偍JSON鏍煎紡鐨勬暟鎹�
private Map<String,Object> jsonMap = new HashMap();
public Map<String, Object> getJsonMap() {
return jsonMap;
}
public void setJsonMap(Map<String, Object> jsonMap) {
this.jsonMap = jsonMap;
}
@Autowired
private BookService bookService;
public String getAllBook(){
List<Book> bookList = bookService.getAllBook();
jsonMap.put("bookList", bookList);
return "jsonOK";
}
}
好了,到这里整个案例已经完成了,一来可以作为我以后复习的笔记,二来希望可以帮助到在这方面学习的朋友,做的不够精细,请多多包含,勿喷!!
笔记(json)实现前后端交互案例的更多相关文章
- ajax学习----json,前后端交互,ajax
json <script> var obj = {"name": "xiaopo","age": 18,"gender ...
- SpringMvc采用 http+json 实现前后端交互
演示列表 报文表示 一.Json请求和Json响应 实现:Spring4.1.1.RELEASE + jackson2.4.4+JQuery1.10.2 1.pom.xml <propertie ...
- JSON(及其在ajax前后端交互的过程)小识
一. json介绍 json是一种轻量级的数据交换格式,规则很简单: 并列的数据之间用逗号(,)分隔: 映射用冒号(:)表示: 并列数据的集合(数组)用方括号([])表示: 映射的集合(对象)用大括号 ...
- 前后端交互实现(nginx,json,以及datatable的问题相关)
1.同源问题解决 首先,在同一个域下搭建网络域名访问,需要nginx软件,下载之后修改部分配置 然后再终端下cmd nginx.exe命令,或者打开nginx.exe文件,会运行nginx一闪而过, ...
- Node之简单的前后端交互
node是前端必学的一门技能,我们都知道node是用的js做后端,在学习node之前我们有必要明白node是如何实现前后端交互的. 这里写了一个简单的通过原生ajax与node实现的一个交互,刚刚学n ...
- Django之META与前后端交互
Django之META与前后端交互 1 提交表单之GET 前端提交数据与发送 1)提交表单数据 2)提交JSON数据 后端的数据接收与响应 1)接收GET请求数据 2)接收POST请求数据 3)响应请 ...
- 百度ueditor的图片上传,前后端交互使用
百度ueditor的使用 一个文本编辑器,看了网上很多文档写的很乱,这里拾人牙慧,整理下怎么使用. 这个东西如果不涉及到图片附件上传,其实很简单,就是几个前端文件,直接引用,然后配置下ueditor. ...
- 【开源.NET】 轻量级内容管理框架Grissom.CMS(第二篇前后端交互数据结构分析)
这是 CMS 框架系列文章的第二篇,第一篇开源了该框架的代码和简要介绍了框架的目的.作用和思想,这篇主要解析如何把sql 转成标准 xml 配置文件和把前端post的增删改数据规范成方便后台解析的结构 ...
- thinkphp+jquery+ajax前后端交互注册验证
thinkphp+jquery+ajax前后端交互注册验证,界面如下 register.html <!DOCTYPE html PUBLIC "-//W3C//DTD XHTML 1. ...
随机推荐
- Ubuntu安装Flash视频插件
http://www.linuxidc.com/Linux/2014-05/101095.htm
- ELK系列~NLog.Targets.Fluentd到达如何通过tcp发到fluentd
最近火的不能再火的日志框架就是ELK,其中E(Elasticsearch)表示日志存储,L(Logstash)表示日志收集,K(kibana)表示日志的UI界面,用来查询和分析,而其中的L可以使用Fl ...
- 上海2017QCon个人分享总结
有幸作为讲师受邀参加InfoQ在上海举办的QCon2017,不得不说,不论是从讲师还是听众的角度衡量,QCon进一步扩大了技术视野.虽然前端专题只有四场,但每一场分享都是目前的热门话题.并且Qcon的 ...
- CountDownLatch、CyclicBarrier和 Semaphore比较
1)CountDownLatch和CyclicBarrier都能够实现线程之间的等待,只不过它们侧重点不同: CountDownLatch一般用于某个线程A等待若干个其他线程执行完任务之后,它才执行: ...
- JS难点--组件开发
p.p1 { margin: 0.0px 0.0px 0.0px 0.0px; font: 15.0px Consolas; color: #a5b2b9 } span.Apple-tab-span ...
- 使用 Hadoop 进行语料处理(面试题)
原创播客,如需转载请注明出处.原文地址:http://www.cnblogs.com/crawl/p/7751741.html ------------------------------------ ...
- 点击下拉,其余不动的jquery事件(转)
<!DOCTYPE html PUBLIC "-//W3C//DTD XHTML 1.0 Transitional//EN" "http://www.w3.org/ ...
- Supervised Learning and Unsupervised Learning
Supervised Learning In supervised learning, we are given a data set and already know what our correc ...
- 微信小程序左滑删除功能
效果图如下: wxml代码: <view class="container"> <view class="touch-item {{item.isTou ...
- MAC - PhpStorm安装调试环境xdebug
今天下午一直在捣鼓如何用PhpStorm进行调试,查找了许多资料,零零碎碎的,所以自己弄篇文章记录一下步骤. 安装xdebug 使用brew安装xdebug,语法如下 brew install hom ...