四、分离分层的 platform驱动
学习目标: 学习实现platform机制的分层分离,并基于platform机制,编写led设备和驱动程序;
一、分离分层
输入子系统、usb设备比驱动以及platform类型的驱动等都体现出分离分层机制;如下图所示,一种典型的分离分层框架:
二、platform机制下的分离
分离就是在驱动层中使用platform机制把硬件相关的代码(固定的,如板子的网卡、中断地址)和驱动(会根据程序作变动,如点哪一个灯)分离开来,即要编写两个文件:dev.c和drv.c(platform设备和platform驱动)。
会在开发板/sys/bus/platform目录下出现这两个文件,并且在两个文件目录下存在命名相同的设备和驱动程序。
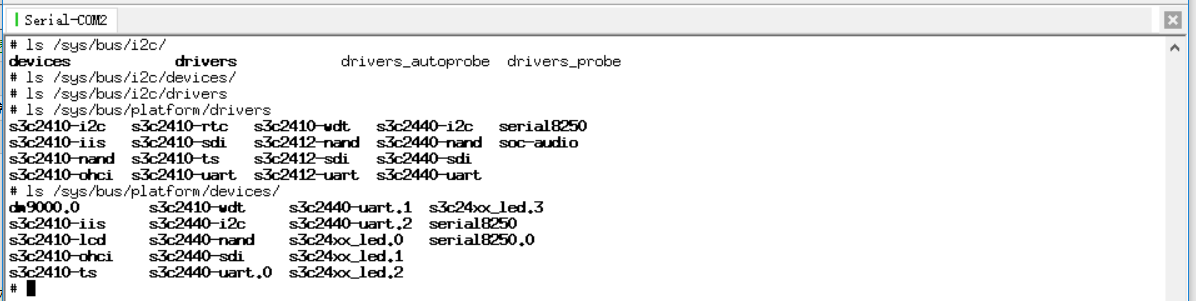
同样的,在/sys/bus/i2c等其它的总线类型目录下,也存在设备和驱动各自的目录。
platform总线:为platform_bus_type,是个全局变量,属于虚拟设备总线, 属于Linux中bus的一种:
 struct bus_type platform_bus_type = {

     .name            = "platform",

     .dev_attrs       = platform_dev_attrs,

     .match           = platform_match,

     .uevent          = platform_uevent,

     .suspend         = platform_suspend,

     .suspend_late    = platform_suspend_late,

     .resume_early    = platform_resume_early,

     .resume          = platform_resume,

 };
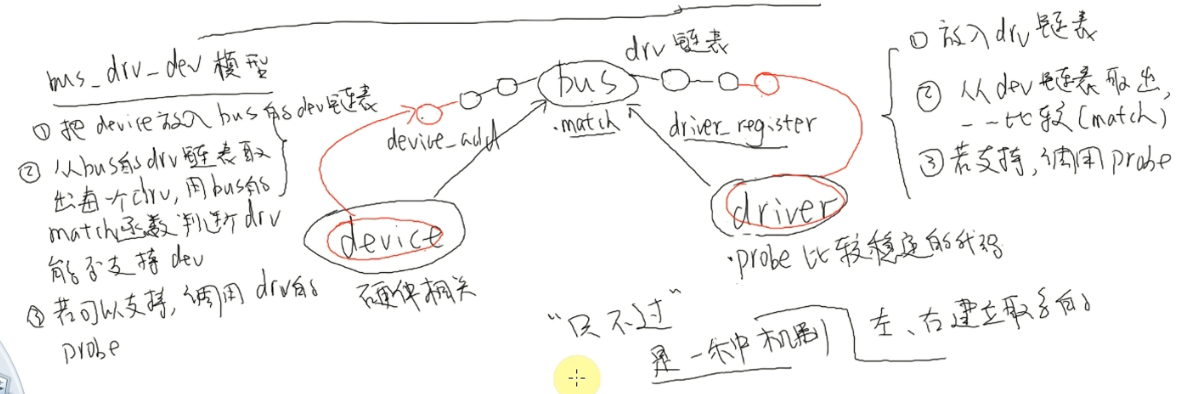
利用该设备总线,一旦一方注册就会调用.match函数进行匹配,将driver和device连接在一起,匹配成功后会调用driver程序里的.probe函数:
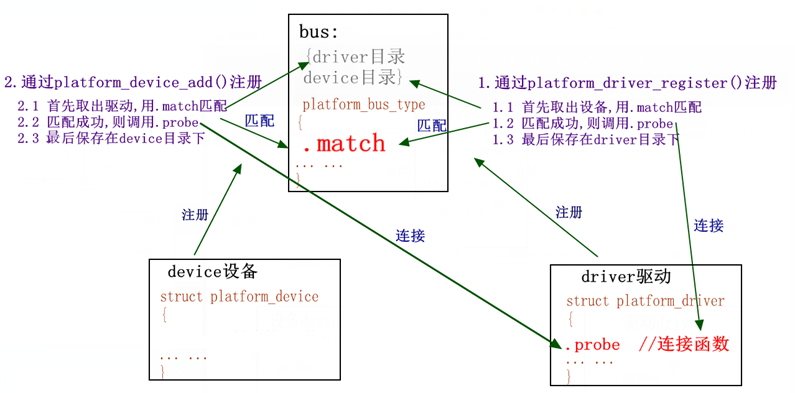
其中,device设备为挂接在platform总线下的设备, platform_device结构体类型,driver驱动为挂接在platform总线下,与某种设备相关的驱动程序, platform_driver结构体类型。
三、例程--基于platform机制,编写led设备和驱动程序
需要分别编写设备代码和驱动代码: led_dev.c 、led_drv.c。其中,
led_dev.c:指定设备硬件/寄存器资源。
led_drv.c:获取设备资源,初始化并操作led。
3.1 led_drv.c
 /* 分配/设置/注册一个platform_driver */

 #include <linux/module.h>

 #include <linux/version.h>

 #include <linux/init.h>

 #include <linux/fs.h>

 #include <linux/interrupt.h>

 #include <linux/irq.h>

 #include <linux/sched.h>

 #include <linux/pm.h>

 #include <linux/sysctl.h>

 #include <linux/proc_fs.h>

 #include <linux/delay.h>

 #include <linux/platform_device.h>

 #include <linux/input.h>

 #include <linux/irq.h>

 #include <asm/uaccess.h>

 #include <asm/io.h>

 static int major;

 static struct class *cls;

 static volatile unsigned long *gpio_con;

 static volatile unsigned long *gpio_dat;

 static int pin;

 static int led_open(struct inode *inode, struct file *file)

 {

     /* 配置为输出 */

     *gpio_con &= ~(0x3<<(pin*));

     *gpio_con |= (0x1<<(pin*));

      return ;

 }

 static ssize_t led_write(struct file *file, const char __user *buf, size_t count, loff_t * ppos)

 {

     int val;

     copy_from_user(&val, buf, count); //    copy_to_user();

     if (val == )

     {

         // 点灯

         *gpio_dat &= ~(<<pin);

     }

     else

     {

         // 灭灯

         *gpio_dat |= (<<pin);

     }

     return ;

 }

 static struct file_operations led_fops = {

     .owner  =   THIS_MODULE,    /* 这是一个宏,推向编译模块时自动创建的__this_module变量 */

     .open   =   led_open,

     .write    =    led_write,

 };

 /* 2.1 当驱动和设备都insmod加载后,然后bus总线会匹配成功,就进入.probe函数,

    2.2 在.probe函数中便使用platform_get_resource()函数获取LED的地址和引脚,然后初始化LED,并注册字符设备,和设备节点"led",

    2.3 编写注册时的file_operations成员函数

 */

 static int led_probe(struct platform_device *pdev)

 {

     struct resource        *res;

     /* 根据platform_device的资源进行ioremap */

     res = platform_get_resource(pdev, IORESOURCE_MEM, );  //IORESOURCE_MEM资源中的第0个

     gpio_con = ioremap(res->start, res->end - res->start + );

     gpio_dat = gpio_con + ;                //指针加1==》相当于+4

     res = platform_get_resource(pdev, IORESOURCE_IRQ, );  //IORESOURCE_IRQ资源中的第0个

     pin = res->start;

     /* 注册字符设备驱动程序 */

     printk("led_probe, found led\n");

     major = register_chrdev(, "myled", &led_fops);

     cls = class_create(THIS_MODULE, "myled");

     class_device_create(cls, NULL, MKDEV(major, ), NULL, "led"); /* /dev/led */

     return ;

 }

 static int led_remove(struct platform_device *pdev)

 {

     /* 卸载字符设备驱动程序 */

     /* iounmap */

     printk("led_remove, remove led\n");

     class_device_destroy(cls, MKDEV(major, ));

     class_destroy(cls);

     unregister_chrdev(major, "myled");

     iounmap(gpio_con);

     return ;

 }

 struct platform_driver led_drv = {

     .probe        = led_probe,

     .remove        = led_remove,

     .driver        = {

         .name    = "myled",

     }

 };

 /*1. 注册的led驱动*/

 static int led_drv_init(void)

 {

     platform_driver_register(&led_drv);

     return ;

 }

 static void led_drv_exit(void)

 {

     platform_driver_unregister(&led_drv);

 }

 module_init(led_drv_init);

 module_exit(led_drv_exit);

 MODULE_LICENSE("GPL");
其中, platform_get_resource函数为:
struct resource * platform_get_resource(struct platform_device *dev, unsigned int type,unsigned int num);

//获取设备的某个资源,获取成功,则返回一个resource资源结构体

//参数:

// *dev: 指向某个platform device设备

// type: 获取的资源类型

// num: type资源下的第几个数组
platform_driver结构体:
struct platform_driver {

       int (*probe)(struct platform_device *);

       int (*remove)(struct platform_device *);

       void (*shutdown)(struct platform_device *);         //断电

       int (*suspend)(struct platform_device *, pm_message_t state);  //休眠

       int (*suspend_late)(struct platform_device *, pm_message_t state);

       int (*resume_early)(struct platform_device *);

       int (*resume)(struct platform_device *);           //唤醒

       struct device_driver driver;       //内嵌的driver, 主要是name成员:设备的名称

};
3.2 led_dev.c
 #include <linux/module.h>

 #include <linux/version.h>

 #include <linux/init.h>

 #include <linux/kernel.h>

 #include <linux/types.h>

 /* 分配/设置/注册一个platform_device */

 #include <linux/interrupt.h>

 #include <linux/list.h>

 #include <linux/timer.h>

 #include <linux/init.h>

 #include <linux/serial_core.h>

 #include <linux/platform_device.h>

 static struct resource led_resource[] = {

     [] = {

         .start = 0x56000050,               //寄存器的起始物理地址  GPFCON 0x56000050

         .end   = 0x56000050 +  - ,

         .flags = IORESOURCE_MEM,           //哪一类资源

     },

     [] = {

         .start = ,                        //哪(位)个引脚

         .end   = ,

         .flags = IORESOURCE_IRQ,

     }

 };

 static void led_release(struct device * dev)

 {

 }

 static struct platform_device led_dev = {

     .name         = "myled",

     .id       = -,        //表示只有一个设备

     .num_resources    = ARRAY_SIZE(led_resource),//资源数量,ARRAY_SIZE()函数:获取数量

     .resource     = led_resource,

     .dev = {

         .release = led_release,

     },

 };

 static int led_dev_init(void)

 {

     platform_device_register(&led_dev);

     return ;

 }

 static void led_dev_exit(void)

 {

     platform_device_unregister(&led_dev);

 }

 module_init(led_dev_init);

 module_exit(led_dev_exit);

 MODULE_LICENSE("GPL");
其中,platform_driver结构体:
struct platform_device {

  const char       * name; //设备名称,要与platform_driver的name一样,这样总线才能匹配成功

  u32          id;         //id号,插入总线下相同name的设备编号(一个驱动可以有多个设备),如果只有一个设备填-1

  struct  device  dev;     //内嵌的具体的device结构体,其中成员platform_data,是个void *类型,可以给平台driver提供各种数据(比如:GPIO引脚等等)

  u32 num_resources;                 //资源数量,

  struct resource         * resource;    //资源结构体,保存设备的信息

};
struct resource {

         resource_size_t start;                    //起始资源,如果是地址的话,必须是物理地址

         resource_size_t end;                      //结束资源,如果是地址的话,必须是物理地址

         const char *name;                         //资源名

         unsigned long flags;                      //资源的标志

         //比如IORESOURCE_MEM,表示地址资源, IORESOURCE_IRQ表示中断引脚... ...

         struct resource *parent, *sibling, *child;   //资源拓扑指针父、兄、子,可以构成链表

};
3.3 测试程序
 #include <sys/types.h>

 #include <sys/stat.h>

 #include <fcntl.h>

 #include <stdio.h>

 /* led_test on

  * led_test off

  */

 int main(int argc, char **argv)

 {

     int fd;

     int val = ;

     fd = open("/dev/led", O_RDWR);

     if (fd < )

     {

         printf("can't open!\n");

     }

     if (argc != )

     {

         printf("Usage :\n");

         printf("%s <on|off>\n", argv[]);

         return ;

     }

     if (strcmp(argv[], "on") == )

     {

         val  = ;

     }

     else

     {

         val = ;

     }

     write(fd, &val, );

     return ;

 }
1)将led_dev和led_drv编译为模块,加载。会在sys/bus/platform/devices目录下分别生成一个"myled"。
2)最后,编译应用程序,并在开发板运行可执行程序,控制led:
# led_test on
# led_test off
四、分离分层的 platform驱动的更多相关文章
- Linux驱动之平台设备驱动模型简析(驱动分离分层概念的建立)
Linux设备模型的目的:为内核建立一个统一的设备模型,从而有一个对系统结构的一般性抽象描述.换句话说,Linux设备模型提取了设备操作的共同属性,进行抽象,并将这部分共同的属性在内核中实现,而为需要 ...
- linux驱动分离分层的概念
这个分离分层的概念和输入子系统有点像,但不是完全一样的.为什么会再弄一个这个模型出来我也没有搞懂,现在我的学习还停留在把知识学懂的层面上.至于为什么会产生这种知识,现在我还无从解释,还需时日成长. 这 ...
- platform驱动分离
目录 platform驱动分离 框架结构 与输入子系统联系 设备描述 驱动算法 注册机制 程序 测试 platform驱动分离 框架结构 与输入子系统联系 设备描述 驱动算法 注册机制 程序 测试 - ...
- Linux Platform驱动模型(二) _驱动方法
在Linux设备树语法详解和Linux Platform驱动模型(一) _设备信息中我们讨论了设备信息的写法,本文主要讨论平台总线中另外一部分-驱动方法,将试图回答下面几个问题: 如何填充platfo ...
- Linux Platform驱动模型(二) _驱动方法【转】
转自:http://www.cnblogs.com/xiaojiang1025/archive/2017/02/06/6367910.html 在Linux设备树语法详解和Linux Platform ...
- Linux 驱动框架---platform驱动框架
Linux系统的驱动框架主要就是三个主要部分组成,驱动.总线.设备.现在常见的嵌入式SOC已经不是单纯的CPU的概念了,它们都会在片上集成很多外设电路,这些外设都挂接在SOC内部的总线上,不同与IIC ...
- platform驱动之probe函数
驱动注册的probe函数 probe函数在设备驱动注册最后收尾工作,当设备的device 和其对应的driver 在总线上完成配对之后,系统就调用platform设备的probe函数完成驱动注册最后工 ...
- Linux 下wifi 驱动开发(四)—— USB接口WiFi驱动浅析
源: Linux 下wifi 驱动开发(四)—— USB接口WiFi驱动浅析
- 聊聊GIS数据的四个分层与GIS服务
本篇不讨论矢量栅格数据的结构,也不讨论矢量与栅格的区别(即设定读者有这方面的基础). 版权声明:原创.博客园/B站/小专栏/知乎/CSDN @秋意正寒 转载请标注原地址并声明转载: https://w ...
随机推荐
- WebLogic如何设置session超时时间
1.web.xml 设置WEB应用程序描述符web.xml里的<session-timeout>元素.这个值以分钟为单位,并覆盖weblogic.xml中的TimeoutSecs属性 ...
- React - React Developer Tools开发者工具的安装与使用(Chrome调试插件)
原文地址:http://www.cnplugins.com/zhuanti/how-to-use-react-tools.html 虽然我们曾经在React开发者工具的基础介绍里面有概括性的介绍过Re ...
- GridControl 应用 z
DevExpress学习系列(控件篇):GridControl的基本应用 一般属性设置 不显示分组框:Gridview->Option View->Show Group Panel=fal ...
- 【Leetcode】【Medium】Linked List Cycle
Given a linked list, determine if it has a cycle in it. 解题: 判断单链表是否具有环,使用两个指针once和twice遍历链表,once一次走一 ...
- M-PalindromeP-DP
Palindrome Partitioning 动态规划+深度优先搜索 https://leetcode.com/discuss/23480/c-solution-with-dp-and-dfs-12 ...
- 在IE浏览器输入测试servlet程序报:HTTP Status 404(The requested resource is not available)错
一.HTTP Status 404(The requested resource is not available)异常主要是路径错误或拼写错误造成的,请按以下步骤逐一排查: 1.未部署Web应用 2 ...
- MYSQL 升序排序但值为0的排最后
转载 http://blog.csdn.net/looksun/article/details/51445205 如一张表的数据如下: 需要根据gz列的值进行升序排序,但值为0的排在最后面,即最终结果 ...
- Parcel是个好玩意儿
今天学习了一下Parcel打包工具,确实感觉十分简单易上手,基本不需要配置,未来可能是一个主流的打包工具.相比较于Webpack来说,Parcel简直是毫无难度.接下来总结一下我的学习收获. 1 安装 ...
- PHP-----文件-----目录操作
目录操作 [1]创建目录(文件夹) mkdir("路径"); 例子: mkdir("./test"); 显示的结果: [2]删除目录(文件夹)只能删除空的文 ...
- tp5.0和tp3.2中前台模板IF标签和FOREACH的区别
IF标签 tp3.2 <if condition="($name eq 1) OR ($name gt 100) "> value1 <elseif condit ...