
Shiro源码分析之Subject和SecurityManager
Subject
毫无疑问,Subject是Shiro最重要的一个概念。
“Subject”只是一个安全术语,意味着应用程序用户的特定于安全性的“视图”。Shiro Subject实例代表单个应用程序用户的安全状态和相关操作。
创建
初次创建是在AbstractShiroFilter#doFilterInternal方法中:
final Subject subject = createSubject(request, response);
protected WebSubject createSubject(ServletRequest request, ServletResponse response) {

    return new WebSubject.Builder(getSecurityManager(), request, response).buildWebSubject();

}
创建的时候传入安全管理器,Subject.Builder是这样操作的:
public Builder(SecurityManager securityManager) {

    if (securityManager == null) {

        throw new NullPointerException("SecurityManager method argument cannot be null.");

    }

    this.securityManager = securityManager;

    this.subjectContext = newSubjectContextInstance();

    if (this.subjectContext == null) {

        throw new IllegalStateException("Subject instance returned from 'newSubjectContextInstance' " +

                "cannot be null.");

    }

    this.subjectContext.setSecurityManager(securityManager);

}

public Subject buildSubject() {

    return this.securityManager.createSubject(this.subjectContext);

}
这个安全管理器还是我们指定的那个DefaultWebSecurityManager,一路传过去的。这个subjectContext参数是一个DefaultSubjectContext,子接口中的Builder覆盖了父类的方法,实际赋予的是一个DefaultWebSubjectContext。
protected Subject doCreateSubject(SubjectContext context) {

    return getSubjectFactory().createSubject(context);

}
subjectFactory是安全管理器DefaultWebSecurityManager中默认的DefaultWebSubjectFactory:
public DefaultWebSecurityManager() {

    super();

    ((DefaultSubjectDAO) this.subjectDAO).setSessionStorageEvaluator(new DefaultWebSessionStorageEvaluator());

    this.sessionMode = HTTP_SESSION_MODE;

    setSubjectFactory(new DefaultWebSubjectFactory());

    setRememberMeManager(new CookieRememberMeManager());

    setSessionManager(new ServletContainerSessionManager());

}
最终的创建又回到:
public class DefaultWebSubjectFactory extends DefaultSubjectFactory {

    public DefaultWebSubjectFactory() {

        super();

    }

    public Subject createSubject(SubjectContext context) {

        if (!(context instanceof WebSubjectContext)) {

            return super.createSubject(context);

        }

        WebSubjectContext wsc = (WebSubjectContext) context;

        SecurityManager securityManager = wsc.resolveSecurityManager();

        Session session = wsc.resolveSession();

        boolean sessionEnabled = wsc.isSessionCreationEnabled();

        PrincipalCollection principals = wsc.resolvePrincipals();

        boolean authenticated = wsc.resolveAuthenticated();

        String host = wsc.resolveHost();

        ServletRequest request = wsc.resolveServletRequest();

        ServletResponse response = wsc.resolveServletResponse();

        return new WebDelegatingSubject(principals, authenticated, host, session, sessionEnabled,

                request, response, securityManager);

    }

    //......

}
根据相关属性new出来一个WebDelegatingSubject。
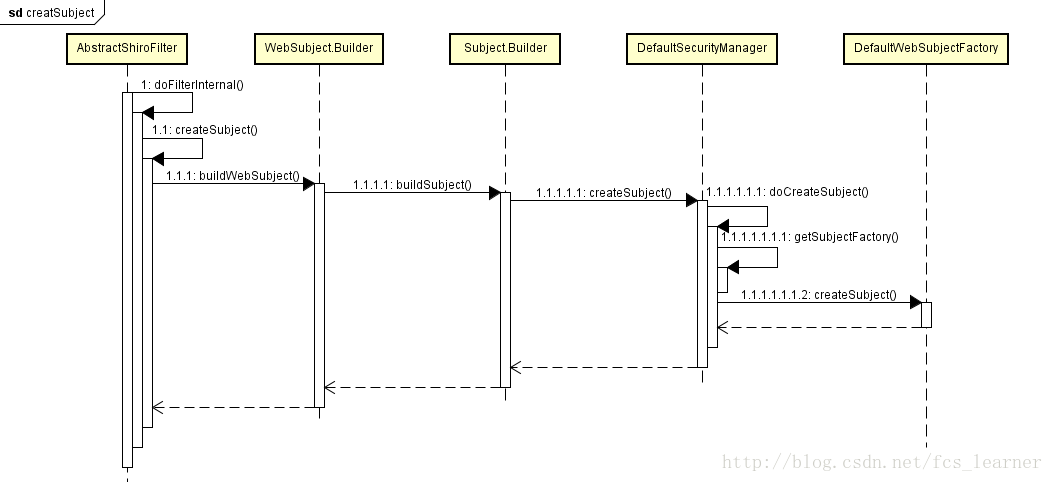
shiro中很多都是这样的继承和组合关系:
DefaultSecurityManager -> DefaultSubjectFactory -> DelegatingSubject
DefaultWebSecurityManager -> DefaultWebSubjectFactory -> WebDelegatingSubject
再回到创建的方法:
final Subject subject = createSubject(request, response);

//noinspection unchecked

subject.execute(new Callable() {

    public Object call() throws Exception {

        updateSessionLastAccessTime(request, response);

        executeChain(request, response, chain);

        return null;

    }

});
这个execute方法是在DelegatingSubject中实现的:
public <V> V execute(Callable<V> callable) throws ExecutionException {

    Callable<V> associated = associateWith(callable);

    try {

        return associated.call();

    } catch (Throwable t) {

        throw new ExecutionException(t);

    }

}

public <V> Callable<V> associateWith(Callable<V> callable) {

    return new SubjectCallable<V>(this, callable);

}
SubjectCallable首先构造了一个ThreadState:
public SubjectCallable(Subject subject, Callable<V> delegate) {

    this(new SubjectThreadState(subject), delegate);

}
associated.call()调用ThreadState.bind():
public V call() throws Exception {

    try {

        threadState.bind();

        return doCall(this.callable);

    } finally {

        threadState.restore();

    }

}
SubjectThreadState的bind方法:
public void bind() {

    SecurityManager securityManager = this.securityManager;

    if ( securityManager == null ) {

        //try just in case the constructor didn't find one at the time:

        securityManager = ThreadContext.getSecurityManager();

    }

    this.originalResources = ThreadContext.getResources();

    ThreadContext.remove();

    ThreadContext.bind(this.subject);

    if (securityManager != null) {

        ThreadContext.bind(securityManager);

    }

}
这样就妥妥地把当前subject和线程绑定到了一起(还有securityManager)。
在这里遇到一个问题,记录下:
https://www.oschina.net/question/2275855_2273492
其实这只是每次进入核心过滤器时默认为我们创建的一个Subject,当调用subject.login方法之后会再次创建一个Subject,后面登录部分会做详细介绍。
获取
Subject subject = SecurityUtils.getSubject();
public static Subject getSubject() {

    Subject subject = ThreadContext.getSubject();

    if (subject == null) {

        subject = (new Subject.Builder()).buildSubject();

        ThreadContext.bind(subject);

    }

    return subject;

}
绑定是通过ThreadContext,获取当然也是从其取。
public abstract class ThreadContext {

    private static final Logger log = LoggerFactory.getLogger(ThreadContext.class);

    public static final String SECURITY_MANAGER_KEY = ThreadContext.class.getName() + "_SECURITY_MANAGER_KEY";

    public static final String SUBJECT_KEY = ThreadContext.class.getName() + "_SUBJECT_KEY";

    private static final ThreadLocal<Map<Object, Object>> resources = new InheritableThreadLocalMap<Map<Object, Object>>();

    private static Object getValue(Object key) {

        return resources.get().get(key);

    }

    public static Object get(Object key) {

        Object value = getValue(key);

        return value;

    }

    public static Subject getSubject() {

        return (Subject) get(SUBJECT_KEY);

    }

}
最终是到ThreadLocal中拿,不过这个ThreadLocal是 InheritableThreadLocalMap 类型的(继承自InheritableThreadLocal)。
每个线程都有一个Map
SecurityManager
<!-- 安全管理器 -->

<bean id="securityManager" class="org.apache.shiro.web.mgt.DefaultWebSecurityManager">

    <property name="realm" ref="casRealm" />

    <property name="sessionManager" ref="sessionManager" />

    <property name="cacheManager" ref="shiroCacheManager" />

    <!-- <property name="rememberMeManager" ref="rememberMeManager" />  -->

</bean>

<bean id="sessionManager" class="org.apache.shiro.web.session.mgt.ServletContainerSessionManager"/>
public interface SecurityManager extends Authenticator, Authorizer, SessionManager {
Subject login(Subject subject, AuthenticationToken authenticationToken) throws AuthenticationException;
void logout(Subject subject);
Subject createSubject(SubjectContext context);
}安全管理器继承了Authenticator, Authorizer, SessionManager三个接口。自顶向下第一个抽象类是CachingSecurityManager,接着是RealmSecurityManager,后面是AuthenticatingSecurityManager,AuthorizingSecurityManager,SessionsSecurityManager。
然后才是DefaultSecurityManager,DefaultWebSecurityManager。
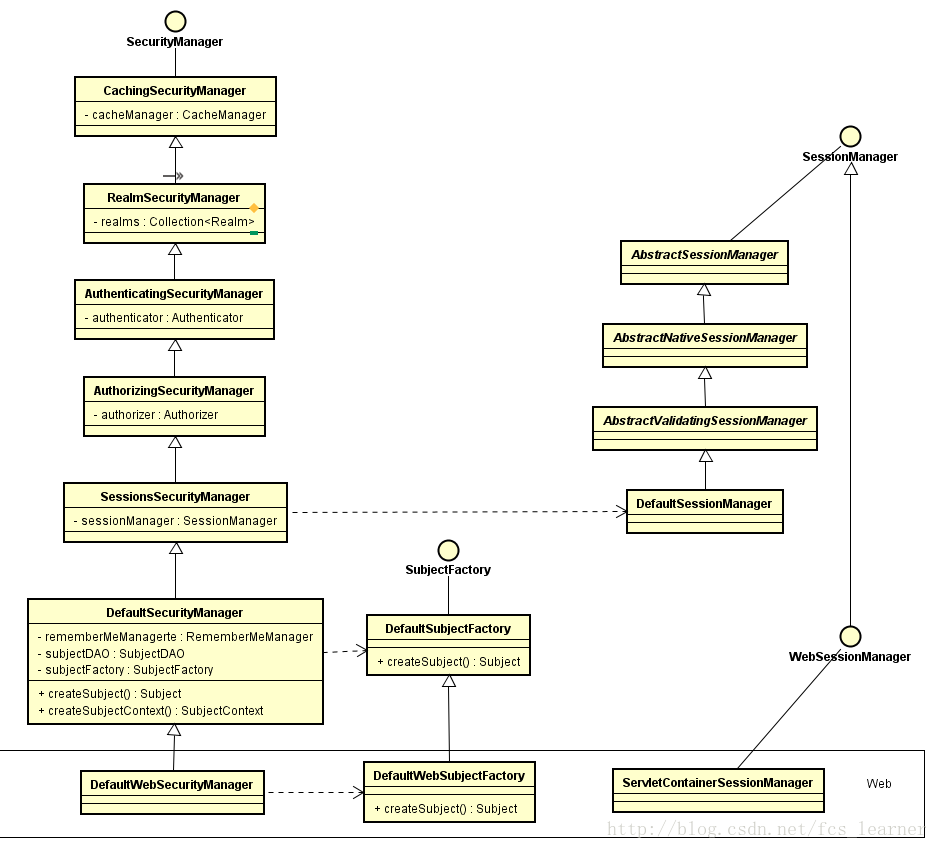
由于是web项目,我们指定了DefaultWebSecurityManager,在构造器中会为我们设置相匹配的属性(都是和web相关的):
public DefaultWebSecurityManager() {

    super();

    ((DefaultSubjectDAO) this.subjectDAO).setSessionStorageEvaluator(new DefaultWebSessionStorageEvaluator());

    this.sessionMode = HTTP_SESSION_MODE;

    setSubjectFactory(new DefaultWebSubjectFactory());

    setRememberMeManager(new CookieRememberMeManager());

    setSessionManager(new ServletContainerSessionManager());

}
SessionsSecurityManager持有一个sessionManager对象,对sessionManager接口的实现是转移到这个对象上来的:
public abstract class SessionsSecurityManager extends AuthorizingSecurityManager {

    private SessionManager sessionManager;

    public SessionsSecurityManager() {

        super();

        this.sessionManager = new DefaultSessionManager();

        applyCacheManagerToSessionManager();

    }

}
AuthenticatingSecurityManager,AuthorizingSecurityManager类似,这两个抽象管理器在无参构造函数中创建了默认的对象:
public abstract class AuthorizingSecurityManager extends AuthenticatingSecurityManager {

    private Authorizer authorizer;

    public AuthorizingSecurityManager() {

        super();

        this.authorizer = new ModularRealmAuthorizer();

    }

}

public abstract class AuthenticatingSecurityManager extends RealmSecurityManager {

    private Authenticator authenticator;

    public AuthenticatingSecurityManager() {

        super();

        this.authenticator = new ModularRealmAuthenticator();

    }

}
所以这个安全管理器几乎承担了所有的操作,然后转移到具体的对象。它的层次结构非常清晰,职责分明。对Subject所有操作最终都会转移到SecurityManager。
Shiro源码分析之Subject和SecurityManager的更多相关文章
- Shiro源码分析之SecurityManager对象获取
目录 SecurityManager获取过程 1.SecurityManager接口介绍 2.SecurityManager实例化时序图 3.源码分析 4.总结 @ 上篇文章Shiro源码分析之获 ...
- Shiro 源码分析
http://my.oschina.net/huangyong/blog/215153 Shiro 是一个非常优秀的开源项目,源码非常值得学习与研究. 我想尝试做一次 不一样 的源码分析:源码分析不再 ...
- Shiro源码分析
1.入口类:AbstractAuthenticator 用户输入的登录信息经过其authenticate方法: public final AuthenticationInfo authenticate ...
- Shiro源码分析-初始化-Realm
在上一篇介绍SecurityManager的初始化过程中,也有realm的粗略介绍. realm的概念在安全领域随处可见: 各种中间件的realm.spring security的realm.shir ...
- Shiro入门学习之shi.ini实现认证及源码分析(二)
一.Shiro.ini文件 1.文件说明 ①ini(InitializationFile)初始文件:Window系统文件扩展名 ②Shiro使用时可以连接数据库,也可以不连接数据库(可以使用shiro ...
- 源码分析shiro认证授权流程
1. shiro介绍 Apache Shiro是一个强大易用的Java安全框架,提供了认证.授权.加密和会话管理等功能: 认证 - 用户身份识别,常被称为用户“登录”: 授权 - 访问控制: 密码加密 ...
- shiro实现无状态的会话,带源码分析
转载请在页首明显处注明作者与出处 朱小杰 http://www.cnblogs.com/zhuxiaojie/p/7809767.html 一:说明 在网上都找不到相关的信息,还是翻了大半天 ...
- Shiro源码解析-Session篇
上一篇Shiro源码解析-登录篇中提到了在登录验证成功后有对session的处理,但未详细分析,本文对此部分源码详细分析下. 1. 分析切入点:DefaultSecurityManger的login方 ...
- spark源码分析以及优化
第一章.spark源码分析之RDD四种依赖关系 一.RDD四种依赖关系 RDD四种依赖关系,分别是 ShuffleDependency.PrunDependency.RangeDependency和O ...
随机推荐
- Android开发——为移动的Paint元素指定图片的方法
源 起 最近在写一个类似“围住神经猫”的应用,现在需要给一个可以移动的Paint元素指定一张图片,如下图,要把黄点改成其他图片: Paint所在的类继承于SurfaceView,SurfaceVie ...
- windows下用时间戳创建文件名
英文环境下: echo Archive_%date:~-4,4%%date:~-10,2%%date:~-7,2%_%time:~0,2%%time:~3,2%%time:~6,2%.zip 中文: ...
- Java程序运行时的几个区域
Java运行时涉及到的区域 几个基本概念: 1.Java对象 2.Java方法 3.一个编译好的类,以class文件的形式出现 4.Java的本地方法 5.线程私有和线程共有 一 ...
- 【20161109】noip模拟赛
1.Game [题目描述] 明明和亮亮在玩一个游戏.桌面上一行有n个格子,一些格子中放着棋子.明明和亮亮轮流选择如下方式中的一种移动棋子(图示中o表示棋子,*表示空着的格子): 1) 当一枚棋子的右边 ...
- 「6月雅礼集训 2017 Day4」qyh(bzoj2687 交与并)
原题传送门:http://www.lydsy.com/JudgeOnline/problem.php?id=2687 [题目大意] 给出若干区间,求一个区间的大于等于2的子集,使得 |区间并| 和 | ...
- Android检测View的可见性
Android中我们经常会用到判断View的可见行,当然有人会说View.VISIBLE就可以了,但是有时候这个真是满足不了,有时候我们为了优化,在View滚到得不可见的时候或者由于滚到只显示了部分内 ...
- jqgrid 翻页记录选中行
简单的jqgrid列表 $("#list").jqGrid({ url:contextPath + "/getList", postData: data, da ...
- Python作业模拟登陆(第一周)
模拟登陆:1. 用户输入帐号密码进行登陆2. 用户信息保存在文件内3. 用户密码输入错误三次后锁定用户 思路: 1. 用户名密码文件为passwd,锁定用户文件为lock 2. 用户输入账号密码采用i ...
- 74cms 注入exp
遇到就瞎写了一个: #!/usr/bin/env python #encoding:utf-8 #by i3ekr import requests,optparse,re parse = optpar ...
- Python模块学习 - psutil
psutil模块介绍 psutil是一个开源切跨平台的库,其提供了便利的函数用来获取才做系统的信息,比如CPU,内存,磁盘,网络等.此外,psutil还可以用来进行进程管理,包括判断进程是否存在.获取 ...