
Android之layout_weight解析
我们先来看以下这段Android布局代码:
 <LinearLayout

     xmlns:android="http://schemas.android.com/apk/res/android"

     android:layout_width="match_parent"

     android:layout_height="match_parent">

     <TextView

         android:layout_width="0.0dip"

         android:layout_height="100.0dip"

         android:layout_weight="1"

         android:background="@color/colorAccent"

         android:gravity="center"

         android:text="1111111111111111111"

         android:textColor="@color/black"

         android:textSize="18.0sp"

         android:textStyle="bold"/>

     <TextView

         android:layout_width="0.0dip"

         android:layout_height="100.0dip"

         android:layout_weight="2"

         android:background="@color/colorPrimary"

         android:gravity="center"

         android:text="2"

         android:textColor="@color/black"

         android:textSize="18.0sp"

         android:textStyle="bold"/>

     <TextView

         android:layout_width="0.0dip"

         android:layout_height="100.0dip"

         android:layout_weight="3"

         android:background="@color/white"

         android:gravity="center"

         android:text="3"

         android:textColor="@color/black"

         android:textSize="18.0sp"

         android:textStyle="bold"/>

 </LinearLayout>
layout_weight解析一代码
在线性布局LinearLayout中,三个TextView以layout_weight属性分别是1、2、3来布局,它们的高度都是100dip,宽度都是0dip。在这种情况下,三个TextView的布局是什么样子的呢?答案如下图所示。
如上图所示,三个TextView所占的宽度分别是1:2:3,这是在我们意料之中的,在我们意料之外的是,第一个TextView的位置偏下。这是为什么呢?我们只需要对结果图稍作处理,答案就会显而易见,见下图。

如上图所示,我们加上一道“辅助线”之后就会发现,虽然位置参差不齐,但它们的第一行文本的位置是在同一高度的。由此我们得出结论:在Android的LinearLayout布局中,TextView默认是根据第一行文本来对齐的。可是我们怎样消去这种文本对齐关系呢?我们只需要在父布局的LinearLayout中添加这样一句代码 android:baselineAligned="false" 就可以解决这个问题,解决后的布局图如下:

如果我们把某一个TextView的layout_width属性设置为wrap_content,结果又会如何呢?如果我们将上面的布局代码修改成如下的样子,那么我们会得到如下图所示的结果。
 <LinearLayout

     xmlns:android="http://schemas.android.com/apk/res/android"

     android:layout_width="match_parent"

     android:layout_height="match_parent"

     android:baselineAligned="false">

     <TextView

         android:layout_width="wrap_content"

         android:layout_height="100.0dip"

         android:layout_weight="1"

         android:background="@color/colorAccent"

         android:gravity="center"

         android:text="1111111111111111111"

         android:textColor="@color/black"

         android:textSize="18.0sp"

         android:textStyle="bold"/>

     <TextView

         android:layout_width="0.0dip"

         android:layout_height="100.0dip"

         android:layout_weight="2"

         android:background="@color/colorPrimary"

         android:gravity="center"

         android:text="2"

         android:textColor="@color/black"

         android:textSize="18.0sp"

         android:textStyle="bold"/>

     <TextView

         android:layout_width="0.0dip"

         android:layout_height="100.0dip"

         android:layout_weight="3"

         android:background="@color/white"

         android:gravity="center"

         android:text="3"

         android:textColor="@color/black"

         android:textSize="18.0sp"

         android:textStyle="bold"/>

 </LinearLayout>
layout_weight解析二代码
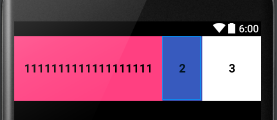
我们把第一个TextView的宽度属性设置成wrap_content,结果如上图所示。从结果中我们可以看到,我们得到的结果不符合1:2:3的布局比例。这时为什么呢?这时因为,Android会先分配已经声明尺寸的控件的空间,再分配未声明尺寸的控件的空间。在这个例子中,第一个TextView的宽度已经声明(wrap_content),而另外两个TextView的宽度都是0(等待父布局按layout_weight分配),那么Android就会先分配第一个TextView的空间,然后再把剩余的空间按1:2:3的比例分配给三个TextView。
如果三个TextView的宽度都是已经声明的,结果又会是怎样的呢?我们把三个TextView的宽度比例改成1:2:2,并把它们的宽度都设置成match_parent(代码如下),这样,我们就会得到如下图所示的结果。
 <LinearLayout

     xmlns:android="http://schemas.android.com/apk/res/android"

     android:layout_width="match_parent"

     android:layout_height="match_parent"

     android:baselineAligned="false">

     <TextView

         android:layout_width="match_parent"

         android:layout_height="100.0dip"

         android:layout_weight="1"

         android:background="@color/colorAccent"

         android:gravity="center"

         android:text="1111111111111111111"

         android:textColor="@color/black"

         android:textSize="18.0sp"

         android:textStyle="bold"/>

     <TextView

         android:layout_width="match_parent"

         android:layout_height="100.0dip"

         android:layout_weight="2"

         android:background="@color/colorPrimary"

         android:gravity="center"

         android:text="2"

         android:textColor="@color/black"

         android:textSize="18.0sp"

         android:textStyle="bold"/>

     <TextView

         android:layout_width="match_parent"

         android:layout_height="100.0dip"

         android:layout_weight="2"

         android:background="@color/white"

         android:gravity="center"

         android:text="3"

         android:textColor="@color/black"

         android:textSize="18.0sp"

         android:textStyle="bold"/>

 </LinearLayout>
layout_weight解析三代码

按照我们上一个demo得到的结论,Android先分配已经声明的控件的空间,那么这里,这三个TextView的宽度应该是按照1:2:2的比例分配的,即把屏幕宽度分成五份,然后让这三个TextView分别占一份、两份、两份。但现在为什么得到的结果与理论不相同呢?其实,我们得到的结果正是“一丝不苟”的按照我们得到的理论进行的,下面我们来分析一下。
我们假设手机屏幕的宽度是480dip,那么按照我们之前得出的结论(先给已经声明的控件分配空间),这三个TextView的宽度都应该是480dip(和屏幕的尺寸相同),那么剩余的空间就是480-(480*3)=-960,也就是说,我们要把-960dip评分成五份,然后按照1:2:2的比例分配给三个TextView。那么,第一个TextView就会分配到-192dip,第二个和第三个TextView都分配到-384dip。用它们之前分配的和屏幕同样宽度的480dip分别减去它们后来分配的尺寸,就可以求出它们实际所占的尺寸分别是288dip、96dip和96dip,即3:1:1。
layout_weight还有一个非常有用的作用,我们来看下面这个需求:我们想要得到一个占屏幕二分之一的TextView,我们该怎么办呢?这时,我们就可以利用layout_weight来解决这个问题。代码如下,结果如下图所示。
 <LinearLayout

     xmlns:android="http://schemas.android.com/apk/res/android"

     android:layout_width="match_parent"

     android:layout_height="match_parent"

     android:weightSum="2">

     <TextView

         android:layout_width="0.0dip"

         android:layout_height="100.0dip"

         android:layout_weight="1"

         android:background="@color/colorAccent"

         android:gravity="center"

         android:text="1111111111111111111"

         android:textColor="@color/black"

         android:textSize="18.0sp"

         android:textStyle="bold"/>

 </LinearLayout>
layout_weight的另一个作用

Android之layout_weight解析的更多相关文章
- Android Service完全解析,关于服务你所需知道的一切(下)
转载请注册出处:http://blog.csdn.net/guolin_blog/article/details/9797169 在上一篇文章中,我们学习了Android Service相关的许多重要 ...
- Android Service完全解析,关于服务你所需知道的一切(上)
转载请注明出处:http://blog.csdn.net/guolin_blog/article/details/11952435 相信大多数朋友对Service这个名词都不会陌生,没错,一个老练的A ...
- [转] Android Volley完全解析(一),初识Volley的基本用法
版权声明:本文出自郭霖的博客,转载必须注明出处. 目录(?)[-] Volley简介 下载Volley StringRequest的用法 JsonRequest的用法 转载请注明出处:http ...
- Android OkHttp完全解析 --zz
参考文章 https://github.com/square/okhttp http://square.github.io/okhttp/ 泡网OkHttp使用教程 Android OkHttp完全解 ...
- Android IntentService完全解析 当Service遇到Handler
一 概述 大家都清楚,在Android的开发中,凡是遇到耗时的操作尽可能的会交给Service去做,比如我们上传多张图,上传的过程用户可能将应用置于后台,然后干别的去了,我们的Activity就很可能 ...
- Android Volley完全解析
1. Volley简介 我们平时在开发Android应用的时候不可避免地都需要用到网络技术,而多数情况下应用程序都会使用HTTP协议来发送和接收网络数据.Android系统中主要提供了两种方式来进行H ...
- Android OkHttp完全解析 是时候来了解OkHttp了
Android OkHttp完全解析 是时候来了解OkHttp了 标签: AndroidOkHttp 2015-08-24 15:36 316254人阅读 评论(306) 收藏 举报 分类: [an ...
- Android Bitmap 全面解析(四)图片处理效果对比 ...
对比对象: UIL Volley 官方教程中的方法(此系列教程一里介绍的,ImageLoader的处理方法和官方的差不多) -------------------------------------- ...
- android源码解析(十七)-->Activity布局加载流程
版权声明:本文为博主原创文章,未经博主允许不得转载. 好吧,终于要开始讲讲Activity的布局加载流程了,大家都知道在Android体系中Activity扮演了一个界面展示的角色,这也是它与andr ...
随机推荐
- Oracle约束(Constraint)详解
概述 约束是数据库用来确保数据满足业务规则的手段,不过在真正的企业开发中,除了主键约束这类具有强需求的约束,像外键约束,检查约束更多时候仅仅出现在数据库设计阶段,真实环境却很少应用,更多是放到程序逻辑 ...
- 利用epoll写一个"迷你"的网络事件库
epoll是linux下高性能的IO复用技术,是Linux下多路复用IO接口select/poll的增强版本,它能显著提高程序在大量并发连接中只有少量活跃的情况下的系统CPU利用率.另一点原因就是获取 ...
- org.hibernate.HibernateException: No Session found for current thread
spring.springmvc和hibernate整合 在sessionFactory.getCurrentSession()时,出现以下异常 No Session found for curren ...
- NYOJ 762
容斥原理 http://blog.csdn.net/shiren_bod/article/details/5787722
- C#.NET 大型通用信息化系统集成快速开发平台 4.1 版本 - 角色成员功能的改进支持公司加入到角色
我们公司有1万多个网点,每个网点都可以看成是一个公司,公司对不同的网点有不同的策略,商业逻辑,每个网点的人员也都是在不断变化,全国有接近10万从业人员,当我们设计好业务逻辑程序后,不可能因为这些人员的 ...
- Servlet容器Tomcat中web.xml中url-pattern的配置详解[附带源码分析]
目录 前言 现象 源码分析 实战例子 总结 参考资料 前言 今天研究了一下tomcat上web.xml配置文件中url-pattern的问题. 这个问题其实毕业前就困扰着我,当时忙于找工作. 找到工作 ...
- 备忘:mybatis 3的使用记录
这是一篇记录.mybatis是一个部分模仿ORM的framework.是一个介于ORM和原始JDBC的框架.既可以提供ORM的操作对象的特性,又能从详细地控制最终的SQL.达到一个平衡.我们还是得写s ...
- smarty下如何将一个数保存为两位小数
smarty模板是一种缓存技术,下面介绍一下smarty string_format用法 取小数点后2位: 用法如下: //index.php$smarty = new Smarty; $smarty ...
- 重新注册IIS
出现问题的原因是先装了.NET4.0,再装IIS造成 处理方法:管理员权限执行cmd, C:\Windows\Microsoft.NET\Framework\v4.0.30319\aspnet_reg ...
- oneThink后台添加插件步骤详解
内容管理框架:oneThink 版本:V1.1.141212 (注:v1.1也有很多版本,一不小心就下到V1.1.140202 去了,还有其他版本,建议去代码托管平台下载最新版本) 我也不偷懒,把每一 ...