个人笔记-----Vue中多个router-view应用
单个 <router-view/> 和多个 <router-view/> 的区别,
单个 <router-view/> 只是一个区域的变化,不需要设置name属性,在设置路由的时候单个<router-view/>使用的是component,
多个<router-view/>里面需要设置一个name属性,设置路由的时候单个<router-view/>使用的是components,
————————————————
<div>
<router-view/>
<router-view class="left" name="nav" />
<router-view class="right" name="con" />
</div>
然后在router.js中进行配置,注意:component改成要components,components是一个对象了,nav:AboutNav,左侧的nav就是<router-view name="nav" /> 标签里的 name属性值,nav:AboutNav,右侧的AboutNav就是引用组件时候import AboutNav from './views/AboutNav.vue'中的AboutNav。
import AboutCon from './views/AboutCon.vue'
import AboutNav from './views/AboutNav.vue'
{
path: '/about',
name: 'about',
components:
{
nav:AboutNav,
con:AboutCon
}
}
--------------------
other
vue同一个页面可以有多个router-view
参考:https://blog.csdn.net/u011615787/article/details/80075240
分别给router-view定义一个name,默认显示的可以不用定义
自己先在components文件夹内写4个组件,准备放入4个router-viewer标签,我的分别是
app.vue
|
1
2
3
4
5
6
7
8
9
10
11
12
13
14
15
16
17
18
19
20
21
22
23
24
25
26
27
28
29
30
31
32
33
34
35
36
37
38
39
40
41
42
43
44
45
46
47
48
49
50
51
52
53
54
|
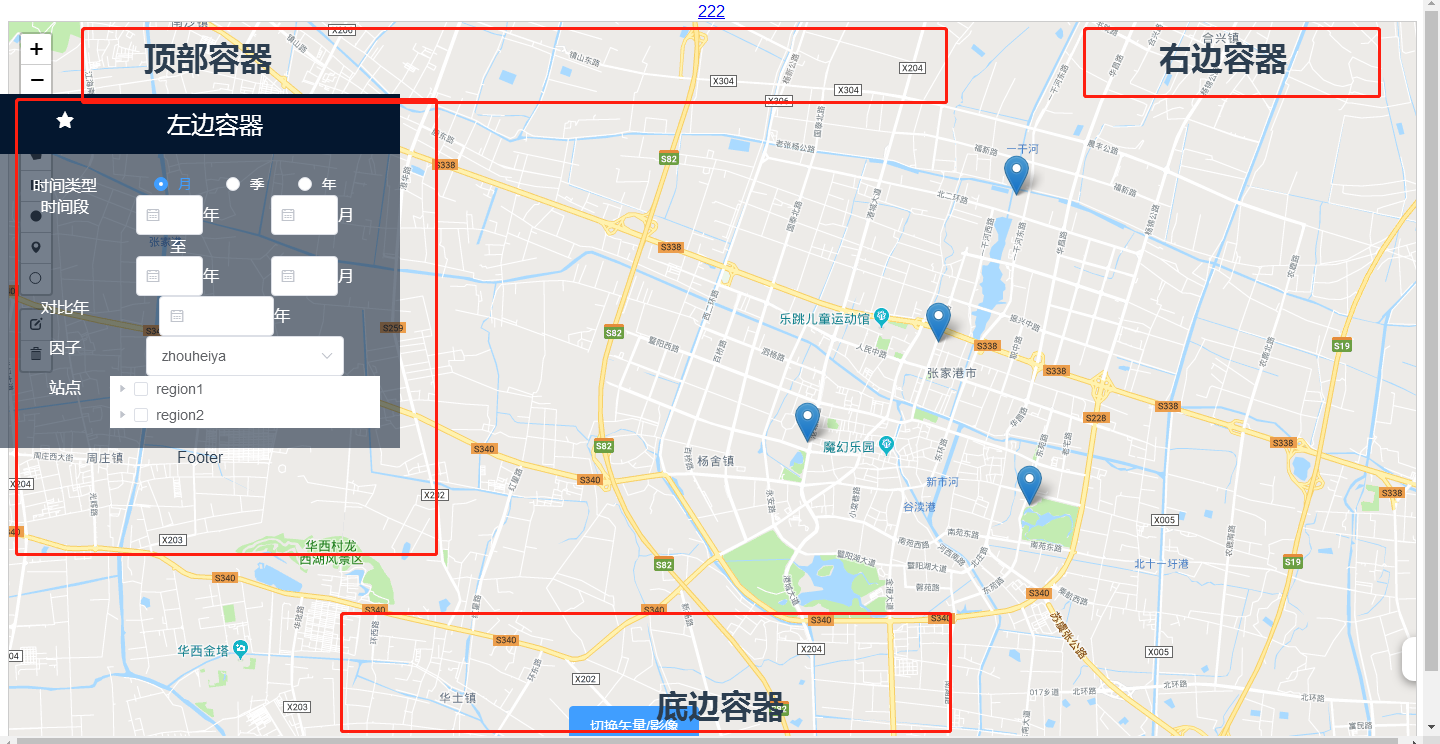
<template> <div id="app"> <!-- <img src="./assets/logo.png"> --> <!-- <container-Left/> --> <router-link to="/HelloWorld" > 222 </router-link> <router-view/> <router-view name="left" class="area left"/> <router-view name="right" class="area right"/> <router-view name="logo" class="area "/> <router-view name="bottom" class="area bottom"/> </div></template><script>import containerLeft from './components/containerLeft.vue'export default { name: 'App', components:{ containerLeft, }}</script><style>#app { font-family: 'Avenir', Helvetica, Arial, sans-serif; -webkit-font-smoothing: antialiased; -moz-osx-font-smoothing: grayscale; text-align: center; color: #2c3e50; /* margin-top: 60px; */}.area{ width: 400px; height:400px; border:1px red soild; position: absolute; top:20px; z-index: 1002;}.left{ left:0px; top:100px;}.right{ right: 0px;}.bottom{ top: 90%; width: 100%; height: 30px;}</style> |
路由文件router/index.js
核心:
|
1
2
3
4
5
6
7
8
9
10
11
12
13
14
15
16
17
18
19
20
21
22
23
24
25
26
27
28
29
30
31
32
33
34
35
36
37
38
39
40
41
42
43
44
45
46
47
48
49
50
51
52
53
54
55
56
57
58
|
import Vue from 'vue'import Router from 'vue-router'import HelloWorld from '@/components/HelloWorld'import Veaflet from '@/components/Veaflet'import containerLeft from '@/components/containerLeft'import containerRight from '@/components/containerRight'import containerTop from '@/components/containerTop'import containerBottom from '@/components/containerBottom'import lefttree from '@/components/lefttree'Vue.use(Router)// 创建一个路由器实例// 并且配置路由规则const router = new Router({ routes: [ { path: '/', name: 'Veaflet', meta:{title:'Veaflet'}, components:{ default: Veaflet, left:containerLeft, right:containerRight, logo:containerTop, bottom:containerBottom } }, { path: '/HelloWorld', name: 'HelloWorld', meta:{title:'HelloWorld'}, component: HelloWorld }, { path: '/containerLeft', name: 'containerLeft', meta:{title:'containerLeft'}, component: containerLeft }, { path: '/lefttree', name: 'lefttree', meta:{title:'lefttree'}, component: lefttree } ]}) //修改动态网页标题 beforeEach 导航钩子,路由改变前触发 router.beforeEach((to,from,next) =>{ //window.document.title = to.meta.title; window.document.title = to.name; next(); }) router.afterEach((to,from,next) =>{ window.scrollTo(0,0); }) export default router; |
运行效果如图:
个人笔记-----Vue中多个router-view应用的更多相关文章
- vue中$route 和$router的区别
在vue中会出现一种情况 const url=this.$route.query.returnURL; this.$router.push(url); $router和$route的区别傻傻的分 ...
- 关于Vue中,$this.router.push到当前页面,只是传入参数不同,页面不刷新的问题解决
在页面的watch中,监听$router的变化 watch: { $route (to, from) { this.$router.go(0) } } 其中this.$router.go(0)为刷新页 ...
- vue中$router.push打开新窗口
在vue中使用 this.$router.push({ path: '/home' }) 默认是替代本窗口 如果想新开一个窗口,可以使用下面的方式: let routeData = this.$ro ...
- Vue学习笔记七:Vue中的样式
目录 两种样式 class样式 内联样式 两种样式 Vue中使用样式方式有两种,一种是class样式,一种是内联样式也就是style class样式 class样式使用的方式有5种,HTML如下 &l ...
- Vue中router两种传参方式
Vue中router两种传参方式 1.Vue中router使用query传参 相关Html: <!DOCTYPE html> <html lang="en"> ...
- vue中$watch源码阅读笔记
项目中使用了vue,一直在比较computed和$watch的使用场景,今天周末抽时间看了下vue中$watch的源码部分,也查阅了一些别人的文章,暂时把自己的笔记记录于此,供以后查阅: 实现一个简单 ...
- [Vue 牛刀小试]:第十二章 - 使用 Vue Router 实现 Vue 中的前端路由控制
一.前言 前端路由是什么?如果你之前从事的是后端的工作,或者虽然有接触前端,但是并没有使用到单页面应用的话,这个概念对你来说还是会很陌生的.那么,为什么会在单页面应用中存在这么一个概念,以及,前端路由 ...
- vue中$router以及$route的使用
路由基本概念 route,它是一条路由. { path: '/home', component: Home } routes,是一组路由. const routes = [ { path: '/hom ...
- Vue 中的Vue Router一级路由,二级路由,三级路由以及跳转
今天编写了一下Vue中的路由 先用命令行新建一个空的项目,并且我知道要用路由,就下载了路由的相关依赖 vue init webpack demo5 完毕之后进入所在的项目 cd demo5 之后用vs ...
随机推荐
- 「BZOJ2839」集合计数
「BZOJ2839」集合计数 题目大意: 一个包含 \(n\) 个数的集合有 \(2^n\) 个子集,从这些子集中取出若干个集合(至少一个),使他们的交集的元素个数恰好为 \(k\),求方案数,答案对 ...
- Shell编程之条件语句:if、case语句
Shell编程之条件语句:if.case语句 一.条件测试 1)test命令测试 2)整数值比较 ...
- SpringBoot默认首页跳转设置
大家在使用SpringBoot时候会遇到将系统接口入门设置为"/",那么这个就是我们常见的默认首页跳转的设置.解决的方式有两种 第一种方式:controller里添加一个" ...
- deepin解压乱码
使用unzip命令解压:unzip -O GBK xxxx.zip -d xxx
- Linux从入门到进阶全集——【第十四集:Shell编程-export命令】
参考: https://www.cnblogs.com/guojun-junguo/p/9855356.html 功能说明:设置或显示环境变量. 语 法:export [-fnp][变量名称]=[变量 ...
- HTML - form表单操作
<!DOCTYPE html><html lang="en"><head> <meta charset="UTF-8" ...
- 谷粒学院-2-mybatisplus
一.参考文档 官网:http://mp.baomidou.com/ 参考教程:http://mp.baomidou.com/guide/ MyBatis-Plus(简称 MP)是一个 MyBatis ...
- spring-3-spring整合mybatis
版本和依赖 MyBatis-Spring 需要以下版本: maven依赖 <dependency> <groupId>org.mybatis</groupId> & ...
- 【模拟】报名签到 luogu-4445
AC代码 #include <bits/stdc++.h> using namespace std; #define ms(a,b) memset(a,b,sizeof(a)) typed ...
- Flask之 Marshmallow 踩坑实录
1.Marshmallow.ModelSchema 报错 AttributeError: 'Marshmallow' object has no attribute 'ModelSchema' `fr ...