opengl 学习 03
opengl 学习 之 03 lesson
简介
使用MVP变换来观察生成的三角形
link
http://www.opengl-tutorial.org/uncategorized/2017/06/07/website-update/
向量介绍
We will now have (x,y,z,w) vectors.
If w == 1, then the vector (x,y,z,1) is a position in space.
If w == 0, then the vector (x,y,z,0) is a direction.
变换矩阵(Translation matrices)
In 3D graphics we will mostly use 4x4 matrices. They will allow us to transform our (x,y,z,w) vertices. This is done by multiplying the vertex with the matrix :
1 & 0 & 0 & X \\
0 & 1 & 0 & Y \\
0 & 0 & 1 & Z \\
0 & 0 & 0 & 1
\end{array}\right]
\]
Example
So if we want to translate the vector (10,10,10,1) of 10 units in the X direction, we get :
1 & 0 & 0 & 10 \\
0 & 1 & 0 & 0 \\
0 & 0 & 1 & 0 \\
0 & 0 & 0 & 1
\end{array}\right] *\left[\begin{array}{c}
10 \\
10 \\
10 \\
1
\end{array}\right]=\left[\begin{array}{c}
1 * 10+0 * 10+0 * 10+10 * 1 \\
0 * 10+1 * 10+0 * 10+0 * 1 \\
0 * 10+0 * 10+1 * 10+0 * 1 \\
0 * 10+0 * 10+0 * 10+1 * 1
\end{array}\right]=\left[\begin{array}{c}
10+0+0+10 \\
0+10+0+0 \\
0+0+10+0 \\
0+0+0+1
\end{array}\right]=\left[\begin{array}{c}
20 \\
10 \\
10 \\
1
\end{array}\right]
\]
Let’s now see what happens to a vector that represents a direction towards the -z axis : (0,0,-1,0)
1 & 0 & 0 & 10 \\
0 & 1 & 0 & 0 \\
0 & 0 & 1 & 0 \\
0 & 0 & 0 & 1
\end{array}\right] *\left[\begin{array}{c}
0 \\
0 \\
-1 \\
0
\end{array}\right]=\left[\begin{array}{ccccccc}
1 * 0 & + & 0 * 0 & + & 0 * 0 & + & 10 * 0 \\
0 * 0 & + & 1 * 0 & + & 0 * 0 & + & 0 * 0 \\
0 *-1 & + & 0 *-1 & + & 1 *-1 & + & 0 *-1 \\
0 * 0 & + & 0 * 0 & + & 0 * 0 & + & 1 * 0
\end{array}\right]=\left[\begin{array}{c}
0+0+0+0 \\
0+0+0+0 \\
0+0+-1+0 \\
0+0+0+0
\end{array}\right]=\left[\begin{array}{c}
0 \\
0 \\
-1 \\
0
\end{array}\right]
\]
单位阵(Identity matrix)
1 & 0 & 0 & 0 \\
0 & 1 & 0 & 0 \\
0 & 0 & 1 & 0 \\
0 & 0 & 0 & 1
\end{array}\right] \times\left[\begin{array}{l}
x \\
y \\
z \\
w
\end{array}\right]=\left[\begin{array}{l}
1 * x+0 * y+0 * z+0 * w \\
0 * x+1 * y+0 * z+0 * w \\
0 * x+0 * y+1 * z+0 * w \\
0 * x+0 * y+0 * z+1 * w
\end{array}\right]=\left[\begin{array}{l}
x+0+0+0 \\
0+y+0+0 \\
0+0+z+0 \\
0+0+0+w
\end{array}\right]=\left[\begin{array}{c}
x \\
y \\
z \\
w
\end{array}\right]
\]
单位阵啥也不干
缩放矩阵(Scaling matrices)
x & 0 & 0 & 0 \\
0 & y & 0 & 0 \\
0 & 0 & z & 0 \\
0 & 0 & 0 & 1
\end{array}\right]
\]
So if you want to scale a vector (position or direction, it doesn’t matter) by 2.0 in all directions :
2 & 0 & 0 & 0 \\
0 & 2 & 0 & 0 \\
0 & 0 & 2 & 0 \\
0 & 0 & 0 & 1
\end{array}\right] \times\left[\begin{array}{l}
x \\
y \\
z \\
w
\end{array}\right]=\left[\begin{array}{l}
2 * x+0 * y+0 * z+0 * w \\
0 * x+2 * y+0 * z+0 * w \\
0 * x+0 * y+2 * z+0 * w \\
0 * x+0 * y+0 * z+1 * w
\end{array}\right]=\left[\begin{array}{c}
2 * x+0+0+0 \\
0+2 * y+0+0 \\
0+0+2 * z+0 \\
0+0+0+1 * w
\end{array}\right]=\left[\begin{array}{c}
2 * x \\
2 * y \\
2 * z \\
w
\end{array}\right]
\]
合并作用
\]
作用顺序是,首先缩放,在旋转,在移动。
The Model Matrix (模型矩阵)
You apply this matrix to all your vertices at each frame (in GLSL, not in C++!) and everything moves. Something that doesn’t move will be at the center of the world.
应该就是 上面的 缩放、移动和旋转的集合就是模型矩阵。
模型的坐标通过模型矩阵变化到世界坐标系
The View matrix(视图矩阵)
功能类似于摄像机。
世界坐标系通过视图举证变换到摄像机坐标。
glm::mat4 CameraMatrix = glm::lookAt(

 cameraPosition, // the position of your camera, in world space

 cameraTarget, // where you want to look at, in world space

 upVector // probably glm::vec3(0,1,0), but (0,-1,0) would make you looking upside-down, which

can be great too

);
The Projection matrix(投影矩阵)
如何放在电脑屏幕上显示,通过一个梯形体,类似于埃及金字塔削去了顶部一个四面体。
// Generates a really hard-to-read matrix, but a normal, standard 4x4 matrix nonetheless

glm::mat4 projectionMatrix = glm::perspective(

 FoV, // The horizontal Field of View, in degrees : the amount of "zoom". Think "camera lens".

Usually between 90° (extra wide) and 30° (quite zoomed in)

 4.0f / 3.0f, // Aspect Ratio. Depends on the size of your window. Notice that 4/3 == 800/600 ==

1280/960, sounds familiar ?

 0.1f, // Near clipping plane. Keep as big as possible, or you'll get precision issues.

 100.0f // Far clipping plane. Keep as little as possible.

);
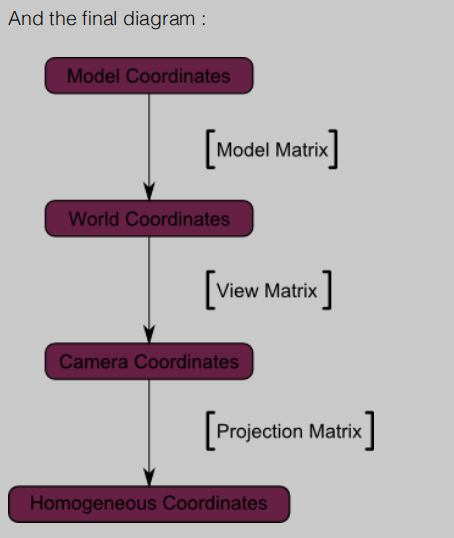
上图即为流程图。
累计变换:MVP(ModelViewProjection)
// C++ : compute the matrix

glm::mat4 MVPmatrix = projection * view * model; // Remember : inverted !
image

code
// Include standard headers

#include <stdio.h>

#include <stdlib.h>

// Include GLEW

#include <GL/glew.h>

// Include GLFW

#include <GLFW/glfw3.h>

GLFWwindow* window;

// Include GLM

#include <glm/glm.hpp>

#include <glm/gtc/matrix_transform.hpp>

using namespace glm;

#include <common/shader.hpp>

int main( void )

{

	// Initialise GLFW

	if( !glfwInit() )

	{

		fprintf( stderr, "Failed to initialize GLFW\n" );

		getchar();

		return -1;

	}

	glfwWindowHint(GLFW_SAMPLES, 4);

	glfwWindowHint(GLFW_CONTEXT_VERSION_MAJOR, 3);

	glfwWindowHint(GLFW_CONTEXT_VERSION_MINOR, 3);

	glfwWindowHint(GLFW_OPENGL_FORWARD_COMPAT, GL_TRUE); // To make MacOS happy; should not be needed

	glfwWindowHint(GLFW_OPENGL_PROFILE, GLFW_OPENGL_CORE_PROFILE); //We don't want the old OpenGL

	// Open a window and create its OpenGL context

	window = glfwCreateWindow( 1024, 768, "Tutorial 03 - Matrices", NULL, NULL);

	if( window == NULL ){

		fprintf( stderr, "Failed to open GLFW window. If you have an Intel GPU, they are not 3.3 compatible. Try the 2.1 version of the tutorials.\n" );

		getchar();

		glfwTerminate();

		return -1;

	}

	glfwMakeContextCurrent(window);

	// Initialize GLEW

	glewExperimental = true; // Needed for core profile

	if (glewInit() != GLEW_OK) {

		fprintf(stderr, "Failed to initialize GLEW\n");

		getchar();

		glfwTerminate();

		return -1;

	}

	// Ensure we can capture the escape key being pressed below

	glfwSetInputMode(window, GLFW_STICKY_KEYS, GL_TRUE);

	// Dark blue background

	glClearColor(0.0f, 0.0f, 0.4f, 0.0f);

	GLuint VertexArrayID;

	glGenVertexArrays(1, &VertexArrayID);

	glBindVertexArray(VertexArrayID);

	// Create and compile our GLSL program from the shaders

	GLuint programID = LoadShaders( "SimpleTransform.vertexshader", "SingleColor.fragmentshader" );

	// Get a handle for our "MVP" uniform

	GLuint MatrixID = glGetUniformLocation(programID, "MVP");

	// Projection matrix : 45� Field of View, 4:3 ratio, display range : 0.1 unit <-> 100 units

	glm::mat4 Projection = glm::perspective(glm::radians(45.0f), 4.0f / 3.0f, 0.1f, 100.0f);

	// Or, for an ortho camera :

	//glm::mat4 Projection = glm::ortho(-10.0f,10.0f,-10.0f,10.0f,0.0f,100.0f); // In world coordinates

	// Camera matrix

	glm::mat4 View       = glm::lookAt(

								glm::vec3(4,3,3), // Camera is at (4,3,3), in World Space

								glm::vec3(0,0,0), // and looks at the origin

								glm::vec3(0,1,0)  // Head is up (set to 0,-1,0 to look upside-down)

						   );

	// Model matrix : an identity matrix (model will be at the origin)

	glm::mat4 Model      = glm::mat4(1.0f);

	// Our ModelViewProjection : multiplication of our 3 matrices

	glm::mat4 MVP        = Projection * View * Model; // Remember, matrix multiplication is the other way around

	static const GLfloat g_vertex_buffer_data[] = {

		-1.0f, -1.0f, 0.0f,

		 1.0f, -1.0f, 0.0f,

		 0.0f,  1.0f, 0.0f,

	};

	GLuint vertexbuffer;

	glGenBuffers(1, &vertexbuffer);

	glBindBuffer(GL_ARRAY_BUFFER, vertexbuffer);

	glBufferData(GL_ARRAY_BUFFER, sizeof(g_vertex_buffer_data), g_vertex_buffer_data, GL_STATIC_DRAW);

	do{

		// Clear the screen

		glClear( GL_COLOR_BUFFER_BIT );

		// Use our shader

		glUseProgram(programID);

		// Send our transformation to the currently bound shader,

		// in the "MVP" uniform

		glUniformMatrix4fv(MatrixID, 1, GL_FALSE, &MVP[0][0]);

		// 1rst attribute buffer : vertices

		glEnableVertexAttribArray(0);

		glBindBuffer(GL_ARRAY_BUFFER, vertexbuffer);

		glVertexAttribPointer(

			0,                  // attribute. No particular reason for 0, but must match the layout in the shader.

			3,                  // size

			GL_FLOAT,           // type

			GL_FALSE,           // normalized?

			0,                  // stride

			(void*)0            // array buffer offset

		);

		// Draw the triangle !

		glDrawArrays(GL_TRIANGLES, 0, 3); // 3 indices starting at 0 -> 1 triangle

		glDisableVertexAttribArray(0);

		// Swap buffers

		glfwSwapBuffers(window);

		glfwPollEvents();

	} // Check if the ESC key was pressed or the window was closed

	while( glfwGetKey(window, GLFW_KEY_ESCAPE ) != GLFW_PRESS &&

		   glfwWindowShouldClose(window) == 0 );

	// Cleanup VBO and shader

	glDeleteBuffers(1, &vertexbuffer);

	glDeleteProgram(programID);

	glDeleteVertexArrays(1, &VertexArrayID);

	// Close OpenGL window and terminate GLFW

	glfwTerminate();

	return 0;

}
#version 330 core

// Output data

out vec3 color;

void main()

{

	// Output color = red

	color = vec3(1,0,0);

}
#version 330 core

// Output data

out vec3 color;

void main()

{

	// Output color = red

	color = vec3(1,0,0);

}
#version 330 core

// Input vertex data, different for all executions of this shader.

layout(location = 0) in vec3 vertexPosition_modelspace;

// Values that stay constant for the whole mesh.

uniform mat4 MVP;

void main(){

	// Output position of the vertex, in clip space : MVP * position

	gl_Position =  MVP * vec4(vertexPosition_modelspace,1);

}
shader 加载函数
#include <stdio.h>

#include <string>

#include <vector>

#include <iostream>

#include <fstream>

#include <algorithm>

#include <sstream>

using namespace std;

#include <stdlib.h>

#include <string.h>

#include <GL/glew.h>

#include "shader.hpp"

GLuint LoadShaders(const char * vertex_file_path,const char * fragment_file_path){

	// Create the shaders

	GLuint VertexShaderID = glCreateShader(GL_VERTEX_SHADER);

	GLuint FragmentShaderID = glCreateShader(GL_FRAGMENT_SHADER);

	// Read the Vertex Shader code from the file

	std::string VertexShaderCode;

	std::ifstream VertexShaderStream(vertex_file_path, std::ios::in);

	if(VertexShaderStream.is_open()){

		std::stringstream sstr;

		sstr << VertexShaderStream.rdbuf();

		VertexShaderCode = sstr.str();

		VertexShaderStream.close();

	}else{

		printf("Impossible to open %s. Are you in the right directory ? Don't forget to read the FAQ !\n", vertex_file_path);

		getchar();

		return 0;

	}

	// Read the Fragment Shader code from the file

	std::string FragmentShaderCode;

	std::ifstream FragmentShaderStream(fragment_file_path, std::ios::in);

	if(FragmentShaderStream.is_open()){

		std::stringstream sstr;

		sstr << FragmentShaderStream.rdbuf();

		FragmentShaderCode = sstr.str();

		FragmentShaderStream.close();

	}

	GLint Result = GL_FALSE;

	int InfoLogLength;

	// Compile Vertex Shader

	printf("Compiling shader : %s\n", vertex_file_path);

	char const * VertexSourcePointer = VertexShaderCode.c_str();

	glShaderSource(VertexShaderID, 1, &VertexSourcePointer , NULL);

	glCompileShader(VertexShaderID);

	// Check Vertex Shader

	glGetShaderiv(VertexShaderID, GL_COMPILE_STATUS, &Result);

	glGetShaderiv(VertexShaderID, GL_INFO_LOG_LENGTH, &InfoLogLength);

	if ( InfoLogLength > 0 ){

		std::vector<char> VertexShaderErrorMessage(InfoLogLength+1);

		glGetShaderInfoLog(VertexShaderID, InfoLogLength, NULL, &VertexShaderErrorMessage[0]);

		printf("%s\n", &VertexShaderErrorMessage[0]);

	}

	// Compile Fragment Shader

	printf("Compiling shader : %s\n", fragment_file_path);

	char const * FragmentSourcePointer = FragmentShaderCode.c_str();

	glShaderSource(FragmentShaderID, 1, &FragmentSourcePointer , NULL);

	glCompileShader(FragmentShaderID);

	// Check Fragment Shader

	glGetShaderiv(FragmentShaderID, GL_COMPILE_STATUS, &Result);

	glGetShaderiv(FragmentShaderID, GL_INFO_LOG_LENGTH, &InfoLogLength);

	if ( InfoLogLength > 0 ){

		std::vector<char> FragmentShaderErrorMessage(InfoLogLength+1);

		glGetShaderInfoLog(FragmentShaderID, InfoLogLength, NULL, &FragmentShaderErrorMessage[0]);

		printf("%s\n", &FragmentShaderErrorMessage[0]);

	}

	// Link the program

	printf("Linking program\n");

	GLuint ProgramID = glCreateProgram();

	glAttachShader(ProgramID, VertexShaderID);

	glAttachShader(ProgramID, FragmentShaderID);

	glLinkProgram(ProgramID);

	// Check the program

	glGetProgramiv(ProgramID, GL_LINK_STATUS, &Result);

	glGetProgramiv(ProgramID, GL_INFO_LOG_LENGTH, &InfoLogLength);

	if ( InfoLogLength > 0 ){

		std::vector<char> ProgramErrorMessage(InfoLogLength+1);

		glGetProgramInfoLog(ProgramID, InfoLogLength, NULL, &ProgramErrorMessage[0]);

		printf("%s\n", &ProgramErrorMessage[0]);

	}

	glDetachShader(ProgramID, VertexShaderID);

	glDetachShader(ProgramID, FragmentShaderID);

	glDeleteShader(VertexShaderID);

	glDeleteShader(FragmentShaderID);

	return ProgramID;

}
#ifndef SHADER_HPP

#define SHADER_HPP

GLuint LoadShaders(const char * vertex_file_path,const char * fragment_file_path);

#endif
opengl 学习 03的更多相关文章
- OpenGL学习笔记3——缓冲区对象
在GL中特别提出了缓冲区对象这一概念,是针对提高绘图效率的一个手段.由于GL的架构是基于客户——服务器模型建立的,因此默认所有的绘图数据均是存储在本地客户端,通过GL内核渲染处理以后再将数据发往GPU ...
- JavaScript学习03 JS函数
JavaScript学习03 JS函数 函数就是包裹在花括号中的代码块,前面使用了关键词function: function functionName() { 这里是要执行的代码 } 函数参数 函数的 ...
- Java虚拟机JVM学习03 连接过程:验证、准备、解析
Java虚拟机JVM学习03 连接过程:验证.准备.解析 类被加载后,就进入连接阶段. 连接就是将已经读入到内存的类的二进制数据合并到虚拟机的运行时环境中去. 连接阶段三个步骤:验证.准备和解析. 类 ...
- OpenGL学习进程(12)第九课:矩阵乘法实现3D变换
本节是OpenGL学习的第九个课时,下面将详细介绍OpenGL的多种3D变换和如何操作矩阵堆栈. (1)3D变换: OpenGL中绘制3D世界的空间变换包括:模型变换.视图变换.投影变换和视口 ...
- OpenGL学习进程(11)第八课:颜色绘制的详解
本节是OpenGL学习的第八个课时,下面将详细介绍OpenGL的颜色模式,颜色混合以及抗锯齿. (1)颜色模式: OpenGL支持两种颜色模式:一种是RGBA,一种是颜色索引模式. R ...
- OpenGL学习笔记:拾取与选择
转自:OpenGL学习笔记:拾取与选择 在开发OpenGL程序时,一个重要的问题就是互动,假设一个场景里面有很多元素,当用鼠标点击不同元素时,期待作出不同的反应,那么在OpenGL里面,是怎么知道我当 ...
- [OpenGL ES 03]3D变换:模型,视图,投影与Viewport
[OpenGL ES 03]3D变换:模型,视图,投影与Viewport 罗朝辉 (http://blog.csdn.net/kesalin) 本文遵循“署名-非商业用途-保持一致”创作公用协议 系列 ...
- OpenGL学习之路(一)
1 引子 虽然是计算机科班出身,但从小对几何方面的东西就不太感冒,空间想象能力也较差,所以从本科到研究生,基本没接触过<计算机图形学>.为什么说基本没学过呢?因为好奇(尤其是惊叹于三维游戏 ...
- OpenGL学习之路(三)
1 引子 这些天公司一次次的软件发布节点忙的博主不可开交,另外还有其它的一些事也占用了很多时间.现在坐在电脑前,在很安静的环境下,与大家分享自己的OpenGL学习笔记和理解心得,感到格外舒服.这让我回 ...
- OpenGL学习之路(四)
1 引子 上次读书笔记主要是学习了应用三维坐标变换矩阵对二维的图形进行变换,并附带介绍了GLSL语言的编译.链接相关的知识,之后介绍了GLSL中变量的修饰符,着重介绍了uniform修饰符,来向着色器 ...
随机推荐
- 331K star!福利来啦,搞定所有API开发需求,这个开源神器绝了!
嗨,大家好,我是小华同学,关注我们获得"最新.最全.最优质"开源项目和高效工作学习方法 「public-apis」是GitHub上最全面的免费API资源库,收录了涵盖商业.娱乐.教 ...
- http2和http3
HTTP/2 和 HTTP/3 是 HTTP 协议的升级版本,主要为了解决 HTTP/1.x 协议的性能瓶颈和安全性问题.以下是它们的主要目标和解决的问题: HTTP/2 的主要目标和解决的问题 1. ...
- 看完这章你也会黑盒edu通杀
负责声明: 请勿利用文章内的相关技术从事非法测试,由于传播.利用此文所提供的信息或者工具而造成的任何直接或者间接的后果及损失,均由使用者本人负责,所产生的一切不良后果与文章作者无关.该文章仅供学习用途 ...
- 完整版QQ(腾讯)开放平台操作指南(包含:qq登录能力获取等等)
之前我和大家提过,我要购买第三方的APP服务,就相当于有自己的APP了,现在APP对接上线之前需要做大量的准备工作,在此把步骤分享给大家,这样可以节省大家很多时间. 完整版QQ(腾讯)开放平台操作指南 ...
- Linux C 获取本机IPV4和IPV6地址列表
有时候设备网卡上有多个IPv6,其中只有一个是可用的,另外一个是内网地址,无法使用,如果程序需要绑定一个V6地址的时候,需要获取网卡上的V6地址,并且要求是可用的. 通过ifconfig可用看到,et ...
- ASP.NET Core之由配置系统与创建app所想到的
先看文件配置的代码: ConfigurationBuilder configBuilder=new ConfigurationBuiler();//典型的创建者模式 configBuilder.Add ...
- Sublimetext3 配置C语言环境
1.MinGW下载 2.设置MinGW环境变量 - Path C:\MinGW\bin 3.在sublime工具栏中,选择"工具"->" ...
- 第2讲、Transformer架构图详解
1. Transformer架构运行机制 Transformer架构是一种强大的神经网络结构,主要用于自然语言处理任务.它摒弃了传统的循环神经网络(RNN)和卷积神经网络(CNN),完全基于注意力机制 ...
- Spring扩展接口-内置事件ContextEvent
.markdown-body { line-height: 1.75; font-weight: 400; font-size: 16px; overflow-x: hidden; color: rg ...
- K8s新手系列之CronJob
概述 官方文档:https://kubernetes.io/zh-cn/docs/concepts/workloads/controllers/cron-jobs/ CronJob控制器以 Job控制 ...