KubeSphere 接入外部 Elasticsearch 最佳实践
作者:张坚,科大讯飞开发工程师,云原生爱好者。
大家好,我是张坚。今天来聊聊如何在 KubeSphere 中集成外置的 ES 组件。
KubeSphere 在安装完成时候可以启用日志组件,这样会安装 ES 组件并可以收集所有部署组件的日志,也可以收集审计日志,然后可以很方便的在 KubeSphere 平台上进行日志查询。
但是在实际使用过程中发现使用 KubeSphere 自身的 ES 会很重,而且官方也建议我们将日志接入到外部的 ES 中减轻 Kubernetes 的压力。
以下为操作实战。
前置步骤
ES 集群需支持 http 协议
1️⃣ 搭建好外部 ES 集群,使用 http 协议(非本文重点)。
测试环境 IP: 172.30.10.226,172.30.10.191,172.30.10.184
port: 9200
username: elastic
password: changeme
2️⃣ 对 ES 做负载均衡。
有三种常见的做法:
- 使用 nginx 做负载均衡;
- 单协调节点;
- 通过自定义 service 和 endpoints 负载均衡。
本文档基于第三种负载均衡方案(通过 endpoints 负载)做对接。
备份 ks-installer
管理员账号登录 KubeSphere,在平台管理 - 集群管理 - CRD 中搜索 clusterconfiguration,在自定义资源中,点击 ks-installer 选择编辑 YAML ,复制备份。
关闭内部 ES 对接外部 ES(如果未开启日志则省略)
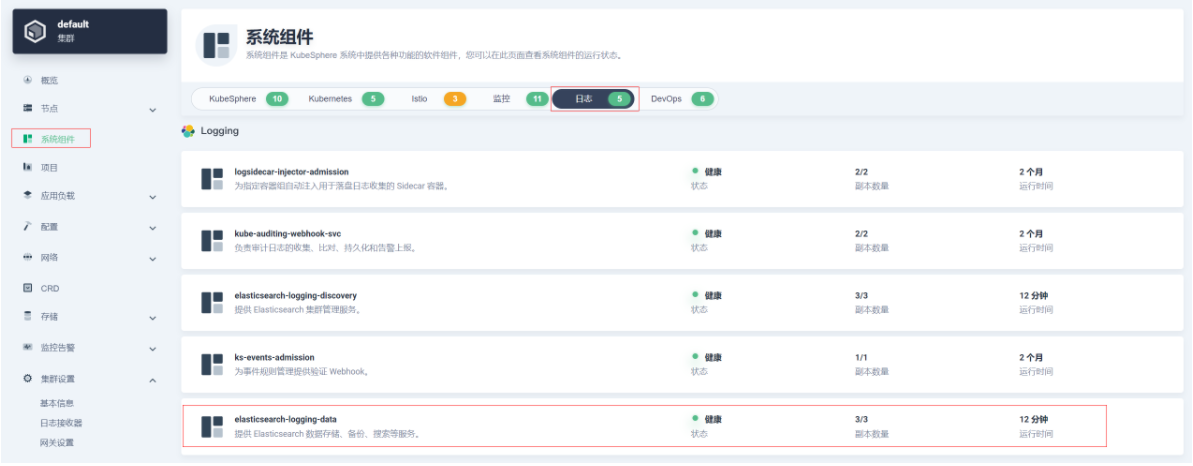
集群开启了内部 Elasticsearch,会存在如下系统组件和日志接收器
1️⃣ 系统组件:
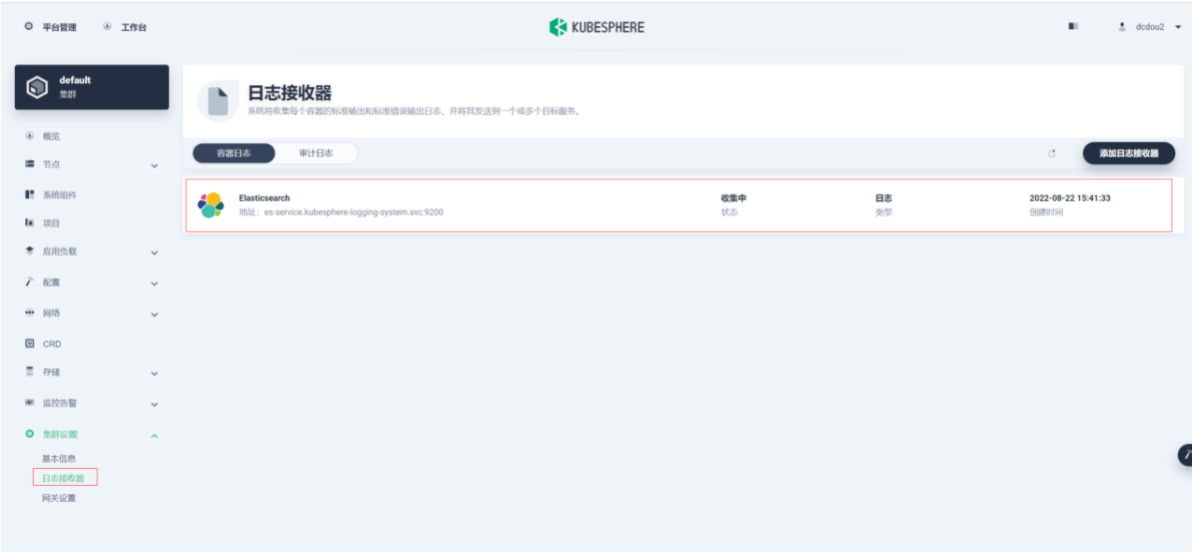
2️⃣ 日志接收器:
容器日志、资源事件、审计日志(不开启不会有日志接收器)
接收器地址为内部 Elasticsearch 地址:elasticsearch-logging-data.kubesphere-logging-system.svc:9200
关闭内部 ES 并卸载日志相关可插拔组件
执行命令编辑 ks-installer:
$ kubectl edit cc ks-installer -n kubesphere-system
1️⃣ 卸载日志系统,将 ks-installer 参数的 logging.enabled 字段的值从 true 改为 false。
2️⃣ 卸载事件日志系统,将 ks-installer 参数的 events.enabled 字段的值从 true 改为 false。
3️⃣ 卸载审计日志系统,将 ks-installer 参数的 auditing.enabled 字段的值从 true 改为 false。
4️⃣ 配置文件的最后,删除如下内容:
 es:

    enabledTime: 2022-08-16T10:33:18CST

    status: enabled

  events:

    enabledTime: 2022-04-15T16:22:59CST

    status: enabled

  fluentbit:

    enabledTime: 2022-04-15T16:19:46CST

    status: enabled

  logging:

    enabledTime: 2022-04-15T16:22:59CST

    status: enabled
执行命令检查安装过程:
$ kubectl logs -n kubesphere-system $(kubectl get pod -n kubesphere-system -l app=ks-install -o jsonpath='{.items[0].metadata.name}') -f
#日志出现以下内容说明重启成功

Collecting installation results ...

#####################################################

###              Welcome to KubeSphere!           ###

#####################################################

Console: http://172.30.9.xxx:30880

Account: admin

Password: P@88w0rd

NOTES:

  1. After you log into the console, please check the

     monitoring status of service components in

     "Cluster Management". If any service is not

     ready, please wait patiently until all components

     are up and running.

  2. Please change the default password after login.

#####################################################

https://kubesphere.io             2022-08-04 15:53:14

#####################################################
执行命令卸载相关可插拔组件:
###### 卸载 KubeSphere 日志系统

$ kubectl delete inputs.logging.kubesphere.io -n kubesphere-logging-system tail

###### 卸载 KubeSphere 事件系统

$ helm delete ks-events -n kubesphere-logging-system

###### 卸载 KubeSphere 审计

$ helm uninstall kube-auditing -n kubesphere-logging-system

$ kubectl delete crd rules.auditing.kubesphere.io

$ kubectl delete crd webhooks.auditing.kubesphere.io

###### 卸载包括 Elasticsearch 的日志系统

$ kubectl delete crd fluentbitconfigs.logging.kubesphere.io

$ kubectl delete crd fluentbits.logging.kubesphere.io

$ kubectl delete crd inputs.logging.kubesphere.io

$ kubectl delete crd outputs.logging.kubesphere.io

$ kubectl delete crd parsers.logging.kubesphere.io

$ kubectl delete deployments.apps -n kubesphere-logging-system fluentbit-operator

$ helm uninstall elasticsearch-logging --namespace kubesphere-logging-system

$ kubectl delete deployment logsidecar-injector-deploy -n kubesphere-logging-system

$ kubectl delete ns kubesphere-logging-system
卸载过程中可能出现如下异常:
crd 资源删除时出现问题,尝试使用如下命令
$ kubectl patch crd/crd名称 -p '{"metadata":{"finalizers":[]}}' --type=merge
创建 namespace
$ kubectl create ns kubesphere-logging-system
自定义 service 负载均衡 ES 节点
es-service.yaml
apiVersion: v1

kind: Service

metadata:

  labels:

    app: es-service

  name: es-service

  namespace: kubesphere-logging-system

spec:

  ports:

  - port: 9200

    name: es

    protocol: TCP

    targetPort: 9200
es-endpoints.yaml
ip 地址修改为真实要对接的 ES 集群节点的 IP 地址。
apiVersion: v1

kind: Endpoints

metadata:

  labels:

    app: es-service

  name: es-service

  namespace: kubesphere-logging-system

subsets:

- addresses:

  - ip: 172.30.10.***

  - ip: 172.30.10.***

  - ip: 172.30.10.***

  ports:

  - port: 9200

    name: es

    protocol: TCP
执行命令创建自定义 SVC:
$ kubectl apply -f es-service.yaml -n kubesphere-logging-system

$ kubectl apply -f es-endpoints.yaml -n kubesphere-logging-system

#查看svc

$ kubectl get svc -n kubesphere-logging-system

NAME                              TYPE        CLUSTER-IP       EXTERNAL-IP   PORT(S)    AGE

es-service                        ClusterIP   109.233.8.178    <none>        9200/TCP   10d

#查看endpoints

$ kubectl get ep -n kubesphere-logging-system

NAME        ENDPOINTS      AGE           es-service                        172.30.10.***:9200,172.30.10.***:9200,172.30.10.***:9200       10d
“平台管理-集群管理-应用负载-服务”搜索 es-service。
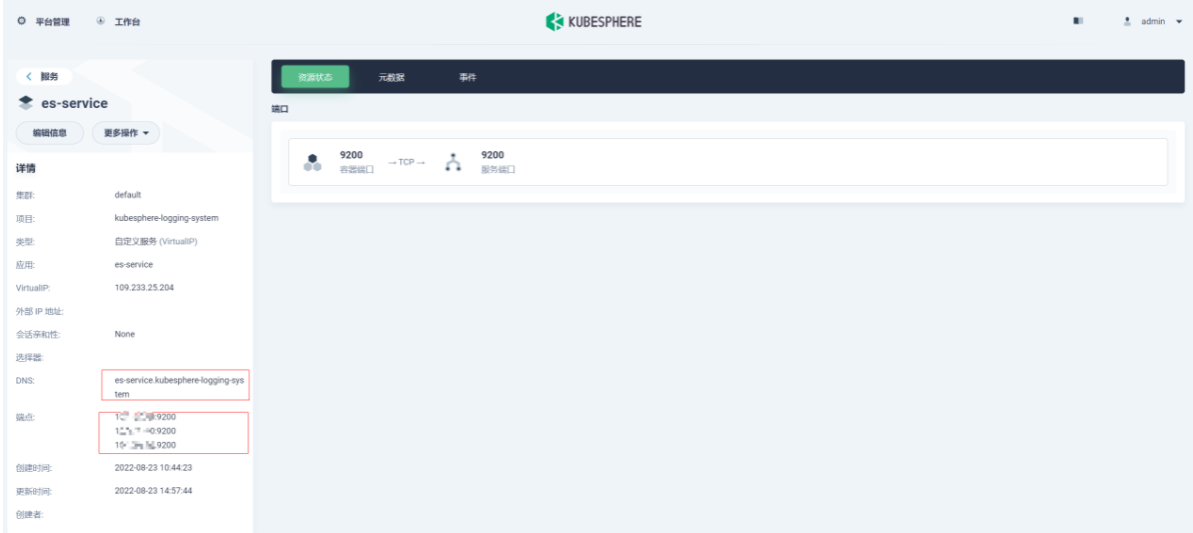
es-service 服务地址:es-service.kubesphere-logging-system.svc。
开启日志并对接外部 ES
在平台管理 - 集群管理 - CRD 中搜索 clusterconfiguration,在自定义资源中,点击 ks-installer,修改配置:
开启容器日志、审计日志分别修改
logging.enabled: true
auditing.enabled: true
修改外部 ES 配置
es.basicAuth.enabled: true
es.basicAuth.password
es.basicAuth.username
es.externalElasticsearchUrl
es.externalElasticsearchPort
修改日志保存日期(默认 7 天)
logMaxAge
修改日志索引前缀(默认 logstash)
elkPrefix(开发:dev,测试:sit,生产:prod)
apiVersion: installer.kubesphere.io/v1alpha1

kind: ClusterConfiguration

metadata:

  labels:

    version: v3.2.1

  name: ks-installer

  namespace: kubesphere-system

spec:

  alerting:

    enabled: false

  auditing:

    enabled: true            # false改为true

  ...

    es:

      basicAuth:

        enabled: true          # false改为true

        password: '****'       # 密码

        username: '****'       # 用户名

      data:

        volumeSize: 20Gi

      elkPrefix: sit           #开发:dev 测试:sit 生产:prod

      externalElasticsearchPort: '9200' # 端口

      externalElasticsearchUrl: es-service.kubesphere-logging-system.svc # 修改es-service

      logMaxAge: 7             #默认7天即可

      master:

        volumeSize: 4Gi

    ...
执行命令检查安装过程
$ kubectl logs -n kubesphere-system $(kubectl get pod -n kubesphere-system -l app=ks-install -o jsonpath='{.items[0].metadata.name}') -f

#日志出现以下内容说明重启成功

Collecting installation results ...

#####################################################

###              Welcome to KubeSphere!           ###

#####################################################

Console: http://172.30.9.xxx:30880

Account: admin

Password: P@88w0rd

NOTES:

  1. After you log into the console, please check the

     monitoring status of service components in

     "Cluster Management". If any service is not

     ready, please wait patiently until all components

     are up and running.

  2. Please change the default password after login.

#####################################################

https://kubesphere.io             2022-08-04 15:53:14

#####################################################
执行命令,查看对应的 ConfigMap 配置:
$ kubectl get configmap kubesphere-config -n kubesphere-system -o yaml
#重点如下,看es的配置是否已经生效,host是否为自定义SVC,以及用户名密码索引是否正确

    logging:

      host: http://es-service.kubesphere-logging-system.svc:9200

      basicAuth: True

      username: "****"  #此处为你填写的正确用户名

      password: "****"  #此处为你填写的正确密码

      indexPrefix: ks-sit-log  #不同环境对应dev\sit\prod

    auditing:

      enable: true

      webhookURL: https://kube-auditing-webhook-svc.kubesphere-logging-system.svc:6443/audit/webhook/event

      host: http://es-service.kubesphere-logging-system.svc:9200

      basicAuth: True

      username: "****"  #此处为你填写的正确用户名

      password: "****"  #此处为你填写的正确密码

      indexPrefix: ks-sit-auditing #不同环境对应dev\sit\prod
执行命令编辑对应 output(如果已自动修改则不需要手动修改):
修改 host
修改索引 (开发、测试、生产前缀分别对应 ks-dev-、ks-sit-、ks-prod-)
#修改es的output

$ kubectl edit output es -n kubesphere-logging-system

#修改host 和 logstashPrefix

# host: es-service.kubesphere-logging-system.svc

# logstashPrefix: ks-对应环境-log

#如下:

spec:

  es:

    generateID: true

    host: es-service.kubesphere-logging-system.svc  # host地址

    httpPassword:

      valueFrom:

        secretKeyRef:

          key: password

          name: elasticsearch-credentials

    httpUser:

      valueFrom:

        secretKeyRef:

          key: username

          name: elasticsearch-credentials

    logstashFormat: true

    logstashPrefix: ks-sit-log  # 修改此处为对应环境的日志索引

    port: 9200

    timeKey: '@timestamp'

  matchRegex: '(?:kube|service)\.(.*)'

#修改es-auditing的output

$ kubectl edit output es-auditing -n kubesphere-logging-system

#修改host 和 logstashPrefix

# host: es-service.kubesphere-logging-system.svc

# logstashPrefix: ks-对应环境-auditing

#如下

spec:

  es:

    generateID: true

    host: es-service.kubesphere-logging-system.svc  # host地址

    httpPassword:

      valueFrom:

        secretKeyRef:

          key: password

          name: elasticsearch-credentials

    httpUser:

      valueFrom:

        secretKeyRef:

          key: username

          name: elasticsearch-credentials

    logstashFormat: true

    logstashPrefix: ks-sit-auditing   # 修改此处为对应环境的日志索引

    port: 9200

  match: kube_auditing
重启 ks-apiserver
$ kubectl rollout restart deployment ks-apiserver -n kubesphere-system
验证
$ kubectl get po -n kubesphere-logging-system

NAME                                                              READY   STATUS      RESTARTS   AGE

elasticsearch-logging-curator-elasticsearch-curator-276864h2xt2   0/1     Error       0          38h

elasticsearch-logging-curator-elasticsearch-curator-276864wc6bs   0/1     Completed   0          38h

elasticsearch-logging-curator-elasticsearch-curator-276879865wl   0/1     Completed   0          14h

elasticsearch-logging-curator-elasticsearch-curator-276879l7xpf   0/1     Error       0          14h

fluent-bit-4vzq5                                                  1/1     Running     0          47h

fluent-bit-6ckvm                                                  1/1     Running     0          25h

fluent-bit-6jt8d                                                  1/1     Running     0          47h

fluent-bit-88crg                                                  1/1     Running     0          47h

fluent-bit-9ps6z                                                  1/1     Running     0          47h

fluent-bit-djhtx                                                  1/1     Running     0          47h

fluent-bit-dmpfv                                                  1/1     Running     0          47h

fluent-bit-dtr7z                                                  1/1     Running     0          47h

fluent-bit-flxbt                                                  1/1     Running     0          47h

fluent-bit-fnxdk                                                  1/1     Running     0          47h

fluent-bit-gqbrl                                                  1/1     Running     0          47h

fluent-bit-kbzsj                                                  1/1     Running     0          47h

fluent-bit-lbnnh                                                  1/1     Running     0          47h

fluent-bit-nq4g8                                                  1/1     Running     0          47h

fluent-bit-q5shz                                                  1/1     Running     0          47h

fluent-bit-qrb7v                                                  1/1     Running     0          47h

fluent-bit-r26fk                                                  1/1     Running     0          47h

fluent-bit-rfrpd                                                  1/1     Running     0          47h

fluent-bit-s8869                                                  1/1     Running     0          47h

fluent-bit-sp5k4                                                  1/1     Running     0          47h

fluent-bit-vjvhl                                                  1/1     Running     0          47h

fluent-bit-xkksv                                                  1/1     Running     0          47h

fluent-bit-xrlz4                                                  1/1     Running     0          47h

fluentbit-operator-745bf5559f-vnz8w                               1/1     Running     0          47h

kube-auditing-operator-84857bf967-ftbjr                           1/1     Running     0          47h

kube-auditing-webhook-deploy-64cfb8c9f8-hf8g8                     1/1     Running     0          47h

kube-auditing-webhook-deploy-64cfb8c9f8-zf4rd                     1/1     Running     0          47h

logsidecar-injector-deploy-5fb6fdc6dd-fj5vm                       2/2     Running     0          47h

logsidecar-injector-deploy-5fb6fdc6dd-qbhdg                       2/2     Running     0          47h
日志接收器:
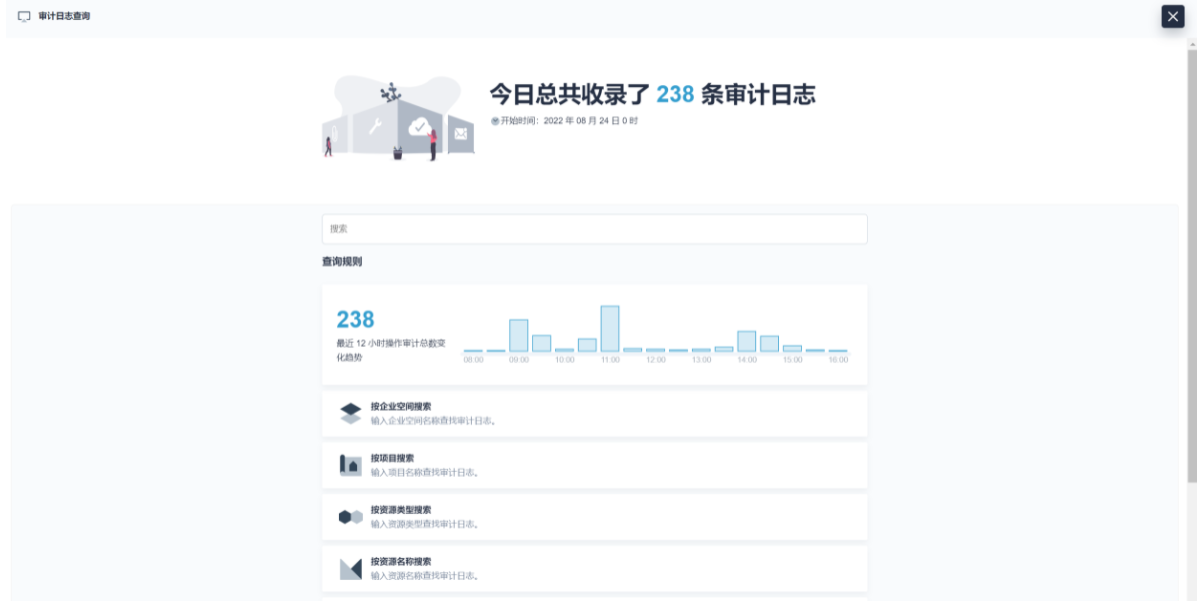
查询审计日志:
本文由博客一文多发平台 OpenWrite 发布!
KubeSphere 接入外部 Elasticsearch 最佳实践的更多相关文章
- Elasticsearch最佳实践之分片使用优化
本文由云+社区发表 作者:老生姜 一.遇到的问题 与大多数分布式系统一样,Elasticsearch按照一定的Hash规则把用户数据切分成多个分片,然后打散到不同机器进行存储,从而实现大规模数据的分布 ...
- elasticsearch最佳实践
创建索引 无mapping 创建索引名称为index的索引 curl -XPUT http://localhost:9200/book 有mapping 如果需要定义每个类型的结构映射,创建type名 ...
- elasticsearch 最佳实践
创建索引 无mapping 创建索引名称为index的索引 curl -XPUT http://localhost:9200/book 有mapping 如果需要定义每个类型的结构映射,创建type名 ...
- ES最佳实践之分片使用优化
Elasticsearch最佳实践之分片使用优化 作者:老生姜 一.遇到的问题 与大多数分布式系统一样,Elasticsearch按照一定的Hash规则把用户数据切分成多个分片,然后打散到不同机器进行 ...
- ELK 性能(4) — 大规模 Elasticsearch 集群性能的最佳实践
ELK 性能(4) - 大规模 Elasticsearch 集群性能的最佳实践 介绍 集群规模 集群数:6 整体集群规模: 300 Elasticsearch 实例 141 物理服务器 4200 CP ...
- ElasticSearch——数据建模最佳实践
如何建模 mapping 设计非常重要,需要从两个维度进行考虑: 功能:搜索.排序.聚合 性能:存储的开锁.内存的开销.搜索的性能 mapping 注意事项: 加入新字段很容易(必要时需要 updat ...
- (转)RESTful API 设计最佳实践
原文:http://www.oschina.net/translate/best-practices-for-a-pragmatic-restful-api 数据模型已经稳定,接下来你可能需要为web ...
- 结合异步模型,再次总结Netty多线程编码最佳实践
更多技术分享可关注我 前言 本文重点总结Netty多线程的一些编码最佳实践和注意事项,并且顺便对Netty的线程调度模型,和异步模型做了一个汇总.原文:结合异步模型,再次总结Netty多线程编码最 ...
- QingStor 对象存储架构设计及最佳实践
对象存储概念及特性 在介绍 QingStor️对象存储内部的的架构和设计原理之前,我们首先来了解一下对象存储的概念,也就是从外部视角看,对象存储有什么特性,我们应该如何使用. 对象存储本质上是一款存储 ...
- JuiceFS CSI Driver 的最佳实践
文章根据 Juicedata 工程师朱唯唯,在云原生 Meetup 杭州站所作主题演讲<JuiceFS CSI Driver 的最佳实践>整理而成. 大家好,我是来自 Juicedata ...
随机推荐
- 区块链DApp学习开发入门 视频
学习视频: https://www.bilibili.com/video/BV13E411P7km?p=1 https://www.bilibili.com/video/BV14z4y1Z7Jd?p= ...
- Inno Setup 出现 the drive or unc share you selected does not exist or is not accessible 解决记录
背景 软件是使用Inno Setup的,且安装后,再次安装是默认安装到历史路径.一次用户电脑维修后,发现再次安装后报错 解决办法 取消自动安装到默认路径就好了~ UsePreviousAppDir=n ...
- Correct the classpath of your application so that it contains a single, compatible version of xxx报错解决
1.背景 有时候引入包有冲突,比如在Maven项目中的不同模块多次重复引入等 这里遇到的问题是重复映入了如下包: <dependency> <groupId>com.baomi ...
- 【牛客刷题】HJ5 进制转换
题目链接 基本上能用最简单代码实现的,就不要考虑的太复杂: package main import "fmt" func main() { a := 0 fmt.Scanf(&qu ...
- 新员工一口气写完了这些C语言例子,领导给他转正了!
持续更新中... 很多想从事嵌入式Linux开发的老铁问一口君,有没有快速提升自己编程水平的小例子? 一口君根据自己多年工作经验,整理了一些基于Linux的c语言的非常实用的小例子, 这些例子在嵌入式 ...
- 关于如何解决IDEA中同一个src下多个类中之一运行时自动报错其他类中的问题导致想要运行的类无法正常运行的问题的解决思路
关于如何解决IDEA中同一个src下多个类中之一运行时自动报错其他类中的问题导致想要运行的类无法正常运行的问题的解决思路 WrongFirst: 我准备了一个正常类BG和一个有错误的类HelloWor ...
- python的dir()函数
dir()函数不带参数时,返回当前范围内的变量.方法和定义的类型列表:
- CSS单位em、rem、vh和vw等及CSS3的calc()以及line-height百分比
css单位我们常用的是px,也即是像素.随着网页开发自适应的要求,css3新增了许多单位,rem.vw和vh.vmin和vmax.ch和ex等. em 做前端的应该对em不陌生,不是什么罕见的单位,是 ...
- AI构建新质生产力,合合信息Embedding模型助力专业知识应用
一.合合信息acge模型获MTEB中文榜单第一 现阶段,大语言模型的飞速发展吸引着社会各界的目光,背后支撑大型语言模型应用落地的Embedding模型也成为业内关注的焦点.近期,合合信息发布了文本 ...
- Time Zone, Leap Year, Date Format, Epoch Time 时区, 闰年, 日期格式
前言 以前有写过一篇了, 但很乱, 这篇就作为它的整理版吧. Leap Year 闰年 闰年是指那些有 366 天, 二月份有 29号 的年份. 比如 2020年 有 2月29日, 所以 2020 就 ...