RabbitMQ 06 工作队列模式
工作队列模式结构图:

这种模式非常适合多个工人等待任务到来的场景。任务有多个,一个一个丢进消息队列,工人也有很多个,就可以将这些任务分配个各个工人,让他们各自负责一些任务,并且做的快的工人还可以多完成一些(能者多劳)。
要实现这种模式,只需要创建多个监听器即可。
先监听再发消息
这里先介绍先监听再发送消息的情况。
定义配置类。
import org.springframework.amqp.core.Binding;

import org.springframework.amqp.core.BindingBuilder;

import org.springframework.amqp.core.Exchange;

import org.springframework.amqp.core.ExchangeBuilder;

import org.springframework.amqp.core.Queue;

import org.springframework.amqp.core.QueueBuilder;

import org.springframework.beans.factory.annotation.Qualifier;

import org.springframework.context.annotation.Bean;

import org.springframework.context.annotation.Configuration;

/**

 * RabbitMQ配置类

 *

 * @author CodeSail

 */

@Configuration

public class RabbitMqConfig {

    /**

     * 定义交换机,可以很多个

     * @return 交换机对象

     */

    @Bean("directExchange")

    public Exchange exchange(){

        return ExchangeBuilder.directExchange("amq.direct").build();

    }

    /**

     * 定义消息队列

     * @return 消息队列对象

     */

    @Bean("testQueue")

    public Queue queue(){

        return QueueBuilder

                // 非持久化类型

                .nonDurable("test_springboot")

                .build();

    }

    /**

     * 定义绑定关系

     * @return 绑定关系

     */

    @Bean

    public Binding binding(@Qualifier("directExchange") Exchange exchange,

                           @Qualifier("testQueue") Queue queue){

        // 将定义的交换机和队列进行绑定

        return BindingBuilder

                // 绑定队列

                .bind(queue)

                // 到交换机

                .to(exchange)

                // 使用自定义的routingKey

                .with("test_springboot_key")

                // 不设置参数

                .noargs();

    }

}
创建两个监听器,监听同一队列。
import org.springframework.amqp.rabbit.annotation.RabbitListener;

import org.springframework.stereotype.Component;

/**

 * 工作队列监听器

 *

 * @author 廖航

 */

@Component

public class WorkListener {

    @RabbitListener(queues = "test_springboot")

    public void receiver1(String message) {

        System.out.println("1号监听器:" + message);

    }

    @RabbitListener(queues = "test_springboot")

    public void receiver2(String message) {

        System.out.println("2号监听器:" + message);

    }

}
定义生产者。
import org.junit.jupiter.api.Test;

import org.springframework.amqp.rabbit.core.RabbitTemplate;

import org.springframework.beans.factory.annotation.Autowired;

import org.springframework.boot.test.context.SpringBootTest;

import java.util.concurrent.TimeUnit;

@SpringBootTest

class RabbitMqSpringBootTests {

    /**

     * RabbitTemplate封装了大量的RabbitMQ操作,已经由Starter提供,因此直接注入使用即可

     */

    @Autowired

    private RabbitTemplate rabbitTemplate;

    /**

     * 生产者

     */

    @Test

    void producer() throws InterruptedException {

        for (int i = 0; i < 10; i++) {

            TimeUnit.SECONDS.sleep(1);

            rabbitTemplate.convertAndSend("amq.direct", "test_springboot_key", "Hello World");

        }

    }

}
启动生产者发送消息。
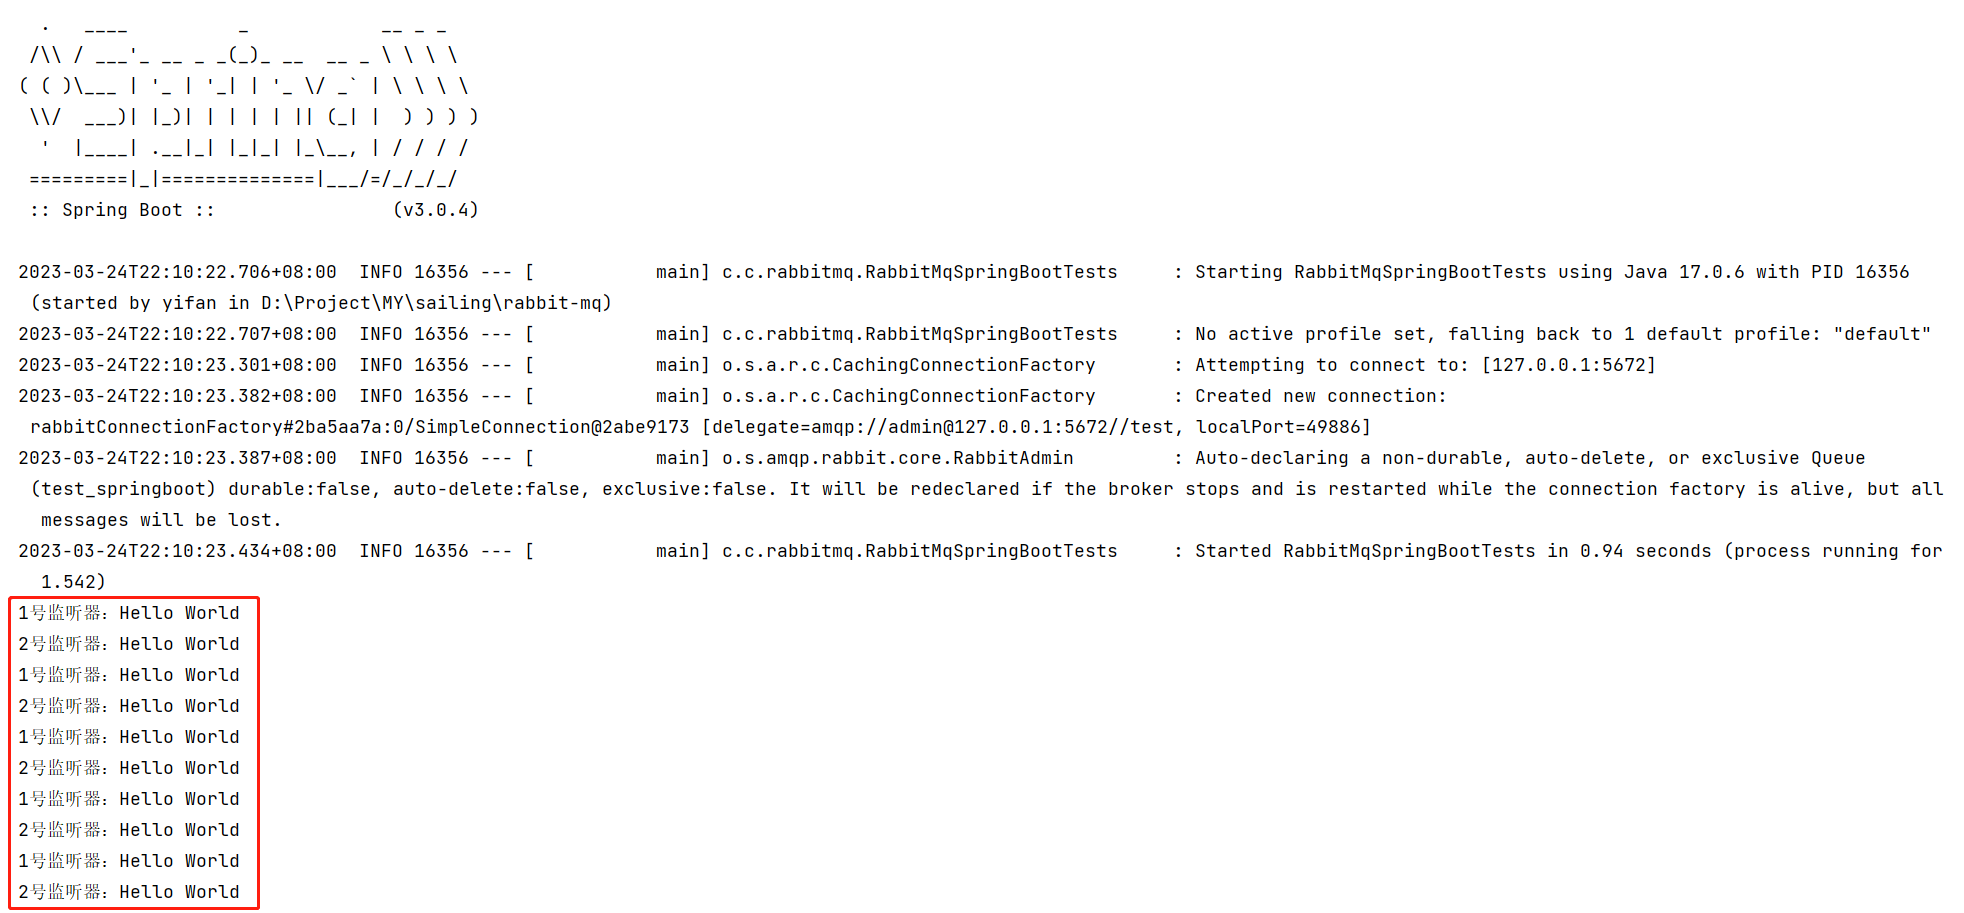
可以看到,当同一个队列有多个监听器时,默认采用轮询的方式消费消息。
先发消息再监听
前面介绍了先监听再发消息的情况,下面介绍先发消息再监听的情况。
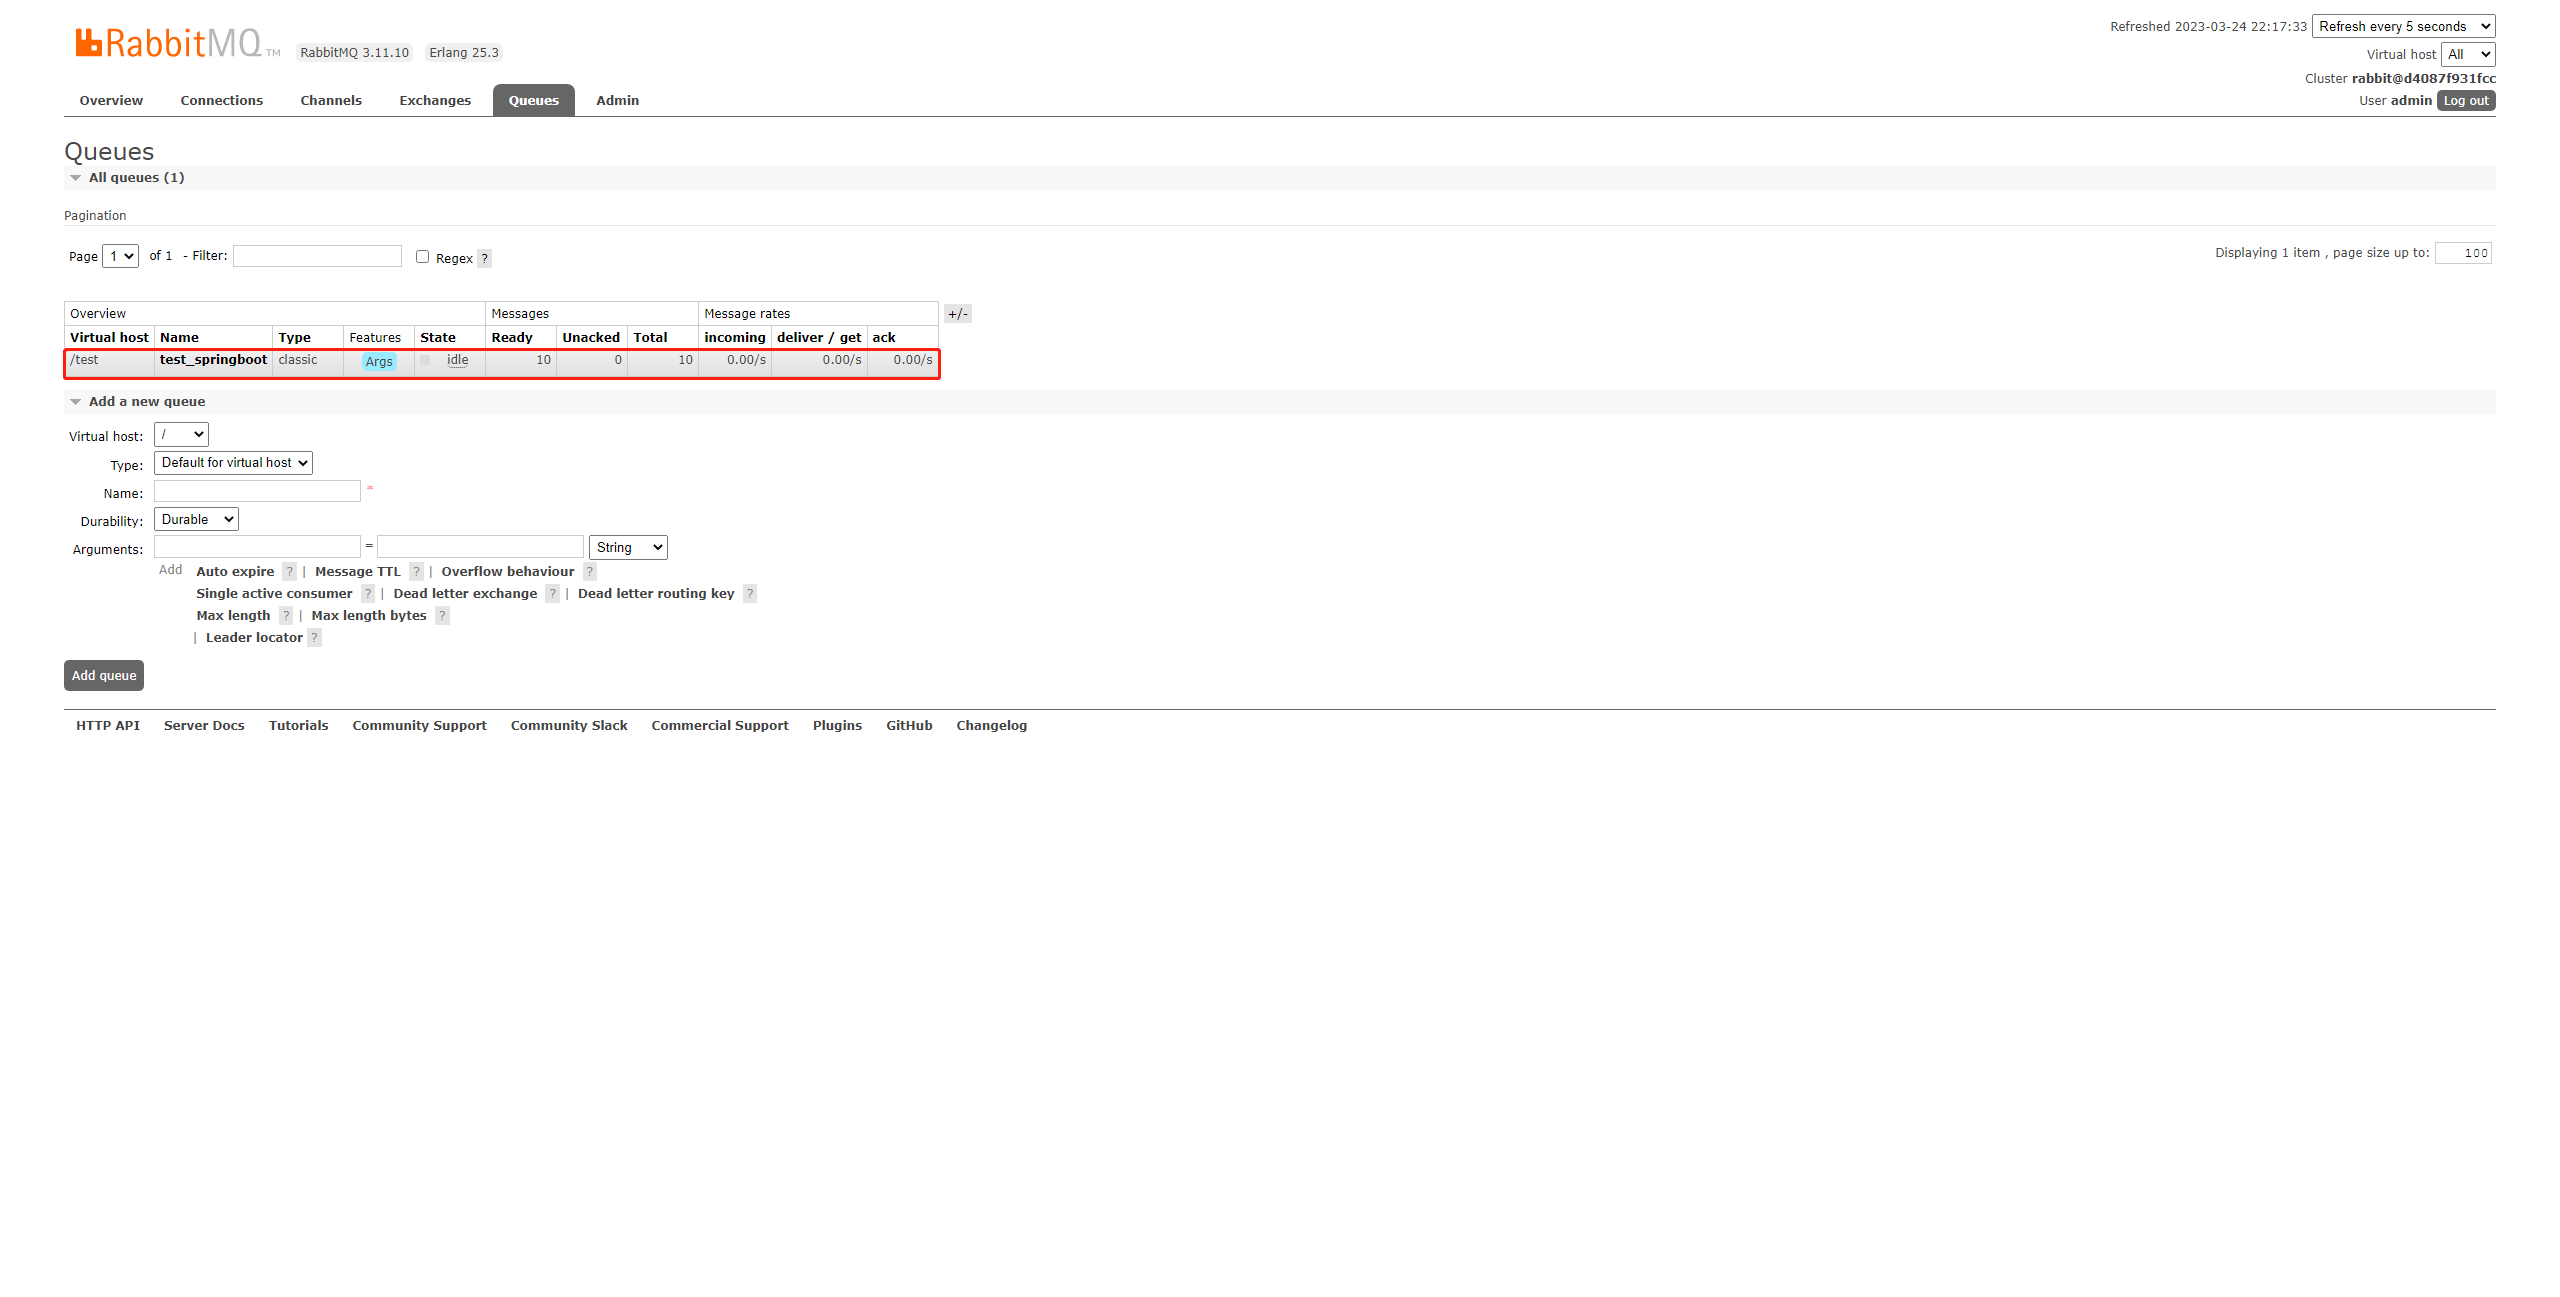
向队列中发送10条消息。
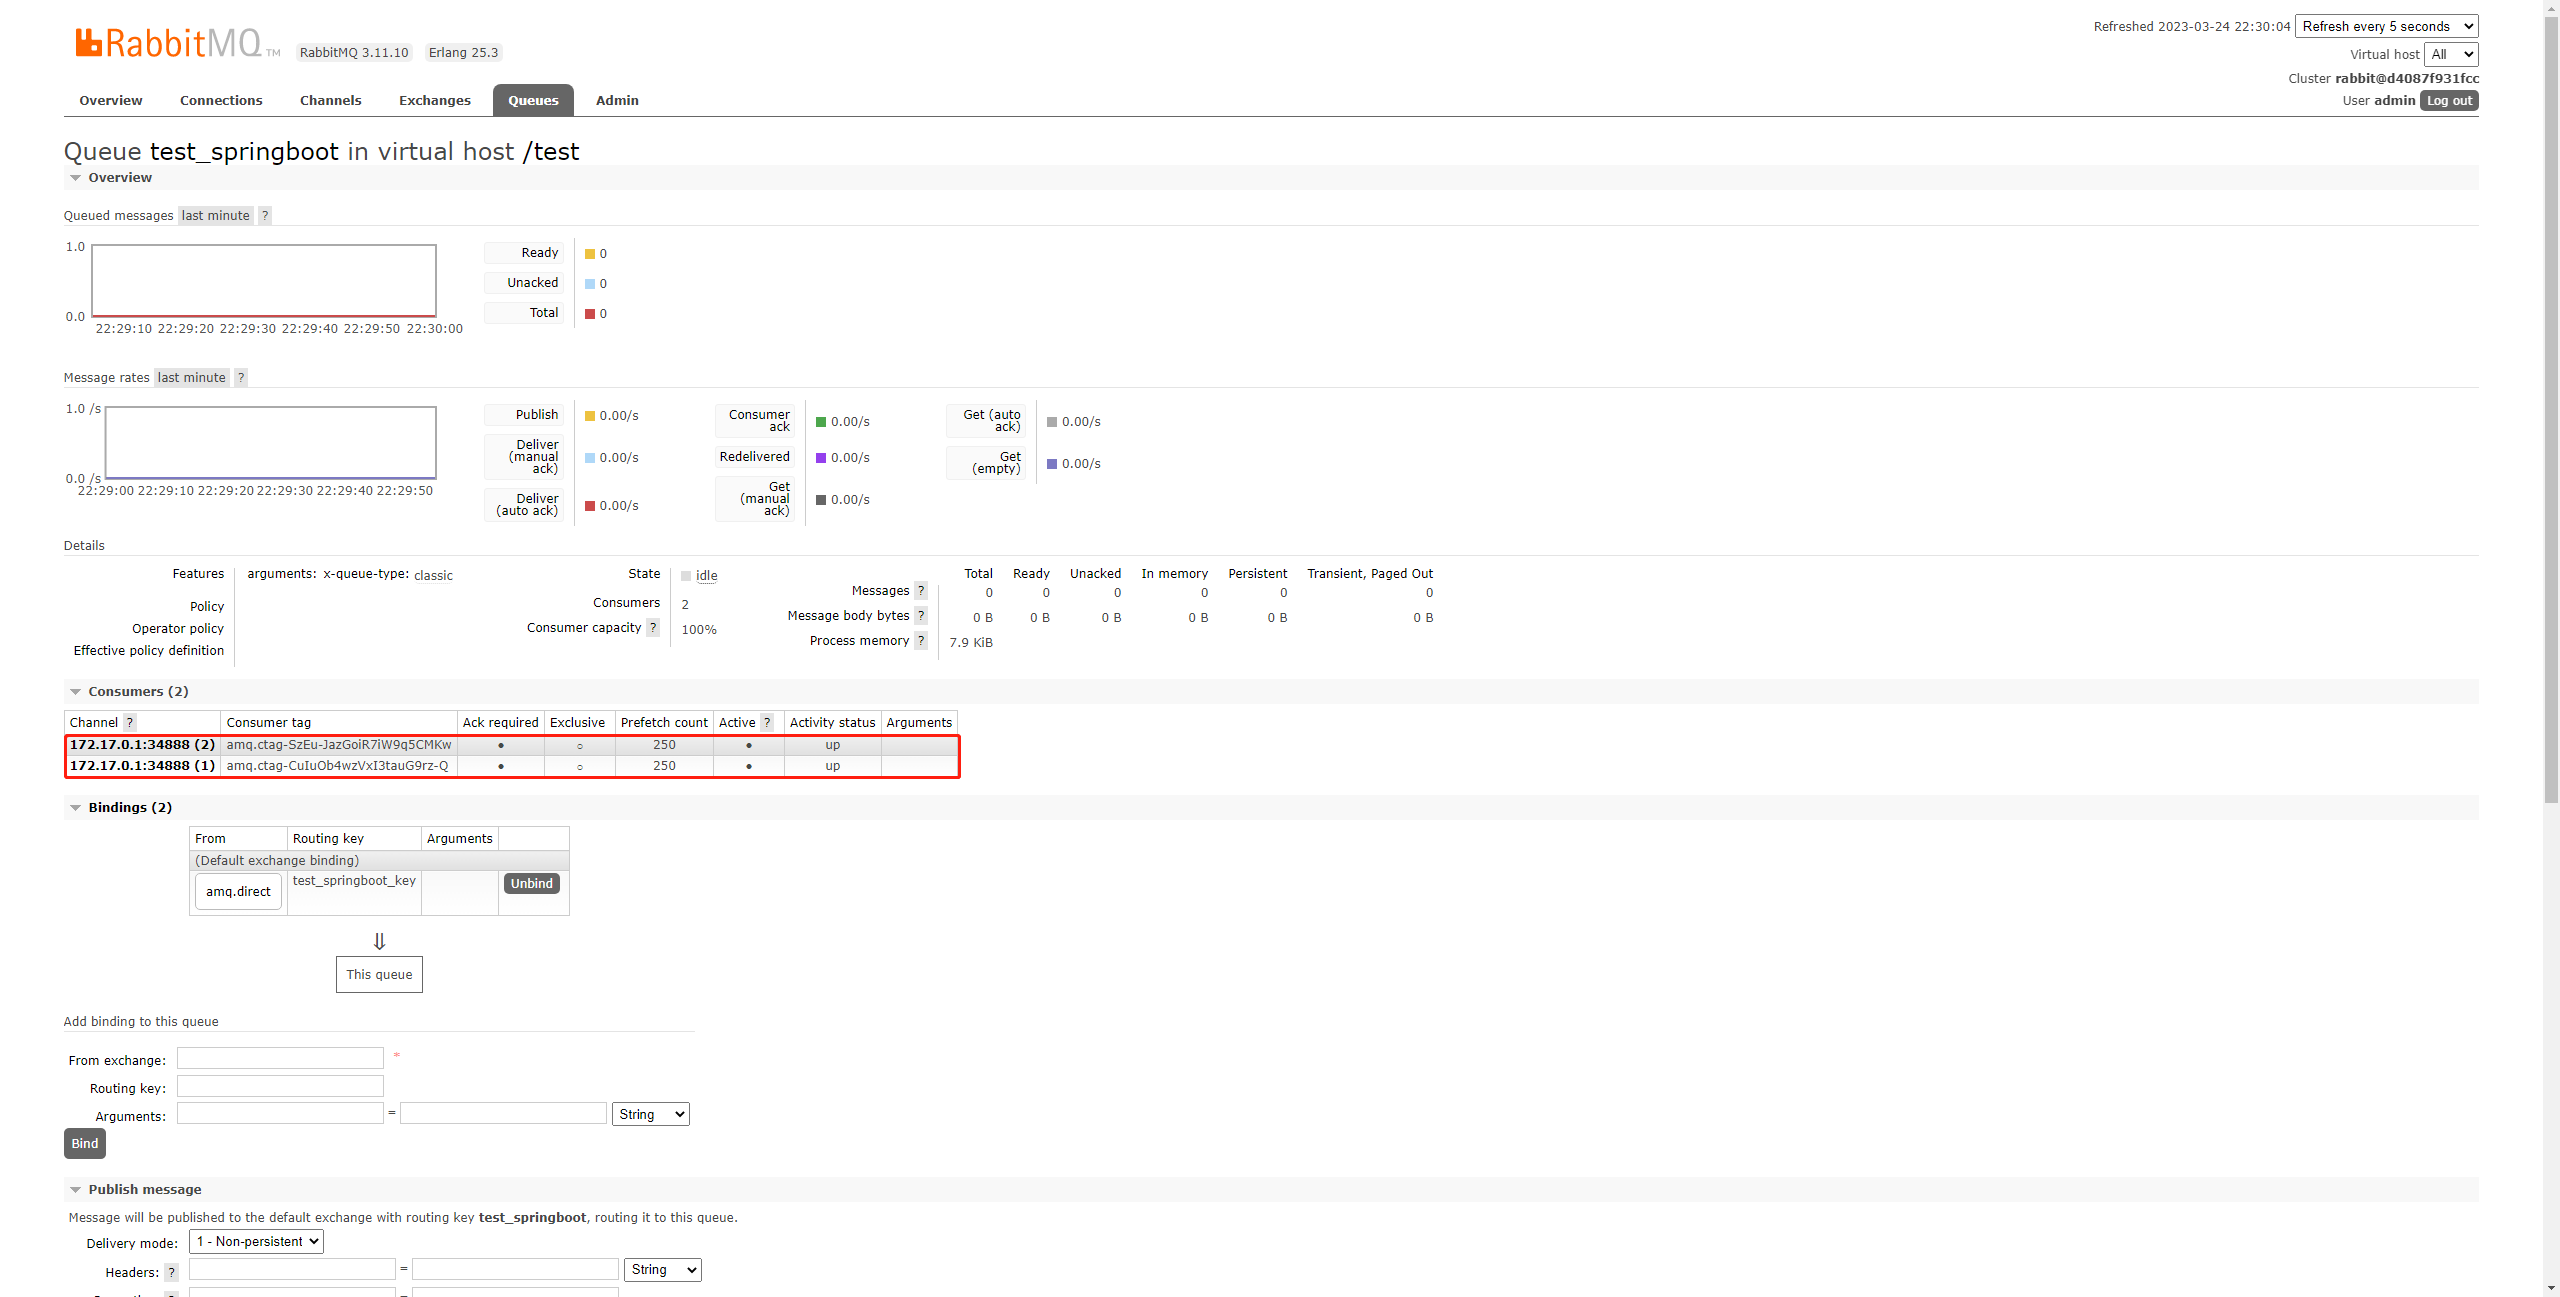
启动服务消费消息。

可以看到,如果是一开始就存在消息,会被一个消费者一次性全部消费,这是因为没有对消费者的Prefetch count(预获取数量,一次性获取消息的最大数量)进行限制。
默认的Prefetch count为250。
也就是说如果希望消费者一次只拿一个消息,而不是将所有的消息全部都获取,需要设置Prefetch count。
要对这个数量进行配置,需要在配置类中定义一个自定义的ListenerContainerFactory,可以在这里设置消费者Channel的PrefetchCount的大小。
配置类中定义
ListenerContainerFactory。import org.springframework.amqp.core.Binding;
import org.springframework.amqp.core.BindingBuilder;
import org.springframework.amqp.core.Exchange;
import org.springframework.amqp.core.ExchangeBuilder;
import org.springframework.amqp.core.Queue;
import org.springframework.amqp.core.QueueBuilder;
import org.springframework.amqp.rabbit.config.SimpleRabbitListenerContainerFactory;
import org.springframework.amqp.rabbit.connection.CachingConnectionFactory;
import org.springframework.beans.factory.annotation.Autowired;
import org.springframework.beans.factory.annotation.Qualifier;
import org.springframework.context.annotation.Bean;
import org.springframework.context.annotation.Configuration; /**
* RabbitMQ配置类
*
* @author CodeSail
*/
@Configuration
public class RabbitMqConfig { @Autowired
private CachingConnectionFactory connectionFactory; ... @Bean(name = "listenerContainer")
public SimpleRabbitListenerContainerFactory listenerContainer(){
SimpleRabbitListenerContainerFactory factory = new SimpleRabbitListenerContainerFactory();
factory.setConnectionFactory(connectionFactory);
// 将PrefetchCount设定为1表示一次只能取一个
factory.setPrefetchCount(1);
return factory;
}
}
监听器中指定。
import org.springframework.amqp.rabbit.annotation.RabbitListener;

import org.springframework.stereotype.Component;

/**

 * 工作队列监听器

 *

 * @author 廖航

 */

@Component

public class WorkListener {

    @RabbitListener(queues = "test_springboot", containerFactory = "listenerContainer")

    public void receiver1(String message) {

        System.out.println("1号监听器:" + message);

    }

    @RabbitListener(queues = "test_springboot", containerFactory = "listenerContainer")

    public void receiver2(String message) {

        System.out.println("2号监听器:" + message);

    }

}
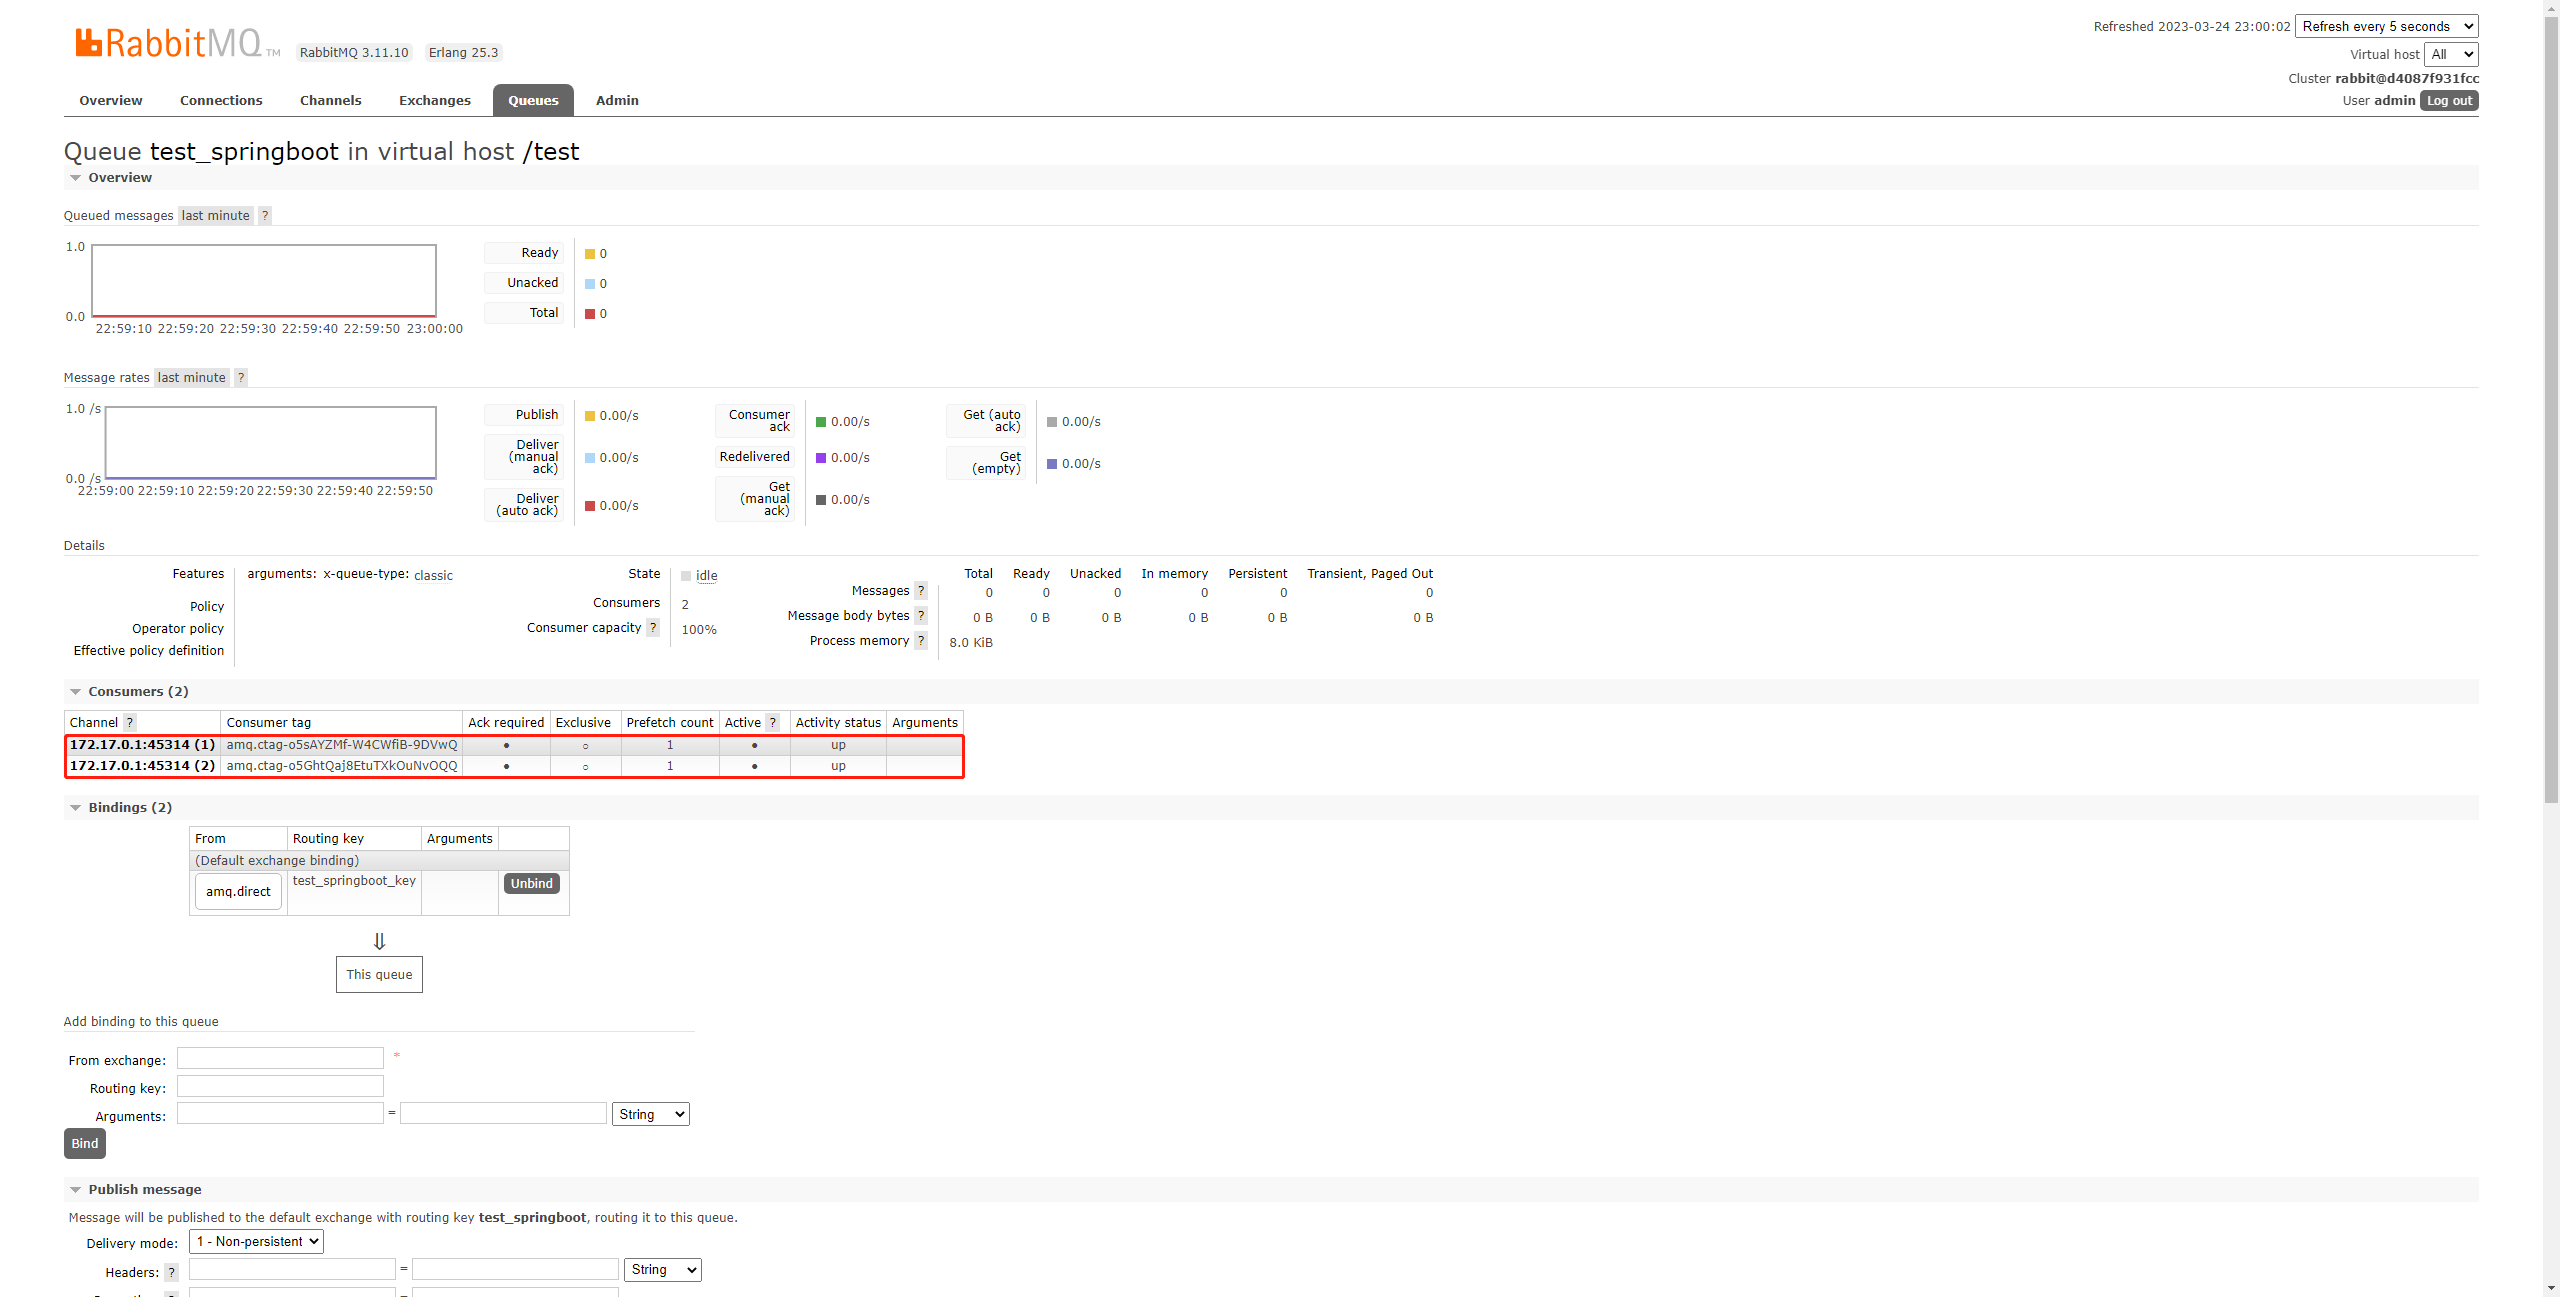
向队列中发送10条消息。

启动服务消费消息。

可以看到,两个监听器又实现了轮询消费消息。
Prefetch count设为了1。
至此,工作队列模式的两种情况就介绍完毕了。
- 环境
- JDK 17.0.6
- Maven 3.6.3
- SpringBoot 3.0.4
- spring-boot-starter-amqp 3.0.4
- 参考
RabbitMQ 06 工作队列模式的更多相关文章
- RabbitMQ六种队列模式-工作队列模式
前言 RabbitMQ六种队列模式-简单队列RabbitMQ六种队列模式-工作队列 [本文]RabbitMQ六种队列模式-发布订阅RabbitMQ六种队列模式-路由模式RabbitMQ六种队列模式-主 ...
- 【RabbitMQ】工作模式介绍
一.前言 之前,笔者写过< CentOS 7.2 安装 RabbitMQ> 这篇文章,今天整理一下 RabbitMQ 相关的笔记便于以后复习. 二.模式介绍 在 RabbitMQ 官网上提 ...
- RabbitMQ六种队列模式-简单队列模式
前言 RabbitMQ六种队列模式-简单队列 [本文]RabbitMQ六种队列模式-工作队列RabbitMQ六种队列模式-发布订阅RabbitMQ六种队列模式-路由模式RabbitMQ六种队列模式-主 ...
- RabbitMQ六种队列模式-发布订阅模式
前言 RabbitMQ六种队列模式-简单队列RabbitMQ六种队列模式-工作队列RabbitMQ六种队列模式-发布订阅 [本文]RabbitMQ六种队列模式-路由模式RabbitMQ六种队列模式-主 ...
- RabbitMQ六种队列模式-路由模式
前言 RabbitMQ六种队列模式-简单队列RabbitMQ六种队列模式-工作队列RabbitMQ六种队列模式-发布订阅RabbitMQ六种队列模式-路由模式 [本文]RabbitMQ六种队列模式-主 ...
- RabbitMQ六种队列模式-主题模式
前言 RabbitMQ六种队列模式-简单队列RabbitMQ六种队列模式-工作队列RabbitMQ六种队列模式-发布订阅RabbitMQ六种队列模式-路由模式RabbitMQ六种队列模式-主题模式 [ ...
- java面试一日一题:rabbitMQ的工作模式
问题:请讲下rabbitMQ的工作模式 分析:该问题纯属概念题,需要掌握rabbtiMQ的基础知识,同时该题也是切入MQ的一个引子: 回答要点: 主要从以下几点去考虑, 1.rabbitMQ的基本概念 ...
- RabbitMQ之消息模式(下)
目的: RabbitMQ之消息模式(上):https://www.cnblogs.com/huangting/p/11994539.html 消费端限流 消息的ACK与重回队列 TTL消息 死信队列 ...
- 阶段5 3.微服务项目【学成在线】_day05 消息中间件RabbitMQ_9.RabbitMQ研究-工作模式-发布订阅模式-消费者
消费者需要写两个消费者 定义邮件的类 复制以前的代码到邮件类里面进行修改 最上面 声明队列的名称和交换机的名称 监听修改为email 的队列的名称 手机短信接收端 复制一份email的接收端的代码 改 ...
- 【RabbitMQ】六种模式与SpringBoot整合
添加rabbitmq的依赖 <dependency> <groupId>org.springframework.boot</groupId> <artifac ...
随机推荐
- 为Study.BlazorOne引入Study.Trade模块
# 1.在Application项目中添加Trade的对应的包 默认的源多半是nuget.org 我们自己的模块,一般在我们自己的NuGet服务器 从"已安装"切换到"浏 ...
- 8、mysql的内存管理及优化
内存优化原则 1) 将尽量多的内存分配给MySQL做缓存,但要给操作系统和其他程序预留足够内存. 2) MyISAM 存储引擎的数据文件读取依赖于操作系统自身的IO缓存,因此,如果有MyISAM表,就 ...
- mysql中innodb创建表的一些限制
1. 背景 在新创建mysql数据表的时候.不太确定表能创建多少个字段,多少个索引.索引多少有限制么?mysql的数据是怎么存储的存在在哪里. 2.基本个数限制 在MySQL5.6.9以后的版本,一个 ...
- 一些Clion使用记录
一些Clion使用记录 编译链设置 在设置"工具链"中可以按需增加不同的编译链 访问越界溢出debug AddressSanitizer介绍:AddressSanitizer 交的 ...
- 孔夫子旧书网书籍信息得爬取并保存为json,csv,excel多种文件格式
python版本:3.7 需要得引入得包: from selenium import webdriver from selenium.common.exceptions import TimeoutE ...
- 来自 AI Secure 实验室的 LLM 安全排行榜简介
近来,LLM 已深入人心,大有燎原之势.但在我们将其应用于千行百业之前,理解其在不同场景下的安全性和潜在风险显得尤为重要.为此,美国白宫发布了关于安全.可靠.可信的人工智能的行政命令; 欧盟人工智能法 ...
- folder-alias vscode左侧目录树 起别名 插件 (git decorations)
folder-alias vscode左侧目录树 起别名 插件 插件 效果 不足 文件路径或目录路径中包含中文 会挂不上别名,纯英文路径没问题 有修改后,git会覆盖,不显示别名 个人意见 我的项目都 ...
- 回声消除(Acoustic Echo Cancellation)中遇到的几个常见问题思考
什么才是好的回声消除效果 个人的理解:好的回声消除算法,要满足两个条件:一个是回声确实被消除了,另外一个是麦克风采集到音频信号不能被消除,常见的就是人的声音信号.这个算法只是提供了一种方法,具体的 ...
- Window10系统通过软件切换扬声器与耳机的音源输出
原文地址: Window10系统通过软件切换扬声器与耳机的音源输出 - Stars-One的杂货小窝 个人平常一般使用扬声器,但有时候直播或和别人打游戏的时候,可能会带上耳机 目前的情况就是手动去插播 ...
- electron 中如何安装或更新 vuejs-devtool 最新稳定版
手上正在开发的项目是vue3.0 通过添加 vue-cli-plugin-electron-builder 插件生成 electron 项目,项目在开发过程中发现 beta版的 vuejs-devto ...