IdentityServer4 + SignalR Core +RabbitMQ 构建web即时通讯(一)
IdentityServer4 + SignalR Core +RabbitMQ 构建web即时通讯
前言
.net core 2.1已经正式发布了,signalr core1.0随之发布,是时候写个demo了,这里带大家复习了下知识链,构建一个web即时聊天室,整个应用构建思路如下:
1.使用IdentityServer4作为独立的用户中心与认证中心,采用password授权模式给客户端提供token,
2.使用RabbitMQ作为消息处理器,客户端发送消息到服务端,服务器并不直接响应该消息,而是发送到消息队列,再由消息处理器获取消息并发送到客户端,提高服务端的处理能力,
3.数据库使用postgresql,本来准备使用mysql的,不过截止发稿时,EF Core2.1发布后,mysql的使用Code First存在bug还未解决,
4.使用Docker构建RabbitMQ,postgresql应用,
5. 前后端分离。
地址:https://github.com/280780363/signalrdemo.git
Docker构建基础应用RabbitMQ,postgresql
环境:虚拟机centos 7.0,docker
xshell连接到centos。
1,启动RabbitMQ容器,官方镜像地址,设置默认用户admin,密码123123,具体环境变量这些的设置可以参考官方文档: docker run -d --hostname myrabbit --name myrabbit -e RABBITMQ_DEFAULT_USER=admin -e RABBITMQ_DEFAULT_PASS=123123 -p 15672:15672 -p 5672:5672 -p 25672:25672 -p 61613:61613 -p 1883:1883 --restart=always rabbitmq:management
2.启动postgresql,官方镜像地址,设置默认用户gucao,密码123123,这里启动时设置的用户是属于超级管理员,挂载数据卷~/docker/postgresql/pgdata目录作为数据存储目录,--privileged设置容器拥有root权限进行文件读写: docker run --restart=always --privileged --name mypostgresql -e POSTGRES_PASSWORD=123123 -e POSTGRES_USER=gucao -v ~/docker/postgresql/pgdata:/var/lib/postgresql/data/ -d -p 5432:5432 postgres
成功启动后:
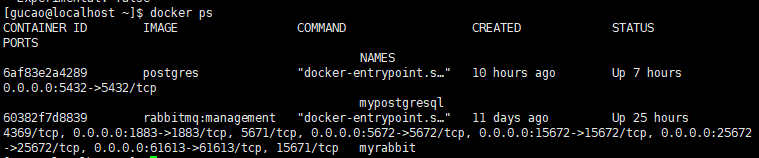
端口号都映射为默认端口。psotgresql默认端口号5432,RabbitMQ用的到端口号比较多,15672是ui管理的端口号。我的虚拟机IP是192.168.1.107。浏览器打开地址:192.168.1.107:15672:

能看到这个登录页面就说明一切ok了。输入容器启动时设置的用户名密码。登录后可以查看当前的一些队列信息。
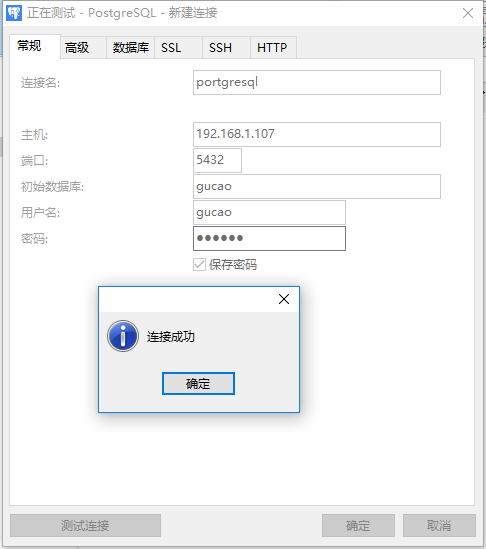
使用Navicat连接数据库,也没有问题:
就这么简单的2个命令就启动了2个应用,如果自己下载安装包来安装,那真是够折腾人的,还得考虑各种各样的环境,不得不说docker真是一个伟大的工具。
IdentityServer4 用户中心
关于IdentityServer4的具体各种使用这里不会赘述,大家可以多参考以下资料:
官方文档
晓晨的博客
我们这里集成AspNetCore Identity提供用户管理,客户端(client),资源(ApiResource,IdentityResource)等配置资料都使用数据库存储。
需要用到的库:
1.IdentityServer4;
2.IdentityServer4.AspNetIdentity ,IdentityServer4集成AspNetCore Identity用到的库;
3.IdentityServer4.EntityFramework,IdentityServer4使用EF作为数据存储用到的库;
4.Npgsql.EntityFrameworkCore.PostgreSQL,postgresql ef驱动库;
5.Microsoft.EntityFrameworkCore.Tools,Ef Code First工具库。
好吧,啰嗦一点,
1.创建空的.net core web项目 Demo.Identity,nuget安装以上用到的库;
2.创建appsettings.json配置文件,增加数据库连接配置,文件名不能错,ConnectionStrings不能错,这是默认的约定
{

  "ConnectionStrings": {

    "chat": "server=192.168.1.107;user id=gucao;password=123123;persistsecurityinfo=True;database=signalrdemo;"

  }

}
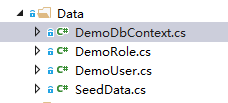
3.增加Data文件夹,存放用户实体,DbContext,种子数据文件类,这里我们使用guid作为主键,这里主要是AspNetCore Identity的类
DemoUser继承自IdentityUser<Guid>,增加一个头像属性
    public class DemoUser : IdentityUser<Guid>

    {

        public string Avatar { get; set; }

    }
因为默认是string类型的主键,要更改主键类型,需要同时建一个Role类,也设置为guid主键,DemoRole:
    public class DemoRole : IdentityRole<Guid>

    {

    }
DemoDbContext
    public class DemoDbContext : IdentityDbContext<DemoUser, DemoRole, Guid>

    {

        public DemoDbContext(DbContextOptions<DemoDbContext> options) : base(options)

        {

        }

    }
SeedData就用来提供基本的数据了,这里先设置3个用户,要聊天总不能一个人聊得开心是吧
        public static List<DemoUser> Users()

        {

            return new List<DemoUser>{

                new DemoUser

                {

                    UserName = "laowang",

                    Email = "520@qq.com",

                    Id = Guid.NewGuid(),

                    EmailConfirmed = true,

                    TwoFactorEnabled = false,

                    Avatar = "https://timgsa.baidu.com/timg?image&quality=80&size=b9999_10000&sec=1528131041794&di=78ae71a3573dc86bc010e301005fea53&imgtype=0&src=http%3A%2F%2Fpic2.orsoon.com%2F2017%2F0309%2F20170309032925886.png"

                },

                new DemoUser

                {

                    UserName = "zhangsan",

                    Email = "521@qq.com",

                    Id = Guid.NewGuid(),

                    EmailConfirmed = true,

                    TwoFactorEnabled = false,

                    Avatar = "http://pic20.photophoto.cn/20110804/0010023712739303_b.jpg"

                },

                new DemoUser

                {

                    UserName = "lisi",

                    Email = "521@qq.com",

                    Id = Guid.NewGuid(),

                    EmailConfirmed = true,

                    TwoFactorEnabled = false,

                    Avatar = "http://p1.qzone.la/upload/0/14vy5x96.jpg"

                }

            };

        }
4.好了 下面开始配置StartUp中的服务,这里我就直接贴代码了
        public void ConfigureServices(IServiceCollection services)

        {

            // 配置AspNetCore Identity 的DbContext服务

            services.AddDbContext<DemoDbContext>(r =>

            {

                r.UseNpgsql(configuration.GetConnectionString("chat"), options =>

                {

                    // 配置迁移时程序集

                    options.MigrationsAssembly(typeof(Startup).GetTypeInfo().Assembly.GetName().Name);

                });

            });

            // 配置AspNetCore Identity服务用户密码的验证规则

            services.AddIdentity<DemoUser, DemoRole>(options =>

            {

                options.Password.RequireDigit = false;

                options.Password.RequiredLength = ;

                options.Password.RequireLowercase = false;

                options.Password.RequireUppercase = false;

                options.Password.RequireNonAlphanumeric = false;

            })

            // 告诉AspNetCore Identity 使用DemoDbContext为数据库上下文

            .AddEntityFrameworkStores<DemoDbContext>()

            .AddDefaultTokenProviders();

            // 配置ids4服务

            services.AddIdentityServer()

                .AddDeveloperSigningCredential()

                // ids4使用AspNetCore Identity为用户认证

                .AddAspNetIdentity<DemoUser>()

                // 使用数据库来存储客户端Clients ApiResource IdentityResource

                .AddConfigurationStore(options =>

                {

                    options.ConfigureDbContext = builder =>

                    {

                        builder.UseNpgsql(configuration.GetConnectionString("chat"), sql =>

                        {

                            sql.MigrationsAssembly(typeof(Startup).GetTypeInfo().Assembly.GetName().Name);

                        });

                    };

                })

                // 使用数据库存储授权操作相关操作,数据库表PersistedGrants

                .AddOperationalStore(options =>

                {

                    options.ConfigureDbContext = builder =>

                    {

                        builder.UseNpgsql(configuration.GetConnectionString("chat"), sql =>

                        {

                            sql.MigrationsAssembly(typeof(Startup).GetTypeInfo().Assembly.GetName().Name);

                        });

                    };

                })

                // ids4使用自定义的用户档案服务

                .Services.AddTransient<IProfileService, ProfileService>();

            // 配置跨域,允许所有

            services.AddCors(r =>

            {

                r.AddPolicy("all", policy =>

                {

                    policy

                    .AllowAnyOrigin()

                    .AllowAnyHeader()

                    .AllowAnyMethod()

                    .AllowCredentials()

                    ;

                });

            });

        }
这里有一句Services.AddTransient<IProfileService, ProfileService>(),什么意思呢?我希望在前端通过请求token时,token中自带有用户基本信息:用户名,头像等等,通过这个类配置ids4发布token时带上这些用户信息;
    public class ProfileService : IProfileService

    {

        UserManager<DemoUser> userManager;

        // 注入AspNetCore Identity的用户管理类

        public ProfileService(UserManager<DemoUser> userManager)

        {

            this.userManager = userManager;

        }

        public async Task GetProfileDataAsync(ProfileDataRequestContext context)

        {

            var claims = context.Subject.Claims.ToList();

            // sub属性就是用户id

            var userId = claims.First(r => r.Type == "sub");

            // 查找用户

            var user = await userManager.FindByIdAsync(userId.Value);

            claims.Add(new System.Security.Claims.Claim("username", user.UserName));

            claims.Add(new System.Security.Claims.Claim("email", user.Email));

            claims.Add(new System.Security.Claims.Claim("avatar", user.Avatar));

            // 这里是设置token包含的用户属性claim

            context.IssuedClaims = claims;

        }

        public async Task IsActiveAsync(IsActiveContext context)

        {

            context.IsActive = true;

            await Task.CompletedTask;

        }

    }
Configure
        public void Configure(IApplicationBuilder app, IHostingEnvironment env)

        {

            if (env.IsDevelopment())

            {

                app.UseDeveloperExceptionPage();

            }

            app.UseCors("all");

            app.UseIdentityServer();

        }
5.可以开始生成迁移代码了,这里有3个DbContext类需要生成迁移:DemoDbContext,ConfiguraionDbContext(ids4 配置数据上下文),PersistedGrantDbContext(ids4授权操作数据上下文)
Add-Migration init -Context DemoDbContext -OutputDir Migrations/IdentityDbMigrations

Add-Migration init -Context ConfigurationDbContext -OutputDir Migrations/ConfigurationDbMigrations

Add-Migration init -Context PersistedGrantDbContext -OutputDir Migrations/PersistedGrantDbMigrations
好了,篇幅有点长了,先到这。
IdentityServer4 + SignalR Core +RabbitMQ 构建web即时通讯(一)的更多相关文章
- IdentityServer4 + SignalR Core +RabbitMQ 构建web即时通讯(三)
IdentityServer4 + SignalR Core +RabbitMQ 构建web即时通讯(三) 后台服务用户与认证 新建一个空的.net core web项目Demo.Chat,端口配置为 ...
- IdentityServer4 + SignalR Core +RabbitMQ 构建web即时通讯(二)
IdentityServer4 + SignalR Core +RabbitMQ 构建web即时通讯(二) IdentityServer4 用户中心生成数据库 上文已经创建了所有的数据库上下文迁移代码 ...
- 一套简单的web即时通讯——第一版
前言 我们之前已经实现了 WebSocket+Java 私聊.群聊实例,后面我们模仿layer弹窗,封装了一个自己的web弹窗 自定义web弹窗/层:简易风格的msg与可拖放的dialog,生成博客园 ...
- web即时通讯2--基于Spring websocket达到web聊天室
如本文所用,Spring4和websocket要构建web聊天室,根据框架SpringMVC+Spring+Hibernate的Maven项目,后台使用spring websocket进行消息转发和聊 ...
- 为什么 web 开发人员需要迁移到. NET Core, 并使用 ASP.NET Core MVC 构建 web 和 webservice/API
2018 .NET开发者调查报告: .NET Core 是怎么样的状态,这里我们看到了还有非常多的.net开发人员还在观望,本文给大家一个建议.这仅代表我的个人意见, 我有充分的理由推荐.net 程序 ...
- .Net core 3.0 SignalR+Vue 实现简单的即时通讯/聊天IM (无jq依赖)
.Net core 中的SignalR JavaScript客户端已经不需要依赖Jquery了 一.服务端 1.nuget安装 Microsoft.AspNetCore.SignalR 2.在star ...
- Mysql EF Core 快速构建 Web Api
(1)首先创建一个.net core web api web项目; (2)因为我们使用的是ef连接mysql数据库,通过NuGet安装MySql.Data.EntityFrameworkCore,以来 ...
- 基于spring reactor3构建的即时通讯api。
欢迎阅读Rmessage文档 技术栈 Rmessage是采用Reactor3,基于reactor-netty项目构建的实时消息推送api. 什么是Reactor3? Reactor 是一个用于JVM的 ...
- 一套简单的web即时通讯——第二版
前言 接上一版,这一版的页面与功能都有所优化,具体如下: 1.优化登录拦截 2.登录后获取所有好友并区分显示在线.离线好友,好友上线.下线都有标记 3.将前后端交互的值改成用户id.显示值改成昵称ni ...
随机推荐
- Error-invalid project description(转)
导入android工程时有时会出现下面错误: 按照提示,说是当前的工作空间内已经有同名的工程了,但实际是没有的. 多次碰到这种问题后,无意间找到解决办法.导入工程时,不要选择Android,而是选择G ...
- 关于platform_device和platform_driver的匹配【转】
转自:http://blog.csdn.net/dfysy/article/details/5959451 版权声明:本文为博主原创文章,未经博主允许不得转载. 说句老实话,我不太喜欢现在Linux ...
- linux安全机制学习【转】
转自:http://blog.csdn.net/qq_20307987/article/details/51307820 曾经一度想学来着,今天看到一个链接,讲的很好,算是写一下加深印象吧 1 栈溢出 ...
- LeetCode OJ-- Search a 2D Matrix
https://oj.leetcode.com/problems/search-a-2d-matrix/ 具有数据递增性质的一个二维数组,对它进行二分搜索. 首先搜索target所在的行,再找列. c ...
- (22)python PhantomJS
下载地址 https://bitbucket.org/ariya/phantomjs/downloads/ 安装 解压后把bin目录下的phantomjs.exe文件复制到C:\Python27\Sc ...
- 使用Fiddle监听HTTPS网页
HTTPS相对于HTTP增加了安全性,但是仍然不能有效的防止中间人攻击(Man-in-the-MiddleAttack,简称“MITM攻击”) 这就使得Fiddle工具能够有效的监听HTTPS流量 一 ...
- 聚类kmeans算法在yolov3中的应用
yolov3 kmeans yolov3在做boundingbox预测的时候,用到了anchor boxes.这个anchors的含义即最有可能的object的width,height.事先通过聚类得 ...
- Linux安全漏洞审计工具Lynis
Linux安全漏洞审计工具Lynis Lynis是针对类Unix系统的审计工具,它支持Unix.Linux.FreeBSD.Mac OS多种操作系统.它能对系统实施大于400种测试,以发现39个方 ...
- Light oj 1095 - Arrange the Numbers (组合数学+递推)
题目链接:http://www.lightoj.com/volume_showproblem.php?problem=1095 题意: 给你包含1~n的排列,初始位置1,2,3...,n,问你刚好固定 ...
- Android 控件架构与自定义控件详解
架构: PhoneWindow 将一个 DecorView 设置为整个应用窗口的根 View,这里面所有 View 的监听事件,都通过 WindowManagerService 来接收.DecorVi ...