基于imgAreaSelect的用户图像截取
前言:想到用户资料中一般有个图像自我截取的部分,为什么要截取呢,因为好看了。so,经过我各种百度,各种参考,终于打工搞成了,写下纪念纪念,让以后拿来就用也好。
一:想前端ui这东西,我就懒得说话了,哎,没艺术啊!毫不犹豫的选择上网找资料了,发现一般有两种方法1:Jcrop;2:imgAreaSelect;呵呵,我选了imgAreaSelect;使用很简单么?
二:获取这个插件包:点我就来了开心吧!
三:使用方法简介:
$('#img').imgAreaSelect({
各种参数配置,回调函数
});
$('img#select').imgAreaSelect({

        selectionColor:'blue', //截取颜色
    //看名字就知道了,截取部分的左上右下的点坐标哦

        x1:0,y1:0,x2:50,y2:50,

        maxWidth:400,maxHeitht:400,   //限定的截取部分宽高:

        minWidth:50,minHeight:50,

        selectionOpacity:0.1,         //截取的透明度

        handles: true,                //截取边框的小柄

        aspectRatio:'1:1',            //固定比例大小

        onSelectEnd:preview  //截取操作完后,需要获取什么的函数,自定义

    });
-------------------------------------------------------------------------
四:附加解释说明,经过上方各种链接可能聪明的你已经有点不懂了
(截取的原理):
1:给定你想选择显示截取后的大小:比如200
2:实际你截取的大小:select_width:
3: 显示比例:scale = 200 / (selection.width || 1);
4: 如何显示呢?把原图按此比例扩大,然后在控制边距以 -x,-y,偏移

回调函数部分:
    var scaleX = 200 / (selection.width || 1);

        var scaleY = 200 / (selection.height || 1);

        var scaleX1 = 100 / (selection.width || 1);

        var scaleY1 = 100 / (selection.height || 1);

        $('#preview200').css({

            width: Math.round(scaleX * 300) + 'px',

            height: Math.round(scaleY * 300) + 'px',

            marginLeft: '-' + Math.round(scaleX*selection.x1) + 'px',

            marginTop: '-' + Math.round(scaleY*selection.y1) + 'px'

        });
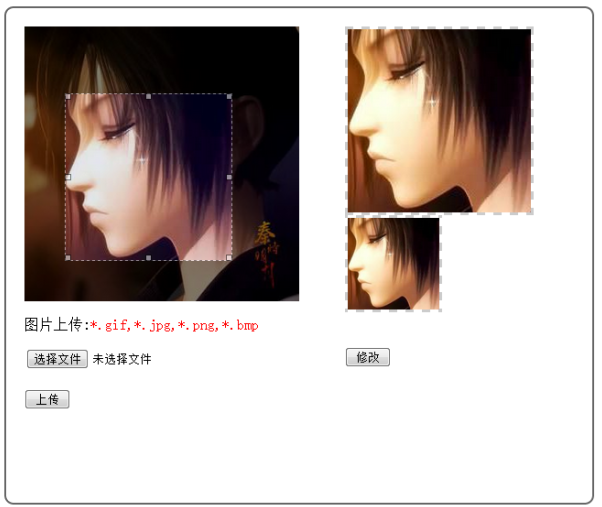
五:好了,激动人心的时候来了,请看图:
参考代码:不含服务端对图像的截取
<!DOCTYPE html PUBLIC "-//W3C//DTD XHTML 1.0 Transitional//EN" "http://www.w3.org/TR/xhtml1/DTD/xhtml1-transitional.dtd">

<html xmlns="http://www.w3.org/1999/xhtml">

<head>

<meta http-equiv="Content-Type" content="text/html; charset=utf-8" />

<title>图像选取</title>

<link rel="stylesheet" type="text/css" href="css/imgareaselect-default.css" />

  <script type="text/javascript" src="scripts/jquery.min.js"></script>

  <script type="text/javascript" src="scripts/jquery.imgareaselect.pack.js"></script>

  <script type="text/javascript" src="../_uploadfilecheck.js"></script>

<script type="text/javascript">

$(document).ready(function () {

    $('img#select').imgAreaSelect({

        selectionColor:'blue',

        x1:0,y1:0,x2:50,y2:50,

        maxWidth:400,maxHeitht:400,

        minWidth:50,minHeight:50,

        selectionOpacity:0.1,

         handles: true,

         aspectRatio:'1:1',

         onSelectEnd:preview

    });

    $("#button1").click(function(){

        if(checkImgType($("#imgFile")[0])){

            $(this).parent().submit();

        }

    });

    $("#button2").click(function(){

            alert($(this).parent().submit());

    });

})

function getValue(selection){

              $('input[name="x1"]').val(selection.x1);

            $('input[name="y1"]').val(selection.y1);

            $('input[name="width"]').val(selection.width);

            $('input[name="height"]').val(selection.height);

}

function preview(img, selection) {

    if(selection.width>49){

        getValue(selection);

        var scaleX = 200 / (selection.width || 1);

        var scaleY = 200 / (selection.height || 1);

        var scaleX1 = 100 / (selection.width || 1);

        var scaleY1 = 100 / (selection.height || 1);

        $('#preview200').css({

            width: Math.round(scaleX * 300) + 'px',

            height: Math.round(scaleY * 300) + 'px',

            marginLeft: '-' + Math.round(scaleX * selection.x1) + 'px',

            marginTop: '-' + Math.round(scaleY * selection.y1) + 'px'

        });

        $('#preview100').css({

            width: Math.round(scaleX1 * 300) + 'px',

            height: Math.round(scaleY1 * 300) + 'px',

            marginLeft: '-' + Math.round(scaleX1* selection.x1) + 'px',

            marginTop: '-' + Math.round(scaleY1 * selection.y1) + 'px'

        });

    }

}

</script>

<style type="text/css">

    #container{

    //    position:absolute;

//        left:40px;

    //    background:#FFF;

        border:#666 2px solid;

        border-radius:10px;

        width:600px;

        height:500px;

        padding:20px;

    }

    #selectdiv{

        width:350px;

        height:550px;

        float:left;

    //    border-right:#666 2px solid;

    //    border:#666 2px solid;

    }

    #uploaddiv{

        margin-top:20px;

        border-top:#CCC 1px solid;

    }

    #prediv200{

        height:200px;

        width:200px;

        overflow:hidden;

        border:#CCC 3px dashed;

    }

    #prediv100{

        height:100px;

        width:100px;

        overflow:hidden;

        border:#CCC 3px dashed;

    }

    #preview{

        position:relative;

        overflow:hidden;

    }

    [type=button]{

        width:50px;

    }

</style>

</head>

<body>

    <div id="container">

        <div id="selectdiv">

            <img  id="select" src="26.jpg" width="300px"  height="300px"  />

            <div>

                    <p>图片上传:<font color='red'>*.gif,*.jpg,*.png,*.bmp</font></p>

                <form>

                   <input type="file" name="imgFile" id="imgFile"><br /><br />

                   <input type="button" value="上传" id="button1"/>

                </form>

            </div>

       </div>

        <div id="prediv200">

            <img  id="preview200" src="26.jpg"  width="200px"  height="200px" />

        </div>

         <div id="prediv100">

            <img  id="preview100" src="26.jpg"  width="100px"  height="100px" />

        </div>

           <div>

           <form>

              <input type="hidden" name="x1" value="0" />

              <input type="hidden" name="y1" value="0" />

              <input type="hidden" name="width" value="100" />

              <input type="hidden" name="height" value="100" />

              <br /><br />

              <input type="button" value="修改" id="button2"/>

            </form>

        </div>

    </div>

</body>

</html>
文件上传验证js:
 /**检查图片上传类型*/

         function checkImgType(obj){

          var imgFile = '';

          //获取图片的全路径

          var imgFilePath = getImgFullPath(obj);

          var endIndex = imgFilePath.lastIndexOf("\\");

          var lastIndex = imgFilePath.length-endIndex-1;

          if (endIndex != -1)

             imgFile= imgFilePath.substr(endIndex+1,lastIndex);

          else

             imgFile = imgFilePath;

          var tag = true;

          endIndex = imgFilePath.lastIndexOf(".");

          if (endIndex == -1)

            tag = false;

          var ImgName = imgFilePath.substr(endIndex+1,lastIndex);

          ImgName = ImgName.toUpperCase();

          if (ImgName !="GIF" && ImgName !="JPG" && ImgName !="PNG" && ImgName !="BMP"){

              tag=false;

          }

          if (!tag) {

              alert("上传图片的文件类型必须为: *.gif,*.jpg,*.png,*.bmp,请重新选择!")

              alert("你逗我么");

        //      Upload.clear(obj);

              return false;

          }

          return true;

      }

        function getImgFullPath(obj) {

            if (obj) {

               //ie

               if (window.navigator.userAgent.indexOf("MSIE") >= 1) {

                   obj.select();

                   return document.selection.createRange().text;

               }

               //firefox

               else if (window.navigator.userAgent.indexOf("Firefox") >= 1) {

                   if (obj.files) {

                       return obj.files.item(0).getAsDataURL();

                   }

                   return obj.value;

               }

               return obj.value;

           }

        }
2014-07-19 13:59:55
基于imgAreaSelect的用户图像截取的更多相关文章
- 基于AXI VDMA的图像采集系统
基于AXI VDMA的图像采集系统 转载 2017年04月18日 17:26:43 标签: framebuffer / AXIS / AXI VDMA 2494 本课程将对Xilinx提供的一款IP核 ...
- 基于SURF特征的图像与视频拼接技术的研究和实现(一)
基于SURF特征的图像与视频拼接技术的研究和实现(一) 一直有计划研究实时图像拼接,但是直到最近拜读西电2013年张亚娟的<基于SURF特征的图像与视频拼接技术的研究和实现>,条 ...
- 基于jwt的用户登录认证
最近在app的开发过程中,做了一个基于token的用户登录认证,使用vue+node+mongoDB进行的开发,前来总结一下. token认证流程: 1:用户输入用户名和密码,进行登录操作,发送登录信 ...
- 基于RC4加密算法的图像加密
基于RC4加密算法的图像加密 某课程的一个大作业内容,对图像加密.项目地址:https://gitee.com/jerry323/RC4_picture 这里使用的是RC4(流.对称)加密算法,算法流 ...
- Laravel 5 中使用 JWT(Json Web Token) 实现基于API的用户认证
在JavaScript前端技术大行其道的今天,我们通常只需在后台构建API提供给前端调用,并且后端仅仅设计为给前端移动App调用.用户认证是Web应用的重要组成部分,基于API的用户认证有两个最佳解决 ...
- 基于jQuery点击图像居中放大插件Zoom
分享一款基于jQuery点击图像居中放大插件Zoom是一款放大的时候会从原图像的位置以动画方式放大到画面中间,支持点击图像或者按ESC键来关闭效果.效果图如下: 在线预览 源码下载 实现的代码. ...
- 深度学习与计算机视觉(12)_tensorflow实现基于深度学习的图像补全
深度学习与计算机视觉(12)_tensorflow实现基于深度学习的图像补全 原文地址:Image Completion with Deep Learning in TensorFlow by Bra ...
- 项目一:第十一天 2、运单waybill快速录入 3、权限demo演示-了解 5、权限模块数据模型 6、基于shiro实现用户认证-登录(重点)
1. easyui DataGrid行编辑功能 2. 运单waybill快速录入 3. 权限demo演示-了解 4. Apache shiro安全框架概述 5. 权限模块数据模型 6. 基于shiro ...
- 基于稀疏表示的图像超分辨率《Image Super-Resolution Via Sparse Representation》
由于最近正在做图像超分辨重建方面的研究,有幸看到了杨建超老师和马毅老师等大牛于2010年发表的一篇关于图像超分辨率的经典论文<ImageSuper-Resolution Via Sparse R ...
随机推荐
- linux内核情景分析之内核中的互斥操作
信号量机制: struct sempahore是其结构,定义如下 struct semaphore { atomic_t count;//资源数目 int sleepers;//等待进程数目 wait ...
- Day 29 process&thread_1
进程和线程 1 进程(process): 1.定义: 最小的执行单元.进程就是一个程序在一个数据集上的一次动态执行过程. 进程一般由程序.数据集.进程控制块三部分组成: 我们编写的程序用来描述进程要完 ...
- Python Challenge 第十二关
这一关依旧只有一张图,右键源代码也没有任何注释,也用PIL处理过那张图但没任何头绪,没办法只有上网搜答案. 别人的博客里说,源代码里面图片的名字是 evil1.jpg,那肯定会有 evil2.jpg. ...
- JS-JavaScript String 对象-string对象方法3:concat()
1.concat():用于连接两个或多个字符串. 1).语法:string.concat(string1, string2, ..., stringX) (string1, string2, . ...
- Codeforces Round #454 C. Shockers【模拟/hash】
C. Shockers time limit per test 2 seconds memory limit per test 256 megabytes input standard input o ...
- TensorFlow——共享变量的使用方法
1.共享变量用途 在构建模型时,需要使用tf.Variable来创建一个变量(也可以理解成节点).当两个模型一起训练时,一个模型需要使用其他模型创建的变量,比如,对抗网络中的生成器和判别器.如果使用t ...
- NOI模拟题6 Problem C: Circle
Solution 首先这个矩阵, 很明显的就是Vandermonde矩阵. 我们有公式: \[ |F_n| = \prod_{1 \le j < i \le n} (a_i - a_j) \] ...
- ArcGIS教程:面积制表
摘要 计算两个数据集之间交叉制表的区域并输出表. 插图 使用方法 · 区域定义为输入中具有同样值的全部区.各区无需相连. 栅格和要素数据集都可用于区域输入. · 假设区域输入和类输入均为具有同样分辨率 ...
- maven module和project的区别
Maven Project可以理解为父工程.Maven Module可以理解为子工程.创建Maven Module工程必须有存在的父工程,maven就是通过父子工程进行工程管理的.
- 手把手教你画AndroidK线分时图及指标
先废话一下:来到公司之前.项目是由外包公司做的,面试初,没有接触过分时图k线这块,认为好难,我能搞定不.可是一段时间之后,发现之前做的那是一片稀烂,可是这货是主功能啊.迟早的自己操刀,痛下决心,开搞, ...