React Native 开发之 (05) flexbox布局
一 flexbox布局
1 flex布局
flexbox是ReactNative 应用开发中必不可少的内容,也是最常用的内容。
传统的页面布局是基于盒子模型,依赖定位属性,流动属性和显示属性来解决。对于一些伸缩性的布局,处理起来很是麻烦。于是在2009年,W3C组织提出来一种新的布局方案,既flex布局。该布局可以简单快速的完成各种伸缩性的设计。
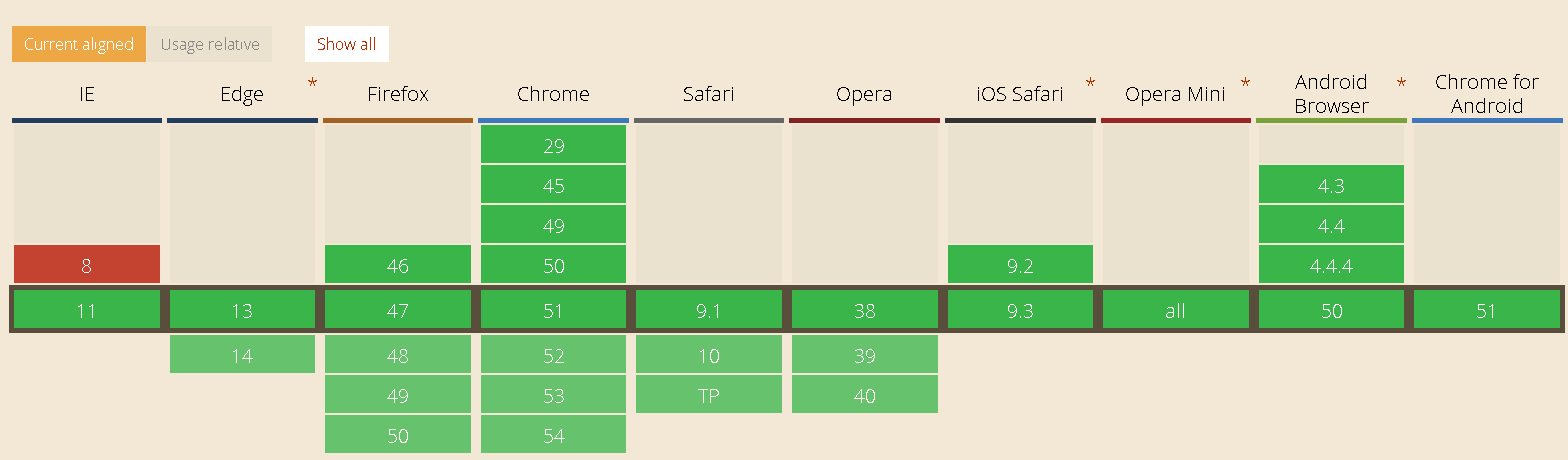
flexBox是 Flexible Box的缩写,既弹性盒子布局,可以为传统的盒子模型布局带来更大的灵活性。关于浏览器该布局的支持,参考 http://caniuse.com中显示。从图中可以看出,目前主流的浏览器都已经支持它。
2 基本概念
采用Flex布局的元素,称为Flex容器(flex container),简称"容器"。它的所有子元素自动成为容器成员,称为Flex项目(flex item),简称"项目"。
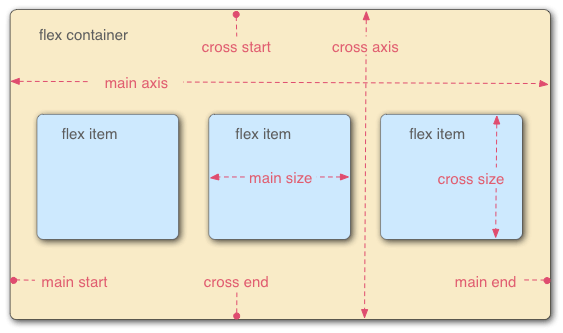
容器默认存在两根轴:水平的主轴(main axis)和垂直的交叉轴(cross axis)。主轴的开始位置(与边框的交叉点)叫做main start,结束位置叫做main end;交叉轴的开始位置叫做cross start,结束位置叫做cross end。
项目默认沿主轴排列。单个项目占据的主轴空间叫做main size,占据的交叉轴空间叫做cross size。
二 React Native中使用flexbox
React Native将Web中的flexbox布局引入进来,使得视图的布局更加合理,从官网上了解到,React Native目前主要支持flexbox的如下属性:
- alignItems
- alignSelf
- flex
- flexDirection
- flexWrap
- justifyContent
1 flexDirection 属性
flex-direction属性决定主轴的方向(即项目的排列方向)。
.box {

      flex-direction: row | row-reverse | column | column-reverse;

}
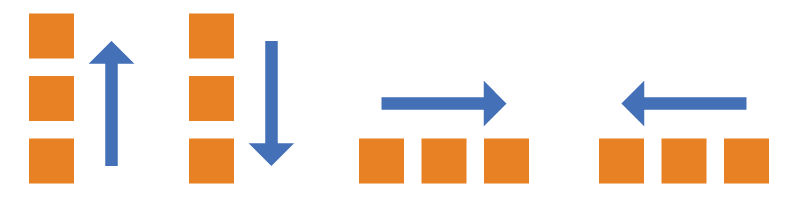
row:主轴为水平方向,起点在左端。

row-reverse:主轴为水平方向,起点在右端。

column(默认值):主轴为垂直方向,起点在上沿。

column-reverse:主轴为垂直方向,起点在下沿。
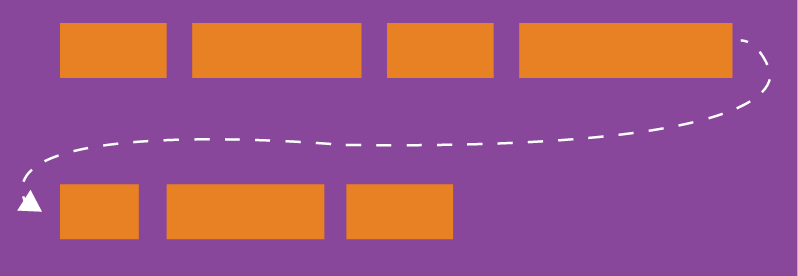
2 flexWrap 属性
默认情况下,项目都排在一条线(又称"轴线")上。flex-wrap属性定义,如果一条轴线排不下,需要如何换行。
.box{

  flex-wrap: nowrap | wrap | wrap-reverse;

}
它可能取三个值。
(1)nowrap(默认):不换行。
(2)wrap:换行,第一行在上方。
(3)wrap-reverse:换行,第一行在下方。
3 flex 属性
flex属性定义了项目的缩小比例,默认为1,即如果空间不足,该项目将缩小。
该属性的语法如下:
.item {
  flex: <number>; /* default 1 */
}
如果所有项目的flex属性都为1,当空间不足时,都将等比例缩小。如果一个项目的flex属性为0,其他项目都为1,则空间不足时,前者不缩小。负值对该属性无效。
4 justifyContent 属性
justify-content属性定义了项目在主轴上的对齐方式。
.box {

  justify-content: flex-start | flex-end | center | space-between | space-around;

}
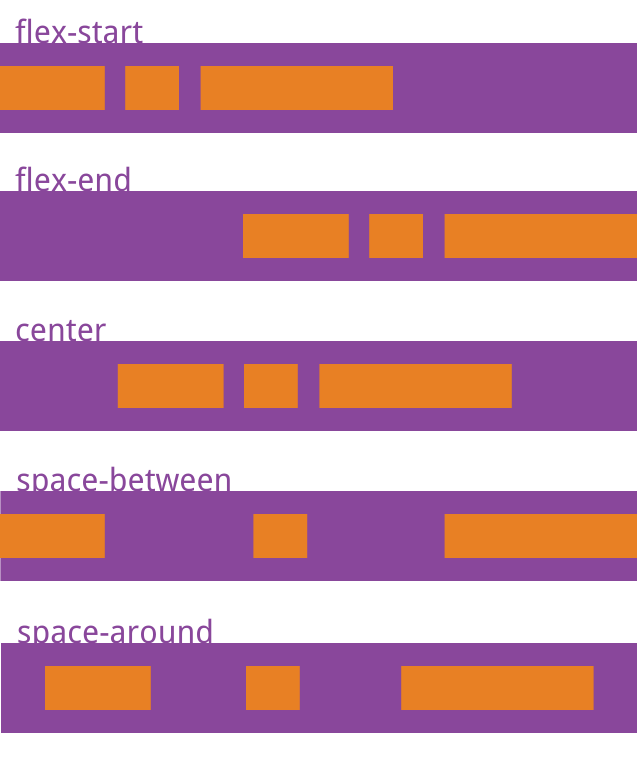
它可能取5个值,具体对齐方式与轴的方向有关。下面假设主轴为从左到右。
flex-start(默认值):左对齐

flex-end:右对齐

center: 居中

space-between:两端对齐,项目之间的间隔都相等。

space-around:每个项目两侧的间隔相等。所以,项目之间的间隔比项目与边框的间隔大一倍。
5 alignItems 属性
align-items属性定义项目在侧轴上如何对齐。
.box {

  align-items: flex-start | flex-end | center | baseline | stretch;

}
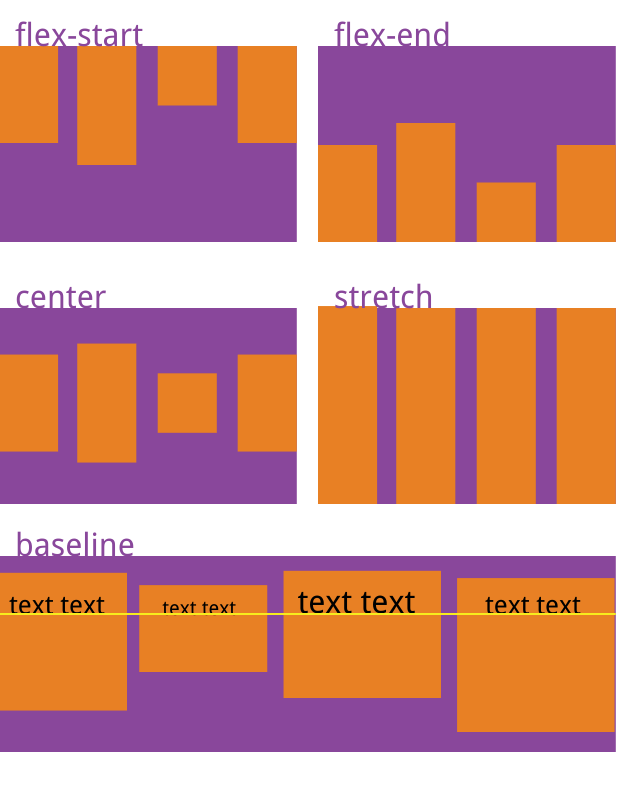
它可能取5个值。具体的对齐方式与交叉轴的方向有关,下面假设交叉轴从上到下。
flex-start:交叉轴的起点对齐。

flex-end:交叉轴的终点对齐。

center:交叉轴的中点对齐。

baseline: 项目的第一行文字的基线对齐。

stretch(默认值):如果项目未设置高度或设为auto,将占满整个容器的高度。
6 alignSelf 属性
align-self属性允许单个项目有与其他项目不一样的对齐方式,可覆盖align-items属性。默认值为auto,表示继承父元素的align-items属性,如果没有父元素,则等同于stretch。
.item {

  align-self: auto | flex-start | flex-end | center | baseline | stretch;

}
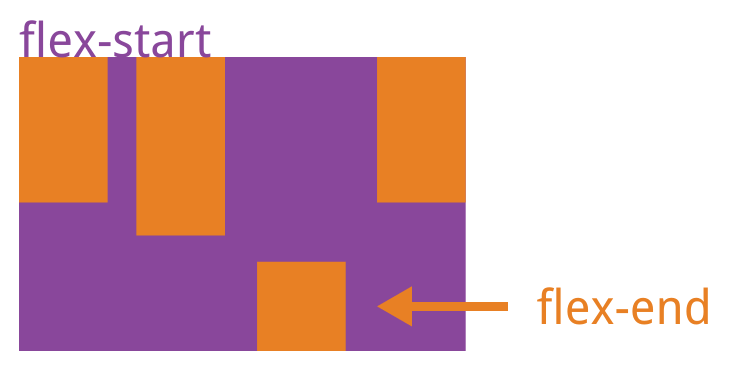
该属性可能取6个值,除了auto,其他都与align-items属性完全一致。
三 CSS和布局例子
1 基本样式例子
这里使用View和Text组件作为演示对象,首先,修改index.ios.js里面的代码,这里只需要关注StyleSheet和render里面的模板。修改后的代码如下:
import React, { Component } from 'react';

import {

  AppRegistry,

  StyleSheet,

  Text,

  View

} from 'react-native';

class demo extends Component {

  render() {

    return (

      <View >

              <View style={{height:, borderWidth: , borderColor: 'red'}}>

                      <Text style={{marginTop:}} >带边框的矩形,红色边框123</Text>

             </View>

      </View>

    );

  }

}

const styles = StyleSheet.create({

});

AppRegistry.registerComponent('demo', () => demo);
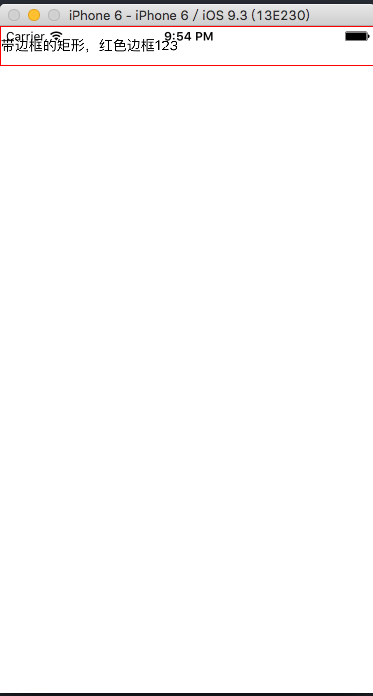
(1)增加一个带边框的矩形,红色边框
直接在组件上添加样式是这样的:style={{height:40, borderWidth: 1, borderColor: 'red'}},style是组件的一个自有属性.
在 render里默认函数里,return后 第一个{}JS执行环境或者是模板,第二个{}只是css样式对象的括号而已(慢慢体会,不难理解)
 render: function() {

        return (

            <View>

                <View style={{height:, borderWidth: , borderColor: 'red'}}>

                      <Text style={{marginTop:10}} >带边框的矩形,红色边框123</Text>

                </View>

            </View>

        );

    }
修改好代码后,按住 cmd + R刷新模拟器,结果如下:
(2) 独立样式类
前面的例子是是直接在组件里写样式,也可以把样式单独抽出来放在 const styles = StyleSheet.create({ }) 里。样式类创建也很简单,只需要使用React.StyleSheet来创建类。其实创建的类就是一个js对象而已。那么在组件上引用是这样的<View style={{对象名称.对象属性}}></View>。
import React, { Component } from 'react';

import {

  AppRegistry,

  StyleSheet,

  Text,

  View

} from 'react-native';

class demo extends Component {

  render() {

    return (

      <View >

              <View  style={styles.style_1}>

                      <Text style={{marginTop:}} >带边框的矩形,红色边框</Text>

             </View>

      </View>

    );

  }

}

const styles = StyleSheet.create({

  style_1:{

        height:,

        borderWidth: ,

        borderColor: 'red',

    }

});

AppRegistry.registerComponent('demo', () => demo);
2 flex 布局例子
(1) flex属性
当一个(元素)组件,定义了flex属性时,表示该元素是可伸缩的。当然flex的属性值是大于0的时候才伸缩,其小于和等于0的时候不伸缩,例如:flex:0, flex:-1等。
import React, { Component } from 'react';

import {

  AppRegistry,

  StyleSheet,

  Text,

  View

} from 'react-native';

class demo extends Component {

  render() {

    return (

      <View style={styles.style_0}>

           <View style={styles.style_1}>

              <Text style={{marginTop:, fontSize:}}>/4高</Text>

           </View>

           <View style={styles.style_1}>

             <Text style={{marginTop:, fontSize:}}>/4高</Text>

           </View>

           <View style={{flex:}}>

             <Text style={{marginTop:, fontSize:}}>/2高</Text>

           </View>

       </View>

    );

  }

}

const styles = StyleSheet.create({

  style_0:{

        flex:,

    },

    style_1:{

        flex: ,

        height:,

        borderWidth: ,

        borderColor: 'red',

    }

});

AppRegistry.registerComponent('demo', () => demo);
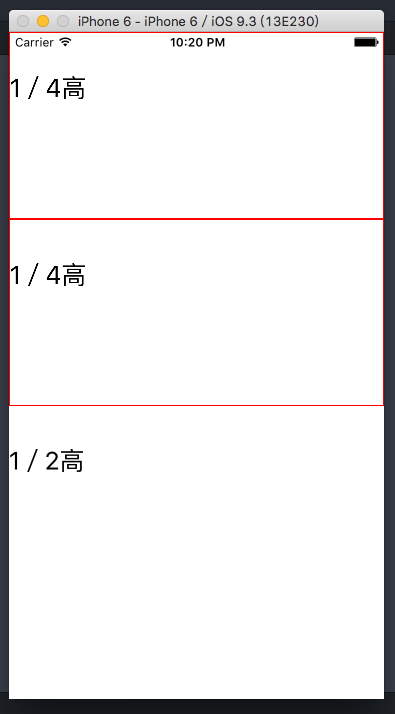
上面的代码中,最外层的view是可伸缩的,因为没有兄弟节点和它抢占空间。里层是3个view,可以看到三个view的flex属性加起来是5+5+10=20,所以第一个view和第二个view分别占1/4伸缩空间, 最后一个view占据1/2空间.
修改好代码后,按住 cmd + R刷新模拟器,结果如下:
(2)flexDirection属性
flexDirection在React-Native中只有两个属性,一个是row(横向伸缩)和column(纵向伸缩).具体的效果可见如下代码:
import React, { Component } from 'react';

import {

  AppRegistry,

  StyleSheet,

  Text,

  View

} from 'react-native';

class MyApp extends Component {

  render() {

    return (

      <View style={styles.style_0}>

                   <View style={styles.style_1}>

                   <Text style={{marginTop:, fontSize:}}>/4高</Text>

                   <Text style={{marginTop:, fontSize:}}>/4高</Text>

               </View>

               <View style={[styles.style_1, {flexDirection: 'column'}]}>

                   <Text style={{marginTop:, fontSize:}}>/4高</Text>

                   <Text style={{marginTop:, fontSize:}}>/4高</Text>

               </View>

               <View style={{flex:, borderWidth: , borderColor: 'red',}}>

                   <Text style={{marginTop:, fontSize:}}>/2高</Text>

                   </View>

               </View>

    );

  }

}

const styles = StyleSheet.create({

      style_0:{

             flex:,

         },

         style_1:{

             flex: ,

             flexDirection: 'row',

             height:,

             borderWidth: ,

             borderColor: 'red',

         }

});

AppRegistry.registerComponent('MyApp', () => MyApp);
修改好代码后,按住 cmd + R刷新模拟器,具体的效果如下:

(3) alignSelf:对齐方式
alignSelf的对齐方式主要有四种:flex-start ,flex-end, center, auto, stretch
import React, { Component } from 'react';
import {
  AppRegistry,
  StyleSheet,
  Text,
  View
} from 'react-native';

class MyApp extends Component {
  render() {
    return (
      <View style={styles.style_0}>
                <View style={styles.view  }>
                    <Text >自由摆放</Text>
                </View>
                <View style={[styles.view ,styles.center]}>
                    <Text >居中摆放</Text>
                </View>
                <View style={[styles.view ,styles.left]}>
                    <Text >居左摆放</Text>
                </View>
                <View style={[styles.view ,styles.right]}>
                    <Text >居右摆放</Text>
                </View>
        </View>
    );
  }
}

const styles = StyleSheet.create({
   style_0 : {
        flex : 1 ,
        borderColor : 'red' ,
        borderWidth : 0.5 ,
    },
    view : {
        borderWidth: 5,
        borderColor: 'blue',
        width: 100,
        height: 40
    },
    center : {
      alignSelf : 'center'
    },
    left : {
      alignSelf : 'flex-start'
    },
    right : {
      alignSelf : 'flex-end'
    }
});

AppRegistry.registerComponent('MyApp', () => MyApp);
修改好代码后,按住 cmd + R刷新模拟器,具体的效果如下:

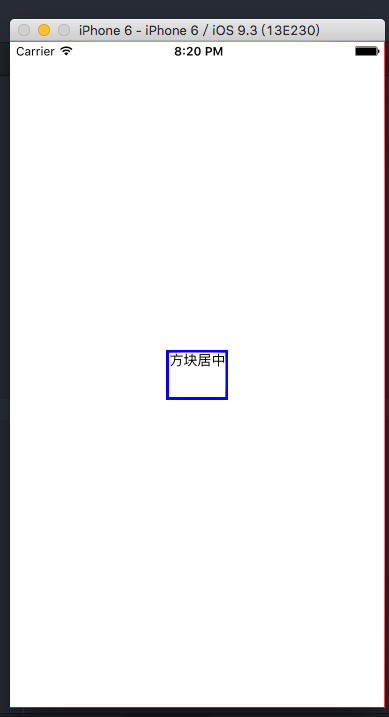
(4) 水平垂直居中
alignItems是alignSelf的变种,跟alignSelf的功能类似,可用于水平居中;justifyContent用于垂直居中
import React, { Component } from 'react';

import {

  AppRegistry,

  StyleSheet,

  Text,

  View

} from 'react-native';

class MyApp extends Component {

  render() {

    return (

      <View style={styles.style_0}>

                <View style={styles.view  }>

                    <Text >方块居中</Text>

                </View>

        </View>

    );

  }

}

const styles = StyleSheet.create({

   style_0 : {

        flex :  ,

        borderColor : 'red' ,

        borderWidth : 0.5 ,

        justifyContent : 'center',

        alignItems : 'center',

    },

    view : {

        borderWidth: ,

        borderColor: 'blue',

        height: ,

    }

});

AppRegistry.registerComponent('MyApp', () => MyApp);
修改好代码后,按住 cmd + R刷新模拟器,具体的效果如下:
资料参考:
http://www.ruanyifeng.com/blog/2015/07/flex-grammar.html?utm_source=tuicool
http://reactnative.cn/
React Native 开发之 (05) flexbox布局的更多相关文章
- React Native 学习(三)之 FlexBox 布局
React Native 学习(三)之 FlexBox 布局
- React Native(一) FlexBox布局
欢迎转载,转载请标明出处: http://blog.csdn.net/johnny901114/article/details/53241550 本文出自:[余志强的博客] 在React Native ...
- React Native开发技术周报2
(1).资讯 1.React Native 0.22_rc版本发布 添加了热自动重载功能 (2).技术文章 1.用 React Native 设计的第一个 iOS 应用 我们想为用户设计一款移动端的应 ...
- 《React Native 精解与实战》书籍连载「Node.js 简介与 React Native 开发环境配置」
此文是我的出版书籍<React Native 精解与实战>连载分享,此书由机械工业出版社出版,书中详解了 React Native 框架底层原理.React Native 组件布局.组件与 ...
- React Native开发入门
目录: 一.前言 二.什么是React Native 三.开发环境搭建 四.预备知识 五.最简单的React Native小程序 六.总结 七.参考资料 一.前言 虽然只是简单的了解了一下Reac ...
- React Native开发技术周报1
(一).资讯 1.React Native 0.21版本发布,最新版本功能特点,修复的Bug可以看一下已翻译 重要:如果升级 Android 项目到这个版本一定要读! 我们简化了 Android 应用 ...
- DECO 一个REACT NAtive 开发IDE工具
DECO 一个REACT NAtive 开发IDE工具. 目前只支持 OS,NO WINDOWS https://www.decosoftware.com/ 一个方便的快速 ERXPRESS 教程:h ...
- React Native 开发之 (02) 用Sublime 3作为React Native的开发IDE
Sublime Text是一个代码编辑器.也是HTML和散文先进的文本编辑器.漂亮的用户界面和非凡的功能,例如:迷你地图,多选择Python插件,代码段等等.完全可自定义键绑定,菜单和工具栏等等.漂亮 ...
- React Native 开发笔记
ReactNativeDemo 学习ReactNative开发,搭建ReactNative第一个项目 React Native 开发笔记 1.安装Homebrew $ /usr/bin/ruby -e ...
随机推荐
- 单元测试中Assert类的用法
Assert类所在的命名空间为Microsoft.VisualStudio.TestTools.UnitTesting 在工程文件中只要引用Microsoft.VisualStudio.Quality ...
- Excel导入导出(篇二)
<body> <h3>一.Excel导入</h3> <h5>.模板下载:<a href="UpFiles/TemplateFiles/学 ...
- [BZOJ1116][Poi2008]LCO(并查集)
题目:http://hzwer.com/3010.html 分析:注意这里无向边是对入度没有贡献的. 那么对于一个n个点的连通块而言,如果它是一颗树(n-1条边),那么把所有边全部从某个根开始向下指, ...
- [BZOJ2876][NOI2012]骑行川藏(拉格朗日乘数法)
题目:http://www.lydsy.com:808/JudgeOnline/problem.php?id=2876 分析:就是要求约束条件下函数的极值,于是拉格朗日乘数列方程,发现化简后的关于vi ...
- MVC架构设计——EF-Code First
详情参考:http://www.cnblogs.com/guomingfeng/archive/2013/05/28/mvc-ef-repository.html
- C语言输入输出整数
scanf("%llu", &x); printf("%llu\n", x); scanf("%u", &x); print ...
- GO语言数组和切片实例详解
本文实例讲述了GO语言数组和切片的用法.分享给大家供大家参考.具体分析如下: 一.数组 与其他大多数语言类似,Go语言的数组也是一个元素类型相同的定长的序列. (1)数组的创建. 数组有3种创建方式: ...
- android 调用电话功能
今天用到了打电话的功能,这要如何实现呢? 很简单 1.创建对应对的xml展示页面喝java文件 2.在manifest中添加权限 下面上代码吧: 这是布局的一部分 <LinearLayout a ...
- [转]Spring3 MVC + jQuery easyUI 做的ajax版本用户管理
原文地址:http://www.iteye.com/topic/1081739 上周写了篇基于spring3.0.5 mvc 简单用户管理实例 ( http://www.iteye.com/topic ...
- 怎么给我的Office文档加密
很多的用户朋友都可以熟练的使用office中的Word.Excel和PowerPoint文档,但大家对Office文档加密方式了解的并不多.Advanced Office Password Recov ...