CentOS7 源码编译安装Tengine
简介

Tengine是由淘宝网发起的Web服务器项目。它在Nginx的基础上,针对大访问量网站的需求,添加了很多高级功能和特性。它的目的是打造一个高效、安全的Web平台。
发展
Tengine的性能和稳定性已经在大型的网站如淘宝网,天猫商城等得到了很好的检验。
从2011年12月开始,Tengine成为一个开源项目,Tengine团队在积极地开发和维护着它。Tengine团队的核心成员来自于淘宝、搜狗等互联网企业。Tengine是社区合作的成果,我们欢迎大家参与其中,贡献自己的力量。
一、安装编译环境
1.安装依赖包
[root@Tengine ~]# yum -y install gcc \
gcc-c++ \ bzip2 perl curl curl-devel \
expat-devel gettext-devel openssl-devel \
libxml2 libxml2-devel libjpeg-devel libpng-devel \
freetype-devel libmcrypt-devel autoconf
2.配置扩展包安装源
[root@Tengine ~]# yum -y install epel-release

[root@Tengine ~]# yum -y install libmcrypt libmcrypt-devel mcrypt mhash
3.安装编译所需要的组件
(1)pcre:是一个Perl库,包括 perl 兼容的正则表达式库。nginx rewrite依赖于PCRE库,所以在安装Tengine前一定要先安装PCRE。
[root@Tengine ~]# cd /usr/local/src && wget ftp://ftp.csx.cam.ac.uk/pub/software/programming/pcre/pcre-8.42.tar.gz && tar zxvf pcre-8.42.tar.gz && cd pcre-8.42 && ./configure --prefix=/usr/local/pcre && make && make install
(2)zlib:Zlib是提供资料压缩之用的函式库,当Tengine想启用GZIP压缩的时候就需要使用到Zlib。
[root@Tengine pcre-8.42]# cd /usr/local/src && wget http://zlib.net/zlib-1.2.11.tar.gz && tar zxvf zlib-1.2.11.tar.gz && cd zlib-1.2.11 && ./configure --prefix=/usr/local/zlib && make && make install
(3)jemalloc:是一个更好的内存管理工具,使用jemalloc可以更好的优化Tengine的内存管理。
[root@Tengine zlib-1.2.]# cd /usr/local/src && wget https://github.com/jemalloc/jemalloc/releases/download/5.1.0/jemalloc-5.1.0.tar.bz2 && tar xvf jemalloc-5.1.0.tar.bz2 && cd jemalloc-5.1.0 && ./configure --prefix=/usr/local/jemalloc && make && make install
(4)OpenSSL:是一个强大的安全套接字层密码库,囊括主要的密码算法、常用的密钥和证书封装管理功能及SSL协议,并提供丰富的应用程序供测试或其它目的使用。主要是为了让tengine支持Https的访问请求。
[root@Tengine jemalloc-5.1.]# cd /usr/local/src && wget https://www.openssl.org/source/openssl-1.1.1.tar.gz && tar zxvf openssl-1.1.1.tar.gz && cd openssl-1.1.1 && ./config --prefix=/usr/local/openssl && make && make install
二、安装Tengine
在主要核心的组件安装完毕以后就可以安装Tegine了,最新版本的Tegine可从官网(http://tengine.taobao.org/)获取。
在编译安装前还需要做的一件事是添加一个专门的用户来执行Tengine。不建议使用root用户启动
[root@Tengine openssl-1.1.]# useradd www -s /sbin/nologin -M
下载Tengine
[root@Tengine openssl-1.1.]# cd /usr/local/src && wget http://tengine.taobao.org/download/tengine-2.2.3.tar.gz && tar -zxvf tengine-2.2.3.tar.gz && cd tengine-2.2.3
配置编译安装
[root@Tengine tengine-2.2.]# ./configure --prefix=/usr/local/tengine \

> --user=www \

> --group=www \

> --with-pcre=/usr/local/src/pcre-8.42 \

> --with-openssl=/usr/local/src/openssl-1.1. \

> --with-jemalloc=/usr/local/src/jemalloc-5.1. \

> --with-http_gzip_static_module \

> --with-http_realip_module \

> --with-http_stub_status_module \

> --with-http_concat_module=shared \

> --with-zlib=/usr/local/src/zlib-1.2.
[root@Tengine tengine-2.2.]# echo $?

[root@Tengine tengine-2.2.]# make -j &&make install

[root@Tengine tengine-2.2.3]# echo $?
0
加入到系统服务
[root@Tengine tengine-2.2.]# cd /lib/systemd/system

[root@Tengine system]# vi tengine.service

[Unit]

Description=The nginx HTTP and reverse proxy server

After=syslog.target network.target remote-fs.target nss-lookup.target

[Service]

Type=forking

PIDFile=/usr/local/nginx/logs/nginx.pid

ExecStartPre=/usr/local/nginx/sbin/nginx -t

ExecStart=/usr/local/nginx/sbin/nginx -c /usr/local/nginx/conf/nginx.conf

ExecReload=/bin/kill -s HUP $MAINPID

ExecStop=/bin/kill -s QUIT $MAINPID

PrivateTmp=true

[Install]

WantedBy=multi-user.target

[root@Tengine system]# chmod  nginx.service  # 修改权限

[root@Tengine system]# systemctl enable tengine.service  # 开机自启

Created symlink from /etc/systemd/system/multi-user.target.wants/tengine.service to /usr/lib/systemd/system/tengine.service.
[root@Tengine system]# systemctl start tengine.service  #启动Tengine
安装完成
可能有的人在make的时候会报这个错 我在安装2.2.3时也碰到了这个问题
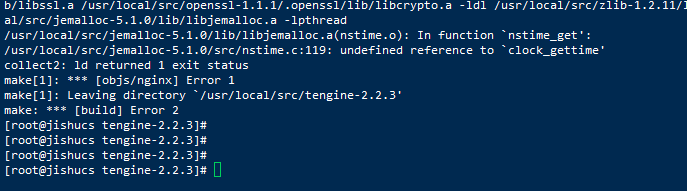
上面出错根本原因是编译nginx找不到实时库librt
只要将tengine文件中的objs/Makefile中的第一行的 CC = cc 改成 CC = cc -lrt后在编译安装就可以了
-lrt的意思是让编译的时候加入实时库librt

CentOS7 源码编译安装Tengine的更多相关文章
- Centos7源码编译安装PHP7.2(生产环境)
安装PHP依赖包,否则在编译的过程中可能会出现各种报错 # Centos 安装epel-release源并将系统包更新到最新版本 $ yum install epel-release-y $ yum ...
- centos7源码编译安装lamp/lnmp
centos7源码编译安装lamp/lnmp 进程:是包工头(相当于是个门,只管开门关门,不管门内的事儿) 线程:是各种工种(cpu调度的是线程) 进程 是一件事情, 线程 是 同一个时间范围内 同时 ...
- centos7 源码编译安装TensorFlow CPU 版本
一.前言 我们都知道,普通使用pip安装的TensorFlow是万金油版本,当你运行的时候,会提示你不是当前电脑中最优的版本,特别是CPU版本,没有使用指令集优化会让TensorFlow用起来更慢. ...
- Centos7源码编译安装mysql8
前面介绍了很多关于mysql的文章,下面主要介绍一下mysql8的源码编译安装 一 基本环境 [root@CentOS-7-x86-64-Minimal-1810 ~]# cd /usr/local/ ...
- CentOS7 源码编译安装Nginx
源码编译安装nginx 1.下载nginx源码包(这里以nginx-1.18.0为例) wget http://nginx.org/download/nginx-1.18.0.tar.gz 2 ...
- centos7源码编译安装Subversion 1.9.5
svn是Subversion的简称,是一个开放源代码的版本控制系统.svn有两种运行方式:1.独立服务器(svn://xxx.xxx/xxx) 2.借助apache(http://svn.xxx.xx ...
- centos7 源码编译安装 php
准备工作 下载 PHP 源码包并解压 $ wget https://www.php.net/distributions/php-7.2.19.tar.bz2 $ yum -y install bzip ...
- centos7 源码编译安装 nginx
安装步骤 下载 nginx 源码包 官网 $ wget http://nginx.org/download/nginx-1.16.0.tar.gz 解压 nginx 压缩包 $ tar -zxvf n ...
- Centos7源码编译安装tengine1.5.1
安装依赖包 yum install pcre pcre-devel openssl openssl-devel gcc make zlib-devel wget -y 下载和创建用户 mkdir /t ...
随机推荐
- Leetcode中值得一做的题
3.longest substring Given a string, find the length of the longest substring without repeating chara ...
- hadoop2-HBase的安装和测试
在安装和测试HBase之前,我们有必要先了解一下HBase是什么 我们可以通过下面的资料对其有一定的了解: HBase 官方文档中文版 HBase 深入浅出 我想把我知道的分享给大家,方便大家交流. ...
- 转UI么?不想
最近一直在弄UI 对于UI实在是不想弄了 很痛苦...我一开始都比较热衷后台开发 但是前端UI 我只是有点兴趣而已,但是还一直要做...太累了 或许要学的东西还是有很多的!一直不知道 ...
- 消除 ASP.NET Core 告警 "No XML encryptor configured. Key may be persisted to storage in unencrypted form"
在 ASP.NET Core 中如果在 DataProtection 中使用了 PersistKeysToFileSystem 或 PersistKeysToFileSystem services.A ...
- jsplumb 使用总结
1 删除连线问题 funcion clearDrawGraph { if (this.graphInstance !== null) { const connections = this.graphI ...
- 5. Scala函数式编程的基础
5.1 函数式编程内容及介绍顺序说明 5.1.1 函数式编程内容 -函数式编程基础 函数定义/声明 函数运行机制 递归(难点,[最短路径,邮差问题,迷宫问题,回溯]) 过程 惰性函数和异常 -函数式编 ...
- 栈->栈的应用
e.g.1 数制转换 十进制数N和其它d进制数的转换是计算机实现计算的基本问题,其解决方法很多,其中一个简单算法基于下列原理. 假设编写一个程序:对于输入的任意一个非负十进制整数,打印输出与其等值的八 ...
- python基础4 input()函数
input()函数 赋值输出: name=input('请求输入你喜欢的电影名:')print(name+'是我最喜欢的电影!') 输入:大话西游 输出:大话西游是我最喜欢的电影! print('那么 ...
- vim模式下报错E37: No write since last change (add ! to override)
故障现象: 使用vim修改文件报错,系统提示如下: E37: No write since last change (add ! to override) 故障原因: 文件为只读文件,无法修改. 解决 ...
- 发现了一个比较有意思的url参数
今天登录阿里云发现需要二次验证了,手机号不是我的很麻烦,然后就看到有个手机app快捷登录的方式,点进去一看,链接地址是这样的http://qd.alibaba.com/onekey.htm?spm=0 ...