CNN卷积神经网络
import os # third-party library
import torch
import torch.nn as nn
import torch.utils.data as Data
import torchvision
import matplotlib.pyplot as plt # torch.manual_seed(1) # reproducible # Hyper Parameters
EPOCH = 1 # train the training data n times, to save time, we just train 1 epoch
BATCH_SIZE = 50
LR = 0.001 # learning rate
DOWNLOAD_MNIST = False # Mnist digits dataset
if not(os.path.exists('./mnist/')) or not os.listdir('./mnist/'):
# not mnist dir or mnist is empyt dir
DOWNLOAD_MNIST = True train_data = torchvision.datasets.MNIST(
root='./mnist/',
train=True, # this is training data
transform=torchvision.transforms.ToTensor(), # Converts a PIL.Image or numpy.ndarray to
# torch.FloatTensor of shape (C x H x W) and normalize in the range [0.0, 1.0]
download=DOWNLOAD_MNIST,
) # plot one example
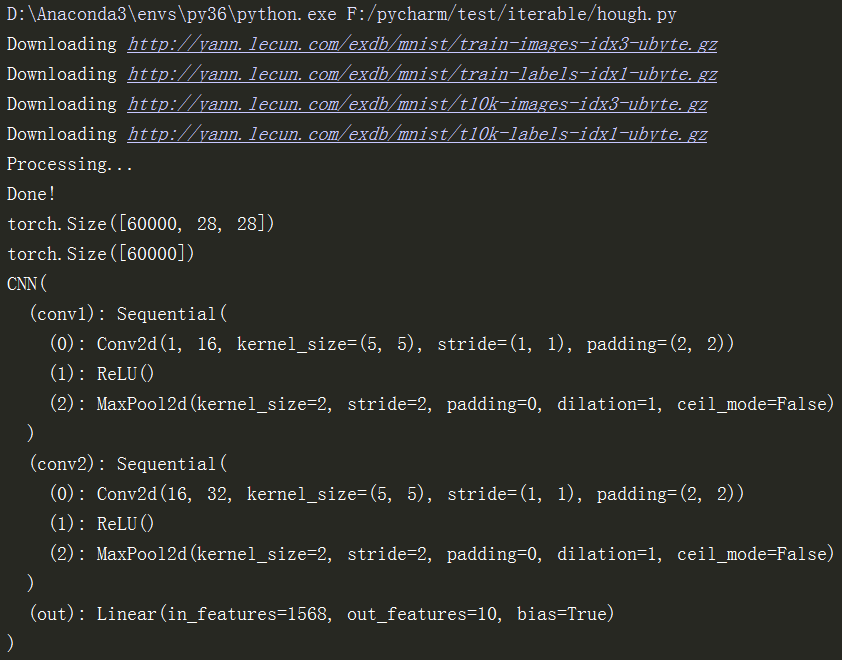
print(train_data.train_data.size()) # (60000, 28, 28)
print(train_data.train_labels.size()) # (60000)
plt.imshow(train_data.train_data[0].numpy(), cmap='gray')
plt.title('%i' % train_data.train_labels[0])
plt.show() # Data Loader for easy mini-batch return in training, the image batch shape will be (50, 1, 28, 28)
train_loader = Data.DataLoader(dataset=train_data, batch_size=BATCH_SIZE, shuffle=True) # pick 2000 samples to speed up testing
test_data = torchvision.datasets.MNIST(root='./mnist/', train=False)
test_x = torch.unsqueeze(test_data.test_data, dim=1).type(torch.FloatTensor)[:2000]/255. # shape from (2000, 28, 28) to (2000, 1, 28, 28), value in range(0,1)
test_y = test_data.test_labels[:2000] class CNN(nn.Module):
def __init__(self):
super(CNN, self).__init__()
self.conv1 = nn.Sequential( # input shape (1, 28, 28)
nn.Conv2d(
in_channels=1, # input height
out_channels=16, # n_filters
kernel_size=5, # filter size
stride=1, # filter movement/step
padding=2, # if want same width and length of this image after Conv2d, padding=(kernel_size-1)/2 if stride=1
), # output shape (16, 28, 28)
nn.ReLU(), # activation
nn.MaxPool2d(kernel_size=2), # choose max value in 2x2 area, output shape (16, 14, 14)
)
self.conv2 = nn.Sequential( # input shape (16, 14, 14)
nn.Conv2d(16, 32, 5, 1, 2), # output shape (32, 14, 14)
nn.ReLU(), # activation
nn.MaxPool2d(2), # output shape (32, 7, 7)
)
self.out = nn.Linear(32 * 7 * 7, 10) # fully connected layer, output 10 classes def forward(self, x):
x = self.conv1(x)
x = self.conv2(x)
x = x.view(x.size(0), -1) # flatten the output of conv2 to (batch_size, 32 * 7 * 7)
output = self.out(x)
return output, x # return x for visualization cnn = CNN()
print(cnn) # net architecture optimizer = torch.optim.Adam(cnn.parameters(), lr=LR) # optimize all cnn parameters
loss_func = nn.CrossEntropyLoss() # the target label is not one-hotted # following function (plot_with_labels) is for visualization, can be ignored if not interested
from matplotlib import cm
try: from sklearn.manifold import TSNE; HAS_SK = True
except: HAS_SK = False; print('Please install sklearn for layer visualization')
def plot_with_labels(lowDWeights, labels):
plt.cla()
X, Y = lowDWeights[:, 0], lowDWeights[:, 1]
for x, y, s in zip(X, Y, labels):
c = cm.rainbow(int(255 * s / 9)); plt.text(x, y, s, backgroundcolor=c, fontsize=9)
plt.xlim(X.min(), X.max()); plt.ylim(Y.min(), Y.max()); plt.title('Visualize last layer'); plt.show(); plt.pause(0.01) plt.ion()
# training and testing
for epoch in range(EPOCH):
for step, (b_x, b_y) in enumerate(train_loader): # gives batch data, normalize x when iterate train_loader output = cnn(b_x)[0] # cnn output
loss = loss_func(output, b_y) # cross entropy loss
optimizer.zero_grad() # clear gradients for this training step
loss.backward() # backpropagation, compute gradients
optimizer.step() # apply gradients if step % 50 == 0:
test_output, last_layer = cnn(test_x)
pred_y = torch.max(test_output, 1)[1].data.numpy()
accuracy = float((pred_y == test_y.data.numpy()).astype(int).sum()) / float(test_y.size(0))
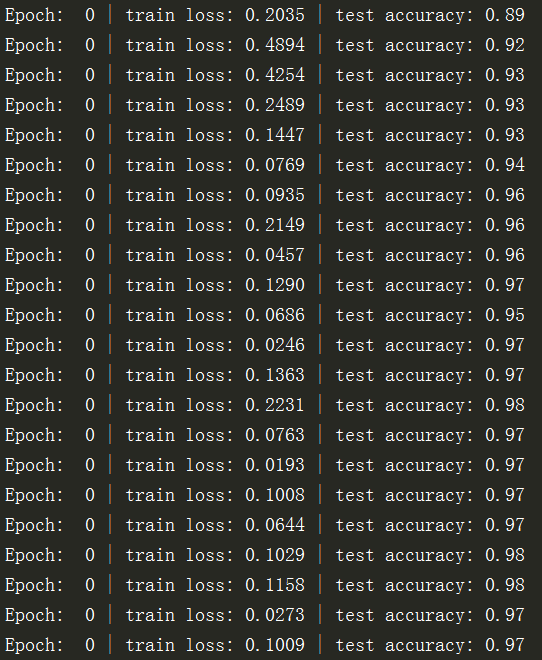
print('Epoch: ', epoch, '| train loss: %.4f' % loss.data.numpy(), '| test accuracy: %.2f' % accuracy)
if HAS_SK:
# Visualization of trained flatten layer (T-SNE)
tsne = TSNE(perplexity=30, n_components=2, init='pca', n_iter=5000)
plot_only = 500
low_dim_embs = tsne.fit_transform(last_layer.data.numpy()[:plot_only, :])
labels = test_y.numpy()[:plot_only]
plot_with_labels(low_dim_embs, labels)
plt.ioff() # print 10 predictions from test data
test_output, _ = cnn(test_x[:10])
pred_y = torch.max(test_output, 1)[1].data.numpy()
print(pred_y, 'prediction number')
print(test_y[:10].numpy(), 'real number')
运行效果:

CNN卷积神经网络的更多相关文章
- Deep Learning模型之:CNN卷积神经网络(一)深度解析CNN
http://m.blog.csdn.net/blog/wu010555688/24487301 本文整理了网上几位大牛的博客,详细地讲解了CNN的基础结构与核心思想,欢迎交流. [1]Deep le ...
- [转]Theano下用CNN(卷积神经网络)做车牌中文字符OCR
Theano下用CNN(卷积神经网络)做车牌中文字符OCR 原文地址:http://m.blog.csdn.net/article/details?id=50989742 之前时间一直在看 Micha ...
- Deep Learning论文笔记之(四)CNN卷积神经网络推导和实现(转)
Deep Learning论文笔记之(四)CNN卷积神经网络推导和实现 zouxy09@qq.com http://blog.csdn.net/zouxy09 自己平时看了一些论文, ...
- CNN(卷积神经网络)、RNN(循环神经网络)、DNN(深度神经网络)的内部网络结构有什么区别?
https://www.zhihu.com/question/34681168 CNN(卷积神经网络).RNN(循环神经网络).DNN(深度神经网络)的内部网络结构有什么区别?修改 CNN(卷积神经网 ...
- CNN(卷积神经网络)、RNN(循环神经网络)、DNN,LSTM
http://cs231n.github.io/neural-networks-1 https://arxiv.org/pdf/1603.07285.pdf https://adeshpande3.g ...
- day-16 CNN卷积神经网络算法之Max pooling池化操作学习
利用CNN卷积神经网络进行训练时,进行完卷积运算,还需要接着进行Max pooling池化操作,目的是在尽量不丢失图像特征前期下,对图像进行downsampling. 首先看下max pooling的 ...
- cnn(卷积神经网络)比较系统的讲解
本文整理了网上几位大牛的博客,详细地讲解了CNN的基础结构与核心思想,欢迎交流. [1]Deep learning简介 [2]Deep Learning训练过程 [3]Deep Learning模型之 ...
- Keras(四)CNN 卷积神经网络 RNN 循环神经网络 原理及实例
CNN 卷积神经网络 卷积 池化 https://www.cnblogs.com/peng8098/p/nlp_16.html 中有介绍 以数据集MNIST构建一个卷积神经网路 from keras. ...
- TensorFlow——CNN卷积神经网络处理Mnist数据集
CNN卷积神经网络处理Mnist数据集 CNN模型结构: 输入层:Mnist数据集(28*28) 第一层卷积:感受视野5*5,步长为1,卷积核:32个 第一层池化:池化视野2*2,步长为2 第二层卷积 ...
- tensorflow CNN 卷积神经网络中的卷积层和池化层的代码和效果图
tensorflow CNN 卷积神经网络中的卷积层和池化层的代码和效果图 因为很多 demo 都比较复杂,专门抽出这两个函数,写的 demo. 更多教程:http://www.tensorflown ...
随机推荐
- 关于Math.round()方法
先上结论: 1.参数的小数点后第一位<5,运算结果为参数整数部分. 2.参数的小数点后第一位>5,运算结果为参数整数部分绝对值+1,符号(+ or -)不变. 3.参数的小数点后第一位=5 ...
- codeforces#1139D. Steps to One (概率dp+莫比乌斯反演)
题目链接: http://codeforces.com/contest/1139/problem/D 题意: 在$1$到$m$中选择一个数,加入到一个初始为空的序列中,当序列的$gcd$和为$1$时, ...
- springboot开启事务支持时报代理错误
问题:The bean 'xxx' could not be injected as a 'com.github.service.xx' because it is a JDK dynamic pro ...
- MySQL--事务操作
/*事务:由一个或一组sql命令组成的事件,要么全部执行,要么全部不执行 查看事务隔离级别:select @@tx_isoolation 修改事务隔离级别:set session transactio ...
- gitlab搭建和使用
原文地址:https://blog.csdn.net/zhushuai662/article/details/79581377 大家常听说Git.Github.Gitlab,很多人对着三个词很懵逼,分 ...
- git常用命令一、git cherry-pick
在自己的分支查看想要合并的节点的commit id : Git log —oneline -3 //查看最新的三个提交 commit id 切换到总分支: Git fetch Git pull G ...
- NLP句子表征,NLP 的巨人肩膀(下):从 CoVe 到 BERT (转载)
深度长文:NLP的巨人肩膀(上):https://www.jiqizhixin.com/articles/2018-12-10-17 NLP 的巨人肩膀(下):从 CoVe 到 BERT: https ...
- 通过VuePress管理项目文档(一)
VuePress 相关链接 完整的Vue组件代码以及完整的文档,仅适用于个人参考学习: 文档预览地址:预览链接 使用VuePress编辑文档的代码访问:组件文档 完整代码:组件代码 Vue组件开发 这 ...
- tensorflow-TensorBoard
Tensorborad--> 是Tensorflow的可视化工具,它可以通过Tensorflow程序运行过程中输出的日志文件可视化Tensorflow程序的运行状态.Tensorflow和Ten ...
- 数据分析三剑客之pandas
Pandas 引入 前面一篇文章我们介绍了numpy,但numpy的特长并不是在于数据处理,而是在它能非常方便地实现科学计算,所以我们日常对数据进行处理时用的numpy情况并不是很多,我们需要处理的数 ...