
自定义微信小程序导航(兼容各种手机)
详细代码请见github,请点击地址,其中有原生小程序的实现,也有wepy版本的实现
了解小程序默认导航
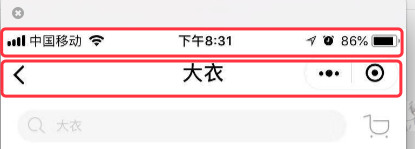
如上图所示,微信导航分为两部分,第一个部分为statusBarHeight,刘海屏手机(iPhone X,小米8等)会比其他的手机高很多,第二部分为titleBarHeight,安卓和IOS的高度不同,但是IOS高度是一样的,IOS高度是一样的,
所以我们要实现一个兼容不同手机的导航必须要根据不同的手机实现statusBarHeight和titleBarHeight
第一步:全局设置
把app.json中的window中的navigationStyle设置为custom,官方文档链接
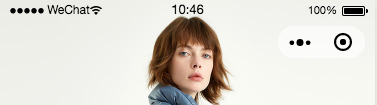
设置完之后发现导航栏变成了如下图所示,只剩下了右上角胶囊按钮
第二步:确定导航栏两部分的高度
(1)确定第一部分statusBarHeight的高度,这部分是手机用来展示时间,信号和手机电量的,我们可以从wx.getSystemInfo从获得
wx.getSystemInfo({

  success: function(res) {

    console.log(res.statusBarHeight)

  }

})
(2)第二部分titleBarHeight为小程序导航栏的高度,经过我查询无数文档和实践得知,在iPhone上titleBarHeight=44px,在安卓上titleBarHeight = 48px
(3)最后总结一下微信小程序的高度代码为
wx.getSystemInfo({

  success: function(res) {

    let titleBarHeight = 0

    if (res.model.indexOf('iPhone') !== -1) {

      titleBarHeight = 44

    } else {

      titleBarHeight = 48

    }

    that.setData({

      statusBarHeight: res.statusBarHeight,

      titleBarHeight: titleBarHeight

    });

  },

  failure() {

    that.setData({

      statusBarHeight: 0,

      titleBarHeight: 0

    });

  }

})
第三步:编写Navigation组件
(1)Navigation.js
const app = getApp();

Component({

  properties: {

    //小程序页面的标题

    title: {

      type: String,

      default: '默认标题'

    },

    //是否展示返回和主页按钮

    showIcon: {

      type: Boolean,

      default: true

    }

  },

  data: {

    statusBarHeight: 0,

    titleBarHeight: 0,

  },

  ready: function () {

    // 因为每个页面都需要用到这连个字段,所以放到全局对象中

    if (app.globalData && app.globalData.statusBarHeight && app.globalData.titleBarHeight) {

      this.setData({

        statusBarHeight: app.globalData.statusBarHeight,

        titleBarHeight: app.globalData.titleBarHeight

      });

    } else {

      let that = this

      wx.getSystemInfo({

        success: function(res) {

          if (!app.globalData) {

            app.globalData = {}

          }

          if (res.model.indexOf('iPhone') !== -1) {

            app.globalData.titleBarHeight = 44

          } else {

            app.globalData.titleBarHeight = 48

          }

          app.globalData.statusBarHeight = res.statusBarHeight

          that.setData({

            statusBarHeight: app.globalData.statusBarHeight,

            titleBarHeight: app.globalData.titleBarHeight

          });

        },

        failure() {

          that.setData({

            statusBarHeight: 0,

            titleBarHeight: 0

          });

        }

      })

    }

  },

  methods: {

    headerBack() {

      wx.navigateBack({

        delta: 1,

        fail(e) {

          wx.switchTab({

            url: '/pages/main/main'

          })

        }

      })

    },

    headerHome() {

      wx.switchTab({

        url: '/pages/main/main'

      })

    }

  }

})
(2) Navigation.wxml
<view style="height:{{titleBarHeight}}px;padding-top:{{statusBarHeight}}px">

  <view class="header" style="height:{{titleBarHeight}}px;padding-top:{{statusBarHeight}}px">

    <view wx:if="{{showIcon}}" class="title-bar">

      <view class="back" bindtap="headerBack"><image src="https://dn-testimage.qbox.me/Files/08/6b/086b8e19c7a5aa031dc4df31ca8b53ac2ed32212_644.png"></image></view>

      <view class="line"></view>

      <view class="home" bindtap="headerHome"><image src="https://dn-testimage.qbox.me/Files/fc/49/fc4958729bf1937667b68c78f495edeafe30f339_1030.png"></image></view>

    </view>

    <view class="header-title">{{title}}</view>

  </view>

</view>
css就不贴了,有点多,需要的朋友可以去的github上拿 点击地址
第四步:展示效果
iPhone X展示效果 iPhone 7展示效果
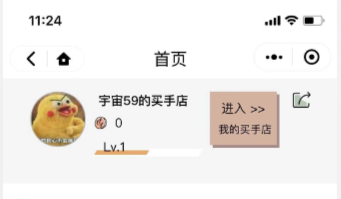

小米8展示效果
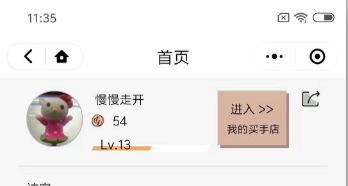
用我们公司的测试机基本上都试了一遍,基本上都能正常显示,别问我为什么样式和右边这么相似,因为我是叫公司设计给了我样式
解决下拉刷新的问题

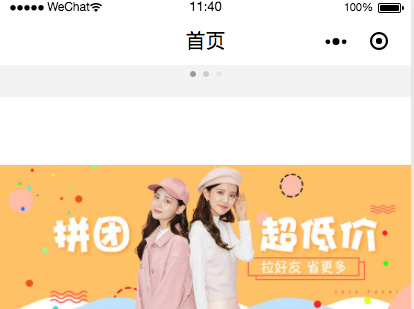
图一为默认导航下的下拉刷新,显示正常,图二为自定义导航栏下的下拉刷新,显示异常,中间有一大块空白。
如果解决这个问题,我们自定义一个加载动画,藏在导航底下
(1)把app.json中的window设置为如下,这样加载动画就隐藏了,因为加载动画必须要设置window的backgroundTextStyle=black和backgroundColor=#F3F3F3才会显示如上图所示
window: {
"navigationStyle": "custom",
"backgroundTextStyle": "light",
"navigationBarBackgroundColor": "#fff",
"navigationBarTitleText": "ICY买手店",
"navigationBarTextStyle": "black"
}
(2)修改Navigation.wxml
<view style="height:{{titleBarHeight}}px;padding-top:{{statusBarHeight}}px">

  <view class="header" style="height:{{titleBarHeight}}px;padding-top:{{statusBarHeight}}px">

    <view wx:if="{{showIcon}}" class="title-bar">

      <view class="back" bindtap="headerBack"><image src="https://dn-testimage.qbox.me/Files/08/6b/086b8e19c7a5aa031dc4df31ca8b53ac2ed32212_644.png"></image></view>

      <view class="line"></view>

      <view class="home" bindtap="headerHome"><image src="https://dn-testimage.qbox.me/Files/fc/49/fc4958729bf1937667b68c78f495edeafe30f339_1030.png"></image></view>

    </view>

    <view class="header-title">{{title}}</view>

  </view>

  <view class="loading-wrap"><image class="loading-gif" src="https://dn-testimage.qbox.me/Files/e0/35/e03562502eae6d5944bed747b7c21a3c2cce1ff8_1250.gif"></image></view>

</view>
效果如下图,加载动画我可能写的不太好看

问题:这样做在iPhone上是能正常展示的,但是在安卓上还有一点小问题,自定义导航栏的标题和图标有一起滑动
注意点
(1)安卓手机下拉刷新还是会有一点点展示问题
(2)项目所有fixed的元素都需要改,top需要加上导航栏的高度
目前哪些小程序在用自定义导航栏
我所知道的有 “bilibili”,"票圈长视频",我们公司的小程序也在计划用
自定义微信小程序导航(兼容各种手机)的更多相关文章
- 微信小程序导航:官方工具+精品教程+DEMO集合(1月7更新)
1:官方工具:https://mp.weixin.qq.com/debug/w ... tml?t=14764346784612:简易教程:https://mp.weixin.qq.com/debug ...
- 微信小程序例子-保存图片到手机相册
微信小程序例子-保存图片到手机相册 1.关键代码 1)WXML文件 2)JS文件 saveImgToPhotosAlbumTap: function(){ // 图片必须是 https 的 var I ...
- 微信小程序-导航 & 路由
微信小程序-导航 & 路由 页面跳转 页面路由 页面栈, 框架以栈的形式维护了当前的所有页面. https://developers.weixin.qq.com/miniprogram/dev ...
- 微信小程序——导航栏组件
组件内属性详解 属性 类型 默认值 必填 说明 nav-postion String relative 否 导航栏(包含导航栏以及状态栏)的position,可取值relative.fixed.a ...
- 个人也能申请微信小程序获得APPID和手机测试效果
微信小程序昨晚火爆公测,我也第一时间注册了小程序账号开启公测之旅. 注册过程可以看文档:https://my.oschina.net/imhoodoo/blog/780901 进入后台之后我们其实主要 ...
- 如何自定义微信小程序swiper轮播图面板指示点的样式
https://www.cnblogs.com/myboogle/p/6278163.html 微信小程序的swiper组件是滑块视图容器,也就是说平常我们看到的轮播图就可以用它来做,不过这个组件有很 ...
- 自定义微信小程序swiper轮播图面板指示点的样式
微信小程序的swiper组件是滑块视图容器,也就是说平常我们看到的轮播图就可以用它来做,不过这个组件有很多样式是固定的,但是,有时候我们的设计稿的面板指示点是需要个性化的,那么如何去修改swiper组 ...
- 微信小程序 导航(a 连接)自定义组件
导航:navigator 组件 组件上的属性: target:跳到其他小程序( 默认是当前小程序 ),当属性值为 miniProgram 时,跳到别的小程序(如果要跳到别的小程序,需要填写 appid ...
- 微信小程序------导航栏样式、tabBar导航栏
一:导航栏样式设置 小程序的导航栏样式在app.json中定义. 这里设置导航,背景黑色,文字白色,文字内容测试小程序 app.json内容: { "pages":[ " ...
随机推荐
- Android应用程序如何使用Internet资源?
思路:连接Internet资源-->分析XML资源-->使用Download Manager下载文件 Android的Internet连接模型和用于分析Internet数据源的Java技术 ...
- javascript 数据类型 -- 检测
一.前言 在上一篇博文中 Javascript 数据类型 -- 分类 中,我们梳理了 javascript 的基本类型和引用类型,并提到了一些冷知识.大概的知识框架如下: 这篇博文就讲一下在写代码的过 ...
- 机器学习——KMeans
导入类库 from sklearn.cluster import KMeans from sklearn.datasets import make_blobs import numpy as np i ...
- Linux进阶命令用法
1.tr命令 可以对来自标准输入的字符进行替换.压缩和删除.它可以将一组字符变成另一组字符 选项 -c或——complerment:取代所有不属于第一字符集的字符: -d或——delete:删除所有属 ...
- SpringBoot报错:Failed to load ApplicationContext( Failed to bind properties under 'logging.level')
引起条件: SpringBoot2.0下yml文件配置SLF4j日志输出日志级别 logging: level: debug 解决方法: 指定系统包路径 logging: root: debug 指定 ...
- laravel-神奇的服务容器(转)
原文地址: http://www.insp.top/learn-laravel-container ,转载务必保留来源,谢谢了! 容器,字面上理解就是装东西的东西.常见的变量.对象属性等都可以算是容器 ...
- 你不知道的JS之作用域和闭包(三)函数 vs. 块级作用域
原文:你不知道的js系列 在第(二)节中提到的,标识符在作用域中声明,这些作用域就像是一个容器,一个嵌套一个,这个嵌套关系是在代码编写时定义的. 那么到底是什么产生了一个新的作用域,只有函数能做到 ...
- Python基础之模块+异常
一.模块相关概念 1.定义:包含一系列数据.函数.类的文件,通常以.py结尾. 2.作用:让一些相关的数据,函数,类有逻辑的组织在一起,使逻辑结构更加清晰.有利于多人合作开发. 3.模块导入方式(三种 ...
- react-native-upgrade-android
React Native的版本升级插件(仅是android), react-native版本需要0.17.0及以上 如何安装 1.首先安装npm包 npm install react-native-u ...
- Docker常用命令(一)
[转]原始出处:http://zxx287856774.blog.51cto.com/3417296/1665264 docker中 启动所有的容器命令 docker start $(docker p ...