搭建LNMP发布ecshop系统及压测启用opcache缓存与否的情况
安装环境:CENTOS6.5,nginx1.6.2,php-5.5.18,mysql5.5.38
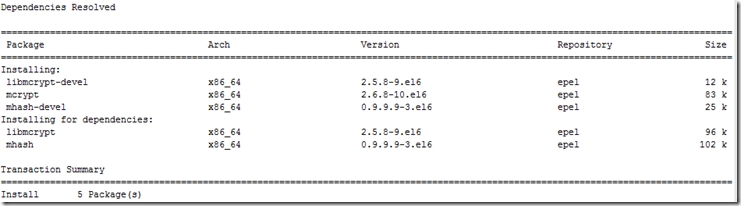
在安装软件之前安装epel源,就可以直接用yum安装libmcrypt,mhash,mcrypt等php扩展。
安装nginx
解决依赖关系,安装开发包组"Development Tools"和 "Server Platform Development"。
#tar –xf nginx-1.6.2
./configure \
--prefix=/usr/local/nginx \
--conf-path=/etc/nginx/nginx.conf \
--error-log-path=/var/log/nginx/error.log \
--http-log-path=/var/log/nginx/access.log \
--pid-path=/var/run/nginx/nginx.pid \
--lock-path=/var/lock/nginx.lock \
--user=nginx \
--group=nginx \
--http-client-body-temp-path=/var/tmp/nginx/client/ \
--http-proxy-temp-path=/var/tmp/nginx/proxy/ \
--http-fastcgi-temp-path=/var/tmp/nginx/fcgi/ \
--http-uwsgi-temp-path=/var/tmp/nginx/uwsgi \
--http-scgi-temp-path=/var/tmp/nginx/scgi \
--with-pcre
#make && make install
添加nginx启动脚本,设置开机启动,请见上一篇博客
安装php-5.5.18
安装mcrypt libmcrypt mhash 等php扩展
# yum –y install mcrypt libmcrypt-devel mhash-devel
安装php图型扩展支持
# yum install -y libxml2-devel libjpeg-devel libpng-devel freetype-devel openssl-devel libcurl-devel libmcrypt-devel gd-devel
#tar –xf php-5.5.18.tar.bz2
#cd php-5.5.18
#./configure --prefix=/usr/local/php55 --with-config-file-path=/usr/local/php55/etc --with-mysql=mysqlnd --with-zlib --enable-xml --disable-rpath --enable-bcmath --enable-shmop --enable-sysvsem --with-curl --enable-fpm --enable-opcache --with-mcrypt --with-gd --with-openssl --with-mhash --enable-sockets --with-xmlrpc -enable-zip --enable-soap --with-config-file-scan-dir=/etc/php.d --with-bz2 --with-curl --with-jpeg-dir --with-png-dir
# make && make install
# cp php.ini-production /usr/local/php55/etc/php.ini #为php提供配置文件
#ln –s /usr/local/php55/etc/php.ini /etc/php.ini #为php.ini在/etc目录下创建软链接
# cp sapi/fpm/init.d.php-fpm /etc/rc.d/init.d/php-fpm
# chmod +x /etc/rc.d/init.d/php-fpm
# chkconfig --add php-fpm
# chkconfig php-fpm on #配置php-fpm,为php-fpm提供Sysv init脚本,并将其添加至服务列表
# cp /usr/local/php55/etc/php-fpm.conf.default /usr/local/php55/etc/php-fpm.conf #为php-fpm提供配置文件
编辑php-fpm的配置文件:
# vim /usr/local/php55/etc/php-fpm.conf
配置fpm的相关选项为你所需要的值,并启用pid文件(如下最后一行):
pm.max_children = 50 #设定php子进程最大数为50
pm.start_servers = 5 #启动php时子进程数为52上
pm.min_spare_servers = 2 #空闲php子进程最少为2个
pm.max_spare_servers = 8 #空闲php子进程最大为8个
pid = /usr/local/php/var/run/php-fpm.pid #pid文件路径
上面这些参数是可以根据系统性能和负载情况去调整的,在生产环境中这些参数可能会比这些数字要大很多,也可以设定php的子进程个数为静态的值。如果要设置静态的值,需要更改 pm = static ,php-fpm默认为动态的 pm = dynamic
# service php-fpm start 启动php-fpm
nginx配置文件设置及整合nginx和php5.5
nginx
的配置文件核心模块为main和events,此外还包括标准http模块,可选http模块和邮件模块,还可支持诸多第三方模块。main用于配置错误
日志、进程、及权限等相关的参数,events用于配置I/O模型,如epoll,kqueue,select或poll等。nginx的主配置文件由几
个段组成,main,http, server,upstrean和location,被称为nginx的上下文,支持嵌套。
nginx的配置文件
|
1
2
3
4
5
6
7
8
9
10
11
12
|
#user nobody; #定义nginx工作进程的用户,在编译安装时已经指定用户nginx,注释掉worker_processes 1; #指定工作进程个数#worker_cup_affinity cpumask ; #用cpu掩码位明确绑定nginx运行在某个cpu上,这里这台虚拟机只有一个cpu,所以注释掉worker_rlimit_nofile 51200; #nginx进程打开文件数目,可设定大一点#error_log logs/error.log; #定义错误日志,在编译时已指定位置,注释#error_log logs/error.log notice;#error_log logs/error.log info;#pid logs/nginx.pid;#pid文件,编译时已指定位置events { |
|
1
2
3
4
5
6
7
8
9
10
11
12
13
14
15
16
17
18
19
20
21
22
23
24
25
26
27
28
29
30
31
|
use epoll; #定义I/O模型 worker_connections 51200; #设定每个工作进程所处理的最大连接数.与main中的worker_processes决定了整个nginx能处理的最大连接数}http{ include mime.types; #设定mime类型,类型由mime.type文件定义 default_type application/octet-stream; sendfile on; #sendfile keepalive_timeout 65; #连接超时时间 gzip on; #开启gzip压缩 server { #server表示的是一个虚拟主机 listen 80; #监听端口 server_name 10.204.80.75; #虚拟主机名称,可以是ip或域名 location / { #通常用于server上下文中,用于设定某URI的访问属性。location可以嵌套。 root html; #定义服务器网站根目录位置 index index.php index.html index.htm; #定义首页索引文件的名称,index.php是后加的 } error_page 500 502 503 504 /50x.html; #定义错误提示页面 location = /50x.html { root html; } location ~ \.php$ { #定义.php结尾的文件解析 root html; fastcgi_pass 127.0.0.1:9000; #定义解析php程序使用的FastCGI接口 fastcgi_index index.php; #定义php程序首页索引文件名称 fastcgi_param SCRIPT_FILENAME /usr/local/nginx/html$fastcgi_script_name; include fastcgi_params; } }} |
如上所示,php和nginx组合到一块了。
MySQL配置
MySQL我启用前面博客中搭建的drbd高可用mysql服务器,过程请见http://piao719.blog.51cto.com/287547/1562390
IP地址为:10.204.80.89
搭建ecshop
上传到/usr/local/nginx/html/ecshop 目录
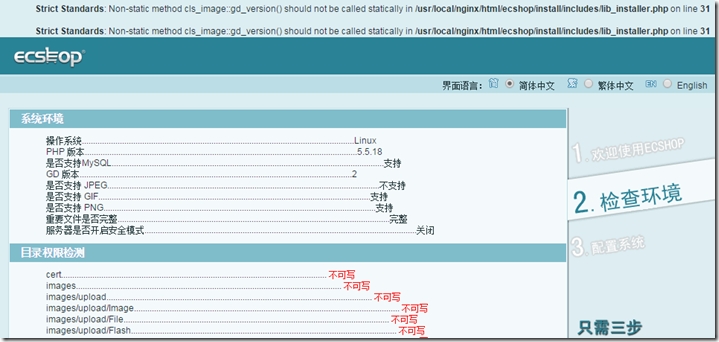
Strict Standards: Non-static method cls_image::gd_version() should
not be called statically in \install\includes\lib_installer.php on line
31
解决:找到install/includes/lib_installer.php中的第31行 return
cls_image::gd_version();然后在找到include/cls_image.php中的678行,发现gd_version()方
法未声明静态static,所以会出错。这时候只要:
将function gd_version()改成static function gd_version()即可。
检测环境的时候提示:是否支持 JPEG是不支持的。
解决:查看发现有libjpeg.lib库,GD2库也有,都加载了,也都正常。查看ecshop源代码发现install/includes/lib_installer.php中第100行,JPEG写成了JPG,正确的应该是:
$jpeg_enabled = ($gd_info['JPEG Support'] === true) ? $_LANG['support'] : $_LANG['not_support'];
给cert、data、images、includes、temp、themes目录加777权限
# cd /usr/local/nginx/html/ecshop
# chmod -R 777 themes/ temp/ includes/ data/ cert/ images/
检查环境完成
配置系统
首先在10.204.80.89这台mysql服务器上创建ecshop数据库,然后添加一个帐号来管理这个数据库
mysql>create database ecshop;
mysql>grant all on ecshop.* to 'ecsuser'@'10.204.%.%' identified by "ecspass";
mysql>flush privileges;
然后照提示把所有信息填完整
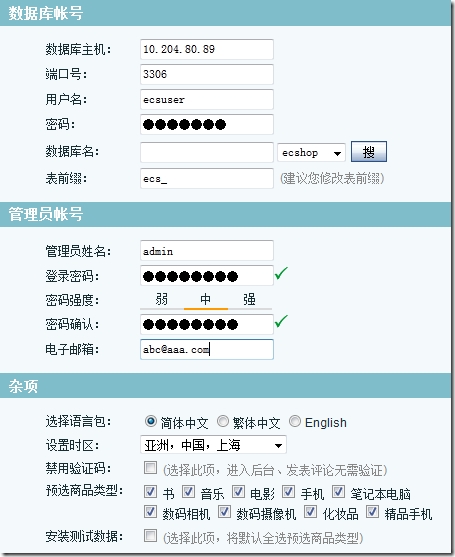
安装数据库失败,提示date.timezone时区设置有问题,
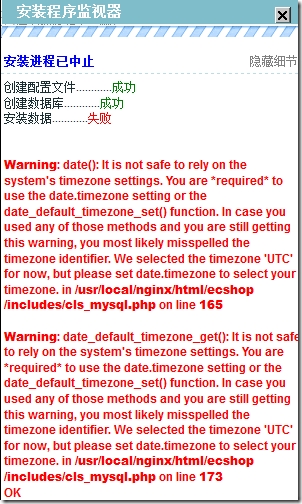
修改/etc/php.ini里面的date.timezone = “Asia/Shanghai”时区,或都在php代码里面添加<?php date_default_timezone_set("PRC"); ?>这一句即可。安装完成

压力测试,这里只是用http自带的ab工具简单测试一下启用opcache缓存与不启用缓存的效果。
首先不启用php自带的opcache缓存器的测试结果如下
|
1
2
3
4
5
6
7
8
9
10
11
12
13
14
15
16
17
18
19
20
21
22
23
24
25
26
27
28
29
30
31
32
33
34
35
36
37
38
39
40
41
42
43
44
45
46
47
48
49
50
51
52
53
54
|
# ab -n 1000 -c 10 http://10.204.80.75/ecshop/index.phpThis is ApacheBench, Version 2.0.40-dev <$Revision: 1.146 $> apache-2.0Copyright 1996 Adam Twiss, Zeus Technology Ltd, http://www.zeustech.net/Copyright 2006 The Apache Software Foundation, http://www.apache.org/Benchmarking 10.204.80.75 (be patient)Completed 100 requestsCompleted 200 requestsCompleted 300 requestsCompleted 400 requestsCompleted 500 requestsCompleted 600 requestsCompleted 700 requestsCompleted 800 requestsCompleted 900 requestsFinished 1000 requestsServer Software: nginx/1.6.2Server Hostname: 10.204.80.75Server Port: 80Document Path: /ecshop/index.phpDocument Length: 35726 bytesConcurrency Level: 10Time taken for tests: 53.620991 secondsComplete requests: 1000Failed requests: 0Write errors: 0Total transferred: 36078000 bytesHTML transferred: 35726000 bytesRequests per second: 18.65 [#/sec] (mean)Time per request: 536.210 [ms] (mean)Time per request: 53.621 [ms] (mean, across all concurrent requests)Transfer rate: 657.06 [Kbytes/sec] receivedConnection Times (ms) min mean[+/-sd] median maxConnect: 0 21 250.2 1 3000Processing: 135 513 103.2 544 887Waiting: 129 499 101.0 531 868Total: 136 535 271.5 545 3754Percentage of the requests served within a certain time (ms) 50% 545 66% 561 75% 571 80% 577 90% 597 95% 618 98% 645 99% 739 100% 3754 (longest request) |
启用opcache,在/etc/php.ini文件中的[opcache]中添加
zend_extension=/usr/local/php55/lib/php/extensions/no-debug-non-zts-20121212/opcache.so
并把下面的这些参数打开
opcache.enable=1
opcache.enable_cli=1
opcache.memory_consumption=256
opcache.interned_strings_buffer=16
opcache.max_accelerated_files=5000
opcache.revalidate_freq=60
opcache.load_comments=1
上面这些参数在生产环境中可以根据实际的需要做出修改
重启php-fpm,再测试一下
|
1
2
3
4
5
6
7
8
9
10
11
12
13
14
15
16
17
18
19
20
21
22
23
24
25
26
27
28
29
30
31
32
33
34
35
36
37
38
39
40
41
42
43
44
45
46
47
48
49
50
51
52
53
54
55
|
ab -n 1000 -c 10 http://10.204.80.75/ecshop/index.phpThis is ApacheBench, Version 2.3 <$Revision: 655654 $>Copyright 1996 Adam Twiss, Zeus Technology Ltd, http://www.zeustech.net/Licensed to The Apache Software Foundation, http://www.apache.org/Benchmarking 10.204.80.75 (be patient)Completed 100 requestsCompleted 200 requestsCompleted 300 requestsCompleted 400 requestsCompleted 500 requestsCompleted 600 requestsCompleted 700 requestsCompleted 800 requestsCompleted 900 requestsCompleted 1000 requestsFinished 1000 requestsServer Software: nginx/1.6.2Server Hostname: 10.204.80.75Server Port: 80Document Path: /ecshop/index.phpDocument Length: 35733 bytesConcurrency Level: 10Time taken for tests: 16.035 secondsComplete requests: 1000Failed requests: 0Write errors: 0Total transferred: 36085000 bytesHTML transferred: 35733000 bytesRequests per second: 62.36 [#/sec] (mean)Time per request: 160.347 [ms] (mean)Time per request: 16.035 [ms] (mean, across all concurrent requests)Transfer rate: 2197.69 [Kbytes/sec] receivedConnection Times (ms) min mean[+/-sd] median maxConnect: 0 2 1.7 1 10Processing: 66 158 73.7 155 885Waiting: 53 148 72.9 145 873Total: 66 160 73.7 157 886Percentage of the requests served within a certain time (ms) 50% 157 66% 168 75% 173 80% 176 90% 186 95% 195 98% 208 99% 739 100% 886 (longest reque |
可以看出来启用opcache缓存的效果比不启用的结果想比,响应时间少了70%,所以php开启opcode是非常有必要的 。
转载:http://piao719.blog.51cto.com/287547/1581240/
搭建LNMP发布ecshop系统及压测启用opcache缓存与否的情况的更多相关文章
- 案例 | 荔枝微课基于 kubernetes 搭建分布式压测系统
王诚强,荔枝微课基础架构负责人.热衷于基础技术研发推广,致力于提供稳定高效的基础架构,推进了荔枝微课集群化从0到1的发展,云原生架构持续演进的实践者. 本文根据2021年4月10日深圳站举办的[腾讯云 ...
- <转>二十问全链路压测干货汇总(上)
本文转载自:微信公众号-数列科技<二十问全链路压测干货汇总(上)> 最近几年全链路压测无疑成为了一个热门话题,在各个技术峰会上都可以看到它的身影. 一些大型的互联网公司,比如阿里巴巴.京东 ...
- 性能压测诡异的Requests/second 响应刺尖问题
最近一段时间都在忙着转java项目最后的冲刺,前期的coding翻代码.debug.fixbug都逐渐收尾,进入上线前的性能压测. 虽然不是大促前的性能压测要求,但是为了安全起见,需要摸个底心里有个数 ...
- Jmeter5 实现多机集群压测(局域网组成多机集群)
想要模拟高并发用户访问的场景,用Jmeter5实现的话,单靠一台PC机,资源是不够的,包括单机的内存.使用端口数量等,所以最好是通过多台PC机组成几个集群来对服务器进行压测. 本文目录: 1.软硬件配 ...
- 压测2.0:云压测 + APM = 端到端压测解决方案
从压力测试说起 压力测试是确立系统稳定性的一种测试方法,通常在系统正常运作范围之外进行,以考察其功能极限和隐患.与功能测试不同,压测是以软件响应速度为测试目标的,尤其是针对在较短时间内大量并发用户的访 ...
- 高德全链路压测平台TestPG的架构与实践
导读 2018年十一当天,高德DAU突破一个亿,不断增长的日活带来喜悦的同时,也给支撑高德业务的技术人带来了挑战.如何保障系统的稳定性,如何保证系统能持续的为用户提供可靠的服务?是所有高德技术人面临的 ...
- Jmeter与压测相关概念
相关概念 RT(response time) 什么是RT? RT就是指系统在接收到请求和做出相应这段时间跨度 但是值得一提的是RT的值越高,并不真的就能说明我们的系统的吞吐量就很高, 比如说,如果存在 ...
- Jmeter让压测随时做起来(转载)
为什么要压测 这个问题问的其实挺没有必要的,做开发的同学应该都很清楚,压测的必要性,压力测试主要目的就是让我们在上线前能够了解到我们系统的承载能力,和当前.未来系统压力的提升情况,能够评估出当前系统的 ...
- 性能工具之Jmeter压测Hprose RPC服务
概述 Hprose(High Performance Remote Object Service Engine),国人开发的一个远程方法调用的开源框架.它是一个先进的轻量级的跨语言跨平台面向对象的高性 ...
随机推荐
- 利用dom4j读取xml文件
对于xml文件的读取,其实有很多方法,例如:SAX实现方法,DOM4J实现方法 ,DOM 实现方法,JDOM实现方法 等等. 下面,我就说下dom4j的读取方法: 1.首先,肯定要引入第三方jar包. ...
- Hadoop与分布式开发
hadoop上的并行应用程序开发是基于MapReduce编程框架的,MapReduce编程模型的原理是:利用一个输入的key/value对集合来产生一个输出的key/value对集合. Map ...
- Android将应用log信息保存文件
相信大家在做应用调试的时候,不可能时时通过USB线连着电脑去查看log信息,所以,将应用的log信息保存到手机本地就很有必要了,有助我们从这些log信息中提取有用的部分,以解决一些bug,下面我把网上 ...
- Android-ViewPagerIndicator
https://github.com/JakeWharton/Android-ViewPagerIndicator
- Free Editor
Mars Nov 19, 2014
- CCLabelAtlas创建自定义字体
有时候游戏中要用到一些特殊的字体效果,特别是数字. CCLabelAtlas就可以从png图中读取文字. CCLabelAtlas* diceCount=CCLabelAtlas::labelWith ...
- 写个 Hello World 而已,要不要这么震撼?!
Atom 编辑器的一个插件,可以让你写代码的时候体验狂拽酷炫的效果! 如果来点音乐.再配上机械键盘的话,写代码是不是爽到爆呢? 这货全名叫: activate-power-mode atom pack ...
- How To Install Kernel 3.10 On Ubuntu, Linux Mint, Debian and Derivates
n this article I will show you how to install Linux Kernel 3.10 on Ubuntu 13.10 Saucy Salamander, Ub ...
- 获取随机颜色js
获取随机颜色方法一: function randomColor1() { var rand = Math.floor(Math.random() * 0xFFFFFF).toString(16); i ...
- UIPickerView实现省 市 区三级联动
前几天用UIPickerView实现了一下三级联动具体的如下图