
How to build the Robotics Library from source code on Windows
The Robotics Library is an open source C++ library for robot kinematics, motion planning and control.
The official website provides a Windows installer. But it's release only and has no debug information. To better debug into the library, we need to build it from the source code.
There's an official building instructions including its source code and all 3rd parties' download and building steps. But that description is for VS 2010 x64 release build, if building into VS 2008 win32 debug version, there're some extra work to do. This article describes all the required steps.
Step-by-step guide
The library can be built in many VS versions (2008, 2010, 2012, .. etc) and flavors (debug/release, win32/x64 bit). This article uses VS 2008 win32 debug version as an example. The process for other flavors (e.g VS 2012 x64 release) are similar.
Part 1: Preparation
- Create a temporary folder c:\temp, type command "subst S: c:\temp". This makes the code path in pdb files starts with a virtual logic drive "S:" so it's easier to debug the robotics library code in the future.
- Download the required third parties following the official building instructions, extract them to different folders in S:\3p. Here we only build the core library, so in a minimum we need Eigen, Boost, LibXml2, Coin3D and CGAL. If we want to build the demo programs then we need more 3ps like Qt, SOLID, .. etc.
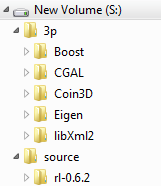
- Download the source code of the robotics library, extract it to S:\source. Here is what my folder structure looks like after doing all these.
- Install CMake ≥ 2.8.11. Here I install CMake 3.0.
- Start "Visual Studio 2008 Command Prompt". type the following command to allow multi-core compilation support.
set VCBUILD_DEFAULT_OPTIONS=/M%NUMBER_OF_PROCESSORS%
set CL=/MP
Part 2: Build the 3rd parties
- Boost:
- change directory to the boost folder. execute the following command:
bootstrap.bat - execute the following command:
b2 toolset=msvc-9.0 install address-model=32 --build-type=complete --prefix="C:\Program Files (x86)\Boost" - add C:\Program Files (x86)\Boost\lib to the system's PATH variable.
- execute the following command:
set BOOST_ROOT=%ProgramFiles(x86)%\Boost
- change directory to the boost folder. execute the following command:
- Eigen:
change directory to the Eigen folder and execute the following command:mkdir Default
cd Default
cmake -G "Visual Studio 9 2008" -D CMAKE_INSTALL_PREFIX="C:\Program Files (x86)\eigen" ..
cmake --build . --config Debug --target INSTALL - LibXml2:
- change directory to the subdirectory "win32" and execute
cscript configure.js compiler=msvc debug=yes iconv=no prefix="C:\Program Files (x86)\libxml2" - edit the file "config.msvc" in that folder, find the line PREFIX=C:\Program Files (x86)\libxml2, change it to PREFIX="C:\Program Files (x86)\libxml2". (use double quote to enclose the path).
- execute the following command to build the library
nmake /f Makefile.msvc - change directory to the folder "bin.msvc", execute the following command to embed the manifest into the generated dll
mt.exe -manifest libxml2.dll.manifest -outputresource:libxml2.dll;2 - change director to "win32", execute teh following command to install the library to c:\Program Files (x86)
nmake /f Makefile.msvc install - add the C:\Program Files (x86)\libxml2\bin to the system's PATH variable
- change directory to the subdirectory "win32" and execute
- Coin3D:
- open the Visual Studio solution file build\msvc9\coin3.sln. Select the desired configuration (here are the dll-debug and lib-debug) and build. It'll report "coin3 docs" project built fails (possibly due to lack of doxygen), which is OK.
- create a folder "c:\Program Files (x86)\coin".
- create a temporary folder named like "c:\temp\install". Note this temp folder's full path should have no white space. We'll firstly install Coin3D to it and then copy all the files to "c:\Program Files (x86)\coin".
- change directory to the build\msvc9 folder, type the following command
   set COINDIR=c:\temp\install

   ..\misc\install-sdk.bat dll debug msvc9 coin3
   xcopy /s %COINDIR% "%programfiles(x86)%\coin"
- CGAL:
- change directory to the CGAL folder, open the CMakeLists.txt, remove the following line:
list (INSERT CGAL_ESSENTIAL_3RD_PARTY_LIBRARIES 0 GMP MPFR) - execute the following command
mkdir Default

cd Default

cmake -G "Visual Studio 9 2008" -D CMAKE_INSTALL_PREFIX="C:\Program Files (x86)\cgal" -D WITH_CGAL_ImageIO=OFF -D WITH_CGAL_Qt3=OFF -D WITH_CGAL_Qt4=OFF -D WITH_GMP=OFF -D WITH_MPFR=OFF ..

cmake --build . --config Debug --target INSTALL
- change directory to the CGAL folder, open the CMakeLists.txt, remove the following line:
Part 3: Build the Robotics Library
The building instructions builds the library in command line, while I meet some problem when using it. Here are the steps of how to build it with CMake-gui and VS IDE.
- change directory to the robotics library folder, open the CMakeLists.txt. Change the following options to "FALSE" because we don't want to build the demos and tests.
option(BUILD_DEMOS "Build demos" FALSE)
option(BUILD_EXTRAS "Build extras" FALSE)
option(BUILD_RL_MATH "Build RL::MATH" TRUE)
option(BUILD_RL_UTIL "Build RL::UTIL" TRUE)
option(BUILD_RL_XML "Build RL::XML" TRUE)
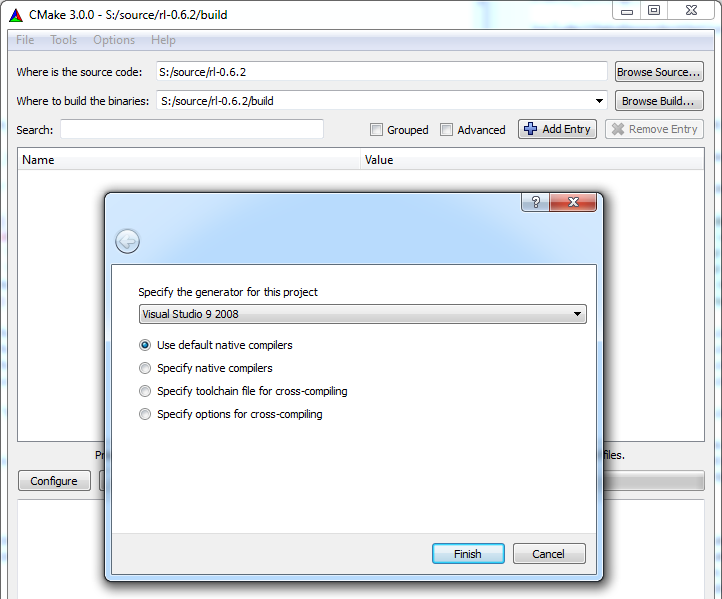
option(BUILD_TESTS "Build tests" FALSE) - open CMake-gui, specify the source directory as "S:\source\rl-0.6.2" and build directory as "S:\source\rl-0.6.2\build". click "Configure", select "Visual Studio 9 2008" as the generator, keeping the default option of "Use default native compilers'.
- It'll prompt "LIBXML2_INCLUDE_DIRS" can't be found, specify it as "C:\Program Files (x86)\libxml2\include\libxml2". Also, add an entry "BOOST_ROOT", specifying its value as "C:\Program Files (x86)\Boost".

- Click "Configure", there'll be no error any more. Click "Configure" again so there's no red item. Click "Generate" to generate the solution files.
- Open the "build\rl.sln" in VS2008. Find these 8 projects: rlhal, rlkin, rlmath, rlmdl, rlplan, rlsg, rlutil, rlxml. Change their default pdb files name to "$(ProjectName)d.pdb" as following:

- Build the solution.
- Copy the pdb files to the installed folderxcopy /s lib\debug\*.pdb "c:\Program Files (x86)\rl\lib"
- Change directory to the "build" folder. Execute the following commands to copy the header files, library files and pdb files to "c:\Program Files (x86)\rl"
cmake --build . --config Debug --target INSTALLxcopy /s lib\debug\*.pdb "c:\Program Files (x86)\rl\lib"
- If building in release, replace the "debug", "Debug" command options to "release", "Release".
- If building in x64, start the "Visual Studio x64 Win64 Command Prompt". And replace the installation folder from "c:\Program Files (x86)" to "c:\Program Files"
- If building in other VS versions, replace the tool set and visual studio version string. E.g., for VS 2012 x64 version, replace "msvc-9.0" with "msvc-11.0", replace "Visual Studio 9 2008" with "Visual Studio 11 Win64". A complete list of CMake 3.0 VS generator string can be found here.
- See the official building instructions for more examples on 64 bit release build instructions.
Part 4: Package the library
The built Robotics Library files and its 3rd parties are in "c:\Program Files (x86)", they don't have to be there. And we can copy all their lib files to one place so the application referencing will be easier.
Copy the following content to a batch file and execute it to put all the files (header, lib, dll) into a similar folder structure as the Robotics Library's official Windows installation.
====================================================================
set RL_ROOT=%programfiles(x86)%
REM copy the header files
xcopy /s %RL_ROOT%\Boost\include\boost-1_55 %RL_ROOT%\rl\include
xcopy /s %RL_ROOT%\cgal\include %RL_ROOT%\rl\include
mkdir %RL_ROOT%\rl\include\coin
xcopy /s %RL_ROOT%\coin\include %RL_ROOT%\rl\include\coin
mkdir %RL_ROOT%\rl\include\Eigen
xcopy /s %RL_ROOT%\eigen\include\eigen3\Eigen %RL_ROOT%\rl\include\Eigen
xcopy /s %RL_ROOT%\libxml2\include\libxml2 %RL_ROOT%\rl\include
REM copy the lib files
xcopy /s %RL_ROOT%\Boost\lib %RL_ROOT%\rl\lib
xcopy /s %RL_ROOT%\cgal\lib %RL_ROOT%\rl\lib
xcopy /s %RL_ROOT%\coin\lib %RL_ROOT%\rl\lib
xcopy /s %RL_ROOT%\libxml2\lib %RL_ROOT%\rl\lib
REM copy the dll files
mkdir %RL_ROOT%\rl\bin
xcopy /s %RL_ROOT%\cgal\bin %RL_ROOT%\rl\bin
xcopy /s %RL_ROOT%\coin\bin %RL_ROOT%\rl\bin
xcopy /s %RL_ROOT%\libxml2\bin %RL_ROOT%\rl\bin
REM remove the old files
rmdir /s /q %RL_ROOT%\Boost
rmdir /s /q %RL_ROOT%\cgal
rmdir /s /q %RL_ROOT%\coin
rmdir /s /q %RL_ROOT%\eigen
rmdir /s /q %RL_ROOT%\libxml2
Part 5: Test the library
- Create a win32 console application, copy below content to the main .cpp file.
#include <iostream>

#include <rl/math/Transform.h>

#include <rl/math/Unit.h>

#include <rl/mdl/Kinematic.h>

#include <rl/mdl/Model.h>

#include <rl/mdl/XmlFactory.h>

int

main(int argc, char** argv)

{

	rl::mdl::XmlFactory factory;

	rl::mdl::Kinematic * kinematics = dynamic_cast<rl::mdl::Kinematic *>(factory.create("C:\\Program Files (x86)\\rl-0.6.2\\share\\rl\\examples\\rlmdl\\unimation-puma560.xml"));

	rl::math::Vector q(6);

	q << 10, 10, -20, 30, 50, -10;

	q *= rl::math::DEG2RAD;

	kinematics->setPosition(q);

	kinematics->forwardPosition();

	rl::math::Transform t = kinematics->getOperationalPosition(0);

	rl::math::Vector3 position = t.translation();

	rl::math::Vector3 orientation = t.rotation().eulerAngles(2, 1, 0).reverse();

	std::cout << "Joint configuration in degrees: " << q.transpose() * rl::math::RAD2DEG << std::endl;

	std::cout << "End-effector position: [m] " << position.transpose() << " orientation [deg] " << orientation.transpose() * rl::math::RAD2DEG << std::endl;

	return 0;

} - Set header file search path to "%RL_ROOT%\rl\include"
- Add "rlmdld.lib rlxmld.lib rlmathd.lib libxml2.lib" as library dependencies. Set library file search path to "%RL_ROOT%\rl\lib"
- Add "EIGEN_DONT_ALIGN" to "C++"–> "Preprocessor" --> "Preprocessor Definitions." (this is to prevent the Eigen issue on 32 bit platforms)
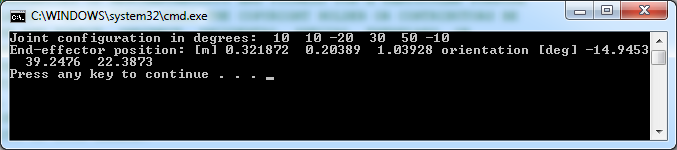
- Build the application, copy libxml2.dll to the exe folder. Run the application, you'll get the following result:
Reference
http://www.roboticslibrary.org/tutorials/build-windows
How to build the Robotics Library from source code on Windows的更多相关文章
- How to Build MySQL from Source Code on Windows & compile MySQL on win7+vs2010
Not counting obtaining the source code, and once you have the prerequisites satisfied, [Windows] use ...
- Visual Studio 2012,创建工程Build Driver,基于纯Source Code.
拿到一堆纯代码,怎么去Create Project,设置Include路径,lib路径,要不要Pre-compile技术,配置Project之间的依赖关系. SourcesConverter Bas ...
- How to build windows azure PowerShell Source Code
Download any version source code of Windows Azure Powershell from https://github.com/Azure/azure-sdk ...
- How to compile and install Linux Kernel 5.1.2 from source code
How to compile and install Linux Kernel 5.1.2 from source code Compiling a custom kernel has its adv ...
- nginx 编译某个模板的问题./configure: error: SSL modules require the OpenSSL library. You can either do not enable the modules, or install the OpenSSL library into the system, or build the OpenSSL library stati
root@hett-PowerEdge-T30:/usr/local/src/nginx-1.9.8# ./configure --prefix=/usr/local/nginx --add-mod ...
- Attach source code to a Netbeans Library Wrapper Module
http://rubenlaguna.com/wp/2008/02/22/attach-source-code-to-a-netbeans-library-wrapper-module/ Attach ...
- Tips for newbie to read source code
This post is first posted on my WeChat public account: GeekArtT Reading source code is always one bi ...
- 3 Ways of JDK Source Code Attachment in Eclipse---reference
You wanna look at a JVM class while you are coding and you cannot. Here is the solution. First of al ...
- How to compile and install Snort from source code on Ubuntu
http://www.tuicool.com/articles/v6j2Ab Snort is by far the most popular open-source network intrusio ...
随机推荐
- html5的FormData对象和input的file属性以及window.URL.createObjectURL( ) 方法(转载)
/** FormData ==>表单数据 能自动把表单数据拼接打包 当ajax发送数据时,发送打包的数据; 还可以使用FormData对象的append(key,value)添加数据 FormD ...
- JS 弹出层
var name='提示'; //网页名称,可为空; var iWidth=550; //弹出窗口的宽度; var iHeight=250; //弹出窗口的高度; var iTo ...
- target,currentTarget和this三者的区别
target在事件流的目标阶段:currentTarget在事件流的捕获,目标及冒泡阶段.只有当事件流处在目标阶段的时候,两个的指向才是一样的, 而当处于捕获和冒泡阶段的时候,target指向被单击的 ...
- PHPCMS V9 分页类的修改教程
首先,打开 phpcms\libs\functions\global.func.php 这个文件,找到文件第622行的分页函数,复制一下,粘贴到默认分页函数的下面,重新命名后保存.(笔者在此命名为:p ...
- C# winform 动态调用WebService
封装的通用方法: using System; using System.Collections.Generic; using System.Text; using System.Xml; using ...
- 微信支付之JSAPI开发第一篇-基本概念
申请权限 具体步骤就不说了,进入微信支付商户平台进行申请认证,认证成功后在微信公众号后台会有个微信支付的菜单按钮,点击后会有如下的信息 配置 在进行微信支付开发之前,必须进行一些必要的配置,如果这些配 ...
- 解决phalcon读取mysql乱码
原先的项目用的是phalcon,迁移到新服务器上面后中文字符变为'?',即便连接参数设置了charset => 'utf8'也无效,一开始怀疑是版本问题,后来直接拷过去完全一样的库也没用:最后还 ...
- curl php 小记
/* 开发用到. */ https 需加入: curl_setopt($ch, CURLOPT_SSL_VERIFYPEER, false); // 跳过证书检查
- 如何自己编写Makefile
如何自己编写Makefile 相信很多朋友都有过这样的经历,看着开源项目中好几页的makefile文件,不知所云.在日常学习和工作中,也有意无意的去回避makefile,能改就不写,能用ide就用 ...
- oracle SQLPLUS 常用set设置
SQL>set colsep' '; //-域输出分隔符 SQL>set echo off; //显示start启动的脚本中的每个sql命令,缺省为on SQL> set echo ...