
Theano入门神经网络(三)
附录一个:Keras学习随笔 http://blog.csdn.net/niuwei22007/article/details/49045909
参考 《Python Machine Learning》这本书的第13章
Theano是Bengio大神课题组弄得。
一、Theano初步
Theano编程三个步骤: 初始化、编译和执行,就是定义符号(变量对象)、编译代码和执行代码
举个例子:计算 z=x1*w1+wo 代码如下:
 # -*- coding: utf-8 -*-

 __author__ = 'Administrator'

 import theano

 import  theano.tensor as T

 import  random

 import  numpy as np

 from itertools import izip

 import matplotlib.pyplot as plt

 #初始化

 x1 = T.scalar()

 w1 = T.scalar()

 w0 = T.scalar()

 z = w1*x1+w0

 #编译

 net_input = theano.function(

     inputs=[w1, x1, w0],

     outputs=z

 )

 #执行

 print 'net input %.2f'% (net_input(2.0, 1.0 ,0.5))
在写Theano代码时,要注意变量的类型 dtype ,要分清楚我们要使用 64或者32为的int or floats
二、 配置Theano
一般来说 采用CPU时,我们设置float64 ,采用GPU时,需要设置float32
print (theano.config.floatX)
print (theano.config.device)
在window中设置CPU or GPU模式,是在运行cmd后出现的路径下,新建一个.theanorc.txt的文件。文件内容如下图所示

三、使用array结构
一个简单的求和例子
 #初始化

 x = T.fmatrix(name ='x')

 x_sum = T.sum(x, axis=1) # 0  是按列 1 是按行

 #编译

 calc_sum = theano.function(

     inputs=[x],

     outputs=x_sum

 )

 #执行

 ary = np.array([[1,2,4],[1,2,3]],dtype=theano.config.floatX)

 print calc_sum(ary)
shared variable 和 权值更新
 #初始化

 x =  T.fmatrix('x')

 w = theano.shared(np.asarray([[0.0,0.0,0.0]],dtype=theano.config.floatX))

 z = T.dot(x,w.T) # 这个就是两个矩阵相乘 w是1*3  x是1*3

 update = [[w, w+1.0]]

 # 编译

 net_input = theano.function(

     inputs=[x],

     updates=update,

     outputs=z

 )

 # 执行

 data = np.array([[1,2,3]],dtype=theano.config.floatX)

 for i in range(5):

     print w.get_value()

     print '%d   %.2f' % (i,net_input(data))
可以提取指定数据,代码如下
 #初始化

 data = np.array([[1,2,3]],dtype=theano.config.floatX)

 x =  T.fmatrix('x')

 w = theano.shared(np.asarray([[0.0,0.0,0.0]],dtype=theano.config.floatX))

 z = T.dot(x,w.T) # 这个就是两个矩阵相乘 w是1*3  x是1*3

 update = [[w, w+1.0]]

 # 编译

 net_input = theano.function(

     inputs=[],

     updates=update,

     givens={x : data},

     outputs=z

 )

 # 执行

 for i in range(5):

     print w.get_value()

     print '%d   %.2f' % (i,net_input())
四、 一个线性回归的例子
 X_train = np.asarray(

     [ [0,0] , [1, 0],

       [2,0] , [3, 0],

       [4,0] , [5, 0],

       [6,0] , [7, 0],

       [8,0] , [9, 0]],

     dtype= theano.config.floatX

     )

 y_train = np.asarray(

     [ 1.0,1.3,3.1,2.0,

       5.0,6.3,6.6,7.4,

       8.0,9.0],

     dtype= theano.config.floatX

     )

 y_train_new = np.asarray(

     [ [1.0],[1.3],[3.1],[2.0],

       [5.0],[6.3],[6.6],[7.4],

       [8.0],[9.0]],

     dtype= theano.config.floatX

     )

 print X_train.shape[1] # shape 0 获取行 shape 1 获取列

 def train_linreg(X_train, y_train ,eta, epochs):

     costs = []

     #初始化array0

     eta0 = T.fscalar('eta0')

     y = T.fvector(name='y')

     X = T.fmatrix(name='X')

     w = theano.shared(np.zeros(

         shape=(X_train.shape[1] +1 ),dtype= theano.config.floatX), name = 'w')

     #计算损失函数

     net_input = T.dot(X, w[1:]) + w[0] # w[1:] 从第二个到最后一个数据

     errors = y - net_input

     cost = T.sum(T.pow(errors,2))

     #梯度更新

     gradient = T.grad(cost,wrt=w)

     update = [(w, w- eta0* gradient)]

     #定义模型

     train = theano .function(inputs=[eta0],

                              outputs=cost,

                              updates=update,

                              givens={X:X_train,

                                      y: y_train})

     for i in range(epochs):

         costs.append(train(eta))

         print w.get_value()

     return  costs, w

 def predict_linreg(X,w):

     Xt = T.matrix(name='X')

     net_input = T.dot(Xt, w[1:])+w[0]

     predict = theano.function(inputs=[Xt],

                               givens={w:w},

                               outputs= net_input)

     return  predict(X)

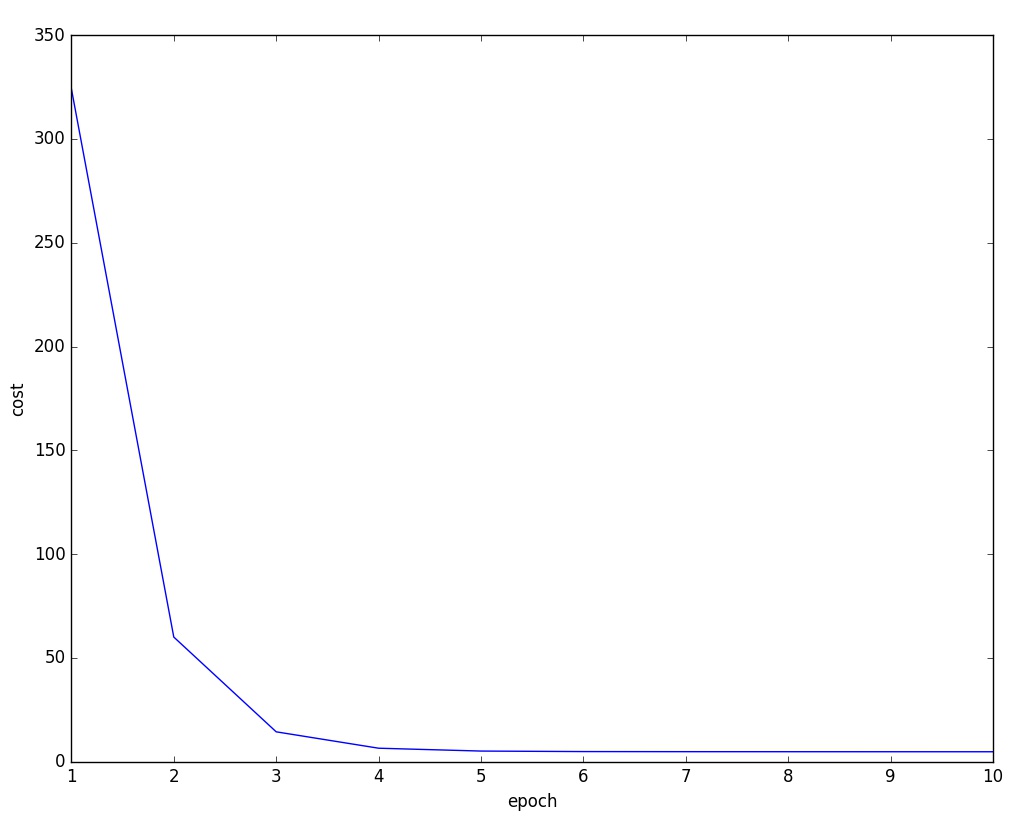
 costs,w= train_linreg(X_train,y_train,eta=0.001,epochs=10)

 plt.plot(range(1,len(costs)+1),costs)

 plt.tight_layout()

 plt.xlabel("epoch")

 plt.ylabel('cost')

 plt.show()

     #

 #plt.scatter(X_train, y_train ,marker='s',s=50)

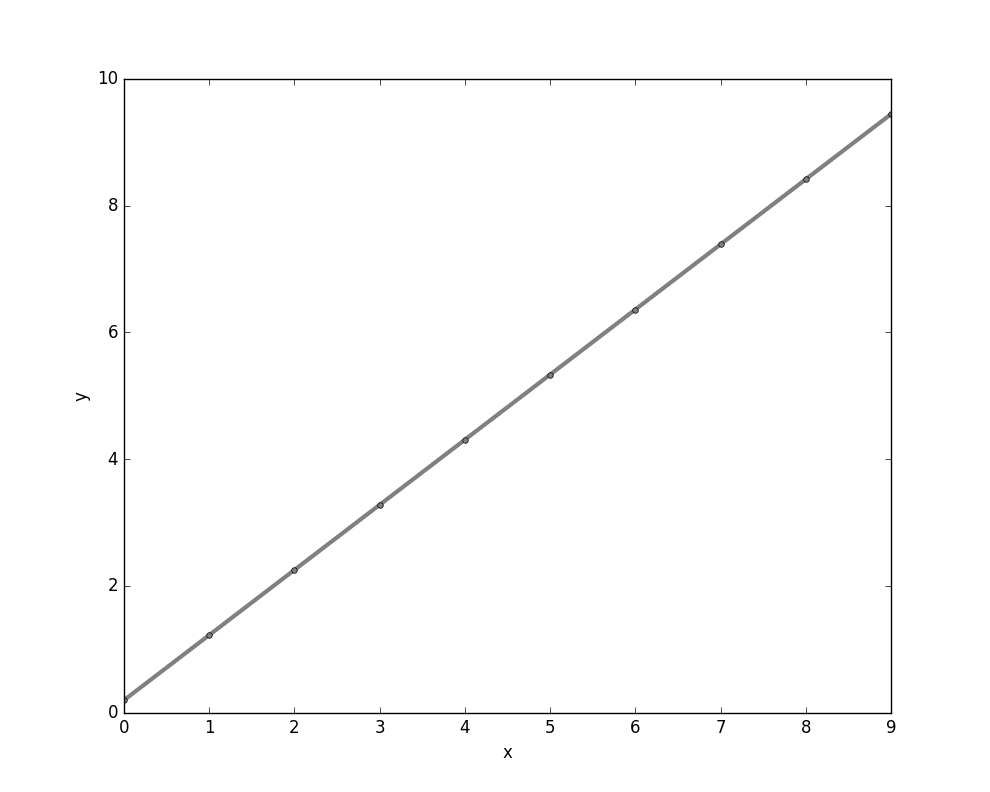
 plt.plot(range(X_train.shape[0]),predict_linreg(X_train,w),color='gray',marker='o',markersize=4,linewidth=3)

 plt.xlabel("x")

 plt.ylabel('y')

 plt.show()
结果图:
Theano入门神经网络(三)的更多相关文章
- Theano入门神经网络(一)
Theano是一个Python库,专门用于定义.优化.求值数学表达式,效率高,适用于多维数组.特别适合做机器学习.一般来说,使用时需要安装python和numpy. 首先回顾一下机器学习的东西,定义一 ...
- Theano入门神经网络(四)
这一部分主要介绍用Theano 实现softmax函数. 在多分类任务中经常用到softmax函数,首先上几个投影片解释一下 假设目标输出是y_hat ,激活函数后的Relu y 一个是1.2 一个是 ...
- Theano入门神经网络(二) 实现一个XOR门
与非门的图片如下 示意图 详细解释: 1 定义变量的代码,包括了输入.权值.输出等.其中激活函数采用的是sigmod函数 # -*- coding: utf-8 -*- __author__ = 'A ...
- Theano入门——CIFAR-10和CIFAR-100数据集
Theano入门——CIFAR-10和CIFAR-100数据集 1.CIFAR-10数据集介绍 CIFAR-10数据集包含60000个32*32的彩色图像,共有10类.有50000个训练图像和1000 ...
- 无废话ExtJs 入门教程三[窗体:Window组件]
无废话ExtJs 入门教程三[窗体:Window组件] extjs技术交流,欢迎加群(201926085) 1.代码如下: 1 <!DOCTYPE html PUBLIC "-//W3 ...
- RequireJS入门(三)转
这篇来写一个具有依赖的事件模块event.event提供三个方法bind.unbind.trigger来管理DOM元素事件. event依赖于cache模块,cache模块类似于jQuery的$.da ...
- RequireJS入门(三)
这篇来写一个具有依赖的事件模块event.event提供三个方法bind.unbind.trigger来管理DOM元素事件. event依赖于cache模块,cache模块类似于jQuery的$.da ...
- 【SSRS】入门篇(三) -- 为报表定义数据集
原文:[SSRS]入门篇(三) -- 为报表定义数据集 通过前两篇文件 [SSRS]入门篇(一) -- 创建SSRS项目 和 [SSRS]入门篇(二) -- 建立数据源 后, 我们建立了一个SSRS项 ...
- Bootstrap入门(三十)JS插件7:警告框
Bootstrap入门(三十)JS插件7:警告框 通过这个插件可以为警告信息添加点击以及消失的功能. 当使用一个.close按钮,它必须是第一个子元素.alert-dismissible,并没有文字内 ...
随机推荐
- Jexus 5.8.2 Beta1发布:为Asp.Net Core进入生产环境提供平台支持
Jeuxs 5.8.2beta1于7月10日正式发布. 有如下更新: 1,为FastCGI提供KEEP_CONN支持,优化FastCGI工作线程池调度算法: 2,完善反向代理的负载均衡策略,支持“随机 ...
- Metrics-Java版的指标度量工具之一
Metrics是一个给JAVA服务的各项指标提供度量工具的包,在JAVA代码中嵌入Metrics代码,可以方便的对业务代码的各个指标进行监控,同时,Metrics能够很好的跟Ganlia.Graphi ...
- Fedora23Server配置
系统准备 启动网卡: sudo service network start 更新系统: sudo dnf update 远程管理: https://IP:9090/ Dnf使用: http://www ...
- reactor & proactor 笔记
1. 基本概念 1.1 同步/异步,针对应用程序和内核交互而言. 同步:进程触发IO操作等待或轮询查看IO操作是否完成: 异步:进程触发IO操作后仅需自身的处理,IO操作完成后会得到通知(异步的特点) ...
- Form认证的几点说明
有的页面需要用户认证之后才可以进入,通常都是在Filter的OnActionExecuting方法中我们需要获取当前用户.有两种情况不必登录:1.用户是登录的,也就是认证过的.2.用户上次登录了,但没 ...
- Unity3D热更新全书-脚本(一) 初识脚本
开篇之前还是要先说明,这是一份给经验并不丰富的程序员阅读的文字. 有需求.有疑惑,往下看. 第一个问题什么是脚本?程序和脚本如何区分?我们给Unity编写的组件是程序还是脚本? 这些问题本文无意去解答 ...
- [stm32] NRF24L01+USART搞定有线和无线通信
前言 一般进行远程监控时,2.4G无线通信是充当远程数据传输的一种方法.这时就需要在现场部分具备无线数据发送装置,而在上位机部分由于一般只有串口,所以将采集到的数据送到电脑里又要在上位机端设计一个数据 ...
- 测试博文中添加可执行JS代码
昨天申请开通了博客园的JS权限,今天来看看效果. 测试执行JS 测试执行JS // 运行
- AWS系列之二 使用EC2
在本文中我们有三个任务. 第一:使用Amazon management console创建一个EC2实例. 第二:使用本地的命令行工具远程登陆到该EC2实例. 第三:在该EC2实例上创建一个web服务 ...
- webservice3
什么是bottom up 什么是top down 通过浏览器访问如 http://localhost:8080/HelloWS/services/HelloWSsss?wsdl 获取的 wsdl, ...